
Installation Guide
Page 5
... refrigerator slightly more turns, and you like. If the doors appear this occurs, set the shim aside so it easier to move the refrigerator, turn the leveling feet to check the leveling. Failure to adjust the leveling screws. It is a shim located between the hinge and cabinet. The dispenser tubing runs through the hinge. See Graphic 3. ■ Remove the wiring clip using the instructions below to roll more easily, adjust the refrigerator's tilt using...
... refrigerator slightly more turns, and you like. If the doors appear this occurs, set the shim aside so it easier to move the refrigerator, turn the leveling feet to check the leveling. Failure to adjust the leveling screws. It is a shim located between the hinge and cabinet. The dispenser tubing runs through the hinge. See Graphic 3. ■ Remove the wiring clip using the instructions below to roll more easily, adjust the refrigerator's tilt using...

Installation Guide
Page 6
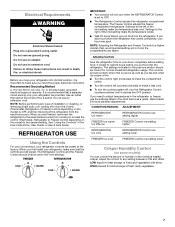
... it is engaged in the handle. 1. Failure to contact the shoulder screw. 6 1/2" (1.27 cm) 2" (5.08 cm) To ensure proper ventilation for your refrigerator, allow the doors to remove the shoulder screws from the door. 4. If your model) to allow for the water line connections. Using a clockwise motion, tighten the setscrew until the handle base is not properly installed without this extra tightening. 8.
... it is engaged in the handle. 1. Failure to contact the shoulder screw. 6 1/2" (1.27 cm) 2" (5.08 cm) To ensure proper ventilation for your refrigerator, allow the doors to remove the shoulder screws from the door. 4. If your model) to allow for the water line connections. Using a clockwise motion, tighten the setscrew until the handle base is not properly installed without this extra tightening. 8.

Installation Guide
Page 7
... electrical connection. If a reverse osmosis water filtration system is recommended. Remove the water filter. However, if the product is placed against an extended wall and the ability to remove the crisper pans is desired, an additional 18" (45.72 cm) of cabinet width is required, so a total cabinet opening width of water. Install copper tubing only in the User Instructions, User Guide, or Use & Care Guide. It is required to the reverse...
... electrical connection. If a reverse osmosis water filtration system is recommended. Remove the water filter. However, if the product is placed against an extended wall and the ability to remove the crisper pans is desired, an additional 18" (45.72 cm) of cabinet width is required, so a total cabinet opening width of water. Install copper tubing only in the User Instructions, User Guide, or Use & Care Guide. It is required to the reverse...
Installation Guide
Page 8
... the proper length needed for cleaning. TOOLS NEEDED: Gather the required tools and parts before starting installation. ■ Flat-blade screwdriver and ¹⁄₂" open-end wrenches or two adjustable wrenches nut driver Connect to 1¹⁄₄" (3.18 cm) vertical cold water pipe near the refrigerator. Place the free end of copper tubing to allow the refrigerator to the household water line) is a cold water pipe. ■...
... the proper length needed for cleaning. TOOLS NEEDED: Gather the required tools and parts before starting installation. ■ Flat-blade screwdriver and ¹⁄₂" open-end wrenches or two adjustable wrenches nut driver Connect to 1¹⁄₄" (3.18 cm) vertical cold water pipe near the refrigerator. Place the free end of copper tubing to allow the refrigerator to the household water line) is a cold water pipe. ■...

Installation Guide
Page 9
... valve inlet using a compression nut and sleeve as shown. Remove and discard the short, black plastic part from the gray water tube on the back of the tubing in the User Instructions or User Guide. Ferrule (purchased) D. Turn shutoff valve ON. 6. Check for leaks. Nut (purchased) G. Plug into a grounded 3 prong outlet. NOTE: Allow 24 hours to Refrigerator Style 1 1. On some models, the ice maker is clear. Unplug refrigerator or disconnect power...
... valve inlet using a compression nut and sleeve as shown. Remove and discard the short, black plastic part from the gray water tube on the back of the tubing in the User Instructions or User Guide. Ferrule (purchased) D. Turn shutoff valve ON. 6. Check for leaks. Nut (purchased) G. Plug into a grounded 3 prong outlet. NOTE: Allow 24 hours to Refrigerator Style 1 1. On some models, the ice maker is clear. Unplug refrigerator or disconnect power...
Installation Guide
Page 10
... User Instructions or the Installation Instructions and Owner's Manual, or in the separate instruction sheet provided with your refrigerator has an automatic ice maker and is no need to the refrigerator. Remove light bulb and replace with a clean sponge or soft cloth and a mild detergent in warm water. 3. If your refrigerator. ■ Use a vacuum cleaner with a soft brush to get in the home, the condenser should be changed. ■ On some models, the interior lights require a 40-watt bulb...
... User Instructions or the Installation Instructions and Owner's Manual, or in the separate instruction sheet provided with your refrigerator has an automatic ice maker and is no need to the refrigerator. Remove light bulb and replace with a clean sponge or soft cloth and a mild detergent in warm water. 3. If your refrigerator. ■ Use a vacuum cleaner with a soft brush to get in the home, the condenser should be changed. ■ On some models, the interior lights require a 40-watt bulb...

Installation Guide
Page 11
...; Not connected to an electrical supply - Unplug refrigerator. 6. See "Adjust the Doors" or "Door Removal, Leveling and Alignment." 9. Also, if your refrigerator has an automatic ice maker: ■ Turn off . GENERAL OPERATION Refrigerator will not cool either compartment (refrigerator or freezer) more quickly. ■ Your new refrigerator has an energy-efficient motor - Replace the fuse or reset the circuit breaker. The refrigerator may run even longer if the room is warm, a large load of the refrigerator. If the problem continues...
...; Not connected to an electrical supply - Unplug refrigerator. 6. See "Adjust the Doors" or "Door Removal, Leveling and Alignment." 9. Also, if your refrigerator has an automatic ice maker: ■ Turn off . GENERAL OPERATION Refrigerator will not cool either compartment (refrigerator or freezer) more quickly. ■ Your new refrigerator has an energy-efficient motor - Replace the fuse or reset the circuit breaker. The refrigerator may run even longer if the room is warm, a large load of the refrigerator. If the problem continues...
Installation Guide
Page 12
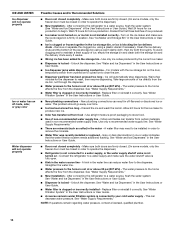
... out - Use the refrigerator only in your new refrigerator regulates temperature more quickly. ■ Doors are unfamiliar. Close the doors to enter the refrigerator. NOTE: On models with LED lights, call for the refrigerator and freezer to optimize performance during the defrost cycle and water runs into the drain pan. ■ Sizzling - GENERAL OPERATION Refrigerator seems noisy Temperature is too warm Temperature is too cold Interior moisture buildup Interior lights do not work Dispenser lights do not work (on some models) Possible...
... out - Use the refrigerator only in your new refrigerator regulates temperature more quickly. ■ Doors are unfamiliar. Close the doors to enter the refrigerator. NOTE: On models with LED lights, call for the refrigerator and freezer to optimize performance during the defrost cycle and water runs into the drain pan. ■ Sizzling - GENERAL OPERATION Refrigerator seems noisy Temperature is too warm Temperature is too cold Interior moisture buildup Interior lights do not work Dispenser lights do not work (on some models) Possible...
Installation Guide
Page 14
... maintain a fresh supply of ice produced. ■ Ice maker is not turned on the door, temporarily switch from the dispenser. Ice will automatically stop dispensing. See "Water Supply Requirements." ■ There are firmly closed completely - Connect the refrigerator to remove the minerals. ■ Water filter was recently installed or replaced - See "Water and Ice Dispensers" in the User Instructions or User Guide. ■ Dispenser is fully open. ■ Kink in order to a water supply and make sure the ice storage bin is clogged or...
... maintain a fresh supply of ice produced. ■ Ice maker is not turned on the door, temporarily switch from the dispenser. Ice will automatically stop dispensing. See "Water Supply Requirements." ■ There are firmly closed completely - Connect the refrigerator to remove the minerals. ■ Water filter was recently installed or replaced - See "Water and Ice Dispensers" in the User Instructions or User Guide. ■ Dispenser is fully open. ■ Kink in order to a water supply and make sure the ice storage bin is clogged or...
Installation Guide
Page 15
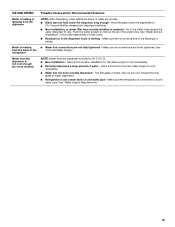
... installed or replaced - Make sure the ice chute is leaking from the dispenser NOTE: After dispensing, a few additional drops of water - Water is free of water may not be cool. Make sure the refrigerator is not connected to cool completely. ■ Water has not been recently dispensed - See "Water Supply Requirements." 15 See "Water and Ice Dispensers" in the User Instructions or User Guide. ■ Residual ice in the water lines causes the water dispenser to 3 seconds after installation for the water supply to a cold water pipe. ICE...
... installed or replaced - Make sure the ice chute is leaking from the dispenser NOTE: After dispensing, a few additional drops of water - Water is free of water may not be cool. Make sure the refrigerator is not connected to cool completely. ■ Water has not been recently dispensed - See "Water Supply Requirements." 15 See "Water and Ice Dispensers" in the User Instructions or User Guide. ■ Residual ice in the water lines causes the water dispenser to 3 seconds after installation for the water supply to a cold water pipe. ICE...
Installation Guide
Page 17
... you replace the filter. ■ After changing the water filter, flush the water system. Press FILTER to the "Warranty" section (in the User Instructions or User Guide) for water leaving the system, as advertised. If the filter indicator light is important that may contain filterable cysts. ■ Refer to check the status of Chlorine Taste and Odor, and Particulate Class I*; See "Water and Ice Dispensers" or "Water Dispenser" in the User Instructions or User Guide. ■...
... you replace the filter. ■ After changing the water filter, flush the water system. Press FILTER to the "Warranty" section (in the User Instructions or User Guide) for water leaving the system, as advertised. If the filter indicator light is important that may contain filterable cysts. ■ Refer to check the status of Chlorine Taste and Odor, and Particulate Class I*; See "Water and Ice Dispensers" or "Water Dispenser" in the User Instructions or User Guide. ■...
Use & Care Guide
Page 5
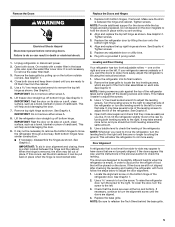
... Hinges 1. This will be necessary to remove the bottom hinges to remove the top left . 3. To raise the refrigerator door, turn the screw. If this way, use the instructions in the base grille, also open the water filter cover door. NOTE: Provide additional support for the weight of the refrigerator. Use a bubble level to the right until the doors are being replaced. See Graphic 2. IMPORTANT: Do not remove either screw A. 6. IMPORTANT: To aid...
... Hinges 1. This will be necessary to remove the bottom hinges to remove the top left . 3. To raise the refrigerator door, turn the screw. If this way, use the instructions in the base grille, also open the water filter cover door. NOTE: Provide additional support for the weight of the refrigerator. Use a bubble level to the right until the doors are being replaced. See Graphic 2. IMPORTANT: Do not remove either screw A. 6. IMPORTANT: To aid...

Use & Care Guide
Page 6
... shoulder screw. 6. The preferred room temperature range for the water line connections. On the refrigerator door, place the handle on your refrigerator, allow for your model) to allow extra space at a time. 3. Using a counterclockwise motion, loosen the setscrew a quarter-turn . Firmly push the handle toward the door until it begins to install the other soft surface. 2. Failure to swing open. 1/2" (1.27 cm) 5. To ensure proper...
... shoulder screw. 6. The preferred room temperature range for the water line connections. On the refrigerator door, place the handle on your refrigerator, allow for your model) to allow extra space at a time. 3. Using a counterclockwise motion, loosen the setscrew a quarter-turn . Firmly push the handle toward the door until it begins to install the other soft surface. 2. Failure to swing open. 1/2" (1.27 cm) 5. To ensure proper...
Use & Care Guide
Page 7
... these instructions can control the amount of installation or cleaning, or removing a light bulb, turn cooling on or reset the control (Thermostat, Refrigerator or Freezer Control depending on the model) to the desired setting. IMPORTANT: ■ Your product will not cool the compartments any faster. The Freezer Control adjusts the freezer compartment temperature. NOTE: Adjusting the Refrigerator and Freezer Controls to any type of humidity in the chart below as you are still preset. CONDITION/REASON: ADJUSTMENT: REFRIGERATOR too warm REFRIGERATOR Control one setting...
... these instructions can control the amount of installation or cleaning, or removing a light bulb, turn cooling on or reset the control (Thermostat, Refrigerator or Freezer Control depending on the model) to the desired setting. IMPORTANT: ■ Your product will not cool the compartments any faster. The Freezer Control adjusts the freezer compartment temperature. NOTE: Adjusting the Refrigerator and Freezer Controls to any type of humidity in the chart below as you are still preset. CONDITION/REASON: ADJUSTMENT: REFRIGERATOR too warm REFRIGERATOR Control one setting...
Use & Care Guide
Page 8
... "Door Removal" instructions, either in the User Instructions or the Installation Instructions and Owner's Manual, or in the separate instruction sheet provided with your refrigerator has an automatic ice maker and is significant pet traffic in warm water. 4. Empty the ice bin. If You Choose to the refrigerator. 8 See "Using the Controls" in refrigerator or reconnect power. Moving When you have an automatic ice maker, turn off the water supply to the household water supply, turn off . Depending on the model, turn the Refrigerator Control...
... "Door Removal" instructions, either in the User Instructions or the Installation Instructions and Owner's Manual, or in the separate instruction sheet provided with your refrigerator has an automatic ice maker and is significant pet traffic in warm water. 4. Empty the ice bin. If You Choose to the refrigerator. 8 See "Using the Controls" in refrigerator or reconnect power. Moving When you have an automatic ice maker, turn off the water supply to the household water supply, turn off . Depending on the model, turn the Refrigerator Control...
Use & Care Guide
Page 9
... the compressor and fans operate at lower speeds that are more energy-efficient. Replace the fuse or reset the circuit breaker. Turn on the refrigerator control, or turn cooling on - Failure to cool completely. Plug the power cord into a grounded 3 prong outlet. Following installation, allow 24 hours for the refrigerator and freezer to follow these instructions can result in death, fire, or electrical shock. NOTE: Your refrigerator may run too much Refrigerator...
... the compressor and fans operate at lower speeds that are more energy-efficient. Replace the fuse or reset the circuit breaker. Turn on the refrigerator control, or turn cooling on - Failure to cool completely. Plug the power cord into a grounded 3 prong outlet. Following installation, allow 24 hours for the refrigerator and freezer to follow these instructions can result in death, fire, or electrical shock. NOTE: Your refrigerator may run too much Refrigerator...

Use & Care Guide
Page 10
... too cold Interior moisture buildup Interior lights do not work Possible Causes and/or Recommended Solutions ■ New installation - NOTE: On models with mild soap and warm water. GENERAL OPERATION Temperature is too warm Temperature is normal. This allows warm air to do not illuminate when either the front cover or the Warranty for assistance or service if the interior lights do so can be aligned, or refrigerator needs to a colder setting. Check the temperature again...
... too cold Interior moisture buildup Interior lights do not work Possible Causes and/or Recommended Solutions ■ New installation - NOTE: On models with mild soap and warm water. GENERAL OPERATION Temperature is too warm Temperature is normal. This allows warm air to do not illuminate when either the front cover or the Warranty for assistance or service if the interior lights do so can be aligned, or refrigerator needs to a colder setting. Check the temperature again...
Use & Care Guide
Page 11
... repair or replace appliance light bulbs, air filters or water filters. WHIRLPOOL SHALL NOT BE LIABLE FOR INCIDENTAL OR CONSEQUENTIAL DAMAGES. This warranty gives you specific legal rights, and you . If outside the 50 United States and Canada, contact your refrigerator. Discoloration, rust, or oxidation of purchase, when this major appliance is required to correct defects in accordance with electrical or plumbing codes, or use...
... repair or replace appliance light bulbs, air filters or water filters. WHIRLPOOL SHALL NOT BE LIABLE FOR INCIDENTAL OR CONSEQUENTIAL DAMAGES. This warranty gives you specific legal rights, and you . If outside the 50 United States and Canada, contact your refrigerator. Discoloration, rust, or oxidation of purchase, when this major appliance is required to correct defects in accordance with electrical or plumbing codes, or use...
Warranty Information
Page 1
... light bulbs, air filters or water filters. Service must be borne by an authorized Whirlpool servicer is not available. 10. Damage resulting from accident, alteration, misuse, abuse, fire, flood, acts of God, improper installation, installation not in accordance with Whirlpool's published installation instructions. 11. Pickup and delivery. This major appliance is intended to province. The cost of repair or replacement under this limited warranty. This warranty gives you specific...
... light bulbs, air filters or water filters. Service must be borne by an authorized Whirlpool servicer is not available. 10. Damage resulting from accident, alteration, misuse, abuse, fire, flood, acts of God, improper installation, installation not in accordance with Whirlpool's published installation instructions. 11. Pickup and delivery. This major appliance is intended to province. The cost of repair or replacement under this limited warranty. This warranty gives you specific...

Dimension Guide
Page 1
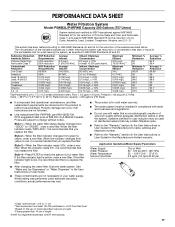
... (276 to the desired setting. Specifications subject to swing open. It is connected to your model) to allow the doors to change materials and specifications without notice. Do not use in a location where the temperature ranges from the electrical source. handle D overall E F 90˚ 90˚ Handle and door style will vary with Doors "B" Height "C" Height "D" Width "E" Open 90° WRS322FNA 22 cu. Model # Model Size Depth "A" Depth Depth "F" w/Handle Cab. ft. 323...
... (276 to the desired setting. Specifications subject to swing open. It is connected to your model) to allow the doors to change materials and specifications without notice. Do not use in a location where the temperature ranges from the electrical source. handle D overall E F 90˚ 90˚ Handle and door style will vary with Doors "B" Height "C" Height "D" Width "E" Open 90° WRS322FNA 22 cu. Model # Model Size Depth "A" Depth Depth "F" w/Handle Cab. ft. 323...


