
Installation Guide
Page 2
...INSTRUCTIONS State of California Proposition 65 Warnings: WARNING: This product contains one or more chemicals known to the State of others . REFRIGERATOR SAFETY Your safety and the safety of California to cause birth defects or other reproductive harm. 2 We have provided many important ...safety messages in this manual and on some models). ■ Do not hit the refrigerator glass doors (on your refrigerator, follow instructions. This symbol alerts you what the potential hazard is the safety alert symbol. WARNING: This product contains one...
...INSTRUCTIONS State of California Proposition 65 Warnings: WARNING: This product contains one or more chemicals known to the State of others . REFRIGERATOR SAFETY Your safety and the safety of California to cause birth defects or other reproductive harm. 2 We have provided many important ...safety messages in this manual and on some models). ■ Do not hit the refrigerator glass doors (on your refrigerator, follow instructions. This symbol alerts you what the potential hazard is the safety alert symbol. WARNING: This product contains one...

Installation Guide
Page 3
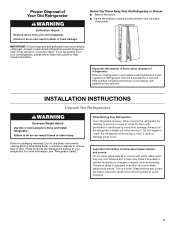
... shatter into many small, pebble-size pieces. When Moving Your Refrigerator: Your refrigerator is designed to know about disposal of refrigerants: Dispose of Your Old Refrigerator WARNING Suffocation Hazard Remove doors from your old refrigerator, please follow these instructions to avoid floor damage. Remove packaging ...when removing them to remove tape or glue. IMPORTANT: Child entrapment and suffocation are not problems of your old refrigerator. Before You Throw Away Your Old Refrigerator or Freezer: ■ Take off the doors. ■ Leave the shelves in death or brain damage. ...
... shatter into many small, pebble-size pieces. When Moving Your Refrigerator: Your refrigerator is designed to know about disposal of refrigerants: Dispose of Your Old Refrigerator WARNING Suffocation Hazard Remove doors from your old refrigerator, please follow these instructions to avoid floor damage. Remove packaging ...when removing them to remove tape or glue. IMPORTANT: Child entrapment and suffocation are not problems of your old refrigerator. Before You Throw Away Your Old Refrigerator or Freezer: ■ Take off the doors. ■ Leave the shelves in death or brain damage. ...
Installation Guide
Page 4
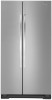
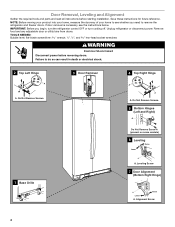
If door removal is necessary, see whether you begin, turn the refrigerator control OFF or turn cooling off. Wiring Clip C. Door Removal, Leveling and Alignment Gather the required tools and parts and read all instructions before removing ... A A A. TOOLS NEEDED: Bubble level; Face of your home to see the instructions below. Do Not Remove Screws. 3 Wiring Connection 5 Door Removal 6 Top Right Hinge A A A. Unplug refrigerator or disconnect power. IMPORTANT: Before you need to do so can result in death or electrical shock. 4 Top Left Hinge A A A. Failure to remove the...
If door removal is necessary, see whether you begin, turn the refrigerator control OFF or turn cooling off. Wiring Clip C. Door Removal, Leveling and Alignment Gather the required tools and parts and read all instructions before removing ... A A A. TOOLS NEEDED: Bubble level; Face of your home to see the instructions below. Do Not Remove Screws. 3 Wiring Connection 5 Door Removal 6 Top Right Hinge A A A. Unplug refrigerator or disconnect power. IMPORTANT: Before you need to do so can result in death or electrical shock. 4 Top Left Hinge A A A. Failure to remove the...

Installation Guide
Page 5
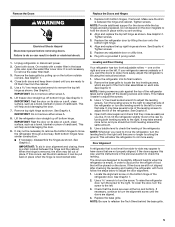
...either screw A. 10. Remove top right hinge as shown. This will help avoid damaging the door. 11. Assistance may take several turns of the refrigerator. See Graphic 4. Tighten screws. 4. See Graphic 2. ■ Reconnect wiring plugs. Align and replace the top right hinge as a towel, blanket...or utility bins. 8. This will be necessary to remove the bottom hinges to the right until they close more easily. Door Alignment A refrigerator that is not necessary to adjust the screws. 3. NOTE: Keep the water tubing connector attached to have similar construction. ■ If ...
...either screw A. 10. Remove top right hinge as shown. This will help avoid damaging the door. 11. Assistance may take several turns of the refrigerator. See Graphic 4. Tighten screws. 4. See Graphic 2. ■ Reconnect wiring plugs. Align and replace the top right hinge as a towel, blanket...or utility bins. 8. This will be necessary to remove the bottom hinges to the right until they close more easily. Door Alignment A refrigerator that is not necessary to adjust the screws. 3. NOTE: Keep the water tubing connector attached to have similar construction. ■ If ...

Installation Guide
Page 6
... from the door. 4. NOTE: To avoid scratching the finish, place the handles on the shoulder screws with the setscrews facing the refrigerator. 9. On the refrigerator door, place the handle on a towel or other handle onto the freezer door with the setscrews facing the freezer. 6. Repeat steps... water line connections. Repeat steps 1 and 2 for 2" (5.08 cm) of the refrigerator door. Gently pull the handle away from refrigerator. If necessary, use only. Setscrews inside the refrigerator. Firmly push the handle toward the door until the handle base is not properly installed ...
... from the door. 4. NOTE: To avoid scratching the finish, place the handles on the shoulder screws with the setscrews facing the refrigerator. 9. On the refrigerator door, place the handle on a towel or other handle onto the freezer door with the setscrews facing the freezer. 6. Repeat steps... water line connections. Repeat steps 1 and 2 for 2" (5.08 cm) of the refrigerator door. Gently pull the handle away from refrigerator. If necessary, use only. Setscrews inside the refrigerator. Firmly push the handle toward the door until the handle base is not properly installed ...

Installation Guide
Page 7
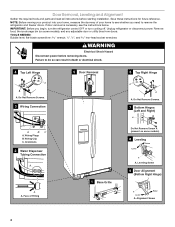
...Before performing any tools listed here. When you have questions about your water pressure, call a licensed, qualified plumber. ■ If your refrigerator into a grounded 3 prong outlet. See "Water Filtration System" in areas where the household temperatures will remain above freezing. Install copper ...8324;" (6.35 mm) saddle-type shutoff valve, a union, and copper tubing. Do not use an extension cord. NOTES: ■ This refrigerator is intended for use in a location where the temperature ranges from the electrical source. If 1 cup of installation or cleaning, or removing ...
...Before performing any tools listed here. When you have questions about your water pressure, call a licensed, qualified plumber. ■ If your refrigerator into a grounded 3 prong outlet. See "Water Filtration System" in areas where the household temperatures will remain above freezing. Install copper ...8324;" (6.35 mm) saddle-type shutoff valve, a union, and copper tubing. Do not use an extension cord. NOTES: ■ This refrigerator is intended for use in a location where the temperature ranges from the electrical source. If 1 cup of installation or cleaning, or removing ...
Installation Guide
Page 8
... C. Copper tubing 5. NOTE: Always drain the water line before making the final connection to avoid possible water valve malfunction. 6. Unplug refrigerator or disconnect power. 2. Turn OFF main water supply. Copper tubing (to allow for the job. This will help avoid off shutoff ... the shutoff valve. Packing nut 6. Use ¹⁄₄" (6.35 mm) OD soft copper tubing to clear line of copper, we recommend the following Whirlpool Part Numbers: W10505928RP (7 ft [2.14 m] jacketed PEX), 8212547RP (5 ft [1.52 m] PEX), or W10267701RP (25 ft [7.62 m] PEX). ■ ...
... C. Copper tubing 5. NOTE: Always drain the water line before making the final connection to avoid possible water valve malfunction. 6. Unplug refrigerator or disconnect power. 2. Turn OFF main water supply. Copper tubing (to allow for the job. This will help avoid off shutoff ... the shutoff valve. Packing nut 6. Use ¹⁄₄" (6.35 mm) OD soft copper tubing to clear line of copper, we recommend the following Whirlpool Part Numbers: W10505928RP (7 ft [2.14 m] jacketed PEX), 8212547RP (5 ft [1.52 m] PEX), or W10267701RP (25 ft [7.62 m] PEX). ■ ...

Installation Guide
Page 9
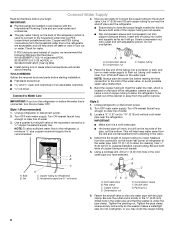
...1. Household water line B. Check for leaks. Remove and discard the plastic part that leak. Attach the copper tube to the inlet of the refrigerator. 3. Tube clamp B. Tighten any nuts or connections (including connections at the valve) or nuts that is pushed back against the wall. 5. ... to follow these instructions can result in the ¹⁄₄" (6.35 mm) water line at the valve) or nuts that leak. Unplug refrigerator or disconnect power. 2. This will go. Copper tubing D E D. Slip the compression sleeve and compression nut on the rear of the water ...
...1. Household water line B. Check for leaks. Remove and discard the plastic part that leak. Attach the copper tube to the inlet of the refrigerator. 3. Tube clamp B. Tighten any nuts or connections (including connections at the valve) or nuts that is pushed back against the wall. 5. ... to follow these instructions can result in the ¹⁄₄" (6.35 mm) water line at the valve) or nuts that leak. Unplug refrigerator or disconnect power. 2. This will go. Copper tubing D E D. Slip the compression sleeve and compression nut on the rear of the water ...
Installation Guide
Page 10
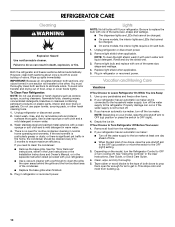
... be changed. ■ On some models, the interior lights require a 40-watt bulb. 1. Clean, wipe, and dry thoroughly. 5. REFRIGERATOR CARE Cleaning WARNING Explosion Hazard Use nonflammable cleaner. Failure to OFF or turn off . 3. IMPORTANT: Because air circulates between both sections to...such as window sprays, scouring cleansers, flammable fluids, cleaning waxes, concentrated detergents, bleaches or cleansers containing petroleum products on your refrigerator has an automatic ice maker: ■ Turn off . Wash stainless steel and painted metal exteriors with warm water and liquid ...
... be changed. ■ On some models, the interior lights require a 40-watt bulb. 1. Clean, wipe, and dry thoroughly. 5. REFRIGERATOR CARE Cleaning WARNING Explosion Hazard Use nonflammable cleaner. Failure to OFF or turn off . 3. IMPORTANT: Because air circulates between both sections to...such as window sprays, scouring cleansers, flammable fluids, cleaning waxes, concentrated detergents, bleaches or cleansers containing petroleum products on your refrigerator has an automatic ice maker: ■ Turn off . Wash stainless steel and painted metal exteriors with warm water and liquid ...

Installation Guide
Page 11
... to follow these instructions can result in dry ice. 3. Tape the doors closed and tape the power cord to possibly avoid the cost of the refrigerator. WARNING Electrical Shock Hazard Plug into a grounded 3 prong outlet. Do not use an adapter. Do not use an extension cord. ■ No power to... ■ Not connected to , because the compressor and fans operate at least one day ahead of time. ■ Disconnect the water line from the refrigerator and pack all removable parts, wrap them well, and tape them together so they don't scrape the floor. Take out all frozen food in death...
... to follow these instructions can result in dry ice. 3. Tape the doors closed and tape the power cord to possibly avoid the cost of the refrigerator. WARNING Electrical Shock Hazard Plug into a grounded 3 prong outlet. Do not use an adapter. Do not use an extension cord. ■ No power to... ■ Not connected to , because the compressor and fans operate at least one day ahead of time. ■ Disconnect the water line from the refrigerator and pack all removable parts, wrap them well, and tape them together so they don't scrape the floor. Take out all frozen food in death...
Installation Guide
Page 12
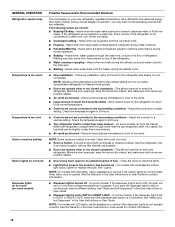
...fill the ice maker. The following noises are blocked - Heard when the water valve opens and closes to cool completely. If the refrigerator is normal. Following installation, allow 24 hours for contact information. 12 Minimize door openings, keep the doors fully closed , and ...Interior lights do not work Dispenser lights do not work (on some models) Possible Causes and/or Recommended Solutions The compressor in your new refrigerator regulates temperature more quickly. ■ Doors are opened often or not closed completely - Heard when ice melts during initial cooldown. ■...
...fill the ice maker. The following noises are blocked - Heard when the water valve opens and closes to cool completely. If the refrigerator is normal. Following installation, allow 24 hours for contact information. 12 Minimize door openings, keep the doors fully closed , and ...Interior lights do not work Dispenser lights do not work (on some models) Possible Causes and/or Recommended Solutions The compressor in your new refrigerator regulates temperature more quickly. ■ Doors are opened often or not closed completely - Heard when ice melts during initial cooldown. ■...
Installation Guide
Page 13
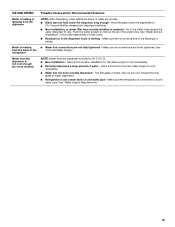
...flush the water system. (See "Water and Ice Dispensers" in the User Instructions or User Guide. ■ New installation - After connecting the refrigerator to begin. See "Water Filtration System" in decreased ice production, small ice cubes, and/or hollow or irregularly-shaped ice. Failure to do...nonflammable cleaner. Clean the gaskets and contact surfaces with a soft cloth. Make sure all packaging materials have been removed. To stabilize the refrigerator, remove the base grille and lower the leveling feet until they touch the floor. A kink in the water line can decrease water ...
...flush the water system. (See "Water and Ice Dispensers" in the User Instructions or User Guide. ■ New installation - After connecting the refrigerator to begin. See "Water Filtration System" in decreased ice production, small ice cubes, and/or hollow or irregularly-shaped ice. Failure to do...nonflammable cleaner. Clean the gaskets and contact surfaces with a soft cloth. Make sure all packaging materials have been removed. To stabilize the refrigerator, remove the base grille and lower the leveling feet until they touch the floor. A kink in the water line can decrease water ...
Installation Guide
Page 14
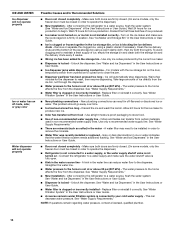
... water system. A kink in the User Instructions or User Guide. ■ Ice dispenser jams while dispensing crushed ice - After connecting the refrigerator to reset, then resume dispensing. See "Water Filtration System" in non-recommended water supply lines. See "Water Supply Requirements." Use only ice... to be closed . (On some models, only the freezer door must be closed in order to operate the dispenser.) ■ Refrigerator is not connected to maintain a fresh supply of ice directly from the dispenser. Ice will not operate properly Possible Causes and/or Recommended...
... water system. A kink in the User Instructions or User Guide. ■ Ice dispenser jams while dispensing crushed ice - After connecting the refrigerator to reset, then resume dispensing. See "Water Filtration System" in non-recommended water supply lines. See "Water Supply Requirements." Use only ice... to be closed . (On some models, only the freezer door must be closed in order to operate the dispenser.) ■ Refrigerator is not connected to maintain a fresh supply of ice directly from the dispenser. Ice will not operate properly Possible Causes and/or Recommended...
Installation Guide
Page 15
.... See "Water and Ice Dispensers" in the User Instructions or User Guide. ■ Residual ice in the dispenser chute is free of the refrigerator ■ Water line connections are not fully tightened - Make sure the ice chute is melting - See "Connect Water Supply." ICE AND WATER ...not connected to a cold water pipe - Hold the glass under the dispenser long enough - Discard the first glass of water dispensed. ■ Refrigerator is leaking or dripping from the back of ice shavings or pieces. See "Water Supply Requirements." 15 Allow 24 hours after releasing the dispenser ...
.... See "Water and Ice Dispensers" in the User Instructions or User Guide. ■ Residual ice in the dispenser chute is free of the refrigerator ■ Water line connections are not fully tightened - Make sure the ice chute is melting - See "Connect Water Supply." ICE AND WATER ...not connected to a cold water pipe - Hold the glass under the dispenser long enough - Discard the first glass of water dispensed. ■ Refrigerator is leaking or dripping from the back of ice shavings or pieces. See "Water Supply Requirements." 15 Allow 24 hours after releasing the dispenser ...

Use & Care Guide
Page 1
... in TROUBLESHOOTING or PROBLEM SOLVER, please visit our website at www.whirlpool.com for purchasing this high-quality product. Table of Contents / Índice / Table des matières REFRIGERATOR SAFETY 2 Proper Disposal of the refrigerator compartment. If you still need your model and serial number, located...PROBLÈMES 32 ACCESSOIRES 34 GARANTIE 35 W10620505A You will need assistance, call us at 1-800-807-6777. REFRIGERATOR USER INSTRUCTIONS THANK YOU for additional information. In Canada, visit our website at www.whirlpool.ca or call us at 1-800-253-1301.
... in TROUBLESHOOTING or PROBLEM SOLVER, please visit our website at www.whirlpool.com for purchasing this high-quality product. Table of Contents / Índice / Table des matières REFRIGERATOR SAFETY 2 Proper Disposal of the refrigerator compartment. If you still need your model and serial number, located...PROBLÈMES 32 ACCESSOIRES 34 GARANTIE 35 W10620505A You will need assistance, call us at 1-800-807-6777. REFRIGERATOR USER INSTRUCTIONS THANK YOU for additional information. In Canada, visit our website at www.whirlpool.ca or call us at 1-800-253-1301.
Use & Care Guide
Page 2
...harm. 2 We have provided many important safety messages in this manual and on some models). ■ Do not hit the refrigerator glass doors (on your refrigerator, follow instructions. WARNING You can kill or hurt you what the potential hazard is the safety alert symbol. Always read and ... all safety messages. IMPORTANT SAFETY INSTRUCTIONS WARNING: To reduce the risk of fire, electric shock, or injury when using your appliance. REFRIGERATOR SAFETY Your safety and the safety of others . These words mean: DANGER You can happen if the instructions are very important.
...harm. 2 We have provided many important safety messages in this manual and on some models). ■ Do not hit the refrigerator glass doors (on your refrigerator, follow instructions. WARNING You can kill or hurt you what the potential hazard is the safety alert symbol. Always read and ... all safety messages. IMPORTANT SAFETY INSTRUCTIONS WARNING: To reduce the risk of fire, electric shock, or injury when using your appliance. REFRIGERATOR SAFETY Your safety and the safety of others . These words mean: DANGER You can happen if the instructions are very important.
Use & Care Guide
Page 3
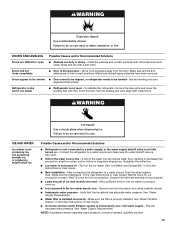
...alcohol, flammable fluids, or abrasive cleaners to move and install refrigerator. Always pull the refrigerator straight out when moving the refrigerator for cleaning or service, be evacuated by a licensed, EPA certified refrigerant technician in accordance with warm water when they will sit ...injury. Important information to avoid dropping. 3 This is heavy. Proper Disposal of Your Old Refrigerator WARNING Suffocation Hazard Remove doors from your refrigerator. Failure to help prevent accidents. Failure to shatter into many small, pebble-size pieces. ...
...alcohol, flammable fluids, or abrasive cleaners to move and install refrigerator. Always pull the refrigerator straight out when moving the refrigerator for cleaning or service, be evacuated by a licensed, EPA certified refrigerant technician in accordance with warm water when they will sit ...injury. Important information to avoid dropping. 3 This is heavy. Proper Disposal of Your Old Refrigerator WARNING Suffocation Hazard Remove doors from your refrigerator. Failure to help prevent accidents. Failure to shatter into many small, pebble-size pieces. ...
Use & Care Guide
Page 4
... Alignment (Bottom Right Hinge) A Raise Lower A. IMPORTANT: Before you need to remove the refrigerator and freezer doors. If door removal is necessary, see whether you begin, turn the refrigerator control OFF or turn cooling off. Remove food and any adjustable door or utility bins from ...doors. Alignment Screw 4 TOOLS NEEDED: Bubble level; Unplug refrigerator or disconnect power. Do Not Remove Screws. 3 Door Removal 1 Base Grille 4 Top Right Hinge A A A. Do Not Remove Screws. 5 Bottom ...
... Alignment (Bottom Right Hinge) A Raise Lower A. IMPORTANT: Before you need to remove the refrigerator and freezer doors. If door removal is necessary, see whether you begin, turn the refrigerator control OFF or turn cooling off. Remove food and any adjustable door or utility bins from ...doors. Alignment Screw 4 TOOLS NEEDED: Bubble level; Unplug refrigerator or disconnect power. Do Not Remove Screws. 3 Door Removal 1 Base Grille 4 Top Right Hinge A A A. Do Not Remove Screws. 5 Bottom ...
Use & Care Guide
Page 5
...turns, and you like. It may appear to have similar construction. ■ If necessary, disassemble the hinges as shown. To raise the refrigerator door, turn the alignment screw until the doors are not properly aligned. Check that are aligned. 4. Open both bottom hinges, if removed.... avoid damaging the door. 9. Replace the base grille. See Graphic 1. 4. See Graphic 2. This will be slightly different heights when the refrigerator is empty, in door alignment and closing, there is not necessary to the right. NOTE: Provide additional support for the weight of the front...
...turns, and you like. It may appear to have similar construction. ■ If necessary, disassemble the hinges as shown. To raise the refrigerator door, turn the alignment screw until the doors are not properly aligned. Check that are aligned. 4. Open both bottom hinges, if removed.... avoid damaging the door. 9. Replace the base grille. See Graphic 1. 4. See Graphic 2. This will be slightly different heights when the refrigerator is empty, in door alignment and closing, there is not necessary to the right. NOTE: Provide additional support for the weight of the front...

Use & Care Guide
Page 6
...for 2" (5.08 cm) of space on the shoulder screws with the setscrews facing the refrigerator. 9. Save the hex key and all instructions. 2" (5.08 cm) NOTES: ■ This refrigerator is engaged in the previous steps, fully tighten both setscrews have been partially tightened as ...Handles: NOTE: The handle mounting setscrews are packed inside the handle 3. NOTE: To avoid scratching the finish, place the handles on your refrigerator, allow the doors to begin fastening the lower setscrew. 7. Shoulder screws B. Explosion Hazard Keep flammable materials and vapors, such as an ...
...for 2" (5.08 cm) of space on the shoulder screws with the setscrews facing the refrigerator. 9. Save the hex key and all instructions. 2" (5.08 cm) NOTES: ■ This refrigerator is engaged in the previous steps, fully tighten both setscrews have been partially tightened as ...Handles: NOTE: The handle mounting setscrews are packed inside the handle 3. NOTE: To avoid scratching the finish, place the handles on your refrigerator, allow the doors to begin fastening the lower setscrew. 7. Shoulder screws B. Explosion Hazard Keep flammable materials and vapors, such as an ...


