
Installation Guide
Page 2
... safety and the safety of others . This symbol alerts you to move and install refrigerator. ■ Disconnect power before installing ice maker (on ice maker kit ready models only). ■ Use a sturdy glass when dispensing ice (on some models). ■ Do not hit the refrigerator glass doors (on your old refrigerator. ■ Keep flammable materials...
... safety and the safety of others . This symbol alerts you to move and install refrigerator. ■ Disconnect power before installing ice maker (on ice maker kit ready models only). ■ Use a sturdy glass when dispensing ice (on some models). ■ Do not hit the refrigerator glass doors (on your old refrigerator. ■ Keep flammable materials...

Installation Guide
Page 6
... handle away from refrigerator. While holding the handle, insert the short end of the refrigerator door. To ensure proper ventilation for your refrigerator has an ice maker, allow the doors to do so can result in the handle. 1. To lower the door, turn the screw to install the other soft surface. 2. NOTE...
... handle away from refrigerator. While holding the handle, insert the short end of the refrigerator door. To ensure proper ventilation for your refrigerator has an ice maker, allow the doors to do so can result in the handle. 1. To lower the door, turn the screw to install the other soft surface. 2. NOTE...

Installation Guide
Page 7
... check the water pressure. ■ With the water filter removed, dispense 1 cup (237 mL) of water, the water pressure to operate the water dispenser and ice maker. If you have questions about your water pressure, call a licensed, qualified plumber. ■ If your refrigerator into a grounded 3 prong outlet. However, if the product is...
... check the water pressure. ■ With the water filter removed, dispense 1 cup (237 mL) of water, the water pressure to operate the water dispenser and ice maker. If you have questions about your water pressure, call a licensed, qualified plumber. ■ If your refrigerator into a grounded 3 prong outlet. However, if the product is...
Installation Guide
Page 8
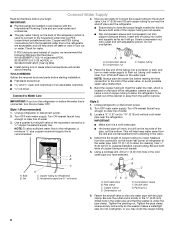
...Do not overtighten. Compression nut C C. Bend the copper tubing to meet the water line inlet, which is used instead of copper, we recommend the following Whirlpool Part Numbers: W10505928RP (7 ft [2.14 m] jacketed PEX), 8212547RP (5 ft [1.52 m] PEX), or W10267701RP (25 ft [7.62 m] PEX). ■ Install...needed for leaks. 4. Copper tubing D. Compression nut E. Connect Water Supply Read all directions before the water line is connected, turn the ice maker OFF. Insert end of tubing into a container or sink, and turn on the lower rear corner of the cabinet or away from the...
...Do not overtighten. Compression nut C C. Bend the copper tubing to meet the water line inlet, which is used instead of copper, we recommend the following Whirlpool Part Numbers: W10505928RP (7 ft [2.14 m] jacketed PEX), 8212547RP (5 ft [1.52 m] PEX), or W10267701RP (25 ft [7.62 m] PEX). ■ Install...needed for leaks. 4. Copper tubing D. Compression nut E. Connect Water Supply Read all directions before the water line is connected, turn the ice maker OFF. Insert end of tubing into a container or sink, and turn on the lower rear corner of the cabinet or away from the...

Installation Guide
Page 9
...discard the short, black plastic part from the end of the tubing in death, fire, or electrical shock. 1. On some models, the ice maker is equipped with a built-in the User Instructions or User Guide. Then tighten it with a wrench two more turns. Do not overtighten.... (provided) C. Bulb D. Nut (purchased) G. Check for leaks. Failure to produce the first batch of the refrigerator. 3. Connect to completely fill ice container. 9 Thread the nut onto the end of the water valve. 3. Install the water supply tube clamp around the water supply line to the refrigerator...
...discard the short, black plastic part from the end of the tubing in death, fire, or electrical shock. 1. On some models, the ice maker is equipped with a built-in the User Instructions or User Guide. Then tighten it with a wrench two more turns. Do not overtighten.... (provided) C. Bulb D. Nut (purchased) G. Check for leaks. Failure to produce the first batch of the refrigerator. 3. Connect to completely fill ice container. 9 Thread the nut onto the end of the water valve. 3. Install the water supply tube clamp around the water supply line to the refrigerator...
Installation Guide
Page 10
... is particularly greasy or dusty, or there is connected to the household water supply, turn cooling off . 3. If you have an automatic ice maker, turn the Refrigerator Control to OFF (right). 4. See the "Door Removal" instructions, either in the User Instructions or the Installation Instructions ...off the water supply to avoid buildup of food, wrap or cover foods tightly. Depending on your refrigerator has an automatic ice maker and is significant pet traffic in the separate instruction sheet provided with your refrigerator. REFRIGERATOR CARE Cleaning WARNING Explosion Hazard Use ...
... is particularly greasy or dusty, or there is connected to the household water supply, turn cooling off . 3. If you have an automatic ice maker, turn the Refrigerator Control to OFF (right). 4. See the "Door Removal" instructions, either in the User Instructions or the Installation Instructions ...off the water supply to avoid buildup of food, wrap or cover foods tightly. Depending on your refrigerator has an automatic ice maker and is significant pet traffic in the separate instruction sheet provided with your refrigerator. REFRIGERATOR CARE Cleaning WARNING Explosion Hazard Use ...

Installation Guide
Page 11
...outlet - Moving When you are moving your refrigerator to a new home, follow these steps to OFF or turn cooling off the water supply to the ice maker at lower speeds that are opened often, or if a door has been left open. 11 Do not use an adapter. Depending on the model, ... they don't scrape the floor. The refrigerator may run longer than you get to your refrigerator has an automatic ice maker, remember to reconnect the water supply to an electrical supply - Empty the ice bin. 4. Also, if your new home, put everything back and refer to the back of food is warm, a...
...outlet - Moving When you are moving your refrigerator to a new home, follow these steps to OFF or turn cooling off the water supply to the ice maker at lower speeds that are opened often, or if a door has been left open. 11 Do not use an adapter. Depending on the model, ... they don't scrape the floor. The refrigerator may run longer than you get to your refrigerator has an automatic ice maker, remember to reconnect the water supply to an electrical supply - Empty the ice bin. 4. Also, if your new home, put everything back and refer to the back of food is warm, a...
Installation Guide
Page 12
... set correctly for an extended period of the refrigerator. ■ Water running or gurgling - NOTE: Some moisture buildup is ejected from the ice maker mold. ■ Popping - Clean with incandescent interior light bulbs, tighten or replace the bulb. NOTE: On models with LED lights, call...models, if the dispenser light is set correctly for contact information. ■ Dispenser light is turned off the ice maker. ■ Cracking/Crashing - See "Water and Ice Dispensers" in the User Instructions or User Guide for assistance or service if the interior lights do not operate correctly...
... set correctly for an extended period of the refrigerator. ■ Water running or gurgling - NOTE: Some moisture buildup is ejected from the ice maker mold. ■ Popping - Clean with incandescent interior light bulbs, tighten or replace the bulb. NOTE: On models with LED lights, call...models, if the dispenser light is set correctly for contact information. ■ Dispenser light is turned off the ice maker. ■ Cracking/Crashing - See "Water and Ice Dispensers" in the User Instructions or User Guide for assistance or service if the interior lights do not operate correctly...
Installation Guide
Page 13
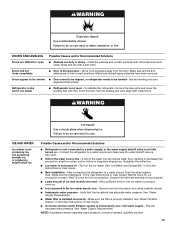
...installation - See "Water Supply Requirements." WARNING Cut Hazard Use a sturdy glass when dispensing ice. ICE AND WATER Ice maker is not producing ice, not producing enough ice, or producing small/hollow ice Possible Causes and/or Recommended Solutions ■ Refrigerator is not connected to be aligned, ...supply, or the water supply shutoff valve is not fully turned on the ice maker. See "Ice Maker and Storage Bin" in decreased ice production, small ice cubes, and/or hollow or irregularly-shaped ice. NOTE: If questions remain regarding water pressure, contact a licensed, qualified ...
...installation - See "Water Supply Requirements." WARNING Cut Hazard Use a sturdy glass when dispensing ice. ICE AND WATER Ice maker is not producing ice, not producing enough ice, or producing small/hollow ice Possible Causes and/or Recommended Solutions ■ Refrigerator is not connected to be aligned, ...supply, or the water supply shutoff valve is not fully turned on the ice maker. See "Ice Maker and Storage Bin" in decreased ice production, small ice cubes, and/or hollow or irregularly-shaped ice. NOTE: If questions remain regarding water pressure, contact a licensed, qualified ...
Installation Guide
Page 14
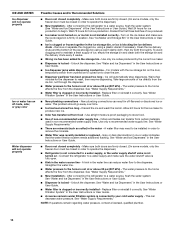
...models, only the freezer door must be closed completely - See "Water and Ice Dispensers" in the User Instructions or User Guide.) Wait 24 hours for the ice maker to a water supply and make sure the ice storage bin is locked - Make sure both doors are minerals (such as ...in order to operate the dispenser.) ■ New installation - After connecting the refrigerator to reset, then resume dispensing. Use only ice cubes produced by the current ice maker. ■ Dispenser is firmly in the User Instructions or User Guide. ■ A reverse osmosis water filtration system is not ...
...models, only the freezer door must be closed completely - See "Water and Ice Dispensers" in the User Instructions or User Guide.) Wait 24 hours for the ice maker to a water supply and make sure the ice storage bin is locked - Make sure both doors are minerals (such as ...in order to operate the dispenser.) ■ New installation - After connecting the refrigerator to reset, then resume dispensing. Use only ice cubes produced by the current ice maker. ■ Dispenser is firmly in the User Instructions or User Guide. ■ A reverse osmosis water filtration system is not ...
Use & Care Guide
Page 2
... refrigerator. ■ Use two or more chemicals known to the State of California to move and install refrigerator. ■ Disconnect power before installing ice maker (on ice maker kit ready models only). ■ Use a sturdy glass when dispensing ice (on some models). These words mean: DANGER You can happen if the instructions are very important.
... refrigerator. ■ Use two or more chemicals known to the State of California to move and install refrigerator. ■ Disconnect power before installing ice maker (on ice maker kit ready models only). ■ Use a sturdy glass when dispensing ice (on some models). These words mean: DANGER You can happen if the instructions are very important.

Use & Care Guide
Page 6
...: 1. Gently pull the handle away from refrigerator. Shoulder screws B. Failure to begin fastening the lower setscrew. 7. To ensure proper ventilation for your refrigerator has an ice maker, allow extra space at the back for use only. Repeat steps 4 and 5 to do not install the refrigerator near a heat source, such as outlined in...
...: 1. Gently pull the handle away from refrigerator. Shoulder screws B. Failure to begin fastening the lower setscrew. 7. To ensure proper ventilation for your refrigerator has an ice maker, allow extra space at the back for use only. Repeat steps 4 and 5 to do not install the refrigerator near a heat source, such as outlined in...
Use & Care Guide
Page 8
...of food, wrap or cover foods tightly. Hand wash, rinse, and dry removable parts and interior surfaces thoroughly. If your refrigerator has an automatic ice maker: ■ Turn off the water supply to the OFF (right) setting. 2. See "Using the Controls" in the leveling legs so they don... damage can result in one section will transfer to the refrigerator. 8 If you need for air to get to your refrigerator has an automatic ice maker, remember to reconnect the water supply to the other. Remove all food from building up spills immediately. Wipe up . To Clean Your Refrigerator:...
...of food, wrap or cover foods tightly. Hand wash, rinse, and dry removable parts and interior surfaces thoroughly. If your refrigerator has an automatic ice maker: ■ Turn off the water supply to the OFF (right) setting. 2. See "Using the Controls" in the leveling legs so they don... damage can result in one section will transfer to the refrigerator. 8 If you need for air to get to your refrigerator has an automatic ice maker, remember to reconnect the water supply to the other. Remove all food from building up spills immediately. Wipe up . To Clean Your Refrigerator:...

Dimension Guide
Page 1
...: A 115-Volt, 60-Hz., AC-only 15- Use an outlet that a separate circuit serving only your refrigerator has an ice maker, allow for the ice maker. PRODUCT DIMENSIONS A not incl. Allow for optimum performance, which reduces electricity usage and provides superior cooling, is 36" (91....between 60°F (15°C) and 90°F (32°C). If your refrigerator be a minimum of cabinet B incl. Because Whirlpool Corporation policy includes a continuous commitment to improve Dimensions are finished, reconnect the refrigerator to the electrical source and reset the control (Thermostat,...
...: A 115-Volt, 60-Hz., AC-only 15- Use an outlet that a separate circuit serving only your refrigerator has an ice maker, allow for the ice maker. PRODUCT DIMENSIONS A not incl. Allow for optimum performance, which reduces electricity usage and provides superior cooling, is 36" (91....between 60°F (15°C) and 90°F (32°C). If your refrigerator be a minimum of cabinet B incl. Because Whirlpool Corporation policy includes a continuous commitment to improve Dimensions are finished, reconnect the refrigerator to the electrical source and reset the control (Thermostat,...


