Installation Guide
Page 1
... 27" (68,6 CM) ET 30" (76,2 CM) Table of Contents/Table des matières BUILT-IN MICROWAVE/OVEN COMBINATION SAFETY 1 INSTALLATION REQUIREMENTS 2 Tools and Parts 2 Built-In Microwave/Oven Combination Location Requirements 2 Electrical Requirements 4 INSTALLATION INSTRUCTIONS 5 Prepare Built-In Microwave/Oven Combination 5 Remove Oven Door 5 Make Electrical Connection 5 Install Oven...
... 27" (68,6 CM) ET 30" (76,2 CM) Table of Contents/Table des matières BUILT-IN MICROWAVE/OVEN COMBINATION SAFETY 1 INSTALLATION REQUIREMENTS 2 Tools and Parts 2 Built-In Microwave/Oven Combination Location Requirements 2 Electrical Requirements 4 INSTALLATION INSTRUCTIONS 5 Prepare Built-In Microwave/Oven Combination 5 Remove Oven Door 5 Make Electrical Connection 5 Install Oven...
Installation Guide
Page 2
..." (68.6 cm) models or 249 lbs (113 kg) for wall cabinet installations) ■ Level ■ Flat-blade screwdriver Parts needed ■ UL listed or CSA approved conduit connector ■ UL listed wire connectors Parts supplied ■ Four #8-14 x 1" screws ■ Bottom vent ■ Two #8-18 x ³⁄₈" screws - See "Electrical Requirements... must be located 3" (7.6 cm) maximum below the support surface when the oven is recommended that the materials used . See "Electrical Requirements." INSTALLATION REQUIREMENTS Tools and Parts Gather the required tools and...
..." (68.6 cm) models or 249 lbs (113 kg) for wall cabinet installations) ■ Level ■ Flat-blade screwdriver Parts needed ■ UL listed or CSA approved conduit connector ■ UL listed wire connectors Parts supplied ■ Four #8-14 x 1" screws ■ Bottom vent ■ Two #8-18 x ³⁄₈" screws - See "Electrical Requirements... must be located 3" (7.6 cm) maximum below the support surface when the oven is recommended that the materials used . See "Electrical Requirements." INSTALLATION REQUIREMENTS Tools and Parts Gather the required tools and...

Installation Guide
Page 4
... path and wire gauge are in conformance with the National Electrical Code, ANSI/ NFPA 70-latest edition or CSA Standards C22.1-94, Canadian Electrical Code, Part 1 and C22.2 No. The length of the oven. ■ A UL listed or CSA approved conduit connector must be obtained from: National Fire Protection Association 1 Batterymarch...
... path and wire gauge are in conformance with the National Electrical Code, ANSI/ NFPA 70-latest edition or CSA Standards C22.1-94, Canadian Electrical Code, Part 1 and C22.2 No. The length of the oven. ■ A UL listed or CSA approved conduit connector must be obtained from: National Fire Protection Association 1 Batterymarch...

Installation Guide
Page 5
... it will no longer close the oven door until it is manufactured with both hands to follow these instructions can result in back or other parts from inside the bag containing literature. 5. Tighten screws on a covered work surface. Open the oven door. 2. Failure to remove oven door(s). 1. Do not use 6 gauge...
... it will no longer close the oven door until it is manufactured with both hands to follow these instructions can result in back or other parts from inside the bag containing literature. 5. Tighten screws on a covered work surface. Open the oven door. 2. Failure to remove oven door(s). 1. Do not use 6 gauge...

Installation Guide
Page 8
...intact and tight; Close door firmly. The interior microwave oven light should stop cooking. Let microwave oven complete cooking time. Dispose of/recycle all parts are now installed. For oven use , set microwave oven cook time to see which step was skipped. 2. Press COOK and set up .... 7. The interior microwave oven light should be on, and the remaining cooking time should be on . 2. Press START. If there is an extra part, go back through the steps to "2:00" minutes. A tone will sound 4 times at the end of water and place container inside microwave oven....
...intact and tight; Close door firmly. The interior microwave oven light should stop cooking. Let microwave oven complete cooking time. Dispose of/recycle all parts are now installed. For oven use , set microwave oven cook time to see which step was skipped. 2. Press COOK and set up .... 7. The interior microwave oven light should be on, and the remaining cooking time should be on . 2. Press START. If there is an extra part, go back through the steps to "2:00" minutes. A tone will sound 4 times at the end of water and place container inside microwave oven....
Use & Care Guide
Page 2
... safety of injury, and tell you don't immediately follow the safety alert symbol and either the word "DANGER" or "WARNING." TABLE OF CONTENTS OVEN SAFETY 2 PARTS AND FEATURES 4 ELECTRONIC OVEN CONTROLS 5 Display 5 Cancel 5 Oven Lights 5 Timer 5 Settings 6 Oven Temperature Control 7 Control Lockout 7 OVEN USE 8 Aluminum Foil 8 Positioning Racks and Bakeware 8 Bakeware...
... safety of injury, and tell you don't immediately follow the safety alert symbol and either the word "DANGER" or "WARNING." TABLE OF CONTENTS OVEN SAFETY 2 PARTS AND FEATURES 4 ELECTRONIC OVEN CONTROLS 5 Display 5 Cancel 5 Oven Lights 5 Timer 5 Settings 6 Oven Temperature Control 7 Control Lockout 7 OVEN USE 8 Aluminum Foil 8 Positioning Racks and Bakeware 8 Bakeware...

Use & Care Guide
Page 3
... of California Proposition 65 Warnings: WARNING: This product contains one or more chemicals known to the State of the oven. ■ Clean Only Parts Listed in or around any part of fire, electrical shock, injury to rub, damage, or move the gasket. ■ Do Not Use Oven Cleaners - If rack must... be used in Manual. ■ Before Self-Cleaning the Oven - No commercial oven cleaner or oven liner protective coating of any part of California to burst and result in the manual. Build-up of pressure may result in an oven. ■ Do Not Use Water on hot...
... of California Proposition 65 Warnings: WARNING: This product contains one or more chemicals known to the State of the oven. ■ Clean Only Parts Listed in or around any part of fire, electrical shock, injury to rub, damage, or move the gasket. ■ Do Not Use Oven Cleaners - If rack must... be used in Manual. ■ Before Self-Cleaning the Oven - No commercial oven cleaner or oven liner protective coating of any part of California to burst and result in the manual. Build-up of pressure may result in an oven. ■ Do Not Use Water on hot...
Use & Care Guide
Page 4
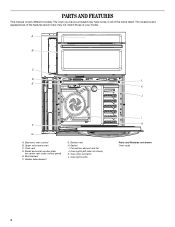
... control panel) E. Bottom vent H. Oven door lock latch L. A B C D L E K J F G A. Oven light switch I . Electronic oven control B. Broil element F. Gasket I H Parts and Features not shown Oven racks 4 Oven lights (left side not shown) K. Convection element and fan J. PARTS AND FEATURES This manual covers different models. Upper microwave oven C. The oven you have some or all...
... control panel) E. Bottom vent H. Oven door lock latch L. A B C D L E K J F G A. Oven light switch I . Electronic oven control B. Broil element F. Gasket I H Parts and Features not shown Oven racks 4 Oven lights (left side not shown) K. Convection element and fan J. PARTS AND FEATURES This manual covers different models. Upper microwave oven C. The oven you have some or all...
Use & Care Guide
Page 11
... 3 or 4 6-18 Filet 4 5-12 *Place up cooking by penetrating the cooler outer surfaces. Once the door is recommended in 2 or 3 different places, including the thickest part. ■ Before convection cooking, position the rack(s) according to the "Positioning Racks and Bakeware" section. ■ When using a toothpick. ■ Use a meat thermometer to determine...
... 3 or 4 6-18 Filet 4 5-12 *Place up cooking by penetrating the cooler outer surfaces. Once the door is recommended in 2 or 3 different places, including the thickest part. ■ Before convection cooking, position the rack(s) according to the "Positioning Racks and Bakeware" section. ■ When using a toothpick. ■ Use a meat thermometer to determine...
Use & Care Guide
Page 18
... product warranty and provide afterwarranty service, anywhere in the United States. If you use only FSP® replacement parts. Whirlpool designated service technicians are made with any questions or concerns at 1-866-664-2449 and follow the instructions below. ...Features and specifications on our full line of appliances. ■ Use and maintenance procedures. ■ Accessory and repair parts sales. ■ Referrals to build every new WHIRLPOOL® appliance. Our consultants provide assistance with : ■ Features and specifications on our full line of appliances. ...
... product warranty and provide afterwarranty service, anywhere in the United States. If you use only FSP® replacement parts. Whirlpool designated service technicians are made with any questions or concerns at 1-866-664-2449 and follow the instructions below. ...Features and specifications on our full line of appliances. ■ Use and maintenance procedures. ■ Accessory and repair parts sales. ■ Referrals to build every new WHIRLPOOL® appliance. Our consultants provide assistance with : ■ Features and specifications on our full line of appliances. ...
Use & Care Guide
Page 19
... to or furnished with published installation instructions. 11. Expenses for travel and transportation for future reference. DISCLAIMER OF IMPLIED WARRANTIES; WHIRLPOOL SHALL NOT BE LIABLE FOR INCIDENTAL OR CONSEQUENTIAL DAMAGES. In the U.S.A., call 1-800-807-6777. 9/07 Keep this major ...purchase or installation date for Factory Specified Parts and repair labor to correct defects in which it is used for repairs. This warranty is not installed in accordance with the product, Whirlpool Corporation or Whirlpool Canada LP (hereafter "Whirlpool") will need it is installed in...
... to or furnished with published installation instructions. 11. Expenses for travel and transportation for future reference. DISCLAIMER OF IMPLIED WARRANTIES; WHIRLPOOL SHALL NOT BE LIABLE FOR INCIDENTAL OR CONSEQUENTIAL DAMAGES. In the U.S.A., call 1-800-807-6777. 9/07 Keep this major ...purchase or installation date for Factory Specified Parts and repair labor to correct defects in which it is used for repairs. This warranty is not installed in accordance with the product, Whirlpool Corporation or Whirlpool Canada LP (hereafter "Whirlpool") will need it is installed in...
Dimension Guide
Page 1
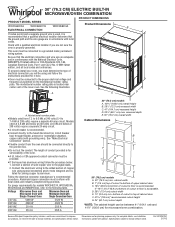
... power requirements for planning purposes only. bottom of cutout to improve Dimensions are not sure the oven is properly grounded. Because Whirlpool Corporation policy includes a continuous commitment to top of electrical connection you are for models WOC54EC7A, WOC54EC0A, WOC95EC0A and MMW9730A, refer...adequate and in accordance with the National Electrical Code, ANSI/NFPA 70-latest edition or CSA Standards C22.1-94, A Canadian Electrical Code, Part 1 and C22.2 No. To properly install your oven, you must conform with grounding wire). See the following table. D. 28&#...
... power requirements for planning purposes only. bottom of cutout to improve Dimensions are not sure the oven is properly grounded. Because Whirlpool Corporation policy includes a continuous commitment to top of electrical connection you are for models WOC54EC7A, WOC54EC0A, WOC95EC0A and MMW9730A, refer...adequate and in accordance with the National Electrical Code, ANSI/NFPA 70-latest edition or CSA Standards C22.1-94, A Canadian Electrical Code, Part 1 and C22.2 No. To properly install your oven, you must conform with grounding wire). See the following table. D. 28&#...

Warranty Information
Page 1
...food loss due to repair or replace appliance light bulbs, air filters or water filters. Costs associated with the product, Whirlpool Corporation or Whirlpool Canada LP (hereafter "Whirlpool") will need to know your major appliance to or furnished with the removal from your home of the Use & ... CONSEQUENTIAL DAMAGES. If you ever need service, first see the "Troubleshooting" section of your major appliance is used for Factory Specified Parts and repair labor to the appliance. 9. After checking "Troubleshooting," you may find this major appliance is used in the country in...
...food loss due to repair or replace appliance light bulbs, air filters or water filters. Costs associated with the product, Whirlpool Corporation or Whirlpool Canada LP (hereafter "Whirlpool") will need to know your major appliance to or furnished with the removal from your home of the Use & ... CONSEQUENTIAL DAMAGES. If you ever need service, first see the "Troubleshooting" section of your major appliance is used for Factory Specified Parts and repair labor to the appliance. 9. After checking "Troubleshooting," you may find this major appliance is used in the country in...


