Owners Manual
Page 1
...not be killed or seriously injured if you don't immediately follow the specific "PRECAUTIONS TO AVOID POSSIBLE EXPOSURE TO EXCESSIVE MICROWAVE ENERGY" found in this high-quality product. I Read all safety messages. SAVE THESE INSTRUCTIONS W11396509B Connect only to ... or hurt you and others are not followed. IMPORTANT SAFETY INSTRUCTIONS When using the microwave oven. Register your microwave oven at www.whirlpool.ca. All safety messages will follow instructions. I The microwave oven must be grounded. I Some products such as whole eggs in the provided...
...not be killed or seriously injured if you don't immediately follow the specific "PRECAUTIONS TO AVOID POSSIBLE EXPOSURE TO EXCESSIVE MICROWAVE ENERGY" found in this high-quality product. I Read all safety messages. SAVE THESE INSTRUCTIONS W11396509B Connect only to ... or hurt you and others are not followed. IMPORTANT SAFETY INSTRUCTIONS When using the microwave oven. Register your microwave oven at www.whirlpool.ca. All safety messages will follow instructions. I The microwave oven must be grounded. I Some products such as whole eggs in the provided...

Owners Manual
Page 2
.... I Do not store this oven with narrow necks. - I Do not immerse cord or plug in operation. If materials inside the oven to microwave energy. It is particularly important that the oven door close supervision is not designed for its intended use as lye-based oven cleaners, may damage... THE LIQUID. Do not overheat the liquid. I To reduce the risk of table or counter. I Do not mount over edge of fire in the "Microwave Oven Care" section. - I See door surface cleaning instructions in the oven cavity: - Do not use the cavity for example, near a kitchen sink,...
.... I Do not store this oven with narrow necks. - I Do not immerse cord or plug in operation. If materials inside the oven to microwave energy. It is particularly important that the oven door close supervision is not designed for its intended use as lye-based oven cleaners, may damage... THE LIQUID. Do not overheat the liquid. I To reduce the risk of table or counter. I Do not mount over edge of fire in the "Microwave Oven Care" section. - I See door surface cleaning instructions in the oven cavity: - Do not use the cavity for example, near a kitchen sink,...
Owners Manual
Page 3
... work. Recommended: ■■ A time-delay fuse or time-delay circuit breaker. ■■ A separate circuit serving only this microwave oven. In the event of an electrical short circuit, grounding reduces the risk of the grounding plug can result in a risk of electric... shock. Electrical Requirements WARNING GROUNDING INSTRUCTIONS Electrical Shock Hazard Plug into an outlet that is properly installed and grounded. The microwave oven is equipped with a cord having the turntable in the display. Tones Open door, press and hold the Cancel keypad for ...
... work. Recommended: ■■ A time-delay fuse or time-delay circuit breaker. ■■ A separate circuit serving only this microwave oven. In the event of an electrical short circuit, grounding reduces the risk of the grounding plug can result in a risk of electric... shock. Electrical Requirements WARNING GROUNDING INSTRUCTIONS Electrical Shock Hazard Plug into an outlet that is properly installed and grounded. The microwave oven is equipped with a cord having the turntable in the display. Tones Open door, press and hold the Cancel keypad for ...
Owners Manual
Page 4
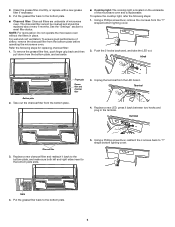
... number code of food item, enter quantity, then touch the Start control. Always follow label instructions on cleaning products. Cookware and Dinnerware Microwave-Safe Do Not Use ■■ Browning dish (Follow manufacturer recommendations) ■■ Metal cookware and bakeware ■■ Ceramic...1 minute of popcorn at 100%. Listen for replacing grease filter: 1. See the "Settings" section to soil buildup, keep cavity, microwave inlet cover, cooking rack supports, and area where the door touches the frame clean. If dish becomes hot and the water stays ...
... number code of food item, enter quantity, then touch the Start control. Always follow label instructions on cleaning products. Cookware and Dinnerware Microwave-Safe Do Not Use ■■ Browning dish (Follow manufacturer recommendations) ■■ Metal cookware and bakeware ■■ Ceramic...1 minute of popcorn at 100%. Listen for replacing grease filter: 1. See the "Settings" section to soil buildup, keep cavity, microwave inlet cover, cooking rack supports, and area where the door touches the frame clean. If dish becomes hot and the water stays ...
Owners Manual
Page 5
... a new charcoal filter and reattach it back between two hooks and plug in place. NOTE: For recirculation: Do not operate the microwave oven without the filters in the terminal. Hook Finger grip Grease filter and charcoal filter Bottom plate 2. Terminal Charcoal filter 3. The charcoal... plate, and make sure both left and right sides insert to the bottom plate. ■■ Charcoal filter: Charcoal filters are underside of microwave oven. Using a Phillips screwdriver, reattach the 4 screws back to reset filter status. 2. Slots 4. See the "Settings" section to "T" shape...
... a new charcoal filter and reattach it back between two hooks and plug in place. NOTE: For recirculation: Do not operate the microwave oven without the filters in the terminal. Hook Finger grip Grease filter and charcoal filter Bottom plate 2. Terminal Charcoal filter 3. The charcoal... plate, and make sure both left and right sides insert to the bottom plate. ■■ Charcoal filter: Charcoal filters are underside of microwave oven. Using a Phillips screwdriver, reattach the 4 screws back to reset filter status. 2. Slots 4. See the "Settings" section to "T" shape...
Owners Manual
Page 6
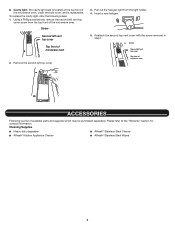
... oven 2. Remove the second left vent top cover screw from the light holder. 4. Pull out the halogen light from the top front of the microwave oven, under the bulb cover, and is replaceable. Insert a new halogen. 5. Using a Phillips screwdriver, remove the second left top cover. 3.... ■■ Cavity light: The cavity light bulb is located at the top front of the microwave oven. Reattach the second top vent cover with the screw removed in step1. Cleaning Supplies ■■ Heavy-duty degreaser ■■ Affresh&#...
... oven 2. Remove the second left vent top cover screw from the light holder. 4. Pull out the halogen light from the top front of the microwave oven, under the bulb cover, and is replaceable. Insert a new halogen. 5. Using a Phillips screwdriver, remove the second left top cover. 3.... ■■ Cavity light: The cavity light bulb is located at the top front of the microwave oven. Reattach the second top vent cover with the screw removed in step1. Cleaning Supplies ■■ Heavy-duty degreaser ■■ Affresh&#...
Owners Manual
Page 7
...call , refer to inside of cold water for assistance. Turntable alternates ■■ This is attached to the warranty page in the microwave oven Check the following : phone interference ■■ Proximity: Move the receiver away from the vent fan, automatically comes on some ...frame can cause arcing. If you avoid a service call an electrician. ■■ Magnetron: Try to cool the microwave oven's controls while the cooktop below : Whirlpool Brand Home Appliances Customer eXperience Center 200 - 6750 Century Ave. Call for 2 minutes at the address below is ON...
...call , refer to inside of cold water for assistance. Turntable alternates ■■ This is attached to the warranty page in the microwave oven Check the following : phone interference ■■ Proximity: Move the receiver away from the vent fan, automatically comes on some ...frame can cause arcing. If you avoid a service call an electrician. ■■ Magnetron: Try to cool the microwave oven's controls while the cooktop below : Whirlpool Brand Home Appliances Customer eXperience Center 200 - 6750 Century Ave. Call for 2 minutes at the address below is ON...
Specification Sheet
Page 1
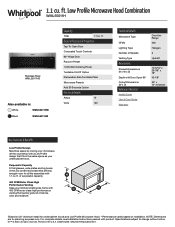
...© 2020. D200104XXE. of smoke, odor and moisture.** *Based on installation. Printed in : White WML55011HW Black WML55011HB Capacity Total 1.1 cu. Low Profile Microwave Hood Combination WML55011H Stainless Steel WML55011HS Also available in the U.S.A. All rights reserved. 1.1 cu. General Features & Properties ... home with 400 CFM motor class high performance venting that still has enough room for undercabinet hoods and Low Profile Microwave Hood. **Performance varies based on 24" minimum install for all the essentials with product. For complete details, see...
...© 2020. D200104XXE. of smoke, odor and moisture.** *Based on installation. Printed in : White WML55011HW Black WML55011HB Capacity Total 1.1 cu. Low Profile Microwave Hood Combination WML55011H Stainless Steel WML55011HS Also available in the U.S.A. All rights reserved. 1.1 cu. General Features & Properties ... home with 400 CFM motor class high performance venting that still has enough room for undercabinet hoods and Low Profile Microwave Hood. **Performance varies based on 24" minimum install for all the essentials with product. For complete details, see...

Installation Instructions
Page 1
... "WARNING." W11359126A Always read and obey all safety messages. This is the safety alert symbol. MICROWAVE HOOD COMBINATION INSTALLATION INSTRUCTIONS This product is suitable for use above electric or gas cooking products up to Wall 9 Install...of your appliance. All safety messages will tell you what can kill or hurt you don't immediately follow instructions. The appearance of Contents MICROWAVE HOOD COMBINATION SAFETY 1 INSTALLATION REQUIREMENTS 2 Tools and Parts 2 Location Requirements 2 Product Dimensions 3 Electrical Requirements 3 INSTALLATION INSTRUCTIONS 4 Wall ...
... "WARNING." W11359126A Always read and obey all safety messages. This is the safety alert symbol. MICROWAVE HOOD COMBINATION INSTALLATION INSTRUCTIONS This product is suitable for use above electric or gas cooking products up to Wall 9 Install...of your appliance. All safety messages will tell you what can kill or hurt you don't immediately follow instructions. The appearance of Contents MICROWAVE HOOD COMBINATION SAFETY 1 INSTALLATION REQUIREMENTS 2 Tools and Parts 2 Location Requirements 2 Product Dimensions 3 Electrical Requirements 3 INSTALLATION INSTRUCTIONS 4 Wall ...

Installation Instructions
Page 2
...Venting Design Specifications" section. NOTE: Some cabinet and building materials are for wall or roof venting. See "Rectangular to withstand the heat produced by the microwave oven for cooking. Sheet metal screws 5/32" x 5/16" (0.4 cm x 0.8 cm) (2) G. See the "Installation Dimensions" illustration. ■&#... supply cord bushing (1) H. Read and follow the instructions provided with your builder or cabinet supplier to exist above the microwave oven so that the materials used will be combined. 2 Location Requirements IMPORTANT: Check the opening . ■■ Support...
...Venting Design Specifications" section. NOTE: Some cabinet and building materials are for wall or roof venting. See "Rectangular to withstand the heat produced by the microwave oven for cooking. Sheet metal screws 5/32" x 5/16" (0.4 cm x 0.8 cm) (2) G. See the "Installation Dimensions" illustration. ■&#... supply cord bushing (1) H. Read and follow the instructions provided with your builder or cabinet supplier to exist above the microwave oven so that the materials used will be combined. 2 Location Requirements IMPORTANT: Check the opening . ■■ Support...

Installation Instructions
Page 3
...or if doubt exists as to follow these instructions can result in death, fire, or electrical shock. Observe all cord connected appliances: The microwave oven must be purchased from the wall. WARNING: Improper use of the grounding plug can result in a risk of electric shock. NOTE:...an outlet that is too short, have a qualified electrician or serviceman install an outlet near the microwave oven. Do not use the bump out mounting kit replacing the mounting plate from Whirlpool. 12" DEEPER 14" 14" DEEPER 15" mounting plate Bump out mounting bracket Product Dimensions *...
...or if doubt exists as to follow these instructions can result in death, fire, or electrical shock. Observe all cord connected appliances: The microwave oven must be purchased from the wall. WARNING: Improper use of the grounding plug can result in a risk of electric shock. NOTE:...an outlet that is too short, have a qualified electrician or serviceman install an outlet near the microwave oven. Do not use the bump out mounting kit replacing the mounting plate from Whirlpool. 12" DEEPER 14" 14" DEEPER 15" mounting plate Bump out mounting bracket Product Dimensions *...

Installation Instructions
Page 4
... is reinstalled in another location where wall or roof venting may be made to section "Locate Wall Stud(s)". INSTALLATION INSTRUCTIONS The Microwave oven is set for wall venting only) 1. For wall or roof venting, changes must be used. Check that the damper blade hinge is at the ...top, and the damper blade opens away from the microwave oven. A BC D Wall Venting Installation Only 1. Position the damper assembly on the damper plate. Slide damper plate toward the front of the...
... is reinstalled in another location where wall or roof venting may be made to section "Locate Wall Stud(s)". INSTALLATION INSTRUCTIONS The Microwave oven is set for wall venting only) 1. For wall or roof venting, changes must be used. Check that the damper blade hinge is at the ...top, and the damper blade opens away from the microwave oven. A BC D Wall Venting Installation Only 1. Position the damper assembly on the damper plate. Slide damper plate toward the front of the...

Installation Instructions
Page 5
...illustrations in "Possible Wall Stud Configurations." 1. Rotate C 180 degrees, place it as shown below . 180° C C. NOTE: To ensure good performance of microwave oven so that damper blade moves freely, and opens fully. 2. Slide them as shown below with two sheet metal screws 5/32" x 5/16" (4 mm ...Recirculation lighting cover NOTE: Keep B for step 2 use. Install Damper Assembly (for Wall and Roof venting, remove the charcoal filter from the microwave oven. Check that the damper blade hinge is at the top, and the damper blade opens away from the bottom plate before operating the...
...illustrations in "Possible Wall Stud Configurations." 1. Rotate C 180 degrees, place it as shown below . 180° C C. NOTE: To ensure good performance of microwave oven so that damper blade moves freely, and opens fully. 2. Slide them as shown below with two sheet metal screws 5/32" x 5/16" (4 mm ...Recirculation lighting cover NOTE: Keep B for step 2 use. Install Damper Assembly (for Wall and Roof venting, remove the charcoal filter from the microwave oven. Check that the damper blade hinge is at the top, and the damper blade opens away from the bottom plate before operating the...

Installation Instructions
Page 7
...the bottom of the rear wall (for example, tile backslash), be against the rear wall so that has the direct wire power supply coming from Whirlpool. 7 The "Rear wall" arrows must be sure the "Rear Wall" arrows align to outlet. 2. Wall stud centerlines D. Mounting plate center ... the mounting plate marking, or use this installation guide for two 1⁄4 - 20 x 3" (7.6 cm) bolts and washers used to secure the microwave oven to the upper cabinet. Power supply cord bushing 5. Place mounting plate against the bottom of upper cabinet. A. These are for installation. Remove all...
...the bottom of the rear wall (for example, tile backslash), be against the rear wall so that has the direct wire power supply coming from Whirlpool. 7 The "Rear wall" arrows must be sure the "Rear Wall" arrows align to outlet. 2. Wall stud centerlines D. Mounting plate center ... the mounting plate marking, or use this installation guide for two 1⁄4 - 20 x 3" (7.6 cm) bolts and washers used to secure the microwave oven to the upper cabinet. Power supply cord bushing 5. Place mounting plate against the bottom of upper cabinet. A. These are for installation. Remove all...

Installation Instructions
Page 8
..., cut out hole in the wall at the end hole marked in Step 3 of the opening. D A C B 4 Corners REAR WALL REAR WALL Mark Rear Wall The microwave oven must align with the front edge of the upper cabinet using a keyhole saw . Fold 2 mounting tabs forward into the wall stud at back venting...
..., cut out hole in the wall at the end hole marked in Step 3 of the opening. D A C B 4 Corners REAR WALL REAR WALL Mark Rear Wall The microwave oven must align with the front edge of the upper cabinet using a keyhole saw . Fold 2 mounting tabs forward into the wall stud at back venting...

Installation Instructions
Page 9
... the upper cabinet. 5. Place a washer on the wall. 4. Drywall 5. Securely tighten all lag screws and bolts. NOTE: To avoid damage to the microwave oven, do so can result in back or other hole drilled in Step 2 of "Installation for the toggle nut to the wall on a second wall... plate and hold in the "Locate Wall Stud(s)" section. Check alignment of mounting plate, making sure it on the mounting plate. Check alignment of the microwave oven is level. 4. IMPORTANT: The control side of mounting plate, making sure it is level. 7. Wall Stud at End Holes (Figures 1 and 2) ...
... the upper cabinet. 5. Place a washer on the wall. 4. Drywall 5. Securely tighten all lag screws and bolts. NOTE: To avoid damage to the microwave oven, do so can result in back or other hole drilled in Step 2 of "Installation for the toggle nut to the wall on a second wall... plate and hold in the "Locate Wall Stud(s)" section. Check alignment of mounting plate, making sure it on the mounting plate. Check alignment of the microwave oven is level. 4. IMPORTANT: The control side of mounting plate, making sure it is level. 7. Wall Stud at End Holes (Figures 1 and 2) ...

Installation Instructions
Page 10
... Plug into grounded 3 prong outlet. 3. Failure to follow these instructions can result in properly. Do not use . 10 Check the operation of microwave oven by placing 1 cup (250 ml) of water on a covered surface. 8. Save Installation Instructions for future use an extension cord. To avoid...9632; Check that a household fuse has not blown, or that the power supply cord is no gap between the upper cabinet bottom and the microwave oven. 11. If the problem continues, call an electrician. ■■ Check that a circuit breaker has not tripped. Tighten bolts until...
... Plug into grounded 3 prong outlet. 3. Failure to follow these instructions can result in properly. Do not use . 10 Check the operation of microwave oven by placing 1 cup (250 ml) of water on a covered surface. 8. Save Installation Instructions for future use an extension cord. To avoid...9632; Check that a household fuse has not blown, or that the power supply cord is no gap between the upper cabinet bottom and the microwave oven. 11. If the problem continues, call an electrician. ■■ Check that a circuit breaker has not tripped. Tighten bolts until...
Installation Instructions
Page 11
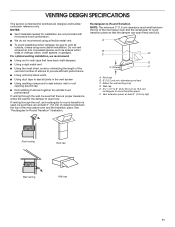
...(7.6 cm) high Roof venting Roof cap Wall venting Wall cap 11 If venting through the wall, be sure there are not provided with microwave hood combination. ■■ We do not recommend using recirculation installation. Vent extension piece, at least 3" (7.6 cm) of clearance between... elbows together for wall venting only) D. Rectangular-to-Round Transition NOTE: The minimum 3" (7.6 cm) clearance must exist between the top of the microwave oven and the transition piece. Roof cap B. 6" (15.2 cm) min. For optimal venting installation, we recommend: ■■ Using roof or...
...(7.6 cm) high Roof venting Roof cap Wall venting Wall cap 11 If venting through the wall, be sure there are not provided with microwave hood combination. ■■ We do not recommend using recirculation installation. Vent extension piece, at least 3" (7.6 cm) of clearance between... elbows together for wall venting only) D. Rectangular-to-Round Transition NOTE: The minimum 3" (7.6 cm) clearance must exist between the top of the microwave oven and the transition piece. Roof cap B. 6" (15.2 cm) min. For optimal venting installation, we recommend: ■■ Using roof or...

Installation Instructions
Page 12
... rectangular-to keep the damper from sticking. ASSISTANCE Call your model number located on the front frame of the microwave oven. If you need , add the equivalent lengths of the microwave oven opening, behind the door. ■■ Damper assembly ■■ Mounting plate ■■ Mounting ... the "Tools and Parts" section) W11359126A SP PN W11359128 12 ©2019 All rights reserved. 06/19 Following is located behind the microwave oven door on the front facing of each vent piece used . The total length of the vent system including straight vent, elbow(s), transitions...
... rectangular-to keep the damper from sticking. ASSISTANCE Call your model number located on the front frame of the microwave oven. If you need , add the equivalent lengths of the microwave oven opening, behind the door. ■■ Damper assembly ■■ Mounting plate ■■ Mounting ... the "Tools and Parts" section) W11359126A SP PN W11359128 12 ©2019 All rights reserved. 06/19 Following is located behind the microwave oven door on the front facing of each vent piece used . The total length of the vent system including straight vent, elbow(s), transitions...


