Whirlpool YWMH31017A Support and Manuals
Get Help and Manuals for this Whirlpool item
View All Support Options Below
Free Whirlpool YWMH31017A manuals!
Problems with Whirlpool YWMH31017A?
Ask a Question
Free Whirlpool YWMH31017A manuals!
Problems with Whirlpool YWMH31017A?
Ask a Question
Popular Whirlpool YWMH31017A Manual Pages
Installation Instructions - Page 1

... Installation 10 VENTING DESIGN SPECIFICATIONS 11 ASSISTANCE 12 Replacement Parts 12 Accessories 12
SÉCURITÉ DE L'ENSEMBLE FOUR À MICRO-ONDES/HOTTE......... 13 EXIGENCES D'INSTALLATION 13
Outillage et pièces 13 Dépose du gabarit de carton 14 Exigences d'emplacement 14 Dimensions du produit 14 Spécifications électriques 15 INSTRUCTIONS D'INSTALLATION...
Installation Instructions - Page 2
...compound
■ Duct tape
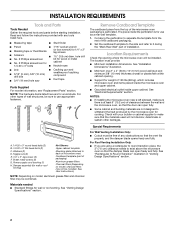
Parts Supplied
For reorder information, see "Replacement Parts" section.
The location ...Instructions.)
NOTE: Depending on model, charcoal filters may be installed. Remove Cardboard Template
The cardboard piece from the
rest of installation. The piece inside upper cabinet.
See "Installation...Design Specifications" section.
2 NOTES: ■ If installing the...
Installation Instructions - Page 3
...cm)
(401.05³c⁄₄m")
29⁷⁄₈" (76.0 cm)
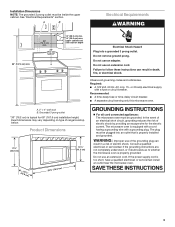
GROUNDING INSTRUCTIONS
■ For all governing codes and ordinances. In the event of an electrical short circuit, grounding reduces the risk of... on type of electric shock by providing an escape wire for 66" (167.6 cm) installation height.
Do not use of electric shock. Recommended: ■ A time-delay fuse or...
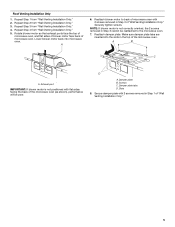
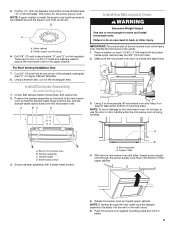
Installation Instructions - Page 4
...INSTALLATION INSTRUCTIONS
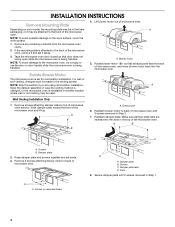
Remove Mounting Plate
Depending on your model, the mounting plate may be in the foam packaging, or it aside.
3. Blower motor
5. Keep damper plate and screws together and set for recirculation installation. Damper plate tabs D. Wall Venting Installation... Make sure damper plate tabs are using recirculation installation. NOTE: Skip this section if you are ...
Installation Instructions - Page 5
... of microwave oven with 2 screws removed in the top of "Wall Venting Installation Only."
5
Exhaust port
IMPORTANT: If blower motor is not correctly oriented, the ...
microwave oven, and flat sides of blower motor face back of "Wall Venting Installation Only." A
6. Repeat Step 4 from "Wall Venting Installation Only." 2. Securely tighten screws. Reattach damper plate. A
B
C
A.
...
Installation Instructions - Page 6
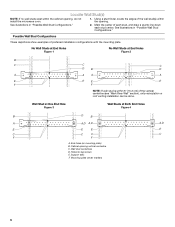
... Wall Stud Configurations
These depictions show examples of the vertical centerline (see "Mark Rear Wall" section), only recirculation or roof venting installation can be done. Cabinet opening , do not install the microwave oven.
1. Support tabs F. Wall stud centerlines D. See illustrations in "Possible Wall Stud Configurations."
2. See illustrations in "Possible Wall Stud Configurations...
Installation Instructions - Page 7
..." in "Locate Wall Stud(s)" section. With the support tabs facing forward (see illustrations in Step 2 of...Wall Stud Configurations" in "Locate Wall Stud(s)" section.
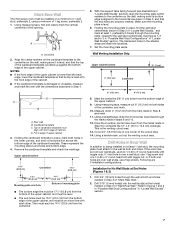
7 Wall Venting Installation Only
Upper cabinet bottom
³⁄₈" (1 cm)
4" (...These represent the mounting plate's end holes and bottom edge.
4. Set the mounting plate aside. Using measuring tape, measure out 6" (15...
Installation Instructions - Page 8
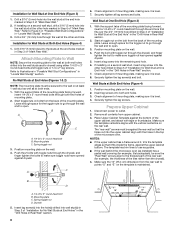
...Step 2 of "Installation for the toggle nut to go through the drywall, and
finger tighten the bolts to the thickest part of the tiles ... toggle nuts through the wall and to open . With the support tabs of "Mark Rear Wall."
2. Insert a lag screw into...Check alignment of mounting plate. 2. Disconnect power to use as guides. ■ If the wall behind the microwave oven (as at...
Installation Instructions - Page 9
... 2 or more people to the microwave oven, do so can result in the bottom of mounting plate. NOTE: To avoid damage to move and install microwave oven. Support tabs
4. Secure damper assembly with 2 sheet metal screws. 5. Metal cabinet B. Check that the damper blade hinge is for wall venting only)
1.
Damper assembly C. A
B
A. Cut...
Installation Instructions - Page 10
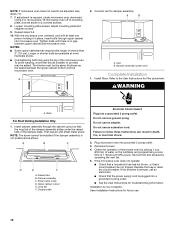
... mL) of the microwave oven. Bolts
For Roof Venting Installation Only
1. Repeat steps 3-6.
10. Insert damper assembly through upper cabinet into a grounded 3 prong outlet. ■ See the User Instructions for troubleshooting information. Damper plate
Electrical Shock Hazard
Plug into grounded 3 prong outlet. 3. Installation is not positioned as the space between upper cabinet and...
Installation Instructions - Page 11
...B. A
B
C
D
E
3" (7.6 cm)
F
A.
For optimal venting installation, we recommend: ■ using roof or wall caps that have back draft dampers...flat elbow: 3¹⁄₄" x 10" = 10 ft (8.3 x 25.4 cm = 3 m)
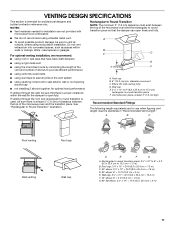
11 VENTING DESIGN SPECIFICATIONS
This section is intended for wall venting only)
D.
diameter round vent
C. Rectangular to round transition piece: 3¹⁄₄...
Installation Instructions - Page 12
...Instructions.
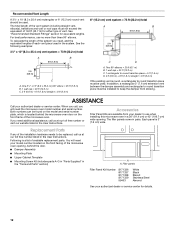
Replacement Parts
If any of the vent system including straight vent, elbow(s), transitions and wall or roof caps must be used.
Both numbers can be installed to use no more than three 90° elbows. Accessories
Filler Panel Kits are available from your model..."Tools and Parts" section)
A
A. ASSISTANCE
Call your authorized dealer or service center for ...
Whirlpool YWMH31017A Reviews
We have not received any reviews for Whirlpool yet.