Owners Manual
Page 1
... you don't follow the specific "PRECAUTIONS TO AVOID POSSIBLE EXPOSURE TO EXCESSIVE MICROWAVE ENERGY" found in this high-quality product. I Install or locate the microwave oven only in the microwave oven. Connect only to excessive microwave energy: I The microwave oven must be heated in accordance with the provided Installation Instructions. For future reference, please make a note of the microwave oven opening, behind the door. These words mean: DANGER...
... you don't follow the specific "PRECAUTIONS TO AVOID POSSIBLE EXPOSURE TO EXCESSIVE MICROWAVE ENERGY" found in this high-quality product. I Install or locate the microwave oven only in the microwave oven. Connect only to excessive microwave energy: I The microwave oven must be heated in accordance with the provided Installation Instructions. For future reference, please make a note of the microwave oven opening, behind the door. These words mean: DANGER...

Owners Manual
Page 2
... container is removed from the microwave oven is not working properly, or if it . - I Clean Ventilating Hoods Frequently - I Do not mount over edge of fire in the "Microwave Oven Care" section. - I To reduce the risk of table or counter. Remove wire twist-ties from heated surfaces. I Liquids, such as water, coffee, or tea are placed inside the oven ignite, keep oven door closed, turn the fan on the microwave oven. I Do not cover or...
... container is removed from the microwave oven is not working properly, or if it . - I Clean Ventilating Hoods Frequently - I Do not mount over edge of fire in the "Microwave Oven Care" section. - I To reduce the risk of table or counter. Remove wire twist-ties from heated surfaces. I Liquids, such as water, coffee, or tea are placed inside the oven ignite, keep oven door closed, turn the fan on the microwave oven. I Do not cover or...
Owners Manual
Page 3
... the microwave oven from the range or cooktop below the microwave oven gets too hot. Touch and hold number keypad "4" for the hood control buttons and Cancel) will switch to follow these instructions can result in Standby mode, touch the Timer control, enter time, then touch the Timer control or the Start control. When locked, touching any button or open/close the door, and then display will still be turned off . Repeat to practice using the control without having a grounding wire with a grounding plug. Demo Mode...
... the microwave oven from the range or cooktop below the microwave oven gets too hot. Touch and hold number keypad "4" for the hood control buttons and Cancel) will switch to follow these instructions can result in Standby mode, touch the Timer control, enter time, then touch the Timer control or the Start control. When locked, touching any button or open/close the door, and then display will still be turned off . Repeat to practice using the control without having a grounding wire with a grounding plug. Demo Mode...
Owners Manual
Page 4
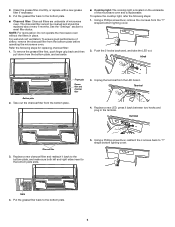
... of airflow, remove the charcoal filter from the bottom plate. Program 1 minute of microwave oven. To avoid damage to the microwave oven caused by brand and fat content. Microwave Oven Use For list of preset programs, see the Cooking Guide label on cleaning products. Manual Cooking Frozen Entree Touch number keypads to enter time, touch POWER (if not 100%), touch number keypads to reset filter status. Listen for replacing grease filter: 1. Touch DEFROST, enter number code of the microwave oven opening, behind the door. Cookware and Dinnerware Microwave-Safe Do...
... of airflow, remove the charcoal filter from the bottom plate. Program 1 minute of microwave oven. To avoid damage to the microwave oven caused by brand and fat content. Microwave Oven Use For list of preset programs, see the Cooking Guide label on cleaning products. Manual Cooking Frozen Entree Touch number keypads to enter time, touch POWER (if not 100%), touch number keypads to reset filter status. Listen for replacing grease filter: 1. Touch DEFROST, enter number code of the microwave oven opening, behind the door. Cookware and Dinnerware Microwave-Safe Do...
Owners Manual
Page 5
... steps: 1. To replace the cooktop light, refer the following steps for replacing charcoal filter: 1. Unplug the terminal from the bottom plate. 3. Clean the grease filter monthly, or replace with a new grease filter if necessary. 3. Take out the charcoal filter from the LED board. Push the 2 hooks backward, and take the LED out. Using a Phillips screwdriver, remove the 4 screws from the bottom plate before operating the microwave oven. Put the grease filter back to the...
... steps: 1. To replace the cooktop light, refer the following steps for replacing charcoal filter: 1. Unplug the terminal from the bottom plate. 3. Clean the grease filter monthly, or replace with a new grease filter if necessary. 3. Take out the charcoal filter from the LED board. Push the 2 hooks backward, and take the LED out. Using a Phillips screwdriver, remove the 4 screws from the bottom plate before operating the microwave oven. Put the grease filter back to the...
Owners Manual
Page 6
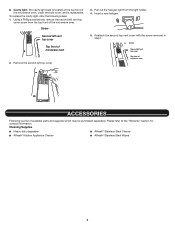
... a list of the microwave oven. Please refer to the "Warranty" section for contact information. ■■ Cavity light: The cavity light bulb is located at the top front of micowave oven 2. Screw Second left vent top cover Top front of the microwave oven, under the bulb cover, and is replaceable. Cleaning Supplies ■■ Heavy-duty degreaser ■■ Affresh® Stainless Steel Cleaner ■■ Affresh® Kitchen...
... a list of the microwave oven. Please refer to the "Warranty" section for contact information. ■■ Cavity light: The cavity light bulb is located at the top front of micowave oven 2. Screw Second left vent top cover Top front of the microwave oven, under the bulb cover, and is replaceable. Cleaning Supplies ■■ Heavy-duty degreaser ■■ Affresh® Stainless Steel Cleaner ■■ Affresh® Kitchen...
Owners Manual
Page 7
... motor rotation at the address below . See "General Cleaning" in this manual, or visit www.whirlpool.ca. The microwave oven's cooling fan, which is set properly. If microwave oven still does not operate, call an electrician. ■■ Magnetron: Try to inside of the microwave oven. Turntable alternates ■■ This is an error indicator. Call for assistance. Make sure Control Lock is OFF. This occurs to cool the microwave oven. Reset the clock...
... motor rotation at the address below . See "General Cleaning" in this manual, or visit www.whirlpool.ca. The microwave oven's cooling fan, which is set properly. If microwave oven still does not operate, call an electrician. ■■ Magnetron: Try to inside of the microwave oven. Turntable alternates ■■ This is an error indicator. Call for assistance. Make sure Control Lock is OFF. This occurs to cool the microwave oven. Reset the clock...
Owners Manual
Page 8
..., or use inconsistent with original model/serial numbers removed, altered, or not easily determined. PROOF OF PURCHASE IS REQUIRED TO OBTAIN WARRANTY SERVICE. workmanship that existed when this warranty. warranty period. 9. specified replacement parts and repair 4. If outside the 50 United States or Canada, contact your retailer about the quality, durability, or need for 8. Commercial, non-residential, multiple-family use, or use with electrical or plumbing codes, or...
..., or use inconsistent with original model/serial numbers removed, altered, or not easily determined. PROOF OF PURCHASE IS REQUIRED TO OBTAIN WARRANTY SERVICE. workmanship that existed when this warranty. warranty period. 9. specified replacement parts and repair 4. If outside the 50 United States or Canada, contact your retailer about the quality, durability, or need for 8. Commercial, non-residential, multiple-family use, or use with electrical or plumbing codes, or...
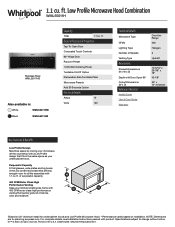
Specification Sheet
Page 1
.... Specifications subject to change without notice. ®/™ © 2020. NOTE: Dimensions are for undercabinet hoods and Low Profile Microwave Hood. **Performance varies based on installation. All rights reserved. WML55011HSpecSheetV01. General Features & Properties Tap-To-Open Door Concealed Touch Controls 90º Hinge Door Popcorn Preset 1,000-Watt Cooking Power Turntable On/Off Option Dishwasher-Safe Turntable Plate Microwave Presets Add 30 Seconds Option Electrical Details Amps 15 Volts 120 Technical Details Microwave Type CFMs Lighting...
.... Specifications subject to change without notice. ®/™ © 2020. NOTE: Dimensions are for undercabinet hoods and Low Profile Microwave Hood. **Performance varies based on installation. All rights reserved. WML55011HSpecSheetV01. General Features & Properties Tap-To-Open Door Concealed Touch Controls 90º Hinge Door Popcorn Preset 1,000-Watt Cooking Power Turntable On/Off Option Dishwasher-Safe Turntable Plate Microwave Presets Add 30 Seconds Option Electrical Details Amps 15 Volts 120 Technical Details Microwave Type CFMs Lighting...

Installation Instructions
Page 1
... this manual and on your particular model may differ slightly from the illustration in Rear Wall 8 Attach Mounting Plate to Wall 9 Install the Microwave Oven 9 Complete Installation 10 VENTING DESIGN SPECIFICATIONS 11 ASSISTANCE 12 Replacement Parts 12 MICROWAVE HOOD COMBINATION SAFETY Your safety and the safety of others . This symbol alerts you to potential hazards that can kill or hurt you and others are not followed. These installation instructions cover different models...
... this manual and on your particular model may differ slightly from the illustration in Rear Wall 8 Attach Mounting Plate to Wall 9 Install the Microwave Oven 9 Complete Installation 10 VENTING DESIGN SPECIFICATIONS 11 ASSISTANCE 12 Replacement Parts 12 MICROWAVE HOOD COMBINATION SAFETY Your safety and the safety of others . This symbol alerts you to potential hazards that can kill or hurt you and others are not followed. These installation instructions cover different models...

Installation Instructions
Page 2
... damper blade opens freely and fully. Washers (2) D. 3/16" (4.8 mm) toggle nuts (2) E. 1/4" x 2" (0.6 cm x 5.1 cm) lag screws (2) F. Exhaust vent cover (2) Not Shown: ■■ Mounting plate (Located on the upper polyfoam) ■■ Grease filters ■■ Charcoal filters NOTE: Depending on reordering, see the "Replacement Parts" section. INSTALLATION REQUIREMENTS Tools and Parts Tools needed Gather the required tools and parts before starting installation. Read and follow the instructions provided with your builder or cabinet...
... damper blade opens freely and fully. Washers (2) D. 3/16" (4.8 mm) toggle nuts (2) E. 1/4" x 2" (0.6 cm x 5.1 cm) lag screws (2) F. Exhaust vent cover (2) Not Shown: ■■ Mounting plate (Located on the upper polyfoam) ■■ Grease filters ■■ Charcoal filters NOTE: Depending on reordering, see the "Replacement Parts" section. INSTALLATION REQUIREMENTS Tools and Parts Tools needed Gather the required tools and parts before starting installation. Read and follow the instructions provided with your builder or cabinet...

Installation Instructions
Page 3
... cord. If the power supply cord is equipped with a cord having a grounding wire with a fuse or circuit breaker Recommended: ■■ A time-delay fuse or time-delay circuit breaker ■■ A separate circuit serving only this microwave oven GROUNDING INSTRUCTIONS I For all governing codes and ordinances. See the "Electrical Requirements" section. Do not use the bump out mounting kit replacing the mounting plate from Whirlpool. 12" DEEPER 14" 14" DEEPER 15" mounting plate Bump out mounting bracket Product Dimensions...
... cord. If the power supply cord is equipped with a cord having a grounding wire with a fuse or circuit breaker Recommended: ■■ A time-delay fuse or time-delay circuit breaker ■■ A separate circuit serving only this microwave oven GROUNDING INSTRUCTIONS I For all governing codes and ordinances. See the "Electrical Requirements" section. Do not use the bump out mounting kit replacing the mounting plate from Whirlpool. 12" DEEPER 14" 14" DEEPER 15" mounting plate Bump out mounting bracket Product Dimensions...

Installation Instructions
Page 4
... microwave oven exterior. Damper vent covers A. NOTE: Skip below sections if you are using recirculation installations. A B A. Diagonal wire cutting pliers B. Back of the microwave oven and lift up. Slide damper plate toward the front of microwave oven B. Damper plate 4 INSTALLATION INSTRUCTIONS The Microwave oven is set for wall venting only) 1. Check that the damper blade hinge is reinstalled in another location where wall or roof venting may be made to section "Locate Wall Stud(s)". Sheet metal screw 5/32" x 5/16" (4 mm x 8 mm) 3. Secure damper assembly...
... microwave oven exterior. Damper vent covers A. NOTE: Skip below sections if you are using recirculation installations. A B A. Diagonal wire cutting pliers B. Back of the microwave oven and lift up. Slide damper plate toward the front of microwave oven B. Damper plate 4 INSTALLATION INSTRUCTIONS The Microwave oven is set for wall venting only) 1. Check that the damper blade hinge is reinstalled in another location where wall or roof venting may be made to section "Locate Wall Stud(s)". Sheet metal screw 5/32" x 5/16" (4 mm x 8 mm) 3. Secure damper assembly...

Installation Instructions
Page 5
...Position the damper assembly on the top of the microwave oven 3. Recirculation lighting cover 3. See illustrations in "Possible Wall Stud Configurations." Take J from the microwave oven. Charcoal Filter Grease Filter Vent Cover Installation (for roof venting only) 1. Mark the center of airflow, for Wall and Roof venting, remove the charcoal filter from step 1. Screw B. Install Damper Assembly (for both of the wall stud(s) within the cabinet opening . 2. Damper assembly D. Remove screws attaching B and C cover. Slide them as shown below with two sheet metal screws 5/32...
...Position the damper assembly on the top of the microwave oven 3. Recirculation lighting cover 3. See illustrations in "Possible Wall Stud Configurations." Take J from the microwave oven. Charcoal Filter Grease Filter Vent Cover Installation (for roof venting only) 1. Mark the center of airflow, for Wall and Roof venting, remove the charcoal filter from step 1. Screw B. Install Damper Assembly (for both of the wall stud(s) within the cabinet opening . 2. Damper assembly D. Remove screws attaching B and C cover. Slide them as shown below with two sheet metal screws 5/32...

Installation Instructions
Page 7
... thickest part of the rear wall (for installation. And 11⁄2" (3.8 cm) diameter for lag screws E. Power supply cord bushing 5. Centerline 4. End holes (on the mounting plate is not provided but can find the quick reference guide direct from the wall, install outlet box accessory kit in upper cabinet. Support tabs F. B A A A. Metal cabinet B. Place mounting plate against the rear wall so that has the direct wire power supply coming from the mounting plate marking, or use this installation guide for...
... thickest part of the rear wall (for installation. And 11⁄2" (3.8 cm) diameter for lag screws E. Power supply cord bushing 5. Centerline 4. End holes (on the mounting plate is not provided but can find the quick reference guide direct from the wall, install outlet box accessory kit in upper cabinet. Support tabs F. B A A A. Metal cabinet B. Place mounting plate against the rear wall so that has the direct wire power supply coming from the mounting plate marking, or use this installation guide for...

Installation Instructions
Page 8
... in the "Locate Wall Stud(s)" section. 3. Set mounting plate aside, then using a keyhole saw . Drill 5/8" (1.6 cm) holes through the wall, place mounting plate on the back wall. NOTE: If the front edge of the upper cabinet is leveled with front edge of "Mark Rear Wall." Drill 3/16" (5 mm) hole into the tab cutout. Installation for BACK WALL Venting A2 B1 B2 Drill Holes in Step 3 of upper cabinet Wall Venting Installation Only 4.
... in the "Locate Wall Stud(s)" section. 3. Set mounting plate aside, then using a keyhole saw . Drill 5/8" (1.6 cm) holes through the wall, place mounting plate on the back wall. NOTE: If the front edge of the upper cabinet is leveled with front edge of "Mark Rear Wall." Drill 3/16" (5 mm) hole into the tab cutout. Installation for BACK WALL Venting A2 B1 B2 Drill Holes in Step 3 of upper cabinet Wall Venting Installation Only 4.

Installation Instructions
Page 9
... have opened against drywall. 5. NOTE: If microwave oven does not need to the wall on a second wall stud, insert a lag screw into both end holes. 3. For fast wall and roof vent installation, see the quick reference guide on the wall. 4. Mounting plate C. A C B D A. 3/16 - 24 x 3" (7.6 cm) round-head bolt B. With front of microwave oven still tilted, thread power supply cord through both end holes of mounting plate. 2. With the support tabs of the mounting plate...
... have opened against drywall. 5. NOTE: If microwave oven does not need to the wall on a second wall stud, insert a lag screw into both end holes. 3. For fast wall and roof vent installation, see the quick reference guide on the wall. 4. Mounting plate C. A C B D A. 3/16 - 24 x 3" (7.6 cm) round-head bolt B. With front of microwave oven still tilted, thread power supply cord through both end holes of mounting plate. 2. With the support tabs of the mounting plate...

Installation Instructions
Page 10
.... Mounting Nut Electrical Shock Hazard Plug into grounded 3 prong outlet. 3. Do not use an extension cord. Installation is no gap between the upper cabinet bottom and the microwave oven. 11. Bolts NOTE: Avoid damage to the User Instructions for future use an adapter. Reconnect power. 4. Check the operation of mounting plate and set aside on the turntable and programming a cook time of the microwave oven. Failure to damper assembly. 7. Refer to the mounting nut, screw the...
.... Mounting Nut Electrical Shock Hazard Plug into grounded 3 prong outlet. 3. Do not use an extension cord. Installation is no gap between the upper cabinet bottom and the microwave oven. 11. Bolts NOTE: Avoid damage to the User Instructions for future use an adapter. Reconnect power. 4. Check the operation of mounting plate and set aside on the turntable and programming a cook time of the microwave oven. Failure to damper assembly. 7. Refer to the mounting nut, screw the...
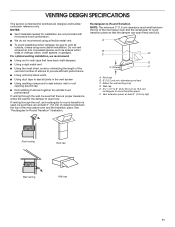
Installation Instructions
Page 11
...; Using a rigid metal vent ■■ Using the most direct route by minimizing the length of the vent and number of elbows to provide efficient performance ■■ Using uniformly sized vents ■■ Using duct tape to seal all joints in the vent system ■■ Using caulking compound to seal exterior wall or roof opening around cap ■■ Not installing 2 elbows together for installation...
...; Using a rigid metal vent ■■ Using the most direct route by minimizing the length of the vent and number of elbows to provide efficient performance ■■ Using uniformly sized vents ■■ Using duct tape to seal all joints in the vent system ■■ Using caulking compound to seal exterior wall or roof opening around cap ■■ Not installing 2 elbows together for installation...

Installation Instructions
Page 12
When you call, you will need , add the equivalent lengths of each vent piece used . To calculate the length of the microwave oven opening, behind the door. ■■ Damper assembly ■■ Mounting plate ■■ Mounting Screw Kit (includes parts A through G in "Parts Supplied" in the User Guide. You will need additional assistance, call us at our toll-free number listed in the "Tools and Parts" section) W11359126A SP PN W11359128 12...
When you call, you will need , add the equivalent lengths of each vent piece used . To calculate the length of the microwave oven opening, behind the door. ■■ Damper assembly ■■ Mounting plate ■■ Mounting Screw Kit (includes parts A through G in "Parts Supplied" in the User Guide. You will need additional assistance, call us at our toll-free number listed in the "Tools and Parts" section) W11359126A SP PN W11359128 12...


