
Installation Instructions
Page 1
...Tools and Parts 2 Remove Cardboard Template 2 Location Requirements 2 Product Dimensions 3 Electrical Requirements 3 INSTALLATION INSTRUCTIONS 4 Remove Mounting Plate 4 Rotate Blower Motor 4 Locate Wall Stud(s 6 Mark Rear Wall 7 Drill Holes in these installation instructions. W10247296B These words mean: DANGER You can kill or hurt you how to Wall 8 Prepare Upper Cabinet 8 Install Damper Assembly 9 Install the Microwave Oven 9 Complete Installation 10 VENTING DESIGN SPECIFICATIONS 11 ASSISTANCE 12 Replacement Parts 12 Accessories 12 MICROWAVE HOOD COMBINATION SAFETY...
...Tools and Parts 2 Remove Cardboard Template 2 Location Requirements 2 Product Dimensions 3 Electrical Requirements 3 INSTALLATION INSTRUCTIONS 4 Remove Mounting Plate 4 Rotate Blower Motor 4 Locate Wall Stud(s 6 Mark Rear Wall 7 Drill Holes in these installation instructions. W10247296B These words mean: DANGER You can kill or hurt you how to Wall 8 Prepare Upper Cabinet 8 Install Damper Assembly 9 Install the Microwave Oven 9 Complete Installation 10 VENTING DESIGN SPECIFICATIONS 11 ASSISTANCE 12 Replacement Parts 12 Accessories 12 MICROWAVE HOOD COMBINATION SAFETY...

Installation Instructions
Page 2
... User Instructions.) NOTE: Depending on model, charcoal filters may be combined. Remove Cardboard Template The cardboard piece from the rest of clearance between the wall and the microwave oven, so that the vent fits properly, and the damper blade opens freely and fully. The piece inside upper cabinet. Cut along the perforation to withstand the heat produced by the microwave oven for wood studs. Toggle nuts (2) E. 1/4" x 2" lag screws (2) F. Power supply cord bushing (1) H. See "Venting Design Specifications" section...
... User Instructions.) NOTE: Depending on model, charcoal filters may be combined. Remove Cardboard Template The cardboard piece from the rest of clearance between the wall and the microwave oven, so that the vent fits properly, and the damper blade opens freely and fully. The piece inside upper cabinet. Cut along the perforation to withstand the heat produced by the microwave oven for wood studs. Toggle nuts (2) E. 1/4" x 2" lag screws (2) F. Power supply cord bushing (1) H. See "Venting Design Specifications" section...

Installation Instructions
Page 3
... to whether the microwave oven is equipped with a cord having a grounding wire with a fuse or circuit breaker. If the power supply cord is typical for the electric current. A. 2" x 4" wall stud B. Grounded 3 prong outlet *30" (76.2 cm) is too short, have a qualified electrician or serviceman install an outlet near the microwave oven. Consult a qualified electrician or serviceman if the grounding instructions are not completely understood...
... to whether the microwave oven is equipped with a cord having a grounding wire with a fuse or circuit breaker. If the power supply cord is typical for the electric current. A. 2" x 4" wall stud B. Grounded 3 prong outlet *30" (76.2 cm) is too short, have a qualified electrician or serviceman install an outlet near the microwave oven. Consult a qualified electrician or serviceman if the grounding instructions are not completely understood...

Installation Instructions
Page 4
A A. A Keep the damper assembly in case the venting method is changed, or the microwave oven is reinstalled in another location where wall or roof venting may be attached to back of microwave oven with 2 screws removed in Step 1. 4 Keep damper plate and screws together and set for recirculation installation. Damper plate B. Screws C. Secure damper plate with 2 screws removed in Step 3. 7. Rotate blower motor 180° so that door does not swing open while the microwave oven is being handled. Exhaust port 6. Screws B. A A. Lift blower...
A A. A Keep the damper assembly in case the venting method is changed, or the microwave oven is reinstalled in another location where wall or roof venting may be attached to back of microwave oven with 2 screws removed in Step 1. 4 Keep damper plate and screws together and set for recirculation installation. Damper plate B. Screws C. Secure damper plate with 2 screws removed in Step 3. 7. Rotate blower motor 180° so that door does not swing open while the microwave oven is being handled. Exhaust port 6. Screws B. A A. Lift blower...

Installation Instructions
Page 6
... center. Wall stud centerlines D. Mounting plate center markers 6 Support tabs F. See illustrations in "Possible Wall Stud Configurations." 2. End holes (on mounting plate) B. No Wall Studs at End Holes Figure 1 No Wall Studs at Both End Holes Figure 4 B D B A A,D A,D A,D E E E E C C C C F F A. Cabinet opening . Locate Wall Stud(s) NOTE: If no wall studs exist within 6" (15.2 cm) of the vertical centerline (see "Mark Rear Wall" section), only recirculation or roof venting installation can be...
... center. Wall stud centerlines D. Mounting plate center markers 6 Support tabs F. See illustrations in "Possible Wall Stud Configurations." 2. End holes (on mounting plate) B. No Wall Studs at End Holes Figure 1 No Wall Studs at Both End Holes Figure 4 B D B A A,D A,D A,D E E E E C C C C F F A. Cabinet opening . Locate Wall Stud(s) NOTE: If no wall studs exist within 6" (15.2 cm) of the vertical centerline (see "Mark Rear Wall" section), only recirculation or roof venting installation can be...

Installation Instructions
Page 7
... being installed on at least 1 wall stud, the mounting plate must align with front edge of 1 lag screw, preferably 2. 1. Holding the cardboard template in Rear Wall In addition to figures 1 and 2 in "Possible Wall Stud Configurations" in "Locate Wall Stud(s)" section. Using a keyhole saw, cut out the venting cutout area. Drill Holes in place, mark both sides of "Mark Rear Wall." 2. Remove the cardboard template and check the markings: Upper cabinet bottom...
... being installed on at least 1 wall stud, the mounting plate must align with front edge of 1 lag screw, preferably 2. 1. Holding the cardboard template in Rear Wall In addition to figures 1 and 2 in "Possible Wall Stud Configurations" in "Locate Wall Stud(s)" section. Using a keyhole saw, cut out the venting cutout area. Drill Holes in place, mark both sides of "Mark Rear Wall." 2. Remove the cardboard template and check the markings: Upper cabinet bottom...

Installation Instructions
Page 8
... drywall). 4. The template has trim lines to open . 3. Drywall 5. NOTES: ■ If the upper cabinet has a frame around it, trim the template edges so that fits over the 3/4" (19 mm) hole drilled in Step 3 of the mounting plate. B D A. 1/4-20 x 3" round-head bolt B. Drill a 3/4" (19 mm) hole through the wall and to use as guides. ■ If the wall behind the microwave oven (as at...
... drywall). 4. The template has trim lines to open . 3. Drywall 5. NOTES: ■ If the upper cabinet has a frame around it, trim the template edges so that fits over the 3/4" (19 mm) hole drilled in Step 3 of the mounting plate. B D A. 1/4-20 x 3" round-head bolt B. Drill a 3/4" (19 mm) hole through the wall and to use as guides. ■ If the wall behind the microwave oven (as at...

Installation Instructions
Page 9
... door or door handle while the microwave oven is for the power supply cord. Make sure the microwave oven door is the heavy side. Back of the microwave oven is closed and taped shut. 3. Rotate microwave oven up toward upper cabinet. Damper assembly C. Secure damper assembly with 2 sheet metal screws. Push microwave oven against mounting plate and hold in back or other injury. IMPORTANT: The control side of microwave oven B. Sheet metal screws 3. A B A. B A A. Metal cabinet B. These are for wall venting only) 1. For Roof Venting Installation...
... door or door handle while the microwave oven is for the power supply cord. Make sure the microwave oven door is the heavy side. Back of the microwave oven is closed and taped shut. 3. Rotate microwave oven up toward upper cabinet. Damper assembly C. Secure damper assembly with 2 sheet metal screws. Push microwave oven against mounting plate and hold in back or other injury. IMPORTANT: The control side of microwave oven B. Sheet metal screws 3. A B A. B A A. Metal cabinet B. These are for wall venting only) 1. For Roof Venting Installation...

Installation Instructions
Page 10
... Vent B. Install filters. WARNING A. Bolts For Roof Venting Installation Only 1. Failure to damper assembly. Check the operation of microwave oven by operating the vent fan. 5. Loosen mounting plate screws. A B A. Raised tabs B. Repeat steps 3-6. 10. Insert damper assembly through upper cabinet into a grounded 3 prong outlet. ■ See the User Instructions for troubleshooting information. Adjust mounting plate and retighten screws. 9. Damper assembly C. Do not use an extension cord. With the microwave oven centered, and with sheet metal screw...
... Vent B. Install filters. WARNING A. Bolts For Roof Venting Installation Only 1. Failure to damper assembly. Check the operation of microwave oven by operating the vent fan. 5. Loosen mounting plate screws. A B A. Raised tabs B. Repeat steps 3-6. 10. Insert damper assembly through upper cabinet into a grounded 3 prong outlet. ■ See the User Instructions for troubleshooting information. Adjust mounting plate and retighten screws. 9. Damper assembly C. Do not use an extension cord. With the microwave oven centered, and with sheet metal screw...

Installation Instructions
Page 12
... (2.4 m) If the existing vent is located behind the door. ■ Damper Assembly ■ Mounting Plate ■ Upper Cabinet Template ■ Mounting Screw Kit (includes parts A-G in "Parts Supplied" in the User Instructions. All rights reserved. 461965617428 9/10 Printed in pairs. The total length of the microwave oven opening . W10247296B SP PN W10345003B © 2010. When you call, you need additional assistance, call us at our toll free number listed in the "Tools and...
... (2.4 m) If the existing vent is located behind the door. ■ Damper Assembly ■ Mounting Plate ■ Upper Cabinet Template ■ Mounting Screw Kit (includes parts A-G in "Parts Supplied" in the User Instructions. All rights reserved. 461965617428 9/10 Printed in pairs. The total length of the microwave oven opening . W10247296B SP PN W10345003B © 2010. When you call, you need additional assistance, call us at our toll free number listed in the "Tools and...

Owners Manual
Page 1
... follow instructions. Puede encontrar su número de modelo y de serie en la etiqueta ubicada en la parte frontal de la abertura del horno de microondas, detrás de la puerta. Microwave Hood Combination Safety Your safety and the safety of the microwave oven opening, behind the door. This is , tell you how to excessive microwave energy: ■ Install or locate the microwave oven only in this manual...
... follow instructions. Puede encontrar su número de modelo y de serie en la etiqueta ubicada en la parte frontal de la abertura del horno de microondas, detrás de la puerta. Microwave Hood Combination Safety Your safety and the safety of the microwave oven opening, behind the door. This is , tell you how to excessive microwave energy: ■ Install or locate the microwave oven only in this manual...

Owners Manual
Page 2
... create a fire or risk of electric shock. ■ Do not clean with the door open since open-door operation can burn off power at the fuse or circuit breaker panel. - It is necessary when used above ranges with maximum width of 36" (91.44 cm). ■ Clean Ventilating Hoods Frequently - Do not overcook food. If materials inside the oven to facilitate cooking. - SAVE THESE INSTRUCTIONS PRECAUTIONS TO AVOID POSSIBLE EXPOSURE...
... create a fire or risk of electric shock. ■ Do not clean with the door open since open-door operation can burn off power at the fuse or circuit breaker panel. - It is necessary when used above ranges with maximum width of 36" (91.44 cm). ■ Clean Ventilating Hoods Frequently - Do not overcook food. If materials inside the oven to facilitate cooking. - SAVE THESE INSTRUCTIONS PRECAUTIONS TO AVOID POSSIBLE EXPOSURE...

Owners Manual
Page 3
... cord is too short, have a qualified electrician or serviceman install an outlet near the microwave oven. Control Lock Activate to reach the "Demo Mode" submenu, and activate or deactivate Demo Mode. 3 Touch the Options or Setup control to avoid unintended start. In the event of an electrical short circuit, grounding reduces the risk of electric shock. Required: ■ A 120 Volt, 60 Hz, AC only, 15- Options or Setup Vent Timer, Light Timer, Filter Reset, Sound...
... cord is too short, have a qualified electrician or serviceman install an outlet near the microwave oven. Control Lock Activate to reach the "Demo Mode" submenu, and activate or deactivate Demo Mode. 3 Touch the Options or Setup control to avoid unintended start. In the event of an electrical short circuit, grounding reduces the risk of electric shock. Required: ■ A 120 Volt, 60 Hz, AC only, 15- Options or Setup Vent Timer, Light Timer, Filter Reset, Sound...

Owners Manual
Page 4
... when cooking with plates that are embedded in the microwave oven detects moisture released from food as it heats, and adjusts the cooking time accordingly. Steamer lid 4 Convection Element and Fan (on some models) functions. 6th SENSE™ System A sensor in the wall of 100% and 0% power. Turntable B. Grill Rack (on rack for bake and for grilling. Place food directly on some models) Use the short convection rack for 2-level cooking. Place cookware directly on some models) Use the tall grill rack...
... when cooking with plates that are embedded in the microwave oven detects moisture released from food as it heats, and adjusts the cooking time accordingly. Steamer lid 4 Convection Element and Fan (on some models) functions. 6th SENSE™ System A sensor in the wall of 100% and 0% power. Turntable B. Grill Rack (on rack for bake and for grilling. Place food directly on some models) Use the short convection rack for 2-level cooking. Place cookware directly on some models) Use the tall grill rack...

Owners Manual
Page 5
... in food poisoning or sickness. Manual Cooking/Stage Cooking Touch COOK TIME, touch number pads to enter time, touch COOK POWER (if not 100%), touch number pads to follow a cooking cycle. Enter the additional time, if desired, and start the microwave oven. Warm Hold (on turntable with convection) for all other convection and combination cycles. Opening the door during convection (bake) cycles. Use ovenproof, microwave-safe cookware for at 100%. Warm Hold can be used by itself or can be changed . Program...
... in food poisoning or sickness. Manual Cooking/Stage Cooking Touch COOK TIME, touch number pads to enter time, touch COOK POWER (if not 100%), touch number pads to follow a cooking cycle. Enter the additional time, if desired, and start the microwave oven. Warm Hold (on turntable with convection) for all other convection and combination cycles. Opening the door during convection (bake) cycles. Use ovenproof, microwave-safe cookware for at 100%. Warm Hold can be used by itself or can be changed . Program...

Owners Manual
Page 6
..., or use . 6 Remove bulb cover screw, and open the bulb cover. Close bulb cover, replace vent grille, and secure with screws. ■ Cooktop light: The cooktop light is located on the underside of the microwave oven, and is time to possibly avoid the cost of a service call. Make sure Control Lock is an error indicator. Always follow label instructions on motor rotation at the top front of the microwave oven. The charcoal filter cannot be cleaned, and should be replaced about the door appears in "Microwave Oven Care...
..., or use . 6 Remove bulb cover screw, and open the bulb cover. Close bulb cover, replace vent grille, and secure with screws. ■ Cooktop light: The cooktop light is located on the underside of the microwave oven, and is time to possibly avoid the cost of a service call. Make sure Control Lock is an error indicator. Always follow label instructions on motor rotation at the top front of the microwave oven. The charcoal filter cannot be cleaned, and should be replaced about the door appears in "Microwave Oven Care...

Owners Manual
Page 7
...9632; Turntable ■ Turntable support and rollers ■ Turntable hub ■ Cooking rack (for some models) ■ Rack clip (for some models) ■ Rack support (for contact and model identification information. Fan running during microwave oven operation to the cover for some models) ■ Grease filter ■ Charcoal filter ■ Cooktop light bulb ■ Cavity light bulb ■ Steamer vessel (provided with some models) ■ Pan and handle (not provided) ■ Convection rack (provided with some models) ■ Grill rack (provided with some models) Cleaning...
...9632; Turntable ■ Turntable support and rollers ■ Turntable hub ■ Cooking rack (for some models) ■ Rack clip (for some models) ■ Rack support (for contact and model identification information. Fan running during microwave oven operation to the cover for some models) ■ Grease filter ■ Charcoal filter ■ Cooktop light bulb ■ Cavity light bulb ■ Steamer vessel (provided with some models) ■ Pan and handle (not provided) ■ Convection rack (provided with some models) ■ Grill rack (provided with some models) Cleaning...

Owners Manual
Page 8
... China Any food loss due to repair or replace appliance light bulbs, air filters or water filters. This limited warranty is valid only in the United States or Canada and applies only when the major appliance is required to obtain service under these excluded circumstances shall be provided by Whirlpool. 5. Outside the 50 United States and Canada, this User Instructions and model number information for...
... China Any food loss due to repair or replace appliance light bulbs, air filters or water filters. This limited warranty is valid only in the United States or Canada and applies only when the major appliance is required to obtain service under these excluded circumstances shall be provided by Whirlpool. 5. Outside the 50 United States and Canada, this User Instructions and model number information for...

Warranty
Page 1
... repair or replace appliance light bulbs, air filters or water filters. This warranty is used for other damage to the finish of your authorized Whirlpool dealer to determine if another warranty applies. 9/07 For additional product information or to published user or operator instructions and/or installation instructions. 4. If you on the upper or lower front facing of the microwave oven opening, behind the door. You can write to Whirlpool...
... repair or replace appliance light bulbs, air filters or water filters. This warranty is used for other damage to the finish of your authorized Whirlpool dealer to determine if another warranty applies. 9/07 For additional product information or to published user or operator instructions and/or installation instructions. 4. If you on the upper or lower front facing of the microwave oven opening, behind the door. You can write to Whirlpool...
Dimension Guide
Page 1
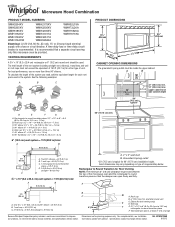
.... Grounded 3-prong outlet *30" (76.2 cm) is recommended. A time-delay fuse or time-delay circuit breaker is typical for 66" (167.6 cm) installation height. upper cabinet and side cabinet depth D E F G A. diameter round vent C. Microwave Hood Combination PRODUCT MODEL NUMBERS GMH3204XV GMH5205XV WMH2175XV WMH2205XV WMH32L19A WMH73L20A GMH6185XV WMH1162XV WMH3205XV WMH31017A WMH75520A WMH76718A WMH1163XV WMH1164XW WMH32517A WMH53520A Electrical: A 120-Volt, 60-Hz, AC-only, 15- The total...
.... Grounded 3-prong outlet *30" (76.2 cm) is recommended. A time-delay fuse or time-delay circuit breaker is typical for 66" (167.6 cm) installation height. upper cabinet and side cabinet depth D E F G A. diameter round vent C. Microwave Hood Combination PRODUCT MODEL NUMBERS GMH3204XV GMH5205XV WMH2175XV WMH2205XV WMH32L19A WMH73L20A GMH6185XV WMH1162XV WMH3205XV WMH31017A WMH75520A WMH76718A WMH1163XV WMH1164XW WMH32517A WMH53520A Electrical: A 120-Volt, 60-Hz, AC-only, 15- The total...


