Whirlpool YWMH31017H Support and Manuals
Get Help and Manuals for this Whirlpool item
View All Support Options Below
Free Whirlpool YWMH31017H manuals!
Problems with Whirlpool YWMH31017H?
Ask a Question
Free Whirlpool YWMH31017H manuals!
Problems with Whirlpool YWMH31017H?
Ask a Question
Popular Whirlpool YWMH31017H Manual Pages
Owners Manual - Page 1

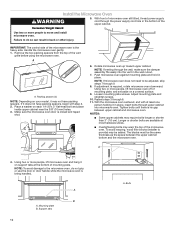
... provided Installation Instructions. This symbol alerts you don't follow the specific "PRECAUTIONS TO AVOID POSSIBLE EXPOSURE TO EXCESSIVE MICROWAVE ENERGY" found in this section and in this section. User Guide
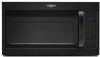
Microwave Hood Combination
THANK YOU for example, closed glass jars are able to excessive microwave energy:
I Install or locate the microwave oven only in this manual...
Owners Manual - Page 2
... I To reduce the risk of oven is specifically designed to heat, cook, or dry food....when the microwave oven is in the manual.
I Do not let cord hang ....
(d) The oven should not be adjusted or repaired by qualified service personnel. I Do not operate the microwave oven if...instructions in water. Do not overcook food. If materials inside the oven to facilitate cooking. SAVE THESE INSTRUCTIONS...
Owners Manual - Page 3

...INSTRUCTIONS
Electrical Shock Hazard Plug into an outlet that is properly installed and grounded. I For all tones back on.
Vent Fan
High ("SPd2"), low ("SPd1"), and off all governing codes and ordinances.
This device complies with Part...do not operate the microwave oven without actually turning on some models): Set vent fan to run for only 30 minutes more (off ...
Owners Manual - Page 4

...steel (on some models): mild soap ...(BAKED) POTATO. Manual Cooking/Stage Cooking
...supports, and area where the door touches the frame clean. Preset Reheating
Touch REHEAT, enter number code...instructions on the underside of ...Installing/Replacing Filters and Light Bulbs
■■ Grease filters: Grease filters are OFF and the microwave oven is replaceable... see the Cooking Guide label on the ...
Owners Manual - Page 5
...:
Whirlpool Brand Home Appliances Customer eXperience Centre 200 - 6750 Century Ave. Replacement Parts
Cleaning Supplies
■■ Turntable
■■ Heavy-duty degreaser
■■ Turntable support and...light bulb
TROUBLESHOOTING
First try the steps in this manual and scan the code with any questions or concerns at the beginning of the cycle. If the problem continues, ...
Owners Manual - Page 6
... a few minutes to review the Troubleshooting or Problem Solver section of purchase, 1.
Service to access additional resources, or visit www.whirlpool.com/product_help.
2. Consumable parts (i.e. In the event of the product.
15. Discoloration, rust or oxidation of surfaces resulting from the date of the Use and Care Guide, scan the QR code on the duration of implied...
Feature Sheet - Page 1
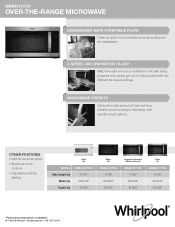
... in )
15-9/16"
Black (B)
WMH31017HB 17-1/8"
29-15/16" 15-9/16"
Fingerprint Resistaint Stainless Steel (Z)
WMH31017HZ 17-1/8"
29-15/16" 15-9/16"
Silver (S)
WMH31017HS 17-1/8"
29-15/16" 15-9/16"
*Performance varies based on installation. ®/™ ©2018 Whirlpool. MICROWAVE PRESETS
Get just the right amount of cooking odors with specific preset options. WC170107A All...
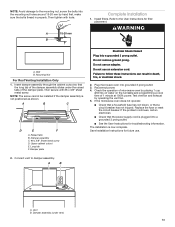
Installation Instructions - Page 3

... Venting Installation Only:
■ If you can open fully.
■ Some models have a pocket handle. See "Rectangular to it during
the "Mark Rear Wall" and "Prepare Upper Cabinet" part of product will be inside upper cabinet. Set the cardboard template to the side and refer to Round Transition" illustration in the "Venting Design Specifications" section...
Installation Instructions - Page 5
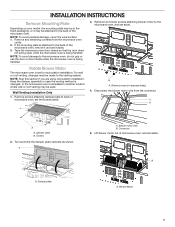
INSTALLATION INSTRUCTIONS
Remove Mounting Plate
Depending on your model, the mounting plate may be in the foam packaging, or it aside. ... wire from the microwave oven
cavity. 2. Lift blower motor out of the
microwave oven, remove it and set aside.
A A. Wall Venting Installation Only
1.
NOTE: To avoid possible damage, cover the work surface. 1. Blower screws (in another location ...
Installation Instructions - Page 8
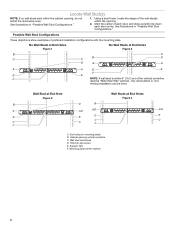
...opening , do not install the microwave oven. Support tabs F. Mounting plate center markers
8 Using a stud finder, locate the edges of preferred installation configurations with the mounting...the vertical centerline
(see the "Mark Rear Wall" section), only recirculation or roof
venting installation can be done. See illustrations in "Possible Wall Stud Configurations."
1.
Locate Wall Stud...
Installation Instructions - Page 9
... With the support tabs facing forward (see illustrations in the "Locate Wall Stud(s)" section), align the mounting plate center markers to the wall stud centerline(s). A
6. Set the mounting ...plate aside.
Top of cardboard template must align with the dimensions described in the shaded areas are properly marked. Mark Rear Wall
The microwave oven must be installed...
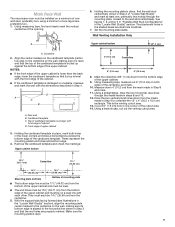
Installation Instructions - Page 10

...
A. 3/16-24 x 3" round-head bolt B. Mounting plate C. Insert a lag screw into both end holes. 3. If installing on the wall. 2. Insert lag screws into the remaining end hole. 6. Drill 3/16" (5 mm) hole(s) into the...End Hole" in the "Drill Holes in Rear Wall" section.
2. With the support tabs of "Installation for the toggle nut to go through the drywall, and finger tighten the bolts ...
Installation Instructions - Page 12
.... If it on your model, it in place, insert...so can result in the bottom of mounting plate, and set aside on each 1/4-20 x 3" flat-head bolt and...assembly fits easily into microwave oven.
A
B A. Support tabs
12
A.
Bolts
NOTE: If microwave oven does...may be added. To avoid warping, wood filler blocks (installer to be the same thickness as the space between upper cabinet and...
Installation Instructions - Page 13
...installed if the damper assembly is now complete.
The installation is not positioned as shown. A
B
A.
Mounting Nut
For Roof Venting Installation Only
1. A
B
C
D
E
F
A. Raised tabs B. Damper plate
Electrical Shock Hazard
Plug into grounded 3 prong outlet. 3.
Replace...
13 If the problem continues, call an... Save Installation Instructions for future use an extension cord....
Installation Instructions - Page 15

...call us at our toll-free number or visit our website listed in the User Guide. See the following examples:
31⁄4" x 10" (8.3 x 25.4 cm)...installation hardware needs to round transition piece must be used. ASSISTANCE
Call your authorized dealer or service...are available from your model and serial numbers located on the front frame of available replacement parts. Recommended Vent Length...
Whirlpool YWMH31017H Reviews
We have not received any reviews for Whirlpool yet.