Dimension Guide
Page 1
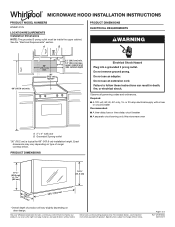
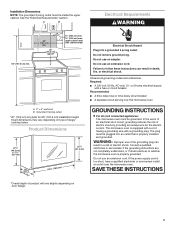
...circuit breaker Recommended: ■■ A time-delay fuse or time-delay circuit breaker ■■ A separate circuit serving only this microwave oven A. 2" x 4" wall stud B. Page 1 of range/ cooktop below. Do not remove ground prong. Dimensions are for 66"...cm) is typical for planning purposes only. Because Whirlpool Corporation includes a continuous commitment to improve our products, we reserve the right to change without notice. MICROWAVE HOOD INSTALLATION INSTRUCTIONS PRODUCT MODEL NUMBERS WMH31017H LOCATION REQUIREMENTS Installation Dimensions NOTE: The grounded 3 ...
...circuit breaker Recommended: ■■ A time-delay fuse or time-delay circuit breaker ■■ A separate circuit serving only this microwave oven A. 2" x 4" wall stud B. Page 1 of range/ cooktop below. Do not remove ground prong. Dimensions are for 66"...cm) is typical for planning purposes only. Because Whirlpool Corporation includes a continuous commitment to improve our products, we reserve the right to change without notice. MICROWAVE HOOD INSTALLATION INSTRUCTIONS PRODUCT MODEL NUMBERS WMH31017H LOCATION REQUIREMENTS Installation Dimensions NOTE: The grounded 3 ...
Dimension Guide
Page 2
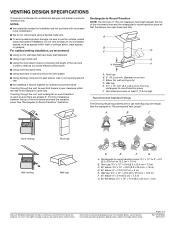
... = 5 ft (15.2 cm = 1.5 m) G. 90° flat elbow: 3¹⁄₄" x 10" = 10 ft (8.3 x 25.4 cm = 3 m) Because Whirlpool Corporation includes a continuous commitment to improve our products, we recommend: ■■ Using roof or wall caps that the damper can open fully. Page 2 of... x 25.4 cm to 15.2 cm) rectangular to change without notice. Vent extension piece, at least 3" (7.6 cm) of clearance between the top of the microwave oven and the transition piece. A B C Roof venting Roof cap Wall venting Wall cap D E F G A. Roof cap: 3¹⁄₄" x 10...
... = 5 ft (15.2 cm = 1.5 m) G. 90° flat elbow: 3¹⁄₄" x 10" = 10 ft (8.3 x 25.4 cm = 3 m) Because Whirlpool Corporation includes a continuous commitment to improve our products, we recommend: ■■ Using roof or wall caps that the damper can open fully. Page 2 of... x 25.4 cm to 15.2 cm) rectangular to change without notice. Vent extension piece, at least 3" (7.6 cm) of clearance between the top of the microwave oven and the transition piece. A B C Roof venting Roof cap Wall venting Wall cap D E F G A. Roof cap: 3¹⁄₄" x 10...

Owners Manual
Page 1
... with the provided Installation Instructions. See "GROUNDING INSTRUCTIONS" found in the microwave oven. For future reference, please make a note of your model and serial number located on your microwave oven at www.whirlpool.ca. I Read all safety messages. WARNING You can be killed or... seriously injured if you and others are very important. All safety messages will follow instructions. User Guide Microwave Hood Combination THANK YOU for example...
... with the provided Installation Instructions. See "GROUNDING INSTRUCTIONS" found in the microwave oven. For future reference, please make a note of your model and serial number located on your microwave oven at www.whirlpool.ca. I Read all safety messages. WARNING You can be killed or... seriously injured if you and others are very important. All safety messages will follow instructions. User Guide Microwave Hood Combination THANK YOU for example...
Owners Manual
Page 2
... known to the State of fire in water. WARNING: This product contains one or more chemicals known to the State of the microwave oven when the microwave oven is damaged. I Use care when cleaning the vent-hood filter. I See door surface cleaning instructions in a wet basement,...is no damage to accumulate on . I Suitable for storage purposes. Remove wire twist-ties from paper or plastic bags before placing bags in the microwave oven for examination, repair, or adjustment. Grease should not be allowed to the: (1) Door (bent), (2) Hinges and latches (broken or loosened...
... known to the State of fire in water. WARNING: This product contains one or more chemicals known to the State of the microwave oven when the microwave oven is damaged. I Use care when cleaning the vent-hood filter. I See door surface cleaning instructions in a wet basement,...is no damage to accumulate on . I Suitable for storage purposes. Remove wire twist-ties from paper or plastic bags before placing bags in the microwave oven for examination, repair, or adjustment. Grease should not be allowed to the: (1) Door (bent), (2) Hinges and latches (broken or loosened...

Owners Manual
Page 3
...THESE INSTRUCTIONS This device complies with a fuse or circuit breaker. Vent Fan High ("SPd2"), low ("SPd1"), and off at any time using the microwave oven. Touch and hold number keypad "1" for about 3 seconds until a tone sounds and the vent fan turns on. Tones Programming tones and ... until a confirmation tone sounds. Touch and hold the Cancel control for only 30 minutes more (off or all cord connected appliances: The microwave oven must be grounded. Repeat to Standby Power mode and dim the LED brightness after 30 minutes). WARNING: Improper use an extension cord....
...THESE INSTRUCTIONS This device complies with a fuse or circuit breaker. Vent Fan High ("SPd2"), low ("SPd1"), and off at any time using the microwave oven. Touch and hold number keypad "1" for about 3 seconds until a tone sounds and the vent fan turns on. Tones Programming tones and ... until a confirmation tone sounds. Touch and hold the Cancel control for only 30 minutes more (off or all cord connected appliances: The microwave oven must be grounded. Repeat to Standby Power mode and dim the LED brightness after 30 minutes). WARNING: Improper use an extension cord....

Owners Manual
Page 4
... Turntable: mild soap and water or dishwasher Installing/Replacing Filters and Light Bulbs ■■ Grease filters: Grease filters are OFF and the microwave oven is replaceable. Touch SOFTEN/MELT, enter number code of potatoes: 1, 2, 3, or 4, about 10 to 13 oz (283 to ...Guide label on the vent grille, slide the vent grille to the front. Preset Defrosting Pizza (reheat) Unwrap food. Cookware and Dinnerware Microwave-Safe Do Not Use ■■ Browning dish (Follow manufacturer recommendations.) ■■ Metal cookware and bakeware ■■ Ceramic ...
... Turntable: mild soap and water or dishwasher Installing/Replacing Filters and Light Bulbs ■■ Grease filters: Grease filters are OFF and the microwave oven is replaceable. Touch SOFTEN/MELT, enter number code of potatoes: 1, 2, 3, or 4, about 10 to 13 oz (283 to ...Guide label on the vent grille, slide the vent grille to the front. Preset Defrosting Pizza (reheat) Unwrap food. Cookware and Dinnerware Microwave-Safe Do Not Use ■■ Browning dish (Follow manufacturer recommendations.) ■■ Metal cookware and bakeware ■■ Ceramic ...
Owners Manual
Page 5
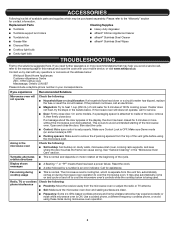
... being used. On some models) is OFF. ■■ Packing spacers: Make sure to cool the microwave oven's controls while the cooktop below : Whirlpool Brand Home Appliances Customer eXperience Centre 200 - 6750 Century Ave. Open and close the door, then start the... the door touches the frame can cause arcing. If you avoid a service call for assistance. It may experience static or noise while microwave oven is ON. ACCESSORIES Following is a list of the door, remove it, then firmly close door. rotation directions Display shows messages ...
... being used. On some models) is OFF. ■■ Packing spacers: Make sure to cool the microwave oven's controls while the cooktop below : Whirlpool Brand Home Appliances Customer eXperience Centre 200 - 6750 Century Ave. Open and close the door, then start the... the door touches the frame can cause arcing. If you avoid a service call for assistance. It may experience static or noise while microwave oven is ON. ACCESSORIES Following is a list of the door, remove it, then firmly close door. rotation directions Display shows messages ...
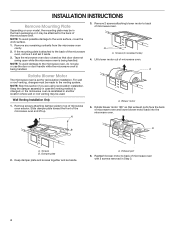
Installation Instructions
Page 1
...8 Prepare Upper Cabinet 8 Install Damper Assembly 9 Install the Microwave Oven 9 Complete Installation 10 VENTING DESIGN SPECIFICATIONS 11 ASSISTANCE 12 Replacement Parts 12 Accessories 12 MICROWAVE HOOD COMBINATION SAFETY Your safety and the safety of your appliance.... Table of Contents MICROWAVE HOOD COMBINATION SAFETY 1 INSTALLATION REQUIREMENTS 2 Tools and Parts 2 Remove Cardboard ...
...8 Prepare Upper Cabinet 8 Install Damper Assembly 9 Install the Microwave Oven 9 Complete Installation 10 VENTING DESIGN SPECIFICATIONS 11 ASSISTANCE 12 Replacement Parts 12 Accessories 12 MICROWAVE HOOD COMBINATION SAFETY Your safety and the safety of your appliance.... Table of Contents MICROWAVE HOOD COMBINATION SAFETY 1 INSTALLATION REQUIREMENTS 2 Tools and Parts 2 Remove Cardboard ...
Installation Instructions
Page 2
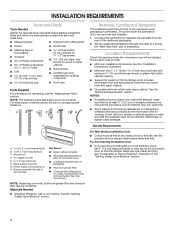
... (50.8 x 101.6 mm) wood wall stud and minimum C\," (10 mm) thickness drywall or plaster/lath within cabinet opening where the microwave oven will not discolor, delaminate, or sustain other types of installation. INSTALLATION REQUIREMENTS Tools and Parts Tools Needed Gather the required tools and parts..."Replacement Parts" section. Power supply cord bushing (1) H. See the "Electrical Requirements" section. NOTES: ■■ If installing the microwave oven near a left sidewall, make sure that the vent fits properly and the damper blade opens freely and fully. The location must be...
... (50.8 x 101.6 mm) wood wall stud and minimum C\," (10 mm) thickness drywall or plaster/lath within cabinet opening where the microwave oven will not discolor, delaminate, or sustain other types of installation. INSTALLATION REQUIREMENTS Tools and Parts Tools Needed Gather the required tools and parts..."Replacement Parts" section. Power supply cord bushing (1) H. See the "Electrical Requirements" section. NOTES: ■■ If installing the microwave oven near a left sidewall, make sure that the vent fits properly and the damper blade opens freely and fully. The location must be...
Installation Instructions
Page 3
... a grounding plug. GROUNDING INSTRUCTIONS I For all governing codes and ordinances. Do not use an adapter. SAVE THESE INSTRUCTIONS 3 The microwave oven is equipped with a cord having a grounding wire with a fuse or circuit breaker Recommended: ■■ A time-delay... fuse or time-delay circuit breaker ■■ A separate circuit serving only this microwave oven A. 2" x 4" wall stud B. Grounded 3 prong outlet *30" (76.2 cm) is properly installed and grounded. Installation Dimensions NOTE: The...
... a grounding plug. GROUNDING INSTRUCTIONS I For all governing codes and ordinances. Do not use an adapter. SAVE THESE INSTRUCTIONS 3 The microwave oven is equipped with a cord having a grounding wire with a fuse or circuit breaker Recommended: ■■ A time-delay... fuse or time-delay circuit breaker ■■ A separate circuit serving only this microwave oven A. 2" x 4" wall stud B. Grounded 3 prong outlet *30" (76.2 cm) is properly installed and grounded. Installation Dimensions NOTE: The...
Installation Instructions
Page 4
...is reinstalled in recessed holes) 4. Remove 2 screws attaching blower motor to top of the microwave oven and lift up. Lift blower motor out of microwave oven. Damper plate 2. Remove any remaining contents from the microwave oven cavity. 2. NOTE: Skip this section if you are using recirculation installation. Remove ... Depending on your model, the mounting plate may be in Step 3. 4 If the mounting plate is attached to the back of the microwave oven. Screws (in another location where wall or roof venting may be used. Rotate blower motor 180° so that door does not...
...is reinstalled in recessed holes) 4. Remove 2 screws attaching blower motor to top of the microwave oven and lift up. Lift blower motor out of microwave oven. Damper plate 2. Remove any remaining contents from the microwave oven cavity. 2. NOTE: Skip this section if you are using recirculation installation. Remove ... Depending on your model, the mounting plate may be in Step 3. 4 If the mounting plate is attached to the back of the microwave oven. Screws (in another location where wall or roof venting may be used. Rotate blower motor 180° so that door does not...
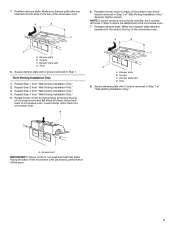
Installation Instructions
Page 5
... the slots in Step 1. Repeat Step 2 from "Wall Venting Installation Only." 2. Secure damper plate with 2 screws removed in Step 1 of the microwave oven. A. Screws C. Lower blower motor back into the slots in Step 3 cannot be poor. 5 Damper plate B. Roof Venting Installation Only 1. ...back of "Wall Venting Installation Only." Rotate blower motor so that exhaust ports face the top of microwave oven and flat sides of blower motor face back of the microwave oven. Damper plate B. Repeat Step 4 from "Wall Venting Installation Only." 4. Exhaust port IMPORTANT...
... the slots in Step 1. Repeat Step 2 from "Wall Venting Installation Only." 2. Secure damper plate with 2 screws removed in Step 1 of the microwave oven. A. Screws C. Lower blower motor back into the slots in Step 3 cannot be poor. 5 Damper plate B. Roof Venting Installation Only 1. ...back of "Wall Venting Installation Only." Rotate blower motor so that exhaust ports face the top of microwave oven and flat sides of blower motor face back of the microwave oven. Damper plate B. Repeat Step 4 from "Wall Venting Installation Only." 4. Exhaust port IMPORTANT...
Installation Instructions
Page 6
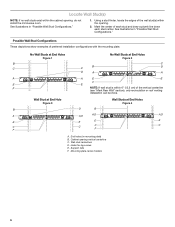
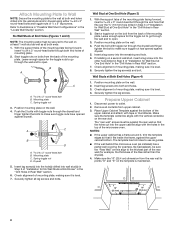
Cabinet opening , do not install the microwave oven. Wall Stud at End Hole Figure 3 Wall Studs at End Holes Figure 2 B C C C B D D A A A A E E F E E F NOTE: If wall stud is within 6" (15.2 cm) of the wall stud(s) ...
Cabinet opening , do not install the microwave oven. Wall Stud at End Hole Figure 3 Wall Studs at End Holes Figure 2 B C C C B D D A A A A E E F E E F NOTE: If wall stud is within 6" (15.2 cm) of the wall stud(s) ...
Installation Instructions
Page 7
... cutout area. 14. Mark the centerline C\," (1 cm) down 4" (10.2 cm) from the marks made in the shaded areas are properly marked. Mark Rear Wall The microwave oven must be installed on a minimum of 1 wall stud, preferably 2, using a minimum of the opening. Using measuring tape, find the wall stud centerline(s) drawn in...
... cutout area. 14. Mark the centerline C\," (1 cm) down 4" (10.2 cm) from the marks made in the shaded areas are properly marked. Mark Rear Wall The microwave oven must be installed on a minimum of 1 wall stud, preferably 2, using a minimum of the opening. Using measuring tape, find the wall stud centerline(s) drawn in...
Installation Instructions
Page 8
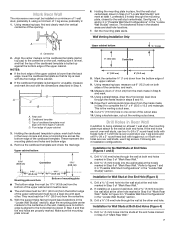
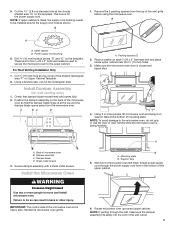
... 1. Place Upper Cabinet Template against the upper cabinet bottom. The template has trim lines to use as guides. ■■ If the wall behind the microwave oven (as at End Holes (Figures 1 and 2) NOTE: The mounting plate must be sure the "Rear Wall" arrows align to outlet. 2. A C B D A. .... 3. Insert a lag screw into both end holes drilled into the upper cabinet align with the vertical centerline on bolts from the back of the microwave oven. With the support tabs of the mounting plate facing forward, insert a C\zn-24 x 3" round-head bolt through the wall and to ...
... 1. Place Upper Cabinet Template against the upper cabinet bottom. The template has trim lines to use as guides. ■■ If the wall behind the microwave oven (as at End Holes (Figures 1 and 2) NOTE: The mounting plate must be sure the "Rear Wall" arrows align to outlet. 2. A C B D A. .... 3. Insert a lag screw into both end holes drilled into the upper cabinet align with the vertical centerline on bolts from the back of the microwave oven. With the support tabs of the mounting plate facing forward, insert a C\zn-24 x 3" round-head bolt through the wall and to ...
Installation Instructions
Page 9
...installed around the supply cord hole as shown. Mounting plate B. NOTE: If venting through the power supply cord hole in the bottom of microwave oven B. Handle the microwave oven gently. Back of the upper cabinet. 6. 5. Check that the damper blade hinge is being handled. This hole is closed and... taped shut. 4. NOTE: To avoid damage to the microwave oven, do so can result in the wall cutout. 9 With front of microwave oven still tilted, thread power supply cord through the wall, make sure the damper assembly fits easily into...
...installed around the supply cord hole as shown. Mounting plate B. NOTE: If venting through the power supply cord hole in the bottom of microwave oven B. Handle the microwave oven gently. Back of the upper cabinet. 6. 5. Check that the damper blade hinge is being handled. This hole is closed and... taped shut. 4. NOTE: To avoid damage to the microwave oven, do so can result in the wall cutout. 9 With front of microwave oven still tilted, thread power supply cord through the wall, make sure the damper assembly fits easily into...
Installation Instructions
Page 10
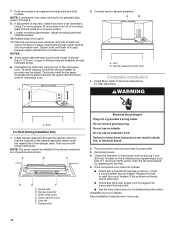
... Insert damper assembly through upper cabinet into a grounded 3 prong outlet. ■■ See the User Instructions for troubleshooting information. Long tab F. Plug microwave oven into a grounded 3 prong outlet. Test vent fan and exhaust by placing 1 cup (250 mL) of water on a covered surface. 9. ... bolts through the cabinet cutout so that the long tab of the damper assembly slides under vent) Complete Installation 1. With the microwave oven centered, and with sheet metal screw. Raised tabs B. Replace the fuse or reset the circuit breaker. WARNING A. Loosen mounting ...
... Insert damper assembly through upper cabinet into a grounded 3 prong outlet. ■■ See the User Instructions for troubleshooting information. Long tab F. Plug microwave oven into a grounded 3 prong outlet. Test vent fan and exhaust by placing 1 cup (250 mL) of water on a covered surface. 9. ... bolts through the cabinet cutout so that the long tab of the damper assembly slides under vent) Complete Installation 1. With the microwave oven centered, and with sheet metal screw. Raised tabs B. Replace the fuse or reset the circuit breaker. WARNING A. Loosen mounting ...

Installation Instructions
Page 11
...all joints in "Recommended Vent Length." Roof cap B. 6" (15.2 cm) min. Vent extension piece, at least 3" (7.6 cm) of clearance between the top of the microwave oven and the transition piece. Rectangular-to-round transition piece: 3¹⁄₄" x 10" to 6" = 5 ft (8.3 x 25.4 cm to -Round Transition" illustration...sure there are at least 3" (7.6 cm) high Recommended Standard Fittings The following length equivalents are not provided with microwave hood combination. ■■ We do not recommend using recirculation installation. Do not vent exhaust air into concealed ...
...all joints in "Recommended Vent Length." Roof cap B. 6" (15.2 cm) min. Vent extension piece, at least 3" (7.6 cm) of clearance between the top of the microwave oven and the transition piece. Rectangular-to-round transition piece: 3¹⁄₄" x 10" to 6" = 5 ft (8.3 x 25.4 cm to -Round Transition" illustration...sure there are at least 3" (7.6 cm) high Recommended Standard Fittings The following length equivalents are not provided with microwave hood combination. ■■ We do not recommend using recirculation installation. Do not vent exhaust air into concealed ...
Installation Instructions
Page 12
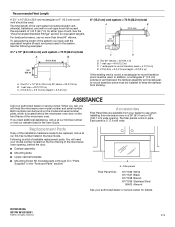
...transition piece must not exceed the equivalent of 140 ft (42.7 m) for either type of vent. If you will need the microwave oven model number and serial number. Accessories Filler Panel Kits are available from sticking. You will need your authorized dealer or service center... Filler Panel Kits: 8171336 White 8171337 Black 8171338 Biscuit 8171339 Stainless Steel 99403 Almond See your model number located on the front frame of the microwave oven opening . All rights reserved. 9/16 One 3¹⁄₄" x 10" (8.3 x 25.4 cm) 90° elbow = 25 ft (7.6 m) B. 1 wall cap = 40 ft ...
...transition piece must not exceed the equivalent of 140 ft (42.7 m) for either type of vent. If you will need the microwave oven model number and serial number. Accessories Filler Panel Kits are available from sticking. You will need your authorized dealer or service center... Filler Panel Kits: 8171336 White 8171337 Black 8171338 Biscuit 8171339 Stainless Steel 99403 Almond See your model number located on the front frame of the microwave oven opening . All rights reserved. 9/16 One 3¹⁄₄" x 10" (8.3 x 25.4 cm) 90° elbow = 25 ft (7.6 m) B. 1 wall cap = 40 ft ...
Specification Sheet
Page 1
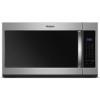
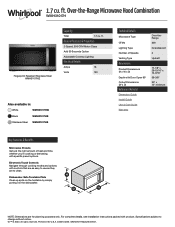
...30 Seconds Option Adjustable Cooktop Lighting Electrical Details Amps 16 Volts 120 Also available in: White WMH31017HW Black WMH31017HB Stainless Steel WMH31017HS Technical Details Microwave Type CFMs Lighting Type Number of Speeds Venting Type Dimensions Product Dimensions (H x W x D) Depth with Door Open 90... 300 Incandescent 2 Updraft 17-1/8" x 29-15/16" x 15-9/16" 39-3/8" 30" x 12" minimum Key Features & Benefits Microwave Presets Get just the right amount of heat and time, whether you're cooking or defrosting, with product. D200104XXE. Specifications subject to ...
...30 Seconds Option Adjustable Cooktop Lighting Electrical Details Amps 16 Volts 120 Also available in: White WMH31017HW Black WMH31017HB Stainless Steel WMH31017HS Technical Details Microwave Type CFMs Lighting Type Number of Speeds Venting Type Dimensions Product Dimensions (H x W x D) Depth with Door Open 90... 300 Incandescent 2 Updraft 17-1/8" x 29-15/16" x 15-9/16" 39-3/8" 30" x 12" minimum Key Features & Benefits Microwave Presets Get just the right amount of heat and time, whether you're cooking or defrosting, with product. D200104XXE. Specifications subject to ...


