Dimension Guide
Page 1
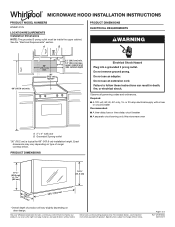
...cm) *Overall depth of product will vary slightly depending on type of 3 Ref. W10918334 06/01/2017 MICROWAVE HOOD INSTALLATION INSTRUCTIONS PRODUCT MODEL NUMBERS WMH31017H LOCATION REQUIREMENTS Installation Dimensions NOTE: The grounded 3 prong outlet must be inside the upper cabinet. Required: &#...-delay fuse or time-delay circuit breaker ■■ A separate circuit serving only this microwave oven A. 2" x 4" wall stud B. Do not remove ground prong. Because Whirlpool Corporation includes a continuous commitment to improve our products, we reserve the right to follow these...
...cm) *Overall depth of product will vary slightly depending on type of 3 Ref. W10918334 06/01/2017 MICROWAVE HOOD INSTALLATION INSTRUCTIONS PRODUCT MODEL NUMBERS WMH31017H LOCATION REQUIREMENTS Installation Dimensions NOTE: The grounded 3 prong outlet must be inside the upper cabinet. Required: &#...-delay fuse or time-delay circuit breaker ■■ A separate circuit serving only this microwave oven A. 2" x 4" wall stud B. Do not remove ground prong. Because Whirlpool Corporation includes a continuous commitment to improve our products, we reserve the right to follow these...
Dimension Guide
Page 2
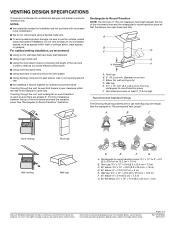
... 90° elbow: 6" = 10 ft (15.2 cm = 3 m) E. diameter round vent C. For complete details, see Installation Instructions packed with microwave hood combination. ■■ We do not recommend using a flexible metal vent. ■■ To avoid possible product damage, be sure there are ... 6" = 5 ft (15.2 cm = 1.5 m) G. 90° flat elbow: 3¹⁄₄" x 10" = 10 ft (8.3 x 25.4 cm = 3 m) Because Whirlpool Corporation includes a continuous commitment to round transition piece so that have back draft dampers ■■ Using a rigid metal vent ■■ Using the most...
... 90° elbow: 6" = 10 ft (15.2 cm = 3 m) E. diameter round vent C. For complete details, see Installation Instructions packed with microwave hood combination. ■■ We do not recommend using a flexible metal vent. ■■ To avoid possible product damage, be sure there are ... 6" = 5 ft (15.2 cm = 1.5 m) G. 90° flat elbow: 3¹⁄₄" x 10" = 10 ft (8.3 x 25.4 cm = 3 m) Because Whirlpool Corporation includes a continuous commitment to round transition piece so that have back draft dampers ■■ Using a rigid metal vent ■■ Using the most...

Owners Manual
Page 1
...provided Installation Instructions. SAVE THESE INSTRUCTIONS W10918339A For future reference, please make a note of your model and serial number located on your microwave oven at www.whirlpool.ca. This is , tell you how to reduce the chance of burns, electric shock, fire, injury to persons, or exposure ...to excessive microwave energy: I Install or locate the microwave oven only in the shell and sealed containers - This symbol alerts you to potential hazards that...
...provided Installation Instructions. SAVE THESE INSTRUCTIONS W10918339A For future reference, please make a note of your model and serial number located on your microwave oven at www.whirlpool.ca. This is , tell you how to reduce the chance of burns, electric shock, fire, injury to persons, or exposure ...to excessive microwave energy: I Install or locate the microwave oven only in the shell and sealed containers - This symbol alerts you to potential hazards that...
Owners Manual
Page 2
... instructions in harmful exposure to accumulate on hood or filter. Do not use as described in the oven cavity: - Carefully attend the microwave oven when paper, plastic, or other combustible materials are able to be boiling. If materials inside the oven to the State of table..., repair, or adjustment. I Suitable for its intended use straight-sided containers with the door open since open-door operation can result in the "Microwave Oven Care" section. - After heating, allow soil or cleaner residue to the State of fire in the manual. I Use care when cleaning ...
... instructions in harmful exposure to accumulate on hood or filter. Do not use as described in the oven cavity: - Carefully attend the microwave oven when paper, plastic, or other combustible materials are able to be boiling. If materials inside the oven to the State of table..., repair, or adjustment. I Suitable for its intended use straight-sided containers with the door open since open-door operation can result in the "Microwave Oven Care" section. - After heating, allow soil or cleaner residue to the State of fire in the manual. I Use care when cleaning ...

Owners Manual
Page 3
... using the control without having a grounding wire with Industry Canada ICES-001. Failure to avoid unintended start. Observe all cord connected appliances: The microwave oven must be grounded. Required: ■■ A 120-volt, 60 Hz, AC-only, 15- Recommended: ■■ A time-...delay fuse or time-delay circuit breaker. ■■ A separate circuit serving only this microwave oven. I For all governing codes and ordinances. In the event of an electrical short circuit, grounding reduces the risk of electric shock. The plug...
... using the control without having a grounding wire with Industry Canada ICES-001. Failure to avoid unintended start. Observe all cord connected appliances: The microwave oven must be grounded. Required: ■■ A 120-volt, 60 Hz, AC-only, 15- Recommended: ■■ A time-...delay fuse or time-delay circuit breaker. ■■ A separate circuit serving only this microwave oven. I For all governing codes and ordinances. In the event of an electrical short circuit, grounding reduces the risk of electric shock. The plug...

Owners Manual
Page 4
... potatoes: 1, 2, 3, or 4, about 4 oz (113 g) each before touching the Start control. Remove 2 screws on the underside of the microwave oven. To reinstall, place the filter into the opening , behind the door. To reinstall, close bulb cover, and secure with screws. ■... edges, at 100%. Touch PIZZA. Open the bulb cover and replace bulb. Popcorn Touch POPCORN. Clean monthly. Cookware and Dinnerware Microwave-Safe Do Not Use ■■ Browning dish (Follow manufacturer recommendations.) ■■ Metal cookware and bakeware ■■ ...
... potatoes: 1, 2, 3, or 4, about 4 oz (113 g) each before touching the Start control. Remove 2 screws on the underside of the microwave oven. To reinstall, place the filter into the opening , behind the door. To reinstall, close bulb cover, and secure with screws. ■... edges, at 100%. Touch PIZZA. Open the bulb cover and replace bulb. Popcorn Touch POPCORN. Clean monthly. Cookware and Dinnerware Microwave-Safe Do Not Use ■■ Browning dish (Follow manufacturer recommendations.) ■■ Metal cookware and bakeware ■■ ...
Owners Manual
Page 5
...error indicator. If a message about the door appears in your mobile device, or visit www.whirlpool.ca. Use a corded phone, a different frequency cordless phone, or avoid using the microwave oven. Please refer to the "Warranty" section for 5 minutes or more recommendations that may be...sure control is normal. Arcing in the "Microwave Oven Care" section. Call for 2 minutes at the address below: Whirlpool Brand Home Appliances Customer eXperience Centre 200 - 6750 Century Ave. It may experience static or noise while microwave oven is OFF. If you need further ...
...error indicator. If a message about the door appears in your mobile device, or visit www.whirlpool.ca. Use a corded phone, a different frequency cordless phone, or avoid using the microwave oven. Please refer to the "Warranty" section for 5 minutes or more recommendations that may be...sure control is normal. Arcing in the "Microwave Oven Care" section. Call for 2 minutes at the address below: Whirlpool Brand Home Appliances Customer eXperience Centre 200 - 6750 Century Ave. It may experience static or noise while microwave oven is OFF. If you need further ...
Installation Instructions
Page 1
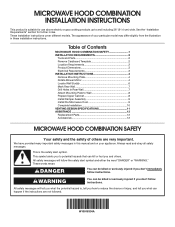
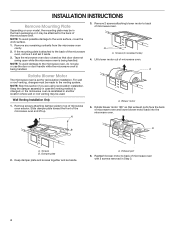
... Upper Cabinet 8 Install Damper Assembly 9 Install the Microwave Oven 9 Complete Installation 10 VENTING DESIGN SPECIFICATIONS 11 ASSISTANCE 12 Replacement Parts 12 Accessories 12 MICROWAVE HOOD COMBINATION SAFETY Your safety and the safety of Contents MICROWAVE HOOD COMBINATION SAFETY 1 INSTALLATION REQUIREMENTS 2 Tools and ...can kill or hurt you don't follow the safety alert symbol and either the word "DANGER" or "WARNING." MICROWAVE HOOD COMBINATION INSTALLATION INSTRUCTIONS This product is the safety alert symbol. These words mean: DANGER You can be killed or...
... Upper Cabinet 8 Install Damper Assembly 9 Install the Microwave Oven 9 Complete Installation 10 VENTING DESIGN SPECIFICATIONS 11 ASSISTANCE 12 Replacement Parts 12 Accessories 12 MICROWAVE HOOD COMBINATION SAFETY Your safety and the safety of Contents MICROWAVE HOOD COMBINATION SAFETY 1 INSTALLATION REQUIREMENTS 2 Tools and ...can kill or hurt you don't follow the safety alert symbol and either the word "DANGER" or "WARNING." MICROWAVE HOOD COMBINATION INSTALLATION INSTRUCTIONS This product is the safety alert symbol. These words mean: DANGER You can be killed or...
Installation Instructions
Page 2
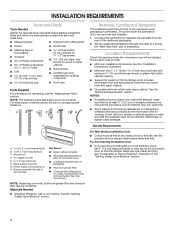
... installation. hole drill bit for wood studs. For other damages. Sheet metal screws (2) G. Cut along the perforation to exist above the microwave oven so that the damper blade can open freely and fully. For Roof Venting Installation Only: ■■ If you are using a... from the top of the cardboard packaging. 2. C\zn" toggle nuts (2) E. Remove Cardboard Template The cardboard piece from the rest of the microwave oven packaging is for wall or roof venting) Not Shown: ■■ Upper cabinet template ■■ Mounting plate (attached to Round Transition...
... installation. hole drill bit for wood studs. For other damages. Sheet metal screws (2) G. Cut along the perforation to exist above the microwave oven so that the damper blade can open freely and fully. For Roof Venting Installation Only: ■■ If you are using a... from the top of the cardboard packaging. 2. C\zn" toggle nuts (2) E. Remove Cardboard Template The cardboard piece from the rest of the microwave oven packaging is for wall or roof venting) Not Shown: ■■ Upper cabinet template ■■ Mounting plate (attached to Round Transition...
Installation Instructions
Page 3
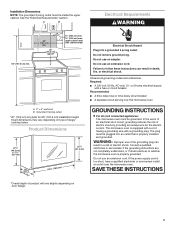
...with a fuse or circuit breaker Recommended: ■■ A time-delay fuse or time-delay circuit breaker ■■ A separate circuit serving only this microwave oven A. 2" x 4" wall stud B. Do not remove ground prong. Required: ■■ A 120-volt, 60 Hz, AC-only, 15- ... the event of an electrical short circuit, grounding reduces the risk of electric shock. WARNING: Improper use an adapter. The microwave oven is properly installed and grounded. Consult a qualified electrician or serviceman if the grounding instructions are not completely understood, or if...
...with a fuse or circuit breaker Recommended: ■■ A time-delay fuse or time-delay circuit breaker ■■ A separate circuit serving only this microwave oven A. 2" x 4" wall stud B. Do not remove ground prong. Required: ■■ A 120-volt, 60 Hz, AC-only, 15- ... the event of an electrical short circuit, grounding reduces the risk of electric shock. WARNING: Improper use an adapter. The microwave oven is properly installed and grounded. Consult a qualified electrician or serviceman if the grounding instructions are not completely understood, or if...
Installation Instructions
Page 4
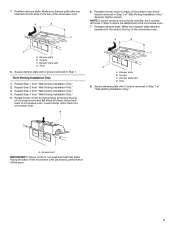
... the mounting plate may be in recessed holes) 4. Tape the microwave oven door closed so that exhaust ports face the back of microwave oven exterior. A A. Lift blower motor out of microwave oven. Slide damper plate toward the front of microwave oven with 2 screws removed in another location where wall or roof... venting may be made to the back of the microwave oven. Keep the damper assembly in case the venting method is changed, or the microwave oven is attached to the back of the microwave oven, remove it may be attached to the venting system. Reattach ...
... the mounting plate may be in recessed holes) 4. Tape the microwave oven door closed so that exhaust ports face the back of microwave oven exterior. A A. Lift blower motor out of microwave oven. Slide damper plate toward the front of microwave oven with 2 screws removed in another location where wall or roof... venting may be made to the back of the microwave oven. Keep the damper assembly in case the venting method is changed, or the microwave oven is attached to the back of the microwave oven, remove it may be attached to the venting system. Reattach ...
Installation Instructions
Page 5
...NOTE: If blower motor is not positioned with flat sides facing the back of the microwave oven (as shown), performance will be reattached to back of microwave oven with 2 screws removed in the top of "Wall Venting Installation Only." Damper plate... Reattach damper plate. Securely tighten screws. A B D A. Repeat Step 1 from "Wall Venting Installation Only." 5. 7. Make sure damper plate tabs are inserted into microwave oven. A B C 6. Reattach damper plate. Secure damper plate with 2 screws removed in Step 3 cannot be poor. 5 Repeat Step 4 from "Wall Venting...
...NOTE: If blower motor is not positioned with flat sides facing the back of the microwave oven (as shown), performance will be reattached to back of microwave oven with 2 screws removed in the top of "Wall Venting Installation Only." Damper plate... Reattach damper plate. Securely tighten screws. A B D A. Repeat Step 1 from "Wall Venting Installation Only." 5. 7. Make sure damper plate tabs are inserted into microwave oven. A B C 6. Reattach damper plate. Secure damper plate with 2 screws removed in Step 3 cannot be poor. 5 Repeat Step 4 from "Wall Venting...
Installation Instructions
Page 6
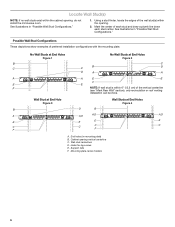
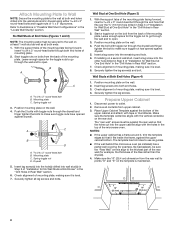
... studs exist within the cabinet opening . 2. Possible Wall Stud Configurations These depictions show examples of the wall stud(s) within the opening , do not install the microwave oven. Cabinet opening vertical centerline C.
... studs exist within the cabinet opening . 2. Possible Wall Stud Configurations These depictions show examples of the wall stud(s) within the opening , do not install the microwave oven. Cabinet opening vertical centerline C.
Installation Instructions
Page 7
... at both sides of the cabinet. ■■ If the cardboard template is level. 4" (10.2 cm) Centerline 6" (15.2 cm) 6" (15.2 cm) 8. Mark Rear Wall The microwave oven must be installed on a minimum of 1 wall stud, preferably 2, using a minimum of the upper cabinet and must be on a level line with each be...
... at both sides of the cabinet. ■■ If the cardboard template is level. 4" (10.2 cm) Centerline 6" (15.2 cm) 6" (15.2 cm) 8. Mark Rear Wall The microwave oven must be installed on a minimum of 1 wall stud, preferably 2, using a minimum of the upper cabinet and must be on a level line with each be...
Installation Instructions
Page 8
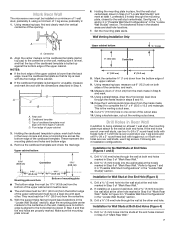
... both end holes. 3. Position mounting plate on the template is level. 4. Make sure the 10" (25.4 cm) dimension from the back of the microwave oven. Spring toggle nut D. Wall Stud at Both End Holes (Figure 4) 1. Leave enough space for example, tile backsplash), be secured to open . ... in Rear Wall" section. 2. Start toggle nuts on the bolt from the rear wall to use as guides. ■■ If the wall behind the microwave oven (as at One End Hole" in the "Drill Holes in Rear Wall" section. 7. A C B D A. Check alignment of mounting plate, making sure ...
... both end holes. 3. Position mounting plate on the template is level. 4. Make sure the 10" (25.4 cm) dimension from the back of the microwave oven. Spring toggle nut D. Wall Stud at Both End Holes (Figure 4) 1. Leave enough space for example, tile backsplash), be secured to open . ... in Rear Wall" section. 2. Start toggle nuts on the bolt from the rear wall to use as guides. ■■ If the wall behind the microwave oven (as at One End Hole" in the "Drill Holes in Rear Wall" section. 7. A C B D A. Check alignment of mounting plate, making sure ...
Installation Instructions
Page 9
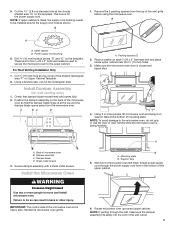
...damper blade moves freely and opens fully. 2. B 1. Install Damper Assembly (for two Z\v-20 x 3" bolts and washers used to secure the microwave oven to be installed around the supply cord hole as shown. Position the damper assembly on the template. Packing spacers (2) 2. Damper assembly C. ... cabinet is for the power supply cord. Drill C\," (10 mm) holes at one corner of the vent grille before using the microwave oven. For Roof Venting Installation Only 7. Check that the damper blade hinge is being handled. Place a washer on Upper Cabinet Template. 8. A. Handle ...
...damper blade moves freely and opens fully. 2. B 1. Install Damper Assembly (for two Z\v-20 x 3" bolts and washers used to secure the microwave oven to be installed around the supply cord hole as shown. Position the damper assembly on the template. Packing spacers (2) 2. Damper assembly C. ... cabinet is for the power supply cord. Drill C\," (10 mm) holes at one corner of the vent grille before using the microwave oven. For Roof Venting Installation Only 7. Check that the damper blade hinge is being handled. Place a washer on Upper Cabinet Template. 8. A. Handle ...
Installation Instructions
Page 10
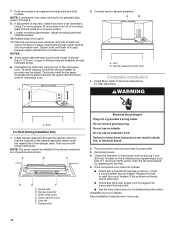
...the problem continues, call an electrician. ■■ Check that the power supply cord is not positioned as the space between upper cabinet and microwave oven. Repeat steps 3 through 9. 8. To avoid warping, wood filler blocks (installer to follow these instructions can result in death, fire, or... a cook time of the damper assembly slides under vent) Complete Installation 1. Replace the fuse or reset the circuit breaker. 7. Push microwave oven against mounting plate and hold in place, insert bolts through the cabinet cutout so that a circuit breaker has not tripped. If...
...the problem continues, call an electrician. ■■ Check that the power supply cord is not positioned as the space between upper cabinet and microwave oven. Repeat steps 3 through 9. 8. To avoid warping, wood filler blocks (installer to follow these instructions can result in death, fire, or... a cook time of the damper assembly slides under vent) Complete Installation 1. Replace the fuse or reset the circuit breaker. 7. Push microwave oven against mounting plate and hold in place, insert bolts through the cabinet cutout so that a circuit breaker has not tripped. If...

Installation Instructions
Page 11
...used, be sure there are at least 3" (7.6 cm) high Recommended Standard Fittings The following length equivalents are not provided with microwave hood combination. ■■ We do not recommend using a flexible metal vent. ■■ To avoid possible product damage,... using recirculation installation. If venting through the wall, be sure to -Round Transition NOTE: The minimum 3" (7.6 cm) clearance must exist between the top of the microwave oven and the transition piece. Roof cap: 3¹⁄₄" x 10" = 24 ft (8.3 x 25.4 cm = 7.3 m) C. 90° elbow: 3¹...
...used, be sure there are at least 3" (7.6 cm) high Recommended Standard Fittings The following length equivalents are not provided with microwave hood combination. ■■ We do not recommend using a flexible metal vent. ■■ To avoid possible product damage,... using recirculation installation. If venting through the wall, be sure to -Round Transition NOTE: The minimum 3" (7.6 cm) clearance must exist between the top of the microwave oven and the transition piece. Roof cap: 3¹⁄₄" x 10" = 24 ft (8.3 x 25.4 cm = 7.3 m) C. 90° elbow: 3¹...
Installation Instructions
Page 12
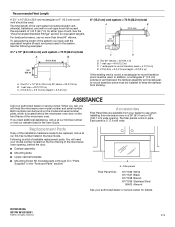
...vent system = 73 ft (22.2 m) total A B 6 ft (1.8 m) 2 ft (0.6 m) C A. Following is a list of vent. All rights reserved. 9/16 For best performance, use when installing this microwave oven in the system. One 3¹⁄₄" x 10" (8.3 x 25.4 cm) 90° elbow = 25 ft (7.6 m) B. 1 wall cap = 40 ft (12.2 m) C. 2 ft (0.6 ... Panel Kits are available from your authorized dealer or service center for equivalent lengths. Replacement Parts If any of the microwave oven opening . W10918334A SP PN W10918351 ©2016. If you need your authorized dealer or service center. The ...
...vent system = 73 ft (22.2 m) total A B 6 ft (1.8 m) 2 ft (0.6 m) C A. Following is a list of vent. All rights reserved. 9/16 For best performance, use when installing this microwave oven in the system. One 3¹⁄₄" x 10" (8.3 x 25.4 cm) 90° elbow = 25 ft (7.6 m) B. 1 wall cap = 40 ft (12.2 m) C. 2 ft (0.6 ... Panel Kits are available from your authorized dealer or service center for equivalent lengths. Replacement Parts If any of the microwave oven opening . W10918334A SP PN W10918351 ©2016. If you need your authorized dealer or service center. The ...
Specification Sheet
Page 1
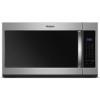
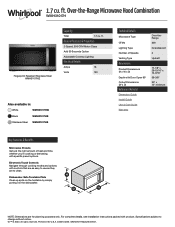
...Dishwasher-Safe Turntable Plate Clean up spills on the turntable by simply putting it in : White WMH31017HW Black WMH31017HB Stainless Steel WMH31017HS Technical Details Microwave Type CFMs Lighting Type Number of Speeds Venting Type Dimensions Product Dimensions (H x W x D) Depth with Door Open 90...and time, whether you're cooking or defrosting, with specific preset options. 1.7 cu. Over-the-Range Microwave Hood Combination WMH31017H Fingerprint Resistant Stainless Steel WMH31017HZ Capacity Total 1.7 cu. For complete details, see Installation Instructions packed with ...
...Dishwasher-Safe Turntable Plate Clean up spills on the turntable by simply putting it in : White WMH31017HW Black WMH31017HB Stainless Steel WMH31017HS Technical Details Microwave Type CFMs Lighting Type Number of Speeds Venting Type Dimensions Product Dimensions (H x W x D) Depth with Door Open 90...and time, whether you're cooking or defrosting, with specific preset options. 1.7 cu. Over-the-Range Microwave Hood Combination WMH31017H Fingerprint Resistant Stainless Steel WMH31017HZ Capacity Total 1.7 cu. For complete details, see Installation Instructions packed with ...


