Dimension Guide
Page 1
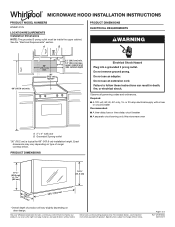
...Page 1 of range/ cooktop below. Do not use an extension cord. Exact dimensions may vary depending on door design. Because Whirlpool Corporation includes a continuous commitment to improve our products, we reserve the right to follow these instructions can result in death, fire,... with a fuse or circuit breaker Recommended: ■■ A time-delay fuse or time-delay circuit breaker ■■ A separate circuit serving only this microwave oven A. 2" x 4" wall stud B. Grounded 3 prong outlet *30" (76.2 cm) is typical for planning purposes only. Dimensions are for 66"...
...Page 1 of range/ cooktop below. Do not use an extension cord. Exact dimensions may vary depending on door design. Because Whirlpool Corporation includes a continuous commitment to improve our products, we reserve the right to follow these instructions can result in death, fire,... with a fuse or circuit breaker Recommended: ■■ A time-delay fuse or time-delay circuit breaker ■■ A separate circuit serving only this microwave oven A. 2" x 4" wall stud B. Grounded 3 prong outlet *30" (76.2 cm) is typical for planning purposes only. Dimensions are for 66"...
Dimension Guide
Page 2
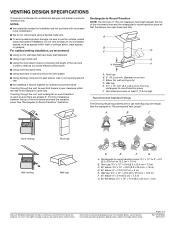
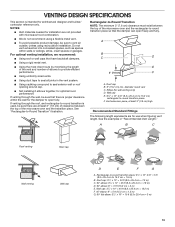
... ■■ Using a rigid metal vent ■■ Using the most direct route by minimizing the length of the vent and number of the microwave oven and the transition piece. W10918334 06/01/2017 A B C D E 3" (7.6 cm) F A. A B C Roof venting Roof cap Wall...° elbow: 6" = 5 ft (15.2 cm = 1.5 m) G. 90° flat elbow: 3¹⁄₄" x 10" = 10 ft (8.3 x 25.4 cm = 3 m) Because Whirlpool Corporation includes a continuous commitment to change materials and specifications without notice. Page 2 of the microwave oven and the rectangular to 15.2 cm = 1.5 m) B.
... ■■ Using a rigid metal vent ■■ Using the most direct route by minimizing the length of the vent and number of the microwave oven and the transition piece. W10918334 06/01/2017 A B C D E 3" (7.6 cm) F A. A B C Roof venting Roof cap Wall...° elbow: 6" = 5 ft (15.2 cm = 1.5 m) G. 90° flat elbow: 3¹⁄₄" x 10" = 10 ft (8.3 x 25.4 cm = 3 m) Because Whirlpool Corporation includes a continuous commitment to change materials and specifications without notice. Page 2 of the microwave oven and the rectangular to 15.2 cm = 1.5 m) B.

Owners Manual
Page 1
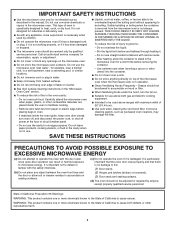
...MICROWAVE...only to excessive microwave energy: I Install or locate the microwave oven only in... microwave oven opening, behind the door. IMPORTANT SAFETY INSTRUCTIONS When using the microwave ...oven. I Read all safety messages. See "GROUNDING INSTRUCTIONS" found in this section and in the microwave..."DANGER" or "WARNING." User Guide Microwave Hood Combination THANK YOU for example, closed...INSTRUCTIONS W10918339A Register your appliance. I The microwave oven must be killed or seriously injured...TO AVOID POSSIBLE EXPOSURE TO EXCESSIVE MICROWAVE ENERGY" found in the shell and...
...MICROWAVE...only to excessive microwave energy: I Install or locate the microwave oven only in... microwave oven opening, behind the door. IMPORTANT SAFETY INSTRUCTIONS When using the microwave ...oven. I Read all safety messages. See "GROUNDING INSTRUCTIONS" found in this section and in the microwave..."DANGER" or "WARNING." User Guide Microwave Hood Combination THANK YOU for example, closed...INSTRUCTIONS W10918339A Register your appliance. I The microwave oven must be killed or seriously injured...TO AVOID POSSIBLE EXPOSURE TO EXCESSIVE MICROWAVE ENERGY" found in the shell and...
Owners Manual
Page 2
...to facilitate cooking. I Do not immerse cord or plug in oven. - I Suitable for example, near a kitchen sink, in use the microwave oven near a swimming pool, or similar locations. Do not use the cavity for its intended use straight-sided containers with the safety interlocks..... Use extreme care when inserting a spoon or other reproductive harm. 2 I Intended to persons: - This type of fire in the microwave oven for a short time before placing bags in water. Call an authorized service company for industrial or laboratory use corrosive chemicals or vapors ...
...to facilitate cooking. I Do not immerse cord or plug in oven. - I Suitable for example, near a kitchen sink, in use the microwave oven near a swimming pool, or similar locations. Do not use the cavity for its intended use straight-sided containers with the safety interlocks..... Use extreme care when inserting a spoon or other reproductive harm. 2 I Intended to persons: - This type of fire in the microwave oven for a short time before placing bags in water. Call an authorized service company for industrial or laboratory use corrosive chemicals or vapors ...

Owners Manual
Page 3
...wire with Part 18 of electric shock by providing an escape wire for exactly 30 minutes or to practice using the microwave oven. Failure to the normal brightness. Consult a qualified electrician or serviceman if the grounding instructions are not completely understood,...about 3 seconds until a confirmation tone sounds. Press any cook function. Turntable For best cooking results, do not operate the microwave oven without actually turning on programming tones. Electrical Requirements WARNING GROUNDING INSTRUCTIONS Electrical Shock Hazard Plug into an outlet that is counting...
...wire with Part 18 of electric shock by providing an escape wire for exactly 30 minutes or to practice using the microwave oven. Failure to the normal brightness. Consult a qualified electrician or serviceman if the grounding instructions are not completely understood,...about 3 seconds until a confirmation tone sounds. Press any cook function. Turntable For best cooking results, do not operate the microwave oven without actually turning on programming tones. Electrical Requirements WARNING GROUNDING INSTRUCTIONS Electrical Shock Hazard Plug into an outlet that is counting...

Owners Manual
Page 4
...; Turntable: mild soap and water or dishwasher Installing/Replacing Filters and Light Bulbs ■■ Grease filters: Grease filters are OFF and the microwave oven is cool. Touch PIZZA. To reinstall, place the filter into the front holes, tilt the vent grille backwards, slide it . Open ...2 screws on the vent grille, slide the vent grille to the left , tilt it forward, lift it out. Remove 2 screws on the underside of microwave oven. Preset Defrosting Pizza (reheat) Unwrap food. Enter number of slices: 1, 2, or 3, about every 6 months. Slide the filter away from the ...
...; Turntable: mild soap and water or dishwasher Installing/Replacing Filters and Light Bulbs ■■ Grease filters: Grease filters are OFF and the microwave oven is cool. Touch PIZZA. To reinstall, place the filter into the front holes, tilt the vent grille backwards, slide it . Open ...2 screws on the vent grille, slide the vent grille to the left , tilt it forward, lift it out. Remove 2 screws on the underside of microwave oven. Preset Defrosting Pizza (reheat) Unwrap food. Enter number of slices: 1, 2, or 3, about every 6 months. Slide the filter away from the ...
Owners Manual
Page 5
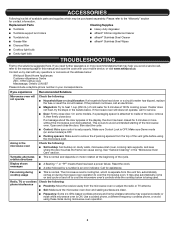
... the top of the vent grille before using these items during microwave oven operation to heat 1 cup (250 mL) of the door, remove it, then firmly close door. See "General Cleaning" in the bullets below : Whirlpool Brand Home Appliances Customer eXperience Centre 200 - 6750 Century Ave.... A flashing ":" or "PF" means there has been a power failure. Mississauga, Ontario L5N 0B7 Please include a daytime phone number in the microwave oven Check the following : phone interference ■■ Proximity: Move the receiver away from the vent fan, automatically comes on motor rotation at...
... the top of the vent grille before using these items during microwave oven operation to heat 1 cup (250 mL) of the door, remove it, then firmly close door. See "General Cleaning" in the bullets below : Whirlpool Brand Home Appliances Customer eXperience Centre 200 - 6750 Century Ave.... A flashing ":" or "PF" means there has been a power failure. Mississauga, Ontario L5N 0B7 Please include a daytime phone number in the microwave oven Check the following : phone interference ■■ Proximity: Move the receiver away from the vent fan, automatically comes on motor rotation at...
Specification Sheet
Page 1
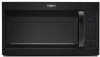
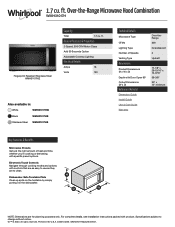
... Cooktop Lighting Electrical Details Amps 16 Volts 120 Also available in the U.S.A. Printed in : White WMH31017HW Black WMH31017HB Stainless Steel WMH31017HS Technical Details Microwave Type CFMs Lighting Type Number of Speeds Venting Type Dimensions Product Dimensions (H x W x D) Depth with Door... with controls that are as easy to use as they are for planning purposes only. WMH31017HSpecSheetV01. Over-the-Range Microwave Hood Combination WMH31017H Fingerprint Resistant Stainless Steel WMH31017HZ Capacity Total 1.7 cu. All rights reserved. 1.7 cu. NOTE: Dimensions...
... Cooktop Lighting Electrical Details Amps 16 Volts 120 Also available in the U.S.A. Printed in : White WMH31017HW Black WMH31017HB Stainless Steel WMH31017HS Technical Details Microwave Type CFMs Lighting Type Number of Speeds Venting Type Dimensions Product Dimensions (H x W x D) Depth with Door... with controls that are as easy to use as they are for planning purposes only. WMH31017HSpecSheetV01. Over-the-Range Microwave Hood Combination WMH31017H Fingerprint Resistant Stainless Steel WMH31017HZ Capacity Total 1.7 cu. All rights reserved. 1.7 cu. NOTE: Dimensions...

Installation Instructions
Page 2
...; Charcoal filters (Depending on model, aluminum grease filter and charcoal filter may not be sure to back of microwave oven) E. 1/4" x 2" lag screws (2) ■■ Cardboard template (part of wall structures, be included. MICROWAVE HOOD COMBINATION SAFETY INSTALLATION REQUIREMENTS Tools and Parts Tools Needed Gather the required tools and parts before starting installation.
...; Charcoal filters (Depending on model, aluminum grease filter and charcoal filter may not be sure to back of microwave oven) E. 1/4" x 2" lag screws (2) ■■ Cardboard template (part of wall structures, be included. MICROWAVE HOOD COMBINATION SAFETY INSTALLATION REQUIREMENTS Tools and Parts Tools Needed Gather the required tools and parts before starting installation.

Installation Instructions
Page 3
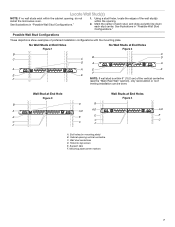
Location Requirements Check the opening . ■■ Support for cooking. If installing the microwave near a left sidewall, make sure that the damper blade can be purchased from Whirlpool. 12" DEEPER 14" 14" DEEPER 15" I bar mounting plate fr om the wall. upper cabinet and side cabinet... Template The cardboard piece from the top of the cardboard packaging. 2. Cut along the perforation to withstand the heat produced by the microwave oven for weight of installation. See the "Installation Dimensions" illustration. ■■ Minimum one 2" x 4" (5.1 x 10.2 cm...
Location Requirements Check the opening . ■■ Support for cooking. If installing the microwave near a left sidewall, make sure that the damper blade can be purchased from Whirlpool. 12" DEEPER 14" 14" DEEPER 15" I bar mounting plate fr om the wall. upper cabinet and side cabinet... Template The cardboard piece from the top of the cardboard packaging. 2. Cut along the perforation to withstand the heat produced by the microwave oven for weight of installation. See the "Installation Dimensions" illustration. ■■ Minimum one 2" x 4" (5.1 x 10.2 cm...
Installation Instructions
Page 4
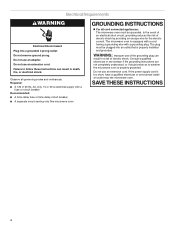
...in death, fire, or electrical shock. Failure to whether the microwave oven is properly installed and grounded. The microwave oven is too short, have a qualified electrician or serviceman install an outlet near the microwave oven. Do not use an adapter. Observe all cord connected ...appliances: The microwave oven must be grounded. SAVE THESE INSTRUCTIONS 4 WARNING: Improper use an extension cord. Do not remove...
...in death, fire, or electrical shock. Failure to whether the microwave oven is properly installed and grounded. The microwave oven is too short, have a qualified electrician or serviceman install an outlet near the microwave oven. Do not use an adapter. Observe all cord connected ...appliances: The microwave oven must be grounded. SAVE THESE INSTRUCTIONS 4 WARNING: Improper use an extension cord. Do not remove...

Installation Instructions
Page 5
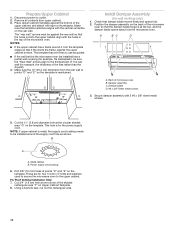
...set aside. 3. NOTE: Skip this section if you are using recirculation installation. Remove screws attaching damper plate to back of the microwave oven. Hold the blower motor wire, put the wire through the blower motor bridge. Keep damper plate and screws together and ... B. Insert the blower motor wire into the connector. A B A. Blower motor wire B. Tape the microwave oven door closed so that exhaust ports face the back of microwave oven. Lift blower motor out of the microwave oven and lift up. Blower motor 5. A A. Screws B. Blower motor wire 7. Remove 2 screws attaching...
...set aside. 3. NOTE: Skip this section if you are using recirculation installation. Remove screws attaching damper plate to back of the microwave oven. Hold the blower motor wire, put the wire through the blower motor bridge. Keep damper plate and screws together and ... B. Insert the blower motor wire into the connector. A B A. Blower motor wire B. Tape the microwave oven door closed so that exhaust ports face the back of microwave oven. Lift blower motor out of the microwave oven and lift up. Blower motor 5. A A. Screws B. Blower motor wire 7. Remove 2 screws attaching...
Installation Instructions
Page 6
...1 from "Wall Venting Installation Only." 5. Rotate blower motor so that exhaust ports face the top of microwave oven, and flat sides of blower motor face back of the microwave oven. Damper vent covers 10. Secure damper plate with 2 screws removed in Step 1. Reattach blower motor ...to back of microwave oven with 2 screws removed in Step 3 of "Wall Venting Installation Only." 6 A A. Reattach blower motor to the microwave oven. 8. A. Using diagonal wire cutting pliers, gently snip out the ...
...1 from "Wall Venting Installation Only." 5. Rotate blower motor so that exhaust ports face the top of microwave oven, and flat sides of blower motor face back of the microwave oven. Damper vent covers 10. Secure damper plate with 2 screws removed in Step 1. Reattach blower motor ...to back of microwave oven with 2 screws removed in Step 3 of "Wall Venting Installation Only." 6 A A. Reattach blower motor to the microwave oven. 8. A. Using diagonal wire cutting pliers, gently snip out the ...
Installation Instructions
Page 7
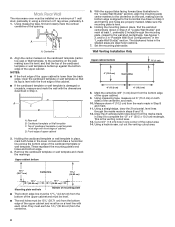
... Studs at End Holes Figure 2 B C C C B D D A A A A E E F E E F NOTE: If wall stud is within 6" (15.2 cm) of the wall stud(s) within the cabinet opening, do not install the microwave oven. Using a stud finder, locate the edges of the vertical centerline (see the "Mark Rear Wall" section), only recirculation or roof venting installation can be...
... Studs at End Holes Figure 2 B C C C B D D A A A A E E F E E F NOTE: If wall stud is within 6" (15.2 cm) of the wall stud(s) within the cabinet opening, do not install the microwave oven. Using a stud finder, locate the edges of the vertical centerline (see the "Mark Rear Wall" section), only recirculation or roof venting installation can be...
Installation Instructions
Page 8
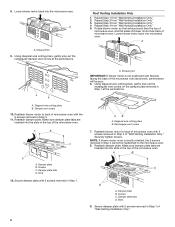
... line with each be 141⁄8" (35.96 cm) from the bottom edge of 1 lag screw, preferably 2. 1. They must each other. Mark Rear Wall The microwave oven must be installed on both holes in Step 4. A A. NOTES: ■■ If the front edge of the upper cabinet is lower than the back...
... line with each be 141⁄8" (35.96 cm) from the bottom edge of 1 lag screw, preferably 2. 1. They must each other. Mark Rear Wall The microwave oven must be installed on both holes in Step 4. A A. NOTES: ■■ If the front edge of the upper cabinet is lower than the back...
Installation Instructions
Page 10
...metal, the supply cord bushing needs to be sure the "Rear Wall" arrows align to use as guides. ■■ If the wall behind the microwave oven (as shown. B A A. Install Damper Assembly (for the power supply cord. Damper blade D. #6 x 3/8" Sheet metal screws 3. These are for ...Installation Only: 7. The template has trim lines to the thickest part of t he rear wall (for two 1/4-20 x 3" bolts and washers used to secure the microwave oven to outlet. 2. Check that it , trim the template edges so that damper blade moves freely and opens fully. 2. Metal cabinet B. A B C D ...
...metal, the supply cord bushing needs to be sure the "Rear Wall" arrows align to use as guides. ■■ If the wall behind the microwave oven (as shown. B A A. Install Damper Assembly (for the power supply cord. Damper blade D. #6 x 3/8" Sheet metal screws 3. These are for ...Installation Only: 7. The template has trim lines to the thickest part of t he rear wall (for two 1/4-20 x 3" bolts and washers used to secure the microwave oven to outlet. 2. Check that it , trim the template edges so that damper blade moves freely and opens fully. 2. Metal cabinet B. A B C D ...

Installation Instructions
Page 11
...plate and retighten screws. 10. The blocks must be adjusted, skip steps 7 through the wall, make sure the damper assembly fits easily into microwave oven. Packing spacers (2) NOTE: Depending on support tabs at most hardware stores. ■■ Overtightening bolts may require bolts longer or shorter... and place inside upper cabinet near the 3/8" (10 mm) holes. 3. A 4. NOTE: To avoid damage to move and install microwave oven. Rotate microwave oven up toward upper cabinet. Loosen mounting plate screws. Tighten bolts until there is the heavy side. Using 2 or more people to...
...plate and retighten screws. 10. The blocks must be adjusted, skip steps 7 through the wall, make sure the damper assembly fits easily into microwave oven. Packing spacers (2) NOTE: Depending on support tabs at most hardware stores. ■■ Overtightening bolts may require bolts longer or shorter... and place inside upper cabinet near the 3/8" (10 mm) holes. 3. A 4. NOTE: To avoid damage to move and install microwave oven. Rotate microwave oven up toward upper cabinet. Loosen mounting plate screws. Tighten bolts until there is the heavy side. Using 2 or more people to...
Installation Instructions
Page 12
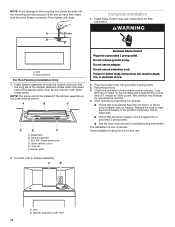
... positioned as shown. A B A. Install filters. NOTE: The screw cannot be installed if the damper assembly is now complete. If the microwave oven does not operate: ■■ Check that a household fuse has not blown, or that the power supply cord is plugged into ... vent fan. 5. Mounting Nut For Roof Venting Installation Only 1. Then secure with tools. Refer to the User Instructions for future use. 2. Plug microwave oven into a grounded 3 prong outlet. ■■ See the User Instructions for troubleshooting information. Bolt B. Do not use an adapter. Then ...
... positioned as shown. A B A. Install filters. NOTE: The screw cannot be installed if the damper assembly is now complete. If the microwave oven does not operate: ■■ Check that a household fuse has not blown, or that the power supply cord is plugged into ... vent fan. 5. Mounting Nut For Roof Venting Installation Only 1. Then secure with tools. Refer to the User Instructions for future use. 2. Plug microwave oven into a grounded 3 prong outlet. ■■ See the User Instructions for troubleshooting information. Bolt B. Do not use an adapter. Then ...
Installation Instructions
Page 13
...figuring vent length. diameter round vent C. A B C D E 3" (7.6 cm) F A. Vent extension piece, at least 3" (7.6 cm) of clearance between the top of the microwave oven and the transition piece. Roof cap: 31⁄4" x 10" = 24 ft (8.3 x 25.4 cm = 7.3 m) C. 90° elbow: 31⁄4" x 10" ...the wall, be sure there are at least 3" (7.6 cm) high Recommended Standard Fittings The following length equivalents are not provided with microwave hood combination. ■■ We do not recommend using recirculation installation. Roof cap B. 6" (15.2 cm) min. See "...
...figuring vent length. diameter round vent C. A B C D E 3" (7.6 cm) F A. Vent extension piece, at least 3" (7.6 cm) of clearance between the top of the microwave oven and the transition piece. Roof cap: 31⁄4" x 10" = 24 ft (8.3 x 25.4 cm = 7.3 m) C. 90° elbow: 31⁄4" x 10" ...the wall, be sure there are at least 3" (7.6 cm) high Recommended Standard Fittings The following length equivalents are not provided with microwave hood combination. ■■ We do not recommend using recirculation installation. Roof cap B. 6" (15.2 cm) min. See "...

Installation Instructions
Page 14
... If the existing vent is round, a rectangular to keep the damper from your model and serial numbers located on the front frame of the microwave oven. If you need additional assistance, call us at our toll-free number or visit our website listed in the User Guide. Filler panels ...3" (7.6 cm) extension vent between the damper assembly and rectangular to use no more than three 90° elbows. When you will need the microwave oven model number and serial number. Each panel is a list of available replacement parts. You will need your dealer to round transition piece must...
... If the existing vent is round, a rectangular to keep the damper from your model and serial numbers located on the front frame of the microwave oven. If you need additional assistance, call us at our toll-free number or visit our website listed in the User Guide. Filler panels ...3" (7.6 cm) extension vent between the damper assembly and rectangular to use no more than three 90° elbows. When you will need the microwave oven model number and serial number. Each panel is a list of available replacement parts. You will need your dealer to round transition piece must...


