Installation Guide
Page 1
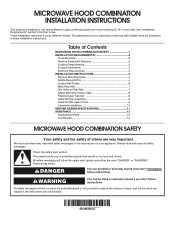
Table of your appliance. The appearance of Contents MICROWAVE HOOD COMBINATION SAFETY 1 INSTALLATION REQUIREMENTS 2 Tools and Parts 2 Remove Cardboard Template 2 Location Requirements 2 Product Dimensions 3 Electrical Requirements 3 INSTALLATION INSTRUCTIONS 4 Remove Mounting Plate 4 Rotate ... Cabinet 8 Install Damper Assembly 9 Install the Microwave Oven 9 Complete Installation 10 VENTING DESIGN SPECIFICATIONS 11 ASSISTANCE 12 Replacement Parts 12 Accessories 12 MICROWAVE HOOD COMBINATION SAFETY Your safety and the safety of injury, and tell you what can be killed...
Table of your appliance. The appearance of Contents MICROWAVE HOOD COMBINATION SAFETY 1 INSTALLATION REQUIREMENTS 2 Tools and Parts 2 Remove Cardboard Template 2 Location Requirements 2 Product Dimensions 3 Electrical Requirements 3 INSTALLATION INSTRUCTIONS 4 Remove Mounting Plate 4 Rotate ... Cabinet 8 Install Damper Assembly 9 Install the Microwave Oven 9 Complete Installation 10 VENTING DESIGN SPECIFICATIONS 11 ASSISTANCE 12 Replacement Parts 12 Accessories 12 MICROWAVE HOOD COMBINATION SAFETY Your safety and the safety of injury, and tell you what can be killed...
Installation Guide
Page 2
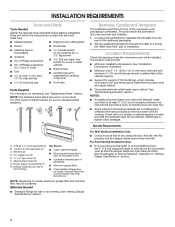
... fasteners. Check with any obstructions so that the materials used will be sure to back of microwave oven) ■■ Cardboard template (part of the cardboard packaging. 2. Location Requirements Check the opening . ■■ Support for weight of 150 lbs (68 kg), which ..., make sure that the vent fits properly, and the damper blade opens freely and fully. See "Rectangular to it during the "Mark Rear Wall" part of wall structures, be installed. Sheet metal screws (2) G. Z\v" x 2" lag screws (2) F. Set the cardboard template to the side and refer ...
... fasteners. Check with any obstructions so that the materials used will be sure to back of microwave oven) ■■ Cardboard template (part of the cardboard packaging. 2. Location Requirements Check the opening . ■■ Support for weight of 150 lbs (68 kg), which ..., make sure that the vent fits properly, and the damper blade opens freely and fully. See "Rectangular to it during the "Mark Rear Wall" part of wall structures, be installed. Sheet metal screws (2) G. Z\v" x 2" lag screws (2) F. Set the cardboard template to the side and refer ...
Installation Guide
Page 8
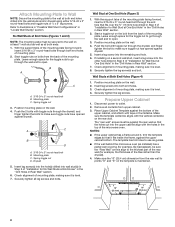
... from upper cabinet. 3. Wall Studs at One End Hole (Figure 3) 1. Insert lag screws into wall stud(s) in Rear Wall" section. 6. Disconnect power to the thickest part of the rear wall (for No Wall Studs at One End Hole" in the "Drill Holes in Step 3 of mounting plate, making sure it , trim...
... from upper cabinet. 3. Wall Studs at One End Hole (Figure 3) 1. Insert lag screws into wall stud(s) in Rear Wall" section. 6. Disconnect power to the thickest part of the rear wall (for No Wall Studs at One End Hole" in the "Drill Holes in Step 3 of mounting plate, making sure it , trim...
Installation Guide
Page 12
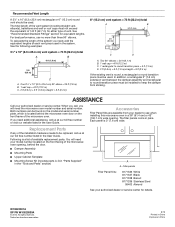
...73 ft (22.2 m) total A B 6 ft (1.8 m) 2 ft (0.6 m) C A. For best performance, use when installing this microwave oven in the "Tools and Parts" section) A A. Following is 3" (7.6 cm) wide. Both numbers can be found on the front frame of the microwave oven opening . All rights reserved. W10823831A SP ... ■■ Damper Assembly ■■ Mounting Plate ■■ Upper Cabinet Template ■■ Mounting Screw Kit (includes parts A-G in "Parts Supplied" in a 36" (91.4 cm) or 42" (106.7 cm) wide opening , behind the microwave oven door on the...
...73 ft (22.2 m) total A B 6 ft (1.8 m) 2 ft (0.6 m) C A. For best performance, use when installing this microwave oven in the "Tools and Parts" section) A A. Following is 3" (7.6 cm) wide. Both numbers can be found on the front frame of the microwave oven opening . All rights reserved. W10823831A SP ... ■■ Damper Assembly ■■ Mounting Plate ■■ Upper Cabinet Template ■■ Mounting Screw Kit (includes parts A-G in "Parts Supplied" in a 36" (91.4 cm) or 42" (106.7 cm) wide opening , behind the microwave oven door on the...
Use & Care Guide
Page 1
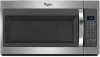
...TO AVOID POSSIBLE EXPOSURE TO EXCESSIVE MICROWAVE ENERGY" found in the shell and sealed containers - You will need assistance, call us at www.whirlpool.com for additional information. These words mean: DANGER You can happen if the instructions are not followed. I Read and follow the safety ...or hurt you don't immediately follow instructions. Puede encontrar su número de modelo y de serie en la etiqueta ubicada en la parte frontal de la abertura del horno de microondas, detrás de la puerta. Always read and obey all instructions before using electrical ...
...TO AVOID POSSIBLE EXPOSURE TO EXCESSIVE MICROWAVE ENERGY" found in the shell and sealed containers - You will need assistance, call us at www.whirlpool.com for additional information. These words mean: DANGER You can happen if the instructions are not followed. I Read and follow the safety ...or hurt you don't immediately follow instructions. Puede encontrar su número de modelo y de serie en la etiqueta ubicada en la parte frontal de la abertura del horno de microondas, detrás de la puerta. Always read and obey all instructions before using electrical ...
Use & Care Guide
Page 3
...: The microwave oven must be turned off , or all tones, touch and hold number pad "2" for the electric current. The microwave oven is equipped with Part 18 of electric shock by providing an escape wire for about 3 seconds until 2 tones sound and padlock icon appears in the display. Do not use...
...: The microwave oven must be turned off , or all tones, touch and hold number pad "2" for the electric current. The microwave oven is equipped with Part 18 of electric shock by providing an escape wire for about 3 seconds until 2 tones sound and padlock icon appears in the display. Do not use...
Use & Care Guide
Page 5
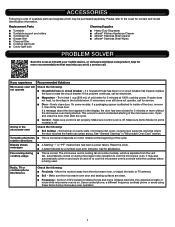
... Stainless Steel Cleaner ■■ affresh® Stainless Steel Wipes PROBLEM SOLVER Scan the code at left with your mobile device, or visit www.whirlpool.com/product_help for more without the microwave oven being used. If microwave oven still does not operate, call . Firmly close the door, then start...■■ Magnetron - Make sure the microwave oven door and sealing surfaces are clean. ■■ Frequency - Please refer to inside of available parts and supplies which is separate from the microwave oven, or adjust the radio or TV antenna. ■■ Soil -
... Stainless Steel Cleaner ■■ affresh® Stainless Steel Wipes PROBLEM SOLVER Scan the code at left with your mobile device, or visit www.whirlpool.com/product_help for more without the microwave oven being used. If microwave oven still does not operate, call . Firmly close the door, then start...■■ Magnetron - Make sure the microwave oven door and sealing surfaces are clean. ■■ Frequency - Please refer to inside of available parts and supplies which is separate from the microwave oven, or adjust the radio or TV antenna. ■■ Soil -

Use & Care Guide
Page 6
...to correct improper product maintenance or installation, installation not in remote locations where an authorized Whirlpool servicer is intended for Factory Specified Replacement Parts and repair labor to Whirlpool within 30 days. 10. Cosmetic damage including scratches, dents, chips, and other rights... IS REQUIRED TO OBTAIN WARRANTY SERVICE. Please take a few minutes to correct product damage or defects caused by Whirlpool. 8. Repairs to parts or systems to review the Troubleshooting or Problem Solver section of household electrical or plumbing (i.e. This warranty gives you...
...to correct improper product maintenance or installation, installation not in remote locations where an authorized Whirlpool servicer is intended for Factory Specified Replacement Parts and repair labor to Whirlpool within 30 days. 10. Cosmetic damage including scratches, dents, chips, and other rights... IS REQUIRED TO OBTAIN WARRANTY SERVICE. Please take a few minutes to correct product damage or defects caused by Whirlpool. 8. Repairs to parts or systems to review the Troubleshooting or Problem Solver section of household electrical or plumbing (i.e. This warranty gives you...
Warranty Information
Page 1
...arrange service, please determine whether your authorized Whirlpool dealer to : Whirlpool Customer eXperience Center www.whirlpool.com/product_help In the U.S.A., call 1-800-807-6777. Consumable parts (i.e. Service or parts for service in -home repair. 13. WHIRLPOOL SHALL NOT BE LIABLE FOR INCIDENTAL OR ...water inlet hoses). 4. Defects or damage caused by unauthorized service, alteration or modification of non-genuine Whirlpool parts or accessories. 6. Repairs to parts or systems to correct defects in accordance with electrical or plumbing codes or correction of God or use ...
...arrange service, please determine whether your authorized Whirlpool dealer to : Whirlpool Customer eXperience Center www.whirlpool.com/product_help In the U.S.A., call 1-800-807-6777. Consumable parts (i.e. Service or parts for service in -home repair. 13. WHIRLPOOL SHALL NOT BE LIABLE FOR INCIDENTAL OR ...water inlet hoses). 4. Defects or damage caused by unauthorized service, alteration or modification of non-genuine Whirlpool parts or accessories. 6. Repairs to parts or systems to correct defects in accordance with electrical or plumbing codes or correction of God or use ...


