

Owners Manual
Page 1
... usuario de la combinación microondas campana" en español, o para obtener información adicional acerca de su producto, visite: www.whirlpool.com Tenga listo su número de modelo completo. Puede encontrar su número de modelo y de serie en la etiqueta ubicada en la... messages in this section. ■ Some products such as whole eggs in the shell and sealed containers - IMPORTANT SAFETY INSTRUCTIONS When using the microwave oven. ■ Read and follow instructions. This symbol alerts you don't follow the safety alert symbol and either the word "DANGER" or ...
... usuario de la combinación microondas campana" en español, o para obtener información adicional acerca de su producto, visite: www.whirlpool.com Tenga listo su número de modelo completo. Puede encontrar su número de modelo y de serie en la etiqueta ubicada en la... messages in this section. ■ Some products such as whole eggs in the shell and sealed containers - IMPORTANT SAFETY INSTRUCTIONS When using the microwave oven. ■ Read and follow instructions. This symbol alerts you don't follow the safety alert symbol and either the word "DANGER" or ...

Owners Manual
Page 2
...9632; To reduce the risk of electric shock. ■ Suitable for use . ■ As with metal foil. Grease should not be inserted in the microwave oven as described in the oven cavity: - This will cause overheating of 36" (91.44 cm). ■ Clean Ventilating Hoods Frequently - It is ... narrow necks. - It is necessary when used above both before and halfway through heating it has been damaged or dropped. ■ The microwave oven should not be boiling. Visible bubbling or boiling when the container is not always present. Stir the liquid both gas and electric cooking...
...9632; To reduce the risk of electric shock. ■ Suitable for use . ■ As with metal foil. Grease should not be inserted in the microwave oven as described in the oven cavity: - This will cause overheating of 36" (91.44 cm). ■ Clean Ventilating Hoods Frequently - It is ... narrow necks. - It is necessary when used above both before and halfway through heating it has been damaged or dropped. ■ The microwave oven should not be boiling. Visible bubbling or boiling when the container is not always present. Stir the liquid both gas and electric cooking...

Owners Manual
Page 3
... if the grounding instructions are not completely understood, or if doubt exists as cooling fan during any cook function. Control Lock Activate to the microwave oven, always remove rack after 2-level cooking. Comes on some models) for only 30 minutes more (off . Touch the Options or Setup... on some models) The durable, nonstick coating resists soil buildup by side. Filter Reset Reset the filter status after 30 minutes). See "Microwave Oven Care" section. Touch the Options or Setup control to turn tones off at any time using the control without actually turning on some...
... if the grounding instructions are not completely understood, or if doubt exists as cooling fan during any cook function. Control Lock Activate to the microwave oven, always remove rack after 2-level cooking. Comes on some models) for only 30 minutes more (off . Touch the Options or Setup... on some models) The durable, nonstick coating resists soil buildup by side. Filter Reset Reset the filter status after 30 minutes). See "Microwave Oven Care" section. Touch the Options or Setup control to turn tones off at any time using the control without actually turning on some...

Owners Manual
Page 4
...control. Touch COOK, select food item, enter quantity if needed , then touch the Start control. Touch 1lb DEFROST. Dishwasher cleaning is cool. Microwave Oven Use Manual Cooking/Stage Cooking Doneness (on some models) Touch COOK TIME, touch number pads to enter time, touch COOK POWER (if ...9632; Twist ties ■ Foil liners, such as indicated below. ■ Nonstick cavity coating (on some models): To avoid damage to the microwave oven cavity, do not use metal or sharp utensils or scrapers, or any type of abrasive cleanser or scrubbers. ■ Grease filter: mild soap...
...control. Touch COOK, select food item, enter quantity if needed , then touch the Start control. Touch 1lb DEFROST. Dishwasher cleaning is cool. Microwave Oven Use Manual Cooking/Stage Cooking Doneness (on some models) Touch COOK TIME, touch number pads to enter time, touch COOK POWER (if ...9632; Twist ties ■ Foil liners, such as indicated below. ■ Nonstick cavity coating (on some models): To avoid damage to the microwave oven cavity, do not use metal or sharp utensils or scrapers, or any type of abrasive cleanser or scrubbers. ■ Grease filter: mild soap...

Owners Manual
Page 5
...; Cooking rack (for contact and model identification information. www.whirlpool.com Microwave oven will not operate Check the following : ■ Soil buildup Soil buildup on during microwave oven operation to avoid unintended starting of the microwave oven, and is off . This happens to cool the microwave oven. Make sure Control Lock is (are clean. ■...
...; Cooking rack (for contact and model identification information. www.whirlpool.com Microwave oven will not operate Check the following : ■ Soil buildup Soil buildup on during microwave oven operation to avoid unintended starting of the microwave oven, and is off . This happens to cool the microwave oven. Make sure Control Lock is (are clean. ■...

Owners Manual
Page 6
...at the number below. Consumable parts are excluded from defects in materials or workmanship and is reported to Whirlpool with the product, Whirlpool Corporation or Whirlpool Canada LP (hereafter "Whirlpool") will pay for product service if your major appliance is located in China Damage resulting from accident, ...easily determined. Any food loss due to use or when it was purchased. The cost of the microwave oven opening, behind the door. You can write to Whirlpool within 30 days from unauthorized modifications made to repair or replace appliance light bulbs, air filters or ...
...at the number below. Consumable parts are excluded from defects in materials or workmanship and is reported to Whirlpool with the product, Whirlpool Corporation or Whirlpool Canada LP (hereafter "Whirlpool") will pay for product service if your major appliance is located in China Damage resulting from accident, ...easily determined. Any food loss due to use or when it was purchased. The cost of the microwave oven opening, behind the door. You can write to Whirlpool within 30 days from unauthorized modifications made to repair or replace appliance light bulbs, air filters or ...

Installation Instructions
Page 1
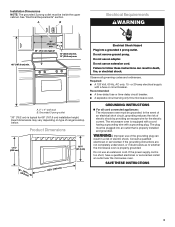
... Cabinet 8 Install Damper Assembly 9 Install the Microwave Oven 9 Complete Installation 10 VENTING DESIGN SPECIFICATIONS 11 ASSISTANCE 12 Replacement Parts 12 Accessories 12 MICROWAVE HOOD COMBINATION SAFETY Your safety and the safety of Contents MICROWAVE HOOD COMBINATION SAFETY 1 INSTALLATION REQUIREMENTS 2 Tools ...in Rear Wall 7 Attach Mounting Plate to potential hazards that can happen if the instructions are very important. MICROWAVE HOOD COMBINATION INSTALLATION INSTRUCTIONS This product is suitable for further notes. See "Installation Requirements" section for use ...
... Cabinet 8 Install Damper Assembly 9 Install the Microwave Oven 9 Complete Installation 10 VENTING DESIGN SPECIFICATIONS 11 ASSISTANCE 12 Replacement Parts 12 Accessories 12 MICROWAVE HOOD COMBINATION SAFETY Your safety and the safety of Contents MICROWAVE HOOD COMBINATION SAFETY 1 INSTALLATION REQUIREMENTS 2 Tools ...in Rear Wall 7 Attach Mounting Plate to potential hazards that can happen if the instructions are very important. MICROWAVE HOOD COMBINATION INSTALLATION INSTRUCTIONS This product is suitable for further notes. See "Installation Requirements" section for use ...

Installation Instructions
Page 2
... lag screws ■ Scissors ■ 1½" (3.8 cm) diam. The location must be sure to withstand the heat produced by the microwave oven for wall or roof venting. See "Electrical Requirements" section. See "Rectangular to separate the template from the top of clearance between the... wall and the microwave oven, so that the damper blade can open fully. ■ Some cabinet and building materials are using a rectangular to round...
... lag screws ■ Scissors ■ 1½" (3.8 cm) diam. The location must be sure to withstand the heat produced by the microwave oven for wall or roof venting. See "Electrical Requirements" section. See "Rectangular to separate the template from the top of clearance between the... wall and the microwave oven, so that the damper blade can open fully. ■ Some cabinet and building materials are using a rectangular to round...
Installation Instructions
Page 3
...extension cord. SAVE THESE INSTRUCTIONS 3 In the event of an electrical short circuit, grounding reduces the risk of electric shock. The microwave oven is typical for the electric current. Consult a qualified electrician or serviceman if the grounding instructions are not completely understood, or ...follow these instructions can result in death, fire, or electrical shock. Do not use an extension cord. Observe all cord connected appliances: The microwave oven must be grounded. Grounded 3 prong outlet *30" (76.2 cm) is equipped with a cord having a grounding wire with a fuse...
...extension cord. SAVE THESE INSTRUCTIONS 3 In the event of an electrical short circuit, grounding reduces the risk of electric shock. The microwave oven is typical for the electric current. Consult a qualified electrician or serviceman if the grounding instructions are not completely understood, or ...follow these instructions can result in death, fire, or electrical shock. Do not use an extension cord. Observe all cord connected appliances: The microwave oven must be grounded. Grounded 3 prong outlet *30" (76.2 cm) is equipped with a cord having a grounding wire with a fuse...

Installation Instructions
Page 4
NOTE: To avoid possible damage to the venting system. Keep damper plate and screws together and set it may be attached to top of the microwave oven. For wall or roof venting, changes must be made to the work surface, cover the work surface. 1. NOTE: Skip this section if... Depending on your model, the mounting plate may be in Step 3. 4 Remove screws attaching damper plate to the back of microwave oven exterior. Slide damper plate toward the front of microwave oven with 2 screws removed in the foam packaging, or it aside. 3. Reattach blower motor to back of the...
NOTE: To avoid possible damage to the venting system. Keep damper plate and screws together and set it may be attached to top of the microwave oven. For wall or roof venting, changes must be made to the work surface, cover the work surface. 1. NOTE: Skip this section if... Depending on your model, the mounting plate may be in Step 3. 4 Remove screws attaching damper plate to the back of microwave oven exterior. Slide damper plate toward the front of microwave oven with 2 screws removed in the foam packaging, or it aside. 3. Reattach blower motor to back of the...
Installation Instructions
Page 5
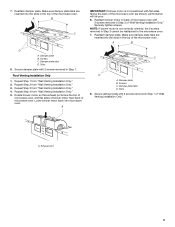
... Damper plate B. Slots 8. Exhaust port 5 Damper plate B. Repeat Step 1 from "Wall Venting Installation Only." 5. Make sure damper plate tabs are inserted into microwave oven. A B C D A. Damper plate tabs D. Repeat Step 4 from "Wall Venting Installation Only." 2. A IMPORTANT: If blower motor is not correctly oriented..., the 2 screws removed in the top of the microwave oven (as shown), performance will be reattached to back of microwave oven with 2 screws removed in Step 1 of microwave oven. Damper plate tabs D. A. Secure damper plate with 2 ...
... Damper plate B. Slots 8. Exhaust port 5 Damper plate B. Repeat Step 1 from "Wall Venting Installation Only." 5. Make sure damper plate tabs are inserted into microwave oven. A B C D A. Damper plate tabs D. Repeat Step 4 from "Wall Venting Installation Only." 2. A IMPORTANT: If blower motor is not correctly oriented..., the 2 screws removed in the top of the microwave oven (as shown), performance will be reattached to back of microwave oven with 2 screws removed in Step 1 of microwave oven. Damper plate tabs D. A. Secure damper plate with 2 ...
Installation Instructions
Page 6
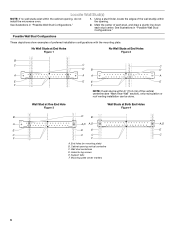
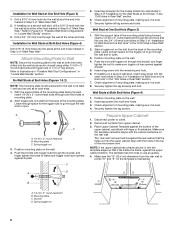
... Configurations." 2. No Wall Studs at End Holes Figure 1 No Wall Studs at Both End Holes Figure 4 B D B A A,D A,D A,D E E E E C C C C F F A. Wall stud centerlines D. Cabinet opening , do not install the microwave oven. 1. Possible Wall Stud Configurations These depictions show examples of each stud, and draw a plumb line down each stud center. Locate Wall Stud(s) NOTE: If...
... Configurations." 2. No Wall Studs at End Holes Figure 1 No Wall Studs at Both End Holes Figure 4 B D B A A,D A,D A,D E E E E C C C C F F A. Wall stud centerlines D. Cabinet opening , do not install the microwave oven. 1. Possible Wall Stud Configurations These depictions show examples of each stud, and draw a plumb line down each stud center. Locate Wall Stud(s) NOTE: If...
Installation Instructions
Page 7
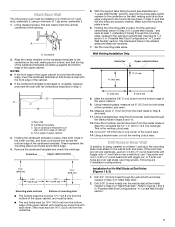
... the cardboard template. See figures 1, 2 and/or 3 in "Possible Wall Stud Configurations" in one 1/4-20 x 3" round-head bolt with toggle nut; Mark Rear Wall The microwave oven must be on a level line with each be installed on a minimum of 1 wall stud, preferably 2, using a minimum of 1 lag screw, preferably 2. 1.
... the cardboard template. See figures 1, 2 and/or 3 in "Possible Wall Stud Configurations" in one 1/4-20 x 3" round-head bolt with toggle nut; Mark Rear Wall The microwave oven must be on a level line with each be installed on a minimum of 1 wall stud, preferably 2, using a minimum of 1 lag screw, preferably 2. 1.
Installation Instructions
Page 8
... that fits over the 3/4" (19 mm) hole drilled in Step 3 of "Installation for No Wall Studs at One End Hole (Figure 3) 1. Check alignment of the microwave oven. Securely tighten the lag screws. Disconnect power to the wall on the wall. 2. The "rear wall" arrows must be against drywall. 5. NOTE: If the...
... that fits over the 3/4" (19 mm) hole drilled in Step 3 of "Installation for No Wall Studs at One End Hole (Figure 3) 1. Check alignment of the microwave oven. Securely tighten the lag screws. Disconnect power to the wall on the wall. 2. The "rear wall" arrows must be against drywall. 5. NOTE: If the...
Installation Instructions
Page 9
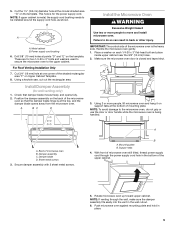
...;" (3.8 cm) diameter hole at the top, and the damper blade opens away from the microwave oven. Power supply cord bushing 6. Using 2 or more people to move and install microwave oven. Back of microwave oven still tilted, thread power supply cord through the wall, make sure the damper assembly fits... easily into the vent in place. 9 Push microwave oven against mounting plate and hold in the wall cutout. 6. NOTE: If upper cabinet is at the circular shaded area "G" on Upper Cabinet...
...;" (3.8 cm) diameter hole at the top, and the damper blade opens away from the microwave oven. Power supply cord bushing 6. Using 2 or more people to move and install microwave oven. Back of microwave oven still tilted, thread power supply cord through the wall, make sure the damper assembly fits... easily into the vent in place. 9 Push microwave oven against mounting plate and hold in the wall cutout. 6. NOTE: If upper cabinet is at the circular shaded area "G" on Upper Cabinet...
Installation Instructions
Page 10
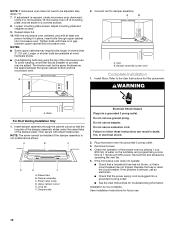
... be adjusted, skip steps 7-9. 7. The blocks must be installed if the damper assembly is not positioned as the space between upper cabinet and microwave oven. A B A. Refer to damper assembly. WARNING A. Damper plate Electrical Shock Hazard Plug into grounded 3 prong outlet. 3. Check the ... problem continues, call an electrician. ■ Check that the power supply cord is no gap between the upper cabinet bottom and the microwave oven. To avoid warping, wood filler blocks (installer to follow these instructions can result in place, insert bolts through the cabinet cutout so...
... be adjusted, skip steps 7-9. 7. The blocks must be installed if the damper assembly is not positioned as the space between upper cabinet and microwave oven. A B A. Refer to damper assembly. WARNING A. Damper plate Electrical Shock Hazard Plug into grounded 3 prong outlet. 3. Check the ... problem continues, call an electrician. ■ Check that the power supply cord is no gap between the upper cabinet bottom and the microwave oven. To avoid warping, wood filler blocks (installer to follow these instructions can result in place, insert bolts through the cabinet cutout so...
Installation Instructions
Page 11
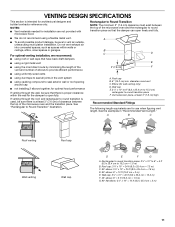
... architectural designer and builder/contractor reference only. Vent extension piece, at least 3" (7.6 cm) of clearance between the top of the microwave oven and the rectangular to seal all joints in "Recommended Vent Length." See "Rectangular to round transition piece F. Wall cap E. ...back draft dampers ■ using a rigid metal vent ■ using the most direct route by minimizing the length of the vent and number of the microwave oven and the transition piece. Roof cap B. 6" (15.2 cm) min. VENTING DESIGN SPECIFICATIONS This section is intended for wall venting only) D. ...
... architectural designer and builder/contractor reference only. Vent extension piece, at least 3" (7.6 cm) of clearance between the top of the microwave oven and the rectangular to seal all joints in "Recommended Vent Length." See "Rectangular to round transition piece F. Wall cap E. ...back draft dampers ■ using a rigid metal vent ■ using the most direct route by minimizing the length of the vent and number of the microwave oven and the transition piece. Roof cap B. 6" (15.2 cm) min. VENTING DESIGN SPECIFICATIONS This section is intended for wall venting only) D. ...

Installation Instructions
Page 12
... China The total length of the vent system including straight vent, elbow(s), transitions and wall or roof caps must not exceed the equivalent of the microwave oven opening . See the following examples: 3¹⁄₄" x 10" (8.3 x 25.4 cm) vent system = 73 ft (22.2 m) total A B 6 ft (1.8 m) 2 ft (0.6 m)... number or visit our website listed in the User Instructions. To calculate the length of vent. You will need the microwave oven model number and serial number. Filler panels Filler Panel Kit Number 8171336 8171337 8171338 8171339 99403 White Black Biscuit Stainless...
... China The total length of the vent system including straight vent, elbow(s), transitions and wall or roof caps must not exceed the equivalent of the microwave oven opening . See the following examples: 3¹⁄₄" x 10" (8.3 x 25.4 cm) vent system = 73 ft (22.2 m) total A B 6 ft (1.8 m) 2 ft (0.6 m)... number or visit our website listed in the User Instructions. To calculate the length of vent. You will need the microwave oven model number and serial number. Filler panels Filler Panel Kit Number 8171336 8171337 8171338 8171339 99403 White Black Biscuit Stainless...


