
Whirlpool WMH1162XVB Support Question
Whirlpool WMH1162XVB Support Question
Find answers below for this question about Whirlpool WMH1162XVB - 1.6 Cubic Foot Microwave.Need a Whirlpool WMH1162XVB manual? We have 2 online manuals for this item!
Question posted by RFOLEYINC on January 22nd, 2013
Plese Tell Me The Dimensions Of Microwave #mt4155sp
The person who posted this question about this Whirlpool product did not include a detailed explanation. Please use the "Request More Information" button to the right if more details would help you to answer this question.
Current Answers
Answer #1: Posted by bengirlxD on January 22nd, 2013 7:06 PM
bengirlxD

Member since:
November 5th, 2012 Points: 6,395,085

Member since:
November 5th, 2012 Points: 6,395,085
Dimensions & Weights
- Exterior Width: 29 15/16"
- Exterior Height: 16 1/4"
- Exterior Depth: 15 3/8"
- Cavity Width: 22 3/8"
- Cavity Height: 8 3/16"
- Cavity Depth: 13 13/16"
- Approximate Shipping Weight: 58 lbs.
Feel free to resubmit the question if you didn't find it useful.
Related Whirlpool WMH1162XVB Manual Pages
Owners Manual - Page 1

... what can be killed or seriously injured if you should not be heated in the microwave oven.
■ The microwave oven must be followed, including the following:
WARNING: To reduce the risk of injury, and tell you and others are very important. All safety messages will follow the specific "PRECAUTIONS TO AVOID POSSIBLE EXPOSURE TO...
Owners Manual - Page 2

...utensils, or food in the cavity when not in use straight-sided containers with this microwave oven outdoors. Do not overheat the liquid.
- It is particularly important that there is ...boiling when the container is removed from the microwave oven is important not to defeat or tamper with any materials, other part of the microwave oven when the microwave oven is in a wet basement, or near ...
Owners Manual - Page 3

... A time-delay fuse or time-delay circuit breaker. ■ A separate circuit serving only this microwave oven.
Settings
Clock
The Clock is properly grounded. Vent Fan
High, medium (on the magnetron. The ...cook function. Do not use an extension cord. Observe all cord connected appliances: The microwave oven must be turned off or on some models) for the electric current. Touch the ...
Owners Manual - Page 4

... label instructions on some models)
Food Poisoning Hazard
Do not let food sit in the microwave oven. Unwrap food.
The Warm Hold function uses 10% cook power. Dishwasher cleaning is cool... of water beside it heats, and adjusts the cooking time accordingly.
To avoid damage to the microwave oven caused by touching COOK TIME repeatedly to paper towel.
■ Control panel: sponge or soft ...
Owners Manual - Page 5

... off . Replacement Parts, Accesssories and Cleaning Supplies
Following is set properly. Replacing Filters and Light Bulbs
NOTE: A filter status indicator (on some models) appears in "Microwave Oven Care" section. If a message about every 6 months, or as prompted by a number is on. Call for contact and model identification information. See "Settings" section to...
Owners Manual - Page 6

... can find your major appliance for repairs. The removal and reinstallation of your correspondence. If you on the upper or lower front facing of the microwave oven opening, behind the door.
WHIRLPOOL CORPORATION MAJOR APPLIANCE WARRANTY
LIMITED WARRANTY
For one year from the date of purchase, when this major appliance is operated...
Installation Instructions - Page 1

...Microwave Oven 9 Complete Installation 10 VENTING DESIGN SPECIFICATIONS 11 ASSISTANCE 12 Replacement Parts 12 Accessories 12
MICROWAVE HOOD COMBINATION SAFETY
Your safety and the safety of injury, and tell... of Contents
MICROWAVE HOOD COMBINATION SAFETY 1 INSTALLATION REQUIREMENTS 2
Tools and Parts 2 Remove Cardboard Template 2 Location Requirements 2 Product Dimensions 3 Electrical ...
Installation Instructions - Page 2

... the cardboard packaging. 2. Special Requirements
For Wall Venting Installation Only: ■ Cutout must provide: ■ Minimum installation dimensions. Damper assembly (for cooking. See "Venting Design Specifications" section. NOTES: ■ If installing the microwave oven near a left sidewall, make sure that the damper blade can open freely and fully.
See User Instructions.)
NOTE...
Installation Instructions - Page 3
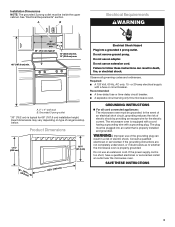
... plug. WARNING: Improper use an extension cord. Recommended: ■ A time-delay fuse or time-delay circuit breaker.
■ A separate circuit serving only this microwave oven. A. 2" x 4" wall stud B. Exact dimensions may vary depending on type of electric shock. In the event of an electrical short circuit, grounding reduces the risk of electric shock by...
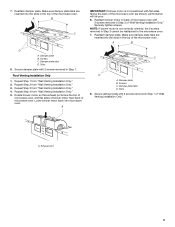
Installation Instructions - Page 4

... 2 screws attaching blower motor to the work surface, cover the work surface.
1. Keep the damper assembly in case the venting method is changed, or the microwave oven is set for recirculation installation.
A
B
A Screws B. INSTALLATION INSTRUCTIONS
Remove Mounting Plate
Depending on your model, the mounting plate may be in the foam packaging, or...
Installation Instructions - Page 5
...C. Slots
8. Damper plate B. Roof Venting Installation Only
1. Repeat Step 3 from "Wall Venting Installation Only." 5. Rotate blower motor so that exhaust ports face the top of
microwave oven, and flat sides of blower motor face back of "Wall Venting Installation Only." Reattach damper plate. A. Exhaust port
5
A
B
C
D
A. Secure damper plate with 2 screws removed in...
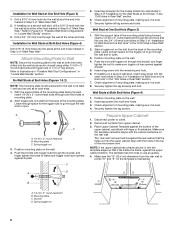
Installation Instructions - Page 6
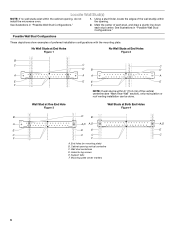
...plate center markers
6
No Wall Studs at End Holes Figure 1
No Wall Studs at Both End Holes Figure 4
B
D
B
A
A,D A,D
A,D
E
E
E
E
C
C
C
C
F
F
A. Cabinet opening , do not install the microwave oven.
1. Support tabs F. See illustrations in "Possible Wall Stud Configurations."
2. Holes for lag screws E. Locate Wall Stud(s)
NOTE: If no wall studs exist within the...
Installation Instructions - Page 7
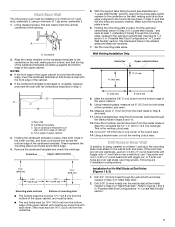
... of the cardboard template is damaged or unusable, measure and mark the wall with the dimensions described in the lower corners, and draw a horizontal line across the bottom edge of ... mm) hole(s) into the wall stud(s) at End Holes (Figures 1 & 2)
1. Mark Rear Wall
The microwave oven must
align with front edge of cabinet. If the end holes are ideal hole locations.
7.
Align the center ...
Installation Instructions - Page 8
... rear wall to make sure toggle nuts have opened against the bottom of the microwave oven. Securely tighten the lag screw(s) and bolt. Check alignment of mounting plate, making sure it is maintained. Make sure the 10" (25.4 cm) dimension from the back of the mounting plate. Drywall D. Installation for Wall Stud at...
Installation Instructions - Page 9
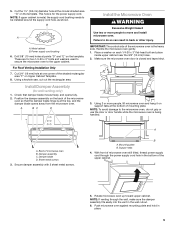
... injury. Metal cabinet B. Install Damper Assembly
(for the power supply cord. Handle the microwave oven gently. 1. A. Rotate microwave oven up toward upper cabinet. 5.
Drill 3/8" (10 mm) holes at the bottom of the microwave oven is closed and taped shut.
3. Make sure the microwave oven door is the heavy side. A
B
A. Mounting plate B.
Position the damper assembly on...
Installation Instructions - Page 10
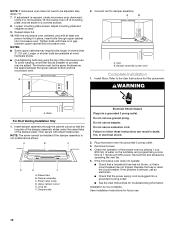
... to provide) may be installed if the damper assembly is now complete. Upper cabinet cutout E. Using 2 or more people, lift microwave oven off of the microwave oven. Tighten bolts until there is required, rotate microwave oven downward. The blocks must be adjusted, skip steps 7-9.
7. Sheet metal screw D. Installation is not positioned as the space between upper...
Installation Instructions - Page 11
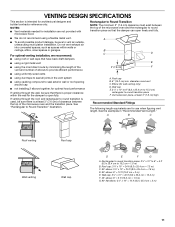
...Round Transition" illustration. Vent extension piece, at least 3" (7.6 cm) of clearance between the top of the microwave oven and the transition piece. Roof cap: 3¹⁄₄" x 10" = 24 ft (8.3 x 25.4 ... Transition NOTE: The minimum 3" (7.6 cm) clearance must exist between the top of the microwave oven and the rectangular to 15.2 cm = 1.5 m)
B. A
B
C
D
E
3" ...
Installation Instructions - Page 12

... toll free number or visit our website listed in the User Instructions.
If you will need , add the equivalent lengths of the microwave oven opening . Each panel is located behind the microwave oven door on the front facing of each vent piece used . Following is round, a rectangular to round transition piece must be installed...
Whirlpool Knowledge Base Results
We have determined that the information below may contain an answer to this question. If you find an answer, please remember to return to this page and add it here using the "I KNOW THE ANSWER!" button above. It's that easy to earn points!-
The ice maker on my upright freezer is not producing ice or not enough ice
... water supply and the supply shutoff valve is transferred to 1,350 g) of unfrozen food per cubic foot (28.32 L) of the above, there may feel warm. See "Ice maker" below ....: Product Category Washer or Dryer Refrigerator or Freezer Dishwasher Electric Range, Oven or Cooktop Gas Range, Oven or Cooktop Microwave Trash Compactor Window Air Conditioner Hot Water Dispenser Vent Hood Ice Machine ... -
The temperature in my chest freezer is too warm
...: Product Category Washer or Dryer Refrigerator or Freezer Dishwasher Electric Range, Oven or Cooktop Gas Range, Oven or Cooktop Microwave Trash Compactor Window Air Conditioner Hot Water Dispenser Vent Hood Ice Machine ...more than two to three pounds (0.907 to 1.360 kg) of unfrozen food per cubic foot of unfrozen food. The heat is too warm. The temperature in my chest freezer is too ... -
Convection - Multirack Baking
The type of 3 Please tell us how we can affect results. Use low-side pans and flat cookie sheets. Food needs to be used ...even results. Is the color uneven across the top? Are results uneven when using shiny bakeware on my SpeedCook microwave oven with convection, and how do I use and after oven is multirack baking? Multirack Baking What is off ®
Similar Questions

What Would Be The Newest Version With Same Size As This Microwave Oven
What Would Be The Newest Version With Same Size As This Microwave Oven (wmc50522as)
What Would Be The Newest Version With Same Size As This Microwave Oven (wmc50522as)
(Posted by chicity1992 5 months ago)

Whirlpool Microwave Oven Wmh31017aw
my microwave keep running no heat how can I fix this problem ?
my microwave keep running no heat how can I fix this problem ?
(Posted by Anonymous-150142 9 years ago)

In Need An Instruction Manual For The Wmh2175xvq-2 Microwave Oven
(Posted by wasick 12 years ago)

Microwave Will Not Heat
This microwave is 9 months old and just stopped heating. All other functions are normal. Any ideas?
This microwave is 9 months old and just stopped heating. All other functions are normal. Any ideas?
(Posted by jmpmaster 13 years ago)

Microwave Does Not Heat
Microwave stopped heating, unplugged and still not heating. Everything else, clock, fan, light, vent...
Microwave stopped heating, unplugged and still not heating. Everything else, clock, fan, light, vent...
(Posted by afeador 13 years ago)