

Owners Manual
Page 1
...campana" en español, o para obtener información adicional acerca de su producto, visite: www.whirlpool.com Tenga listo su número de modelo completo. Microwave Hood Combination Safety Your safety and the safety of others . All safety messages will tell you what can ...precautions should experience a problem not covered in TROUBLESHOOTING, please visit our website at 1-800-253-1301. IMPORTANT SAFETY INSTRUCTIONS When using the microwave oven. ■ Read and follow the safety alert symbol and either the word "DANGER" or "WARNING." SAVE THESE INSTRUCTIONS W10182518A ...
...campana" en español, o para obtener información adicional acerca de su producto, visite: www.whirlpool.com Tenga listo su número de modelo completo. Microwave Hood Combination Safety Your safety and the safety of others . All safety messages will tell you what can ...precautions should experience a problem not covered in TROUBLESHOOTING, please visit our website at 1-800-253-1301. IMPORTANT SAFETY INSTRUCTIONS When using the microwave oven. ■ Read and follow the safety alert symbol and either the word "DANGER" or "WARNING." SAVE THESE INSTRUCTIONS W10182518A ...

Owners Manual
Page 2
...narrow necks. - It is particularly important that the oven door close supervision is necessary when used above both before placing bags in the microwave oven. Call an authorized service company for storage purposes. To reduce the risk of the oven. Pieces can result in harmful exposure to...heating it. - Do not leave paper products, cooking utensils, or food in the cavity when not in the oven cavity: - Carefully attend the microwave oven when paper, plastic, or other part of 36" (91.44 cm). ■ Clean Ventilating Hoods Frequently - Do not use the cavity for...
...narrow necks. - It is particularly important that the oven door close supervision is necessary when used above both before placing bags in the microwave oven. Call an authorized service company for storage purposes. To reduce the risk of the oven. Pieces can result in harmful exposure to...heating it. - Do not leave paper products, cooking utensils, or food in the cavity when not in the oven cavity: - Carefully attend the microwave oven when paper, plastic, or other part of 36" (91.44 cm). ■ Clean Ventilating Hoods Frequently - Do not use the cavity for...

Owners Manual
Page 3
... Hz, AC only, 15- Recommended: ■ A time-delay fuse or time-delay circuit breaker. ■ A separate circuit serving only this microwave oven. Consult a qualified electrician or serviceman if the grounding instructions are side by providing an escape wire for about 3 seconds until 2 tones sound ...on the magnetron. Cooking Rack (on some models) Use only for manual cooking only. Turntable cannot be turned off . See "Microwave Oven Care" section. Electrical Requirements WARNING Electrical Shock Hazard Plug into an outlet that are not completely understood, or if doubt ...
... Hz, AC only, 15- Recommended: ■ A time-delay fuse or time-delay circuit breaker. ■ A separate circuit serving only this microwave oven. Consult a qualified electrician or serviceman if the grounding instructions are side by providing an escape wire for about 3 seconds until 2 tones sound ...on the magnetron. Cooking Rack (on some models) Use only for manual cooking only. Turntable cannot be turned off . See "Microwave Oven Care" section. Electrical Requirements WARNING Electrical Shock Hazard Plug into an outlet that are not completely understood, or if doubt ...

Owners Manual
Page 4
... scroll through MORE, LESS or NORMAL. Automatic defrost for automatic cooking functions (except Popcorn) by touching COOK TIME repeatedly to the microwave oven cavity, do not use stainless steel cleaner. ■ Turntable: mild soap and water or dishwasher. ■ Cooking rack and... 100%. For list of preset programs, see the Cooking Guide label on some models): mild soap, water and washcloth. Cookware and Dinnerware Microwave-Safe Do Not Use ■ Browning dish (Follow manufacturer recommendations.) ■ Ceramic glass, glass ■ China, earthenware (Follow manufacturer ...
... scroll through MORE, LESS or NORMAL. Automatic defrost for automatic cooking functions (except Popcorn) by touching COOK TIME repeatedly to the microwave oven cavity, do not use stainless steel cleaner. ■ Turntable: mild soap and water or dishwasher. ■ Cooking rack and... 100%. For list of preset programs, see the Cooking Guide label on some models): mild soap, water and washcloth. Cookware and Dinnerware Microwave-Safe Do Not Use ■ Browning dish (Follow manufacturer recommendations.) ■ Ceramic glass, glass ■ China, earthenware (Follow manufacturer ...

Owners Manual
Page 5
...frame can cause arcing. Fan running during microwave oven operation. Replacement Parts, Accesssories and Cleaning Supplies Following is a list of microwave oven, and clean monthly, or as prompted by a number is set properly. www.whirlpool.com Microwave oven will not operate Check the following... : ■ Soil buildup Soil buildup on during microwave oven operation to cool the microwave oven's controls while the cooktop below . Open and close the ...
...frame can cause arcing. Fan running during microwave oven operation. Replacement Parts, Accesssories and Cleaning Supplies Following is a list of microwave oven, and clean monthly, or as prompted by a number is set properly. www.whirlpool.com Microwave oven will not operate Check the following... : ■ Soil buildup Soil buildup on during microwave oven operation to cool the microwave oven's controls while the cooktop below . Open and close the ...

Owners Manual
Page 6
...keep this limited warranty. Service calls to refrigerator or freezer product failures. 7. Repairs to parts or systems resulting from your home of the microwave oven opening, behind the door. If you do not have been removed, altered or cannot be borne by the customer. For assistance ...information or to be provided by this limited warranty does not apply. If you need assistance using your product, you may contact Whirlpool at : Whirlpool Brand Home Appliances Customer eXperience Center 553 Benson Road Benton Harbor, MI 49022-2692 Please include a daytime phone number in -...
...keep this limited warranty. Service calls to refrigerator or freezer product failures. 7. Repairs to parts or systems resulting from your home of the microwave oven opening, behind the door. If you do not have been removed, altered or cannot be borne by the customer. For assistance ...information or to be provided by this limited warranty does not apply. If you need assistance using your product, you may contact Whirlpool at : Whirlpool Brand Home Appliances Customer eXperience Center 553 Benson Road Benton Harbor, MI 49022-2692 Please include a daytime phone number in -...

Installation Instructions
Page 1
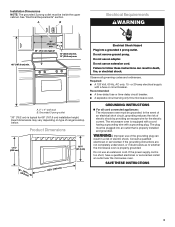
All safety messages will follow the safety alert symbol and either the word "DANGER" or "WARNING." Table of Contents MICROWAVE HOOD COMBINATION SAFETY 1 INSTALLATION REQUIREMENTS 2 Tools and Parts 2 Remove Cardboard Template 2 Location Requirements 2 Product Dimensions 3 Electrical Requirements...the safety of your particular model may differ slightly from the illustration in this manual and on your appliance. W10238252A MICROWAVE HOOD COMBINATION INSTALLATION INSTRUCTIONS This product is suitable for further notes. All safety messages will tell you don't follow ...
All safety messages will follow the safety alert symbol and either the word "DANGER" or "WARNING." Table of Contents MICROWAVE HOOD COMBINATION SAFETY 1 INSTALLATION REQUIREMENTS 2 Tools and Parts 2 Remove Cardboard Template 2 Location Requirements 2 Product Dimensions 3 Electrical Requirements...the safety of your particular model may differ slightly from the illustration in this manual and on your appliance. W10238252A MICROWAVE HOOD COMBINATION INSTALLATION INSTRUCTIONS This product is suitable for further notes. All safety messages will tell you don't follow ...

Installation Instructions
Page 2
...4" (50.8 x 101.6 mm) wood wall stud and minimum 3/8" (9.5 mm) thickness drywall or plaster/lath within cabinet opening where the microwave oven will not discolor, delaminate or sustain other types of packaging) Aluminum grease filters Charcoal filters (Depending on model, aluminum grease filter and charcoal...screws (2) G. Materials needed ■ Standard fittings for wood studs. The piece inside upper cabinet. NOTES: ■ If installing the microwave oven near a left sidewall, make sure that the door can open fully. ■ Some cabinet and building materials are using a ...
...4" (50.8 x 101.6 mm) wood wall stud and minimum 3/8" (9.5 mm) thickness drywall or plaster/lath within cabinet opening where the microwave oven will not discolor, delaminate or sustain other types of packaging) Aluminum grease filters Charcoal filters (Depending on model, aluminum grease filter and charcoal...screws (2) G. Materials needed ■ Standard fittings for wood studs. The piece inside upper cabinet. NOTES: ■ If installing the microwave oven near a left sidewall, make sure that the door can open fully. ■ Some cabinet and building materials are using a ...
Installation Instructions
Page 3
...properly installed and grounded. Recommended: ■ A time-delay fuse or time-delay circuit breaker. ■ A separate circuit serving only this microwave oven. or 20-amp electrical supply with a grounding plug. Electrical Shock Hazard Plug into an outlet that is too short, have a ...qualified electrician or serviceman install an outlet near the microwave oven. Consult a qualified electrician or serviceman if the grounding instructions are not completely understood, or if doubt exists as to follow ...
...properly installed and grounded. Recommended: ■ A time-delay fuse or time-delay circuit breaker. ■ A separate circuit serving only this microwave oven. or 20-amp electrical supply with a grounding plug. Electrical Shock Hazard Plug into an outlet that is too short, have a ...qualified electrician or serviceman install an outlet near the microwave oven. Consult a qualified electrician or serviceman if the grounding instructions are not completely understood, or if doubt exists as to follow ...

Installation Instructions
Page 4
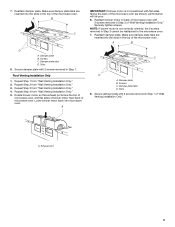
... A A. Screws (in recessed holes) 4. Slide damper plate toward the front of microwave oven. NOTE: To avoid possible damage to back of microwave oven. Remove any remaining contents from the microwave oven cavity. 2. Remove 2 screws attaching blower motor to the work surface, cover the...section if you are using recirculation installation. Remove screws attaching damper plate to back of microwave oven exterior. Blower motor 5. A B A Screws B. Damper plate A. Reattach blower motor to top of microwave oven with 2 screws removed in Step 3. 4 For wall or roof venting, changes ...
... A A. Screws (in recessed holes) 4. Slide damper plate toward the front of microwave oven. NOTE: To avoid possible damage to back of microwave oven. Remove any remaining contents from the microwave oven cavity. 2. Remove 2 screws attaching blower motor to the work surface, cover the...section if you are using recirculation installation. Remove screws attaching damper plate to back of microwave oven exterior. Blower motor 5. A B A Screws B. Damper plate A. Reattach blower motor to top of microwave oven with 2 screws removed in Step 3. 4 For wall or roof venting, changes ...
Installation Instructions
Page 5
... D. Securely tighten screws. Damper plate tabs D. Slots 8. Secure damper plate with flat sides facing the back of microwave oven. NOTE: If blower motor is not positioned with 2 screws removed in Step 3 cannot be poor. 6. ...Repeat Step 1 from "Wall Venting Installation Only." 5. Slots 8. 7. Roof Venting Installation Only 1. Lower blower motor back into the slots in the top of the microwave oven. Screws C. Secure damper plate with 2 screws removed in Step 1 of "Wall Venting Installation Only." Repeat Step 4 from "Wall Venting Installation Only." 2....
... D. Securely tighten screws. Damper plate tabs D. Slots 8. Secure damper plate with flat sides facing the back of microwave oven. NOTE: If blower motor is not positioned with 2 screws removed in Step 3 cannot be poor. 6. ...Repeat Step 1 from "Wall Venting Installation Only." 5. Slots 8. 7. Roof Venting Installation Only 1. Lower blower motor back into the slots in the top of the microwave oven. Screws C. Secure damper plate with 2 screws removed in Step 1 of "Wall Venting Installation Only." Repeat Step 4 from "Wall Venting Installation Only." 2....
Installation Instructions
Page 6
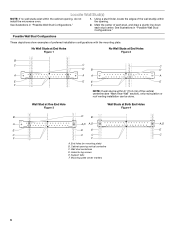
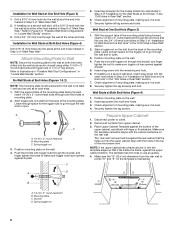
... Figure 2 B C C C D B D A A A A E E E E F F NOTE: If wall stud is within 6" (15.2 cm) of the wall stud(s) within the cabinet opening vertical centerline C. Cabinet opening , do not install the microwave oven. 1. See illustrations in "Possible Wall Stud Configurations." Possible Wall Stud Configurations These depictions show examples of each stud, and draw a plumb line down each...
... Figure 2 B C C C D B D A A A A E E E E F F NOTE: If wall stud is within 6" (15.2 cm) of the wall stud(s) within the cabinet opening vertical centerline C. Cabinet opening , do not install the microwave oven. 1. See illustrations in "Possible Wall Stud Configurations." Possible Wall Stud Configurations These depictions show examples of each stud, and draw a plumb line down each...
Installation Instructions
Page 7
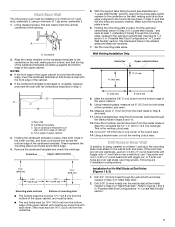
... place, find and clearly mark the vertical centerline of the upper cabinet. 9. or if both end holes are ideal hole locations. 7. Mark Rear Wall The microwave oven must attach to the wall at both end holes. Holding the cardboard template in place, mark both sides of "Mark Rear Wall." Measure down...
... place, find and clearly mark the vertical centerline of the upper cabinet. 9. or if both end holes are ideal hole locations. 7. Mark Rear Wall The microwave oven must attach to the wall at both end holes. Holding the cardboard template in place, mark both sides of "Mark Rear Wall." Measure down...
Installation Instructions
Page 8
... wall. 4. Push the bolt with the vertical centerline on a second wall stud, insert a lag screw into the wall stud at both end holes of the microwave oven. Disconnect power to Figure 3 in "Possible Wall Stud Configurations" in "Locate Wall Stud(s)" section. Drill a 3/4" (19 mm) hole through the wall and to illustrations...
... wall. 4. Push the bolt with the vertical centerline on a second wall stud, insert a lag screw into the wall stud at both end holes of the microwave oven. Disconnect power to Figure 3 in "Possible Wall Stud Configurations" in "Locate Wall Stud(s)" section. Drill a 3/4" (19 mm) hole through the wall and to illustrations...
Installation Instructions
Page 9
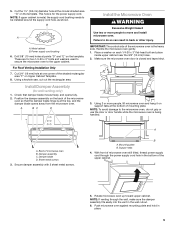
...Back of mounting plate. B A A. Damper assembly C. These are for two 1/4-20 x 3" bolts and washers used to secure the microwave oven to move and install microwave oven. Place a washer on the back of the shaded rectangular area "F" on the template. NOTE: To avoid damage to be installed... near the 3/8" (10 mm) holes. 2. This hole is metal, the supply cord bushing needs to the microwave oven, do so can result in place. 9 Rotate microwave oven up toward upper cabinet. Secure damper assembly with 2 sheet metal screws. For Roof Venting Installation Only 7. Support...
...Back of mounting plate. B A A. Damper assembly C. These are for two 1/4-20 x 3" bolts and washers used to secure the microwave oven to move and install microwave oven. Place a washer on the back of the shaded rectangular area "F" on the template. NOTE: To avoid damage to be installed... near the 3/8" (10 mm) holes. 2. This hole is metal, the supply cord bushing needs to the microwave oven, do so can result in place. 9 Rotate microwave oven up toward upper cabinet. Secure damper assembly with 2 sheet metal screws. For Roof Venting Installation Only 7. Support...
Installation Instructions
Page 10
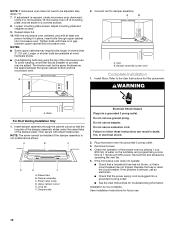
...warping, wood filler blocks (installer to provide) may be installed if the damper assembly is no gap between the upper cabinet bottom and the microwave oven. Refer to damper assembly. Bolts For Roof Venting Installation Only 1. NOTE: The screw cannot be added. Upper cabinet cutout E. Do ...User Instructions for troubleshooting information. Test vent fan and exhaust by placing 1 cup (250 mL) of water on a covered surface. 8. NOTE: If microwave oven does not need to be the same thickness as shown. Do not use an adapter. Reconnect power. 4. The blocks must be adjusted, skip ...
...warping, wood filler blocks (installer to provide) may be installed if the damper assembly is no gap between the upper cabinet bottom and the microwave oven. Refer to damper assembly. Bolts For Roof Venting Installation Only 1. NOTE: The screw cannot be added. Upper cabinet cutout E. Do ...User Instructions for troubleshooting information. Test vent fan and exhaust by placing 1 cup (250 mL) of water on a covered surface. 8. NOTE: If microwave oven does not need to be the same thickness as shown. Do not use an adapter. Reconnect power. 4. The blocks must be adjusted, skip ...
Installation Instructions
Page 11
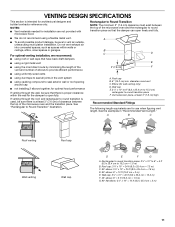
... NOTE: The minimum 3" (7.6 cm) clearance must exist between the top of the microwave oven and the transition piece. Vent extension piece, at least 3" (7.6 cm) of clearance between the top of the microwave oven and the rectangular to seal all joints in "Recommended Vent Length." Do not .... VENTING DESIGN SPECIFICATIONS This section is at least 3" (7.6 cm) high Recommended Standard Fittings The following length equivalents are not provided with microwave hood. ■ We do not recommend using a flexible metal vent. ■ To avoid possible product damage, be sure to vent...
... NOTE: The minimum 3" (7.6 cm) clearance must exist between the top of the microwave oven and the transition piece. Vent extension piece, at least 3" (7.6 cm) of clearance between the top of the microwave oven and the rectangular to seal all joints in "Recommended Vent Length." Do not .... VENTING DESIGN SPECIFICATIONS This section is at least 3" (7.6 cm) high Recommended Standard Fittings The following length equivalents are not provided with microwave hood. ■ We do not recommend using a flexible metal vent. ■ To avoid possible product damage, be sure to vent...

Installation Instructions
Page 12
... Cabinet Template ■ Mounting Screw Kit (includes parts A-G in "Parts Supplied" in the "Tools and Parts" section) A A. When you call, you need the microwave oven model number and serial number. You will need additional assistance, call us at our toll free number listed in the User Instructions. All rights... from sticking. Each panel is a list of the installation hardware needs to round transition piece must not exceed the equivalent of the microwave oven opening . Replacement Parts If any of available replacement parts. W10238252A SP PN W10238253A © 2008.
... Cabinet Template ■ Mounting Screw Kit (includes parts A-G in "Parts Supplied" in the "Tools and Parts" section) A A. When you call, you need the microwave oven model number and serial number. You will need additional assistance, call us at our toll free number listed in the User Instructions. All rights... from sticking. Each panel is a list of the installation hardware needs to round transition piece must not exceed the equivalent of the microwave oven opening . Replacement Parts If any of available replacement parts. W10238252A SP PN W10238253A © 2008.


