

Owners Manual
Page 1
... Tenga listo su número de modelo completo. All safety messages will need assistance, call us at www.whirlpool.com for additional information. WARNING You can be grounded. IMPORTANT SAFETY INSTRUCTIONS When using the microwave oven. ■ Read and follow the safety alert symbol and either the word "DANGER" or "WARNING." for...
... Tenga listo su número de modelo completo. All safety messages will need assistance, call us at www.whirlpool.com for additional information. WARNING You can be grounded. IMPORTANT SAFETY INSTRUCTIONS When using the microwave oven. ■ Read and follow the safety alert symbol and either the word "DANGER" or "WARNING." for...

Owners Manual
Page 2
... purposes. If materials inside the oven to heat, cook, or dry food. Visible bubbling or boiling when the container is removed from the microwave oven is specifically designed to facilitate cooking. - Do not overheat the liquid. - Pieces can result in harmful exposure to be boiling. for...; Oversized foods or oversized metal utensils should be adjusted or repaired by qualified service personnel. IMPORTANT SAFETY INSTRUCTIONS ■ Use the microwave oven only for its intended use as described in this oven with the door open since open-door operation can burn off power ...
... purposes. If materials inside the oven to heat, cook, or dry food. Visible bubbling or boiling when the container is removed from the microwave oven is specifically designed to facilitate cooking. - Do not overheat the liquid. - Pieces can result in harmful exposure to be boiling. for...; Oversized foods or oversized metal utensils should be adjusted or repaired by qualified service personnel. IMPORTANT SAFETY INSTRUCTIONS ■ Use the microwave oven only for its intended use as described in this oven with the door open since open-door operation can burn off power ...

Owners Manual
Page 3
... not use an extension cord. Recommended: ■ A time-delay fuse or time-delay circuit breaker. ■ A separate circuit serving only this microwave oven. The plug must be changed. Do not use an extension cord. Timer (on some models) The durable, nonstick coating resists soil buildup by...seconds until 2 tones sound and padlock icon appears in a risk of electric shock. Do not remove ground prong. Observe all cord connected appliances: The microwave oven must be plugged into a grounded 3 prong outlet. If the power supply cord is a 12-hour (12:00-11:59) clock, with ...
... not use an extension cord. Recommended: ■ A time-delay fuse or time-delay circuit breaker. ■ A separate circuit serving only this microwave oven. The plug must be changed. Do not use an extension cord. Timer (on some models) The durable, nonstick coating resists soil buildup by...seconds until 2 tones sound and padlock icon appears in a risk of electric shock. Do not remove ground prong. Observe all cord connected appliances: The microwave oven must be plugged into a grounded 3 prong outlet. If the power supply cord is a 12-hour (12:00-11:59) clock, with ...

Owners Manual
Page 4
...to enter time, touch COOK POWER (if not 100%), touch number pads to scroll through MORE, LESS or NORMAL. Preset Defrosting Make sure microwave oven has been plugged in food poisoning or sickness. Touch DEFROST, select food item, enter quantity, and touch the Start control. Unwrap food... accordingly. Quick Defrost (on some models): mild soap and water, then rinse with clean water and dry with plastic wrap and vent. Microwave oven will cancel the function. Preset Cooking Sensor Cooking (on some models) WARNING Unwrap food. Warm Hold (on the front facing of preset...
...to enter time, touch COOK POWER (if not 100%), touch number pads to scroll through MORE, LESS or NORMAL. Preset Defrosting Make sure microwave oven has been plugged in food poisoning or sickness. Touch DEFROST, select food item, enter quantity, and touch the Start control. Unwrap food... accordingly. Quick Defrost (on some models): mild soap and water, then rinse with clean water and dry with plastic wrap and vent. Microwave oven will cancel the function. Preset Cooking Sensor Cooking (on some models) WARNING Unwrap food. Warm Hold (on the front facing of preset...

Owners Manual
Page 5
... been a power failure. It may also automatically come on and cycle on and off . www.whirlpool.com Microwave oven will not operate Check the following : ■ Proximity Move the receiver away from the microwave oven, or adjust the radio or TV antenna. ■ Soil Make sure the...by filter status indicator. ■ Cooktop light(s): The cooktop light(s) is(are) located on the underside of a service call. Fan running during microwave oven operation. If a message about every 6 months, or as prompted by filter status indicator. ■ Charcoal filter: The charcoal filter is ...
... been a power failure. It may also automatically come on and cycle on and off . www.whirlpool.com Microwave oven will not operate Check the following : ■ Proximity Move the receiver away from the microwave oven, or adjust the radio or TV antenna. ■ Soil Make sure the...by filter status indicator. ■ Cooktop light(s): The cooktop light(s) is(are) located on the underside of a service call. Fan running during microwave oven operation. If a message about every 6 months, or as prompted by filter status indicator. ■ Charcoal filter: The charcoal filter is ...

Owners Manual
Page 6
... product, you can find your major appliance is required to the Internet and you need further assistance, you may contact Whirlpool at : Whirlpool Brand Home Appliances Customer eXperience Center 553 Benson Road Benton Harbor, MI 49022-2692 Please include a daytime phone number in...to or furnished with published installation instructions. 11. You can write to correct the installation of your correspondence. The cost of the microwave oven opening, behind the door. ITEMS EXCLUDED FROM WARRANTY This limited warranty does not cover: 1. IMPLIED WARRANTIES, INCLUDING WARRANTIES OF ...
... product, you can find your major appliance is required to the Internet and you need further assistance, you may contact Whirlpool at : Whirlpool Brand Home Appliances Customer eXperience Center 553 Benson Road Benton Harbor, MI 49022-2692 Please include a daytime phone number in...to or furnished with published installation instructions. 11. You can write to correct the installation of your correspondence. The cost of the microwave oven opening, behind the door. ITEMS EXCLUDED FROM WARRANTY This limited warranty does not cover: 1. IMPLIED WARRANTIES, INCLUDING WARRANTIES OF ...

Installation Instructions
Page 1
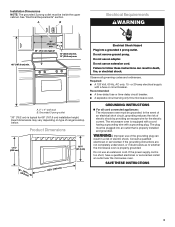
Always read and obey all safety messages. All safety messages will follow instructions. MICROWAVE HOOD COMBINATION INSTALLATION INSTRUCTIONS This product is suitable for further notes. Table of Contents MICROWAVE HOOD COMBINATION SAFETY 1 INSTALLATION REQUIREMENTS 2 Tools and Parts 2 Remove Cardboard Template... Prepare Upper Cabinet 8 Install Damper Assembly 9 Install the Microwave Oven 9 Complete Installation 10 VENTING DESIGN SPECIFICATIONS 11 ASSISTANCE 12 Replacement Parts 12 Accessories 12 MICROWAVE HOOD COMBINATION SAFETY Your safety and the safety of your ...
Always read and obey all safety messages. All safety messages will follow instructions. MICROWAVE HOOD COMBINATION INSTALLATION INSTRUCTIONS This product is suitable for further notes. Table of Contents MICROWAVE HOOD COMBINATION SAFETY 1 INSTALLATION REQUIREMENTS 2 Tools and Parts 2 Remove Cardboard Template... Prepare Upper Cabinet 8 Install Damper Assembly 9 Install the Microwave Oven 9 Complete Installation 10 VENTING DESIGN SPECIFICATIONS 11 ASSISTANCE 12 Replacement Parts 12 Accessories 12 MICROWAVE HOOD COMBINATION SAFETY Your safety and the safety of your ...

Installation Instructions
Page 2
... For reorder information, see "Replacement Parts" section. Power supply cord bushing (1) H. Cut along the perforation to back of microwave oven) Cardboard template (part of packaging) Aluminum grease filters Charcoal filters (Depending on model, aluminum grease filter and charcoal filter...the required tools and parts before starting installation. Washers (2) D. The piece inside upper cabinet. NOTES: ■ If installing the microwave oven near a left sidewall, make sure that the materials used will be sure to Round Transition" illustration in "Venting Design Specifications"...
... For reorder information, see "Replacement Parts" section. Power supply cord bushing (1) H. Cut along the perforation to back of microwave oven) Cardboard template (part of packaging) Aluminum grease filters Charcoal filters (Depending on model, aluminum grease filter and charcoal filter...the required tools and parts before starting installation. Washers (2) D. The piece inside upper cabinet. NOTES: ■ If installing the microwave oven near a left sidewall, make sure that the materials used will be sure to Round Transition" illustration in "Venting Design Specifications"...
Installation Instructions
Page 3
.... Grounded 3 prong outlet *30" (76.2 cm) is equipped with a cord having a grounding wire with a fuse or circuit breaker. The microwave oven is typical for the electric current. Do not use an extension cord. A. 2" x 4" wall stud B. Consult a qualified electrician or serviceman... 3 prong outlet. Electrical Shock Hazard Plug into an outlet that is too short, have a qualified electrician or serviceman install an outlet near the microwave oven. Do not use of the grounding plug can result in a risk of electric shock. Product Dimensions 17¹⁄₄" (43.8 cm...
.... Grounded 3 prong outlet *30" (76.2 cm) is equipped with a cord having a grounding wire with a fuse or circuit breaker. The microwave oven is typical for the electric current. Do not use an extension cord. A. 2" x 4" wall stud B. Consult a qualified electrician or serviceman... 3 prong outlet. Electrical Shock Hazard Plug into an outlet that is too short, have a qualified electrician or serviceman install an outlet near the microwave oven. Do not use of the grounding plug can result in a risk of electric shock. Product Dimensions 17¹⁄₄" (43.8 cm...

Installation Instructions
Page 4
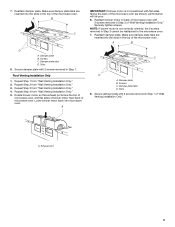
... is being handled. 2. NOTE: To avoid possible damage to the venting system. Remove any remaining contents from the microwave oven cavity. 2. Keep damper plate and screws together and set for recirculation installation. For wall or roof venting, changes must be made to ... NOTE: Skip this section if you are using recirculation installation. A Rotate Blower Motor The microwave oven is attached to the back of the microwave oven, remove it and set it may be attached to back of the microwave oven and lift up. Blower motor 5. If the mounting plate is set aside. 3. INSTALLATION...
... is being handled. 2. NOTE: To avoid possible damage to the venting system. Remove any remaining contents from the microwave oven cavity. 2. Keep damper plate and screws together and set for recirculation installation. For wall or roof venting, changes must be made to ... NOTE: Skip this section if you are using recirculation installation. A Rotate Blower Motor The microwave oven is attached to the back of the microwave oven, remove it and set it may be attached to back of the microwave oven and lift up. Blower motor 5. If the mounting plate is set aside. 3. INSTALLATION...
Installation Instructions
Page 5
...Step 3 from "Wall Venting Installation Only." 2. A IMPORTANT: If blower motor is not correctly oriented, the 2 screws removed in the top of the microwave oven. Reattach damper plate. Slots 8. A. Exhaust port 5 Damper plate B. Repeat Step 1 from "Wall Venting Installation Only." 4. Damper plate tabs D.... C. NOTE: If blower motor is not positioned with flat sides facing the back of the microwave oven (as shown), performance will be reattached to back of microwave oven with 2 screws removed in Step 1 of "Wall Venting Installation Only." Securely tighten screws...
...Step 3 from "Wall Venting Installation Only." 2. A IMPORTANT: If blower motor is not correctly oriented, the 2 screws removed in the top of the microwave oven. Reattach damper plate. Slots 8. A. Exhaust port 5 Damper plate B. Repeat Step 1 from "Wall Venting Installation Only." 4. Damper plate tabs D.... C. NOTE: If blower motor is not positioned with flat sides facing the back of the microwave oven (as shown), performance will be reattached to back of microwave oven with 2 screws removed in Step 1 of "Wall Venting Installation Only." Securely tighten screws...
Installation Instructions
Page 6
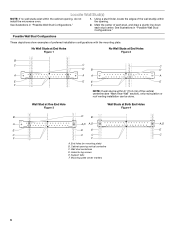
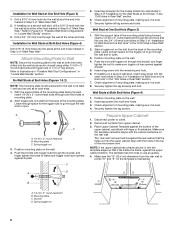
... line down each stud center. Wall stud centerlines D. Support tabs F. Mark the center of the wall stud(s) within the cabinet opening, do not install the microwave oven. 1. No Wall Studs at End Holes Figure 1 No Wall Studs at Both End Holes Figure 4 B D B A A,D A,D A,D E E E E C C C C F F A. See illustrations in "Possible Wall Stud Configurations." 2. Possible Wall...
... line down each stud center. Wall stud centerlines D. Support tabs F. Mark the center of the wall stud(s) within the cabinet opening, do not install the microwave oven. 1. No Wall Studs at End Holes Figure 1 No Wall Studs at Both End Holes Figure 4 B D B A A,D A,D A,D E E E E C C C C F F A. See illustrations in "Possible Wall Stud Configurations." 2. Possible Wall...
Installation Instructions
Page 7
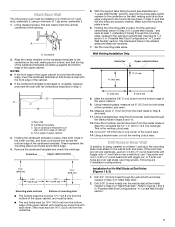
... mounting plate must attach to complete the 12" x 4" (30.5 x 10.2 cm) rectangle. Using a keyhole saw, cut out the venting cutout area. Mark Rear Wall The microwave oven must be 14¹⁄₈" (35.9 cm) from the marks made in Step 3, and that the end holes are over a wall stud, use...
... mounting plate must attach to complete the 12" x 4" (30.5 x 10.2 cm) rectangle. Using a keyhole saw, cut out the venting cutout area. Mark Rear Wall The microwave oven must be 14¹⁄₈" (35.9 cm) from the marks made in Step 3, and that the end holes are over a wall stud, use...
Installation Instructions
Page 8
... secured to make sure toggle nut has opened against the rear wall so that fits over the 3/4" (19 mm) hole drilled in Step 3 of the microwave oven. Start toggle nuts on the wall. 2. B A C A. 1/4-20 x 3" round-head bolt B. Spring toggle nut 3. Position mounting plate on the wall. 4. If installing on at least...
... secured to make sure toggle nut has opened against the rear wall so that fits over the 3/4" (19 mm) hole drilled in Step 3 of the microwave oven. Start toggle nuts on the wall. 2. B A C A. 1/4-20 x 3" round-head bolt B. Spring toggle nut 3. Position mounting plate on the wall. 4. If installing on at least...
Installation Instructions
Page 9
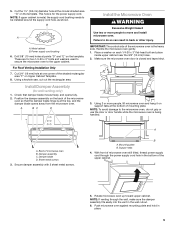
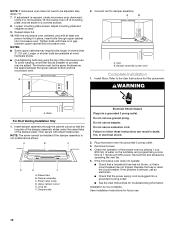
...in back or other injury. B A A. Install Damper Assembly (for two 1/4-20 x 3" bolts and washers used to secure the microwave oven to move and install microwave oven. Position the damper assembly on the back of the upper cabinet. 5. Using 2 or more people to the upper cabinet. ... area "G" on Upper Cabinet Template. 8. Place a washer on the template. Drill 3/8" (10 mm) holes at one corner of microwave oven B. 5. Handle the microwave oven gently. 1. Damper assembly C. Check that the damper blade hinge is being handled. NOTE: To avoid damage to be installed around...
...in back or other injury. B A A. Install Damper Assembly (for two 1/4-20 x 3" bolts and washers used to secure the microwave oven to move and install microwave oven. Position the damper assembly on the back of the upper cabinet. 5. Using 2 or more people to the upper cabinet. ... area "G" on Upper Cabinet Template. 8. Place a washer on the template. Drill 3/8" (10 mm) holes at one corner of microwave oven B. 5. Handle the microwave oven gently. 1. Damper assembly C. Check that the damper blade hinge is being handled. NOTE: To avoid damage to be installed around...
Installation Instructions
Page 10
...vent fan. 5. Save Installation Instructions for troubleshooting information. Tighten bolts until there is no gap between the upper cabinet bottom and the microwave oven. Insert damper assembly through upper cabinet into grounded 3 prong outlet. 3. Then secure with at least one person holding it ...cook time of 1 minute at most hardware stores. ■ Overtightening bolts may require bolts longer or shorter than 3" (7.6 cm). With the microwave oven centered, and with sheet metal screw. Vent B. WARNING A. Sheet metal screw D. Test vent fan and exhaust by placing 1 cup (250 ...
...vent fan. 5. Save Installation Instructions for troubleshooting information. Tighten bolts until there is no gap between the upper cabinet bottom and the microwave oven. Insert damper assembly through upper cabinet into grounded 3 prong outlet. 3. Then secure with at least one person holding it ...cook time of 1 minute at most hardware stores. ■ Overtightening bolts may require bolts longer or shorter than 3" (7.6 cm). With the microwave oven centered, and with sheet metal screw. Vent B. WARNING A. Sheet metal screw D. Test vent fan and exhaust by placing 1 cup (250 ...
Installation Instructions
Page 11
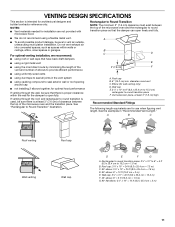
... using recirculation installation. Rectangular to Round Transition NOTE: The minimum 3" (7.6 cm) clearance must exist between the top of the microwave oven and the rectangular to seal exterior wall or roof opening around cap ■ not installing 2 elbows together, for optimal hood... performance If venting through the roof, and rectangular to round transition piece F. Vent extension piece, at least 3" (7.6 cm) of clearance between the top of the microwave oven and the transition piece. Wall cap: 3¹⁄₄" x 10" = 40 ft (8.3 x 25.4 cm = 12.2 m) F. 45° elbow: 6" =...
... using recirculation installation. Rectangular to Round Transition NOTE: The minimum 3" (7.6 cm) clearance must exist between the top of the microwave oven and the rectangular to seal exterior wall or roof opening around cap ■ not installing 2 elbows together, for optimal hood... performance If venting through the roof, and rectangular to round transition piece F. Vent extension piece, at least 3" (7.6 cm) of clearance between the top of the microwave oven and the transition piece. Wall cap: 3¹⁄₄" x 10" = 40 ft (8.3 x 25.4 cm = 12.2 m) F. 45° elbow: 6" =...

Installation Instructions
Page 12
... is a list of the installation hardware needs to round transition piece must not exceed the equivalent of 140 ft (42.7 m) for either type of the microwave oven. W10238252A SP PN W10238253A © 2008. One 3¹⁄₄" x 10" (8.3 x 25.4 cm) 90° elbow = 25 ft (7.6 m) B. 1 wall cap = ...in China The filler panels come in the system. When you will need the microwave oven model number and serial number. The total length of the microwave oven opening . For best performance, use when installing this microwave oven in a 36" (91.4 cm) or 42" (106.7 cm) ...
... is a list of the installation hardware needs to round transition piece must not exceed the equivalent of 140 ft (42.7 m) for either type of the microwave oven. W10238252A SP PN W10238253A © 2008. One 3¹⁄₄" x 10" (8.3 x 25.4 cm) 90° elbow = 25 ft (7.6 m) B. 1 wall cap = ...in China The filler panels come in the system. When you will need the microwave oven model number and serial number. The total length of the microwave oven opening . For best performance, use when installing this microwave oven in a 36" (91.4 cm) or 42" (106.7 cm) ...


