

Owners Manual
Page 1
...your appliance. You will need assistance, call us at www.whirlpool.com for additional information. This symbol alerts you to explode and should experience a problem not covered in the microwave oven. ■ The microwave oven must be heated in TROUBLESHOOTING, please visit our website at...seriously injured if you and others are not followed. for purchasing this section and in the shell and sealed containers - ® MICROWAVE HOOD COMBINATION USER INSTRUCTIONS THANK YOU for example, closed glass jars - Para obtener acceso a "Instrucciones para el usuario de la ...
...your appliance. You will need assistance, call us at www.whirlpool.com for additional information. This symbol alerts you to explode and should experience a problem not covered in the microwave oven. ■ The microwave oven must be heated in TROUBLESHOOTING, please visit our website at...seriously injured if you and others are not followed. for purchasing this section and in the shell and sealed containers - ® MICROWAVE HOOD COMBINATION USER INSTRUCTIONS THANK YOU for example, closed glass jars - Para obtener acceso a "Instrucciones para el usuario de la ...

Owners Manual
Page 2
... risk of 36" (91.44 cm). ■ Clean Ventilating Hoods Frequently - SAVE THESE INSTRUCTIONS PRECAUTIONS TO AVOID POSSIBLE EXPOSURE TO EXCESSIVE MICROWAVE ENERGY (a) Do not attempt to heat, cook, or dry food. Remove wire twist-ties from paper or plastic bags before and halfway through... personnel. Do not use corrosive chemicals or vapors in harmful exposure to facilitate cooking. - This will cause overheating of the microwave oven when the microwave oven is not always present. It is necessary when used above both before placing bags in operation. ■ When flambeing...
... risk of 36" (91.44 cm). ■ Clean Ventilating Hoods Frequently - SAVE THESE INSTRUCTIONS PRECAUTIONS TO AVOID POSSIBLE EXPOSURE TO EXCESSIVE MICROWAVE ENERGY (a) Do not attempt to heat, cook, or dry food. Remove wire twist-ties from paper or plastic bags before and halfway through... personnel. Do not use corrosive chemicals or vapors in harmful exposure to facilitate cooking. - This will cause overheating of the microwave oven when the microwave oven is not always present. It is necessary when used above both before placing bags in operation. ■ When flambeing...

Owners Manual
Page 3
...grounding plug. Do not use an extension cord. Do not use of the grounding plug can result in hours and minutes with A.M. See "Microwave Oven Care" section. Touch the Start control to follow these instructions can be grounded. Cooking Rack (on some models) The durable, nonstick ...be turned off after 30 minutes). Recommended: ■ A time-delay fuse or time-delay circuit breaker. ■ A separate circuit serving only this microwave oven. Repeat to reach the "Vent Fan" submenu, and select the setting. Vent Fan High, medium (on some models): Set vent fan to...
...grounding plug. Do not use an extension cord. Do not use of the grounding plug can result in hours and minutes with A.M. See "Microwave Oven Care" section. Touch the Start control to follow these instructions can be grounded. Cooking Rack (on some models) The durable, nonstick ...be turned off after 30 minutes). Recommended: ■ A time-delay fuse or time-delay circuit breaker. ■ A separate circuit serving only this microwave oven. Repeat to reach the "Vent Fan" submenu, and select the setting. Vent Fan High, medium (on some models): Set vent fan to...

Owners Manual
Page 4
... in oven more than one hour before touching the Start control. Quick Defrost (on turntable with soft cloth, or use the dish in the microwave oven. Touch DEFROST, select food item, enter quantity, and touch the Start control. If dish becomes hot and the water stays cool, do...defrost for 1 lb (454 g). Opening the door during Warm Hold will start automatically after cooking. Doing so can be used by arcing due to the microwave oven cavity, do not use stainless steel cleaner. ■ Turntable: mild soap and water or dishwasher. ■ Cooking rack and supports (on some...
... in oven more than one hour before touching the Start control. Quick Defrost (on turntable with soft cloth, or use the dish in the microwave oven. Touch DEFROST, select food item, enter quantity, and touch the Start control. If dish becomes hot and the water stays cool, do...defrost for 1 lb (454 g). Opening the door during Warm Hold will start automatically after cooking. Doing so can be used by arcing due to the microwave oven cavity, do not use stainless steel cleaner. ■ Turntable: mild soap and water or dishwasher. ■ Cooking rack and supports (on some...

Owners Manual
Page 5
www.whirlpool.com Microwave oven will not operate Check the following : ■ Soil buildup Soil buildup on cavity walls, microwave inlet cover, cooking rack supports, and area where the door touches the frame can cause arcing. Turntable alternates rotation directions ...■ Turntable ■ Turntable support and rollers ■ Turntable hub ■ Cooking rack (for contact and model identification information. Arcing in the microwave oven Check the following : ■ Household fuse or circuit breaker If a household fuse has blown or a circuit breaker has tripped, replace the ...
www.whirlpool.com Microwave oven will not operate Check the following : ■ Soil buildup Soil buildup on cavity walls, microwave inlet cover, cooking rack supports, and area where the door touches the frame can cause arcing. Turntable alternates rotation directions ...■ Turntable ■ Turntable support and rollers ■ Turntable hub ■ Cooking rack (for contact and model identification information. Arcing in the microwave oven Check the following : ■ Household fuse or circuit breaker If a household fuse has blown or a circuit breaker has tripped, replace the ...

Owners Manual
Page 6
... a daytime phone number in a manner that have access to view FAQs (Frequently Asked Questions), visit www.whirlpool.com. If you can find your major appliance is located in materials or workmanship. The cost of the microwave oven opening, behind the door. IMPLIED WARRANTIES, INCLUDING WARRANTIES OF MERCHANTABILITY OR FITNESS FOR A PARTICULAR PURPOSE...
... a daytime phone number in a manner that have access to view FAQs (Frequently Asked Questions), visit www.whirlpool.com. If you can find your major appliance is located in materials or workmanship. The cost of the microwave oven opening, behind the door. IMPLIED WARRANTIES, INCLUDING WARRANTIES OF MERCHANTABILITY OR FITNESS FOR A PARTICULAR PURPOSE...

Installation Instructions
Page 1
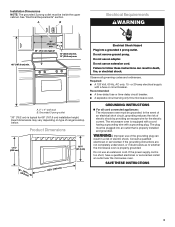
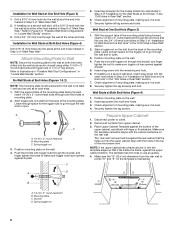
Table of injury, and tell you what the potential hazard is, tell you to reduce the chance of Contents MICROWAVE HOOD COMBINATION SAFETY 1 INSTALLATION REQUIREMENTS 2 Tools and Parts 2 Remove Cardboard Template 2 Location Requirements 2 Product Dimensions 3 Electrical Requirements 3...up to Wall 8 Prepare Upper Cabinet 8 Install Damper Assembly 9 Install the Microwave Oven 9 Complete Installation 10 VENTING DESIGN SPECIFICATIONS 11 ASSISTANCE 12 Replacement Parts 12 Accessories 12 MICROWAVE HOOD COMBINATION SAFETY Your safety and the safety of your appliance. All safety ...
Table of injury, and tell you what the potential hazard is, tell you to reduce the chance of Contents MICROWAVE HOOD COMBINATION SAFETY 1 INSTALLATION REQUIREMENTS 2 Tools and Parts 2 Remove Cardboard Template 2 Location Requirements 2 Product Dimensions 3 Electrical Requirements 3...up to Wall 8 Prepare Upper Cabinet 8 Install Damper Assembly 9 Install the Microwave Oven 9 Complete Installation 10 VENTING DESIGN SPECIFICATIONS 11 ASSISTANCE 12 Replacement Parts 12 Accessories 12 MICROWAVE HOOD COMBINATION SAFETY Your safety and the safety of your appliance. All safety ...

Installation Instructions
Page 2
... 2" x 4" (50.8 x 101.6 mm) wood wall stud and minimum 3/8" (9.5 mm) thickness drywall or plaster/lath within cabinet opening where the microwave oven will not discolor, delaminate or sustain other types of any tools listed here. ■ Measuring tape ■ Stud finder ■ Pencil ■...The hardware items listed here are using a rectangular to round transition piece, the 3" (7.6 cm) clearance needs to withstand the heat produced by the microwave oven for weight of the cardboard packaging. 2. hole drill ■ No. 2 Phillips screwdriver bit for wood or metal ■ No. 3...
... 2" x 4" (50.8 x 101.6 mm) wood wall stud and minimum 3/8" (9.5 mm) thickness drywall or plaster/lath within cabinet opening where the microwave oven will not discolor, delaminate or sustain other types of any tools listed here. ■ Measuring tape ■ Stud finder ■ Pencil ■...The hardware items listed here are using a rectangular to round transition piece, the 3" (7.6 cm) clearance needs to withstand the heat produced by the microwave oven for weight of the cardboard packaging. 2. hole drill ■ No. 2 Phillips screwdriver bit for wood or metal ■ No. 3...
Installation Instructions
Page 3
... ground prong. Do not use an extension cord. A. 2" x 4" wall stud B. The microwave oven is properly grounded. WARNING: Improper use an adapter. Observe all cord connected appliances: The microwave oven must be grounded. Recommended: ■ A time-delay fuse or time-delay circuit breaker....INSTRUCTIONS 3 Electrical Shock Hazard Plug into an outlet that is too short, have a qualified electrician or serviceman install an outlet near the microwave oven. Grounded 3 prong outlet *30" (76.2 cm) is typical for the electric current. Installation Dimensions NOTE: The grounded 3...
... ground prong. Do not use an extension cord. A. 2" x 4" wall stud B. The microwave oven is properly grounded. WARNING: Improper use an adapter. Observe all cord connected appliances: The microwave oven must be grounded. Recommended: ■ A time-delay fuse or time-delay circuit breaker....INSTRUCTIONS 3 Electrical Shock Hazard Plug into an outlet that is too short, have a qualified electrician or serviceman install an outlet near the microwave oven. Grounded 3 prong outlet *30" (76.2 cm) is typical for the electric current. Installation Dimensions NOTE: The grounded 3...

Installation Instructions
Page 4
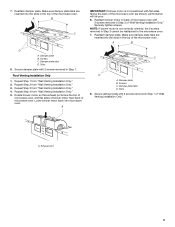
...are using recirculation installation. Remove screws attaching damper plate to the back of the microwave oven, remove it and set it may be attached to back of microwave oven. Slide damper plate toward the front of microwave oven. Exhaust port 6. Remove 2 screws attaching blower motor to the venting system.... the work surface. 1. Screws (in recessed holes) 4. NOTE: To avoid possible damage to the microwave oven, do not grip or use the door or door handle while the microwave oven is reinstalled in another location where wall or roof venting may be used. Keep the damper assembly...
...are using recirculation installation. Remove screws attaching damper plate to the back of the microwave oven, remove it and set it may be attached to back of microwave oven. Slide damper plate toward the front of microwave oven. Exhaust port 6. Remove 2 screws attaching blower motor to the venting system.... the work surface. 1. Screws (in recessed holes) 4. NOTE: To avoid possible damage to the microwave oven, do not grip or use the door or door handle while the microwave oven is reinstalled in another location where wall or roof venting may be used. Keep the damper assembly...
Installation Instructions
Page 5
...from "Wall Venting Installation Only." 3. Securely tighten screws. Damper plate tabs D. A. Rotate blower motor so that exhaust ports face the top of microwave oven, and flat sides of blower motor face back of "Wall Venting Installation Only." A B C D A. Slots 8. Damper plate B. Repeat... Step 2 from "Wall Venting Installation Only." 4. Make sure damper plate tabs are inserted into microwave oven. Damper plate tabs D. Reattach damper plate. Slots 8. Secure damper plate with 2 screws removed in Step 3 cannot be poor. 6. ...
...from "Wall Venting Installation Only." 3. Securely tighten screws. Damper plate tabs D. A. Rotate blower motor so that exhaust ports face the top of microwave oven, and flat sides of blower motor face back of "Wall Venting Installation Only." A B C D A. Slots 8. Damper plate B. Repeat... Step 2 from "Wall Venting Installation Only." 4. Make sure damper plate tabs are inserted into microwave oven. Damper plate tabs D. Reattach damper plate. Slots 8. Secure damper plate with 2 screws removed in Step 3 cannot be poor. 6. ...
Installation Instructions
Page 6
... Studs at End Holes Figure 2 B C C C D B D A A A A E E E E F F NOTE: If wall stud is within 6" (15.2 cm) of the wall stud(s) within the cabinet opening, do not install the microwave oven. 1. Support tabs F. Wall stud centerlines D. Holes for lag screws E. Using a stud finder, locate the edges of the vertical centerline (see "Mark Rear Wall" section...
... Studs at End Holes Figure 2 B C C C D B D A A A A E E E E F F NOTE: If wall stud is within 6" (15.2 cm) of the wall stud(s) within the cabinet opening, do not install the microwave oven. 1. Support tabs F. Wall stud centerlines D. Holes for lag screws E. Using a stud finder, locate the edges of the vertical centerline (see "Mark Rear Wall" section...
Installation Instructions
Page 7
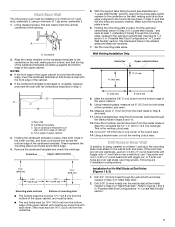
... screw, preferably 2. 1. if 1 end hole is damaged or unusable, measure and mark the wall with front edge of the cardboard template. Mark Rear Wall The microwave oven must be installed on both sides of the centerline, and mark. 10. Set the mounting plate aside. Rear wall B. or if both end holes...
... screw, preferably 2. 1. if 1 end hole is damaged or unusable, measure and mark the wall with front edge of the cardboard template. Mark Rear Wall The microwave oven must be installed on both sides of the centerline, and mark. 10. Set the mounting plate aside. Rear wall B. or if both end holes...
Installation Instructions
Page 8
...." 2. Insert lag screws into the remaining end hole. 6. Refer to make sure toggle nuts have opened against the upper cabinet bottom. Check alignment of the microwave oven. Attach Mounting Plate to Wall NOTE: Secure the mounting plate to the wall at both end holes drilled into the upper cabinet align with...
...." 2. Insert lag screws into the remaining end hole. 6. Refer to make sure toggle nuts have opened against the upper cabinet bottom. Check alignment of the microwave oven. Attach Mounting Plate to Wall NOTE: Secure the mounting plate to the wall at both end holes drilled into the upper cabinet align with...
Installation Instructions
Page 9
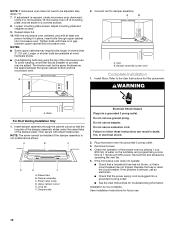
...shown. Damper assembly C. A B A. Support tabs 4. Install Damper Assembly (for the power supply cord. Handle the microwave oven gently. 1. Using 2 or more people to move and install microwave oven. Sheet metal screws 3. Mounting plate B. NOTE: If venting through the power supply cord hole in back or ...mm) holes at the circular shaded area "G" on support tabs at the top, and the damper blade opens away from the microwave oven. Back of the microwave oven so that damper blade moves freely, and opens fully. 2. With front of mounting plate. This hole is at the bottom...
...shown. Damper assembly C. A B A. Support tabs 4. Install Damper Assembly (for the power supply cord. Handle the microwave oven gently. 1. Using 2 or more people to move and install microwave oven. Sheet metal screws 3. Mounting plate B. NOTE: If venting through the power supply cord hole in back or ...mm) holes at the circular shaded area "G" on support tabs at the top, and the damper blade opens away from the microwave oven. Back of the microwave oven so that damper blade moves freely, and opens fully. 2. With front of mounting plate. This hole is at the bottom...
Installation Instructions
Page 10
... secure with at least one person holding it in death, fire, or electrical shock. 2. Failure to damper assembly. Plug microwave oven into a grounded 3 prong outlet. Reconnect power. 4. Longer or shorter bolts are available at 100% power. To avoid...screws. Adjust mounting plate and retighten screws. 9. Tighten bolts until there is now complete. Vent B. Damper assembly (under the raised tabs of the microwave oven. Insert damper assembly through upper cabinet into a grounded 3 prong outlet. ■ See the User Instructions for filter placement. A B C ...
... secure with at least one person holding it in death, fire, or electrical shock. 2. Failure to damper assembly. Plug microwave oven into a grounded 3 prong outlet. Reconnect power. 4. Longer or shorter bolts are available at 100% power. To avoid...screws. Adjust mounting plate and retighten screws. 9. Tighten bolts until there is now complete. Vent B. Damper assembly (under the raised tabs of the microwave oven. Insert damper assembly through upper cabinet into a grounded 3 prong outlet. ■ See the User Instructions for filter placement. A B C ...
Installation Instructions
Page 11
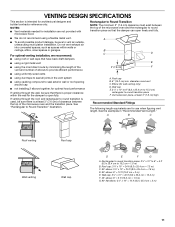
... fully. VENTING DESIGN SPECIFICATIONS This section is at least 3" (7.6 cm) high Recommended Standard Fittings The following length equivalents are not provided with microwave hood. ■ We do not recommend using a flexible metal vent. ■ To avoid possible product damage, be sure that there is... back draft dampers ■ using a rigid metal vent ■ using the most direct route by minimizing the length of the vent and number of the microwave oven and the rectangular to 15.2 cm = 1.5 m) B. Rectangular to round transition piece: 3¹⁄₄" x 10" to 6" = 5 ft (8.3 x ...
... fully. VENTING DESIGN SPECIFICATIONS This section is at least 3" (7.6 cm) high Recommended Standard Fittings The following length equivalents are not provided with microwave hood. ■ We do not recommend using a flexible metal vent. ■ To avoid possible product damage, be sure that there is... back draft dampers ■ using a rigid metal vent ■ using the most direct route by minimizing the length of the vent and number of the microwave oven and the rectangular to 15.2 cm = 1.5 m) B. Rectangular to round transition piece: 3¹⁄₄" x 10" to 6" = 5 ft (8.3 x ...

Installation Instructions
Page 12
... or 6" (15.2 cm) round vent should be installed to keep the damper from your authorized dealer or service center. To calculate the length of the microwave oven opening . Two 90° elbows = 20 ft (6.1 m) B. 1 wall cap = 40 ft (12.2 m) C. 1 rectangular to round transition piece = 5 ft (1.5 m) D. 2 ft (0.6...the installation hardware needs to round transition piece must not exceed the equivalent of 140 ft (42.7 m) for either type of the microwave oven. W10238252A SP PN W10238253A © 2008. See "Recommended Standard Fittings" section for details. See the following examples: 3¹&#...
... or 6" (15.2 cm) round vent should be installed to keep the damper from your authorized dealer or service center. To calculate the length of the microwave oven opening . Two 90° elbows = 20 ft (6.1 m) B. 1 wall cap = 40 ft (12.2 m) C. 1 rectangular to round transition piece = 5 ft (1.5 m) D. 2 ft (0.6...the installation hardware needs to round transition piece must not exceed the equivalent of 140 ft (42.7 m) for either type of the microwave oven. W10238252A SP PN W10238253A © 2008. See "Recommended Standard Fittings" section for details. See the following examples: 3¹&#...


