Installation Instructions
Page 1
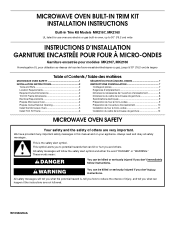
..." (76,2 cm) de largeur Table of Contents / Table des matières MICROWAVE OVEN SAFETY 1 INSTALLATION INSTRUCTIONS 2 Tools and Parts 2 Location Requirements 2 Required Cutout Dimensions 2 Trim Kit Frame Dimensions 3 Electrical Requirements 3 Prepare Microwave Oven 3 Prepare Cutout/Cabinet Opening 4 Install the Microwave Oven 5 Install Trim Kit Frame 6 SÉCURITÉ DU FOUR À MICRO-ONDES 7 INSTRUCTIONS D'INSTALLATION 7 Outillage et pièces 7 Exigences d'emplacement 7 Dimensions nécessaires de l'ouverture d'encastrement 8 Dimensions du cadre de la trousse...
..." (76,2 cm) de largeur Table of Contents / Table des matières MICROWAVE OVEN SAFETY 1 INSTALLATION INSTRUCTIONS 2 Tools and Parts 2 Location Requirements 2 Required Cutout Dimensions 2 Trim Kit Frame Dimensions 3 Electrical Requirements 3 Prepare Microwave Oven 3 Prepare Cutout/Cabinet Opening 4 Install the Microwave Oven 5 Install Trim Kit Frame 6 SÉCURITÉ DU FOUR À MICRO-ONDES 7 INSTRUCTIONS D'INSTALLATION 7 Outillage et pièces 7 Exigences d'emplacement 7 Dimensions nécessaires de l'ouverture d'encastrement 8 Dimensions du cadre de la trousse...
Installation Instructions
Page 2
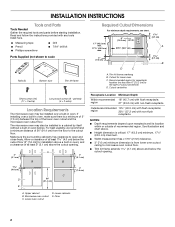
...) min. The microwave oven may be installed in a cabinet by itself (without a built-in oven), and a clearance of 36" (91.4 cm) from lower oven cutout ceiling to microwave oven cutout floor. ■ Trim kit frame extends 1 2.7 cm) above the cutout opening . 2 Read and follow the instructions provided with non-flush receptacle NOTES: ■ Depth requirements depend upon receptacle and its location within or outside of cutout centerline) D. Upper cabinet B. Recommended...
...) min. The microwave oven may be installed in a cabinet by itself (without a built-in oven), and a clearance of 36" (91.4 cm) from lower oven cutout ceiling to microwave oven cutout floor. ■ Trim kit frame extends 1 2.7 cm) above the cutout opening . 2 Read and follow the instructions provided with non-flush receptacle NOTES: ■ Depth requirements depend upon receptacle and its location within or outside of cutout centerline) D. Upper cabinet B. Recommended...
Installation Instructions
Page 3
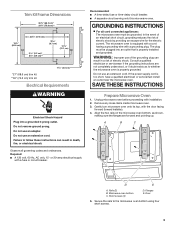
... electric shock by providing an escape wire for the electric current. Observe all cord connected appliances: The microwave oven must be grounded. or 20-amp electrical supply with installation. 2. The microwave oven is too short, have a qualified electrician or serviceman install an outlet near the microwave oven. SAVE THESE INSTRUCTIONS Prepare Microwave Oven 1. A B C D E A. If the power supply cord is equipped with a cord having a grounding wire with the door facing forward (toward installer). 4. Trim Kit Frame Dimensions...
... electric shock by providing an escape wire for the electric current. Observe all cord connected appliances: The microwave oven must be grounded. or 20-amp electrical supply with installation. 2. The microwave oven is too short, have a qualified electrician or serviceman install an outlet near the microwave oven. SAVE THESE INSTRUCTIONS Prepare Microwave Oven 1. A B C D E A. If the power supply cord is equipped with a cord having a grounding wire with the door facing forward (toward installer). 4. Trim Kit Frame Dimensions...

Installation Instructions
Page 4
... 3. Bottom duct mounting holes 5. Bottom duct D. Realign and install the bottom duct with the centerline drawn in the opening, with centerline 4 Using 7/64" drill, drill pilot holes through the bottom duct onto the cutout floor. Place the bottom duct in Step 1 above. Cutout floor B. Short screws (3) B. Bottom duct B. Center arrows, aligned with the flange resting against the bottom front facing of the cutout/cabinet opening . 4. Using 7/64...
... 3. Bottom duct mounting holes 5. Bottom duct D. Realign and install the bottom duct with the centerline drawn in the opening, with centerline 4 Using 7/64" drill, drill pilot holes through the bottom duct onto the cutout floor. Place the bottom duct in Step 1 above. Cutout floor B. Short screws (3) B. Bottom duct B. Center arrows, aligned with the flange resting against the bottom front facing of the cutout/cabinet opening . 4. Using 7/64...
Installation Instructions
Page 5
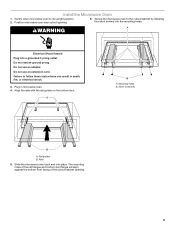
... the microwave oven back and into the mounting holes. Do not use an adapter. Rail guides B. Failure to its upright position. 2. Plug in death, fire, or electrical shock. 3. Do not remove ground prong. Short screws (4) B A. A WARNING Electrical Shock Hazard Plug into a grounded 3 prong outlet. Mounting holes B. Install the Microwave Oven 1. Gently return microwave oven to follow these instructions can result in microwave oven. 4. Position microwave oven near cutout opening . 5 The mounting holes of...
... the microwave oven back and into the mounting holes. Do not use an adapter. Rail guides B. Failure to its upright position. 2. Plug in death, fire, or electrical shock. 3. Do not remove ground prong. Short screws (4) B A. A WARNING Electrical Shock Hazard Plug into a grounded 3 prong outlet. Mounting holes B. Install the Microwave Oven 1. Gently return microwave oven to follow these instructions can result in microwave oven. 4. Position microwave oven near cutout opening . 5 The mounting holes of...
Installation Instructions
Page 6
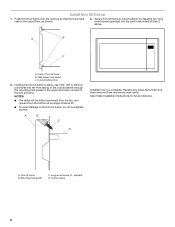
... lower corners of trim kit frame B. Save these Installation Instructions for future reference. Trim kit frame B. Secure trim kit frame to the trim kit frame, do not overtighten screws. Replace any loose items that the lower tabs rest on the cutout floor, as shown. 3. D A. Cutout ceiling 6 A B C Installation is now complete. Mounting hole guide C. Long wood screw (4 - painted) D. Install Trim Kit Frame 1. Position trim kit frame over the opening so that have been removed from the...
... lower corners of trim kit frame B. Save these Installation Instructions for future reference. Trim kit frame B. Secure trim kit frame to the trim kit frame, do not overtighten screws. Replace any loose items that the lower tabs rest on the cutout floor, as shown. 3. D A. Cutout ceiling 6 A B C Installation is now complete. Mounting hole guide C. Long wood screw (4 - painted) D. Install Trim Kit Frame 1. Position trim kit frame over the opening so that have been removed from the...
Specification Sheet
Page 1
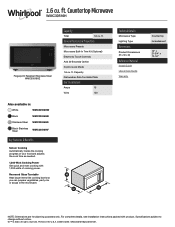
... the cooking progress of your food and adjusts the cook time as needed. 1,200-Watt Cooking Power Get quick and even cooking with product. Capacity Dishwasher-Safe Turntable Plate Electrical Details Amps 15 Volts 120 Technical Details Microwave Type Lighting Type Dimensions Product Dimensions (H x W x D) Reference Material Install Guide Use & Care Guide Warranty Countertop Incandescent 13" x 21-3/4" x 17-1/4" NOTE: Dimensions are for planning purposes only. For complete details, see Installation Instructions packed with 1,200 watts of cooking power. Specifications subject...
... the cooking progress of your food and adjusts the cook time as needed. 1,200-Watt Cooking Power Get quick and even cooking with product. Capacity Dishwasher-Safe Turntable Plate Electrical Details Amps 15 Volts 120 Technical Details Microwave Type Lighting Type Dimensions Product Dimensions (H x W x D) Reference Material Install Guide Use & Care Guide Warranty Countertop Incandescent 13" x 21-3/4" x 17-1/4" NOTE: Dimensions are for planning purposes only. For complete details, see Installation Instructions packed with 1,200 watts of cooking power. Specifications subject...


