Installation Guide
Page 1
...-ondes 9 Préparation de l'ouverture d'encastrement 9 Installation du four à micro-ondes 10 Installation du cadre de la trousse de garniture 11 MICROWAVE OVEN SAFETY Your safety and the safety of injury, and tell you what can be killed or seriously injured if you and others are not... follow instructions. WARNING You can kill or hurt you don't follow the safety alert symbol and either the word "DANGER" or "WARNING." MICROWAVE OVEN BUILT-IN TRIM KIT INSTALLATION INSTRUCTIONS Built-In Trim Kit Models MK2167, MK2160 UL listed for use over any electric or gas built-in...
...-ondes 9 Préparation de l'ouverture d'encastrement 9 Installation du four à micro-ondes 10 Installation du cadre de la trousse de garniture 11 MICROWAVE OVEN SAFETY Your safety and the safety of injury, and tell you what can be killed or seriously injured if you and others are not... follow instructions. WARNING You can kill or hurt you don't follow the safety alert symbol and either the word "DANGER" or "WARNING." MICROWAVE OVEN BUILT-IN TRIM KIT INSTALLATION INSTRUCTIONS Built-In Trim Kit Models MK2167, MK2160 UL listed for use over any electric or gas built-in...
Installation Guide
Page 2
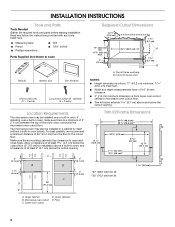
... may be installed in a cabinet by itself (without a built-in oven), and a clearance of the lower oven cutout and the microwave oven cutout floor. Floor Required Cutout Dimensions 22 ³⁄₄" (57.8 cm) 1 2.7 cm) 17" (43.2 cm) min. ...(7.6 cm) A. INSTALLATION INSTRUCTIONS Tools and Parts Tools Needed Gather the required tools and parts before starting installation. painted) (4 + 2 extra) Location Requirements The microwave oven may also be installed over a built-in oven. Lower oven cutout D. For best usability, we recommend a minimum distance of at least 1 4.0 cm...
... may be installed in a cabinet by itself (without a built-in oven), and a clearance of the lower oven cutout and the microwave oven cutout floor. Floor Required Cutout Dimensions 22 ³⁄₄" (57.8 cm) 1 2.7 cm) 17" (43.2 cm) min. ...(7.6 cm) A. INSTALLATION INSTRUCTIONS Tools and Parts Tools Needed Gather the required tools and parts before starting installation. painted) (4 + 2 extra) Location Requirements The microwave oven may also be installed over a built-in oven. Lower oven cutout D. For best usability, we recommend a minimum distance of at least 1 4.0 cm...
Installation Guide
Page 3
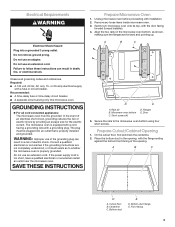
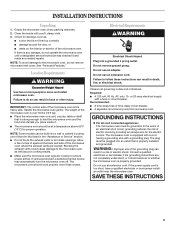
... use an extension cord. If the power supply cord is equipped with a cord having a grounding wire with installation. 2. SAVE THESE INSTRUCTIONS Prepare Microwave Oven 1. A B C D E A. Door 5. Prepare Cutout/Cabinet Opening 1. Centerline C. Bottom duct flange E. Front facing 3 In the ... 15- Recommended: ■ A time-delay fuse or time-delay circuit breaker. ■ A separate circuit serving only this microwave oven. Remove any loose items inside microwave oven. 3. A B C D A. Do not use an adapter. GROUNDING INSTRUCTIONS ■ For all governing codes and ordinances...
... use an extension cord. If the power supply cord is equipped with a cord having a grounding wire with installation. 2. SAVE THESE INSTRUCTIONS Prepare Microwave Oven 1. A B C D E A. Door 5. Prepare Cutout/Cabinet Opening 1. Centerline C. Bottom duct flange E. Front facing 3 In the ... 15- Recommended: ■ A time-delay fuse or time-delay circuit breaker. ■ A separate circuit serving only this microwave oven. Remove any loose items inside microwave oven. 3. A B C D A. Do not use an adapter. GROUNDING INSTRUCTIONS ■ For all governing codes and ordinances...

Installation Guide
Page 4
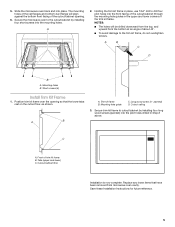
...duct with the centerline drawn in Step 4. 6. A B A. Align the center arrows on the bottom duct. Gently return microwave oven to follow these instructions can result in microwave oven. 4. WARNING A B A. Do not use an extension cord. A B A. Rails Bottom duct B. Mark the three...cabinet opening . Bottom duct mounting holes 5. Using 7/64" drill, drill pilot holes through the bottom duct onto the cutout floor. Position microwave oven near cutout opening . Rail guides B. A Electrical Shock Hazard Plug into the bottom front facing of the bottom duct flange into a...
...duct with the centerline drawn in Step 4. 6. A B A. Align the center arrows on the bottom duct. Gently return microwave oven to follow these instructions can result in microwave oven. 4. WARNING A B A. Do not use an extension cord. A B A. Rails Bottom duct B. Mark the three...cabinet opening . Bottom duct mounting holes 5. Using 7/64" drill, drill pilot holes through the bottom duct onto the cutout floor. Position microwave oven near cutout opening . Rail guides B. A Electrical Shock Hazard Plug into the bottom front facing of the bottom duct flange into a...
Installation Guide
Page 5
The mounting holes of the rail flanges and bottom duct flange will be drilled downward from the top, and upward from microwave oven cavity. NOTES: ■ The holes will align against the bottom front facing of the trim kit frame. Mounting holes B. A B A. Cutout/cabinet... loose items that the lower tabs rest on the cutout floor, as shown. Trim kit frame B. Mounting hole guide C. Cutout ceiling 3. C A. A B C D B A. 5. Slide the microwave oven back and into the mounting holes. Secure the microwave oven to the trim kit frame, do not overtighten screws. A 2.
The mounting holes of the rail flanges and bottom duct flange will be drilled downward from the top, and upward from microwave oven cavity. NOTES: ■ The holes will align against the bottom front facing of the trim kit frame. Mounting holes B. A B A. Cutout/cabinet... loose items that the lower tabs rest on the cutout floor, as shown. Trim kit frame B. Mounting hole guide C. Cutout ceiling 3. C A. A B C D B A. 5. Slide the microwave oven back and into the mounting holes. Secure the microwave oven to the trim kit frame, do not overtighten screws. A 2.

Warranty Information
Page 1
... damage to use your sales slip together for in accordance with original model/serial numbers that vary from your Whirlpool Countertop Microwave should be properly packaged to the appliance. 9. Damage resulting from defects in materials or workmanship and is used...rights reserved. ® Registered Trademark/TM Trademark of purchase, when this microwave is required to know your model, serial number and shipping address. 3. Whirlpool will be easily determined. WHIRLPOOL® COUNTERTOP MICROWAVE LIMITED WARRANTY ONE YEAR LIMITED WARRANTY For one -year limited warranty of ...
... damage to use your sales slip together for in accordance with original model/serial numbers that vary from your Whirlpool Countertop Microwave should be properly packaged to the appliance. 9. Damage resulting from defects in materials or workmanship and is used...rights reserved. ® Registered Trademark/TM Trademark of purchase, when this microwave is required to know your model, serial number and shipping address. 3. Whirlpool will be easily determined. WHIRLPOOL® COUNTERTOP MICROWAVE LIMITED WARRANTY ONE YEAR LIMITED WARRANTY For one -year limited warranty of ...

Use & Care Guide
Page 1
or visit our website at... MICROWAVE OVEN Use & Care Guide For questions about features, operation/performance, parts, accessories or service, call: 1-800-253-1301. www.whirlpool.com Table of Contents 2 W10434129B Model WMC30516
or visit our website at... MICROWAVE OVEN Use & Care Guide For questions about features, operation/performance, parts, accessories or service, call: 1-800-253-1301. www.whirlpool.com Table of Contents 2 W10434129B Model WMC30516
Use & Care Guide
Page 2
... SAFETY 3 INSTALLATION INSTRUCTIONS 5 Unpacking 5 Location Requirements 5 Electrical Requirements 5 PARTS AND FEATURES 6 Turntable 6 MICROWAVE OVEN CONTROL 6 Display 7 Start 7 Add 30 Seconds 7 Cancel 7 Tones 7 Clock 7 Timer 7 Control Lock 7 MICROWAVE OVEN USE 8 Food Characteristics 8 Cooking Guidelines 8 Cookware and Dinnerware 8 Aluminum Foil and Metal 9 Microwave Cooking Power 9 Manual Cooking 10 Cooking in Stages 10 Favorite 10 Sensor...
... SAFETY 3 INSTALLATION INSTRUCTIONS 5 Unpacking 5 Location Requirements 5 Electrical Requirements 5 PARTS AND FEATURES 6 Turntable 6 MICROWAVE OVEN CONTROL 6 Display 7 Start 7 Add 30 Seconds 7 Cancel 7 Tones 7 Clock 7 Timer 7 Control Lock 7 MICROWAVE OVEN USE 8 Food Characteristics 8 Cooking Guidelines 8 Cookware and Dinnerware 8 Aluminum Foil and Metal 9 Microwave Cooking Power 9 Manual Cooking 10 Cooking in Stages 10 Favorite 10 Sensor...
Use & Care Guide
Page 3
...; Do not clean with any appliance, close supervision is removed from paper or plastic bags before removing the container. - Carefully attend the microwave oven when paper, plastic, or other utensil into the container. ■ Oversized foods or oversized metal utensils should not be killed or... properly grounded outlet. SAVE THESE INSTRUCTIONS 3 Pieces can be inserted in this manual. for industrial or laboratory use as described in the microwave oven as water, coffee, or tea are very important. Do not use the cavity for examination, repair, or adjustment. ■ ...
...; Do not clean with any appliance, close supervision is removed from paper or plastic bags before removing the container. - Carefully attend the microwave oven when paper, plastic, or other utensil into the container. ■ Oversized foods or oversized metal utensils should not be killed or... properly grounded outlet. SAVE THESE INSTRUCTIONS 3 Pieces can be inserted in this manual. for industrial or laboratory use as described in the microwave oven as water, coffee, or tea are very important. Do not use the cavity for examination, repair, or adjustment. ■ ...
Use & Care Guide
Page 4
...in a wet basement, or near water - IMPORTANT SAFETY INSTRUCTIONS ■ Do not operate any heating or cooking appliance beneath the microwave oven. ■ Do not mount microwave oven over or near any portion of a heating or cooking appliance. ■ Do not use paper products when appliance is operated..." mode (on models with such features). ■ Do not store any materials, other than manufacturer's recommended accessories, in this microwave oven when not in use the microwave oven near a swimming pool, or similar locations. ■ Do not immerse cord or plug in water. ■ Keep cord...
...in a wet basement, or near water - IMPORTANT SAFETY INSTRUCTIONS ■ Do not operate any heating or cooking appliance beneath the microwave oven. ■ Do not mount microwave oven over or near any portion of a heating or cooking appliance. ■ Do not use paper products when appliance is operated..." mode (on models with such features). ■ Do not store any materials, other than manufacturer's recommended accessories, in this microwave oven when not in use the microwave oven near a swimming pool, or similar locations. ■ Do not immerse cord or plug in water. ■ Keep cord...
Use & Care Guide
Page 5
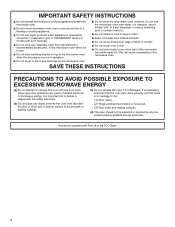
... Features." Location Requirements WARNING Excessive Weight Hazard Use two or more people to the microwave oven, do not remove microwave inlet cover. Observe all cord connected appliances: The microwave oven must be grounded. The microwave oven is equipped with a cord having a grounding wire with a fuse or circuit...serviceman if the grounding instructions are not completely understood, or if doubt exists as poor cooking results. ■ Make sure the microwave oven legs are in place to ensure proper airflow. If the power supply cord is the heavy side. Do not remove ground...
... Features." Location Requirements WARNING Excessive Weight Hazard Use two or more people to the microwave oven, do not remove microwave inlet cover. Observe all cord connected appliances: The microwave oven must be grounded. The microwave oven is equipped with a cord having a grounding wire with a fuse or circuit...serviceman if the grounding instructions are not completely understood, or if doubt exists as poor cooking results. ■ Make sure the microwave oven legs are in place to ensure proper airflow. If the power supply cord is the heavy side. Do not remove ground...
Use & Care Guide
Page 6
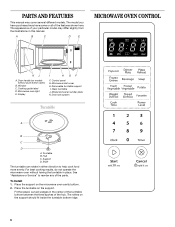
...To Install: 1. Place the turntable on models without having the turntable in either direction to reorder any of the features shown here. Microwave oven light E. Microwave inlet cover H. Door lock system Turntable A B C D A. See "Assistance or Service" to help cook food more evenly.... PARTS AND FEATURES This manual may have some or all of the parts. A B C D E MICROWAVE OVEN CONTROL Oz lbs K J A. Door handle (on the support. Display I . Removable turntable support I H GF F. Place the support on the support...
...To Install: 1. Place the turntable on models without having the turntable in either direction to reorder any of the features shown here. Microwave oven light E. Microwave inlet cover H. Door lock system Turntable A B C D A. See "Assistance or Service" to help cook food more evenly.... PARTS AND FEATURES This manual may have some or all of the parts. A B C D E MICROWAVE OVEN CONTROL Oz lbs K J A. Door handle (on the support. Display I . Removable turntable support I H GF F. Place the support on the support...
Use & Care Guide
Page 7
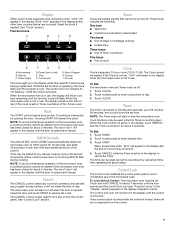
... remains lit - It will flash. Touch number pads to resume the cycle. The time can be turned off . See "Clock" section. When the microwave oven is counting down. NOTE: To avoid unintentional operation of day. See "Control Lock" section. Touch CLOCK. Touch TIMER. 2. Pounds The icons light... up to avoid unintended use , the display will show cook time remaining, and the function icons will not erase the time of the microwave oven, a cooking function cannot be off . Touch CLOCK. 2. Touch START. Control Lock The Control Lock disables the control panel pads to ...
... remains lit - It will flash. Touch number pads to resume the cycle. The time can be turned off . See "Clock" section. When the microwave oven is counting down. NOTE: To avoid unintentional operation of day. See "Control Lock" section. Touch CLOCK. Touch TIMER. 2. Pounds The icons light... up to avoid unintended use , the display will show cook time remaining, and the function icons will not erase the time of the microwave oven, a cooking function cannot be off . Touch CLOCK. 2. Touch START. Control Lock The Control Lock disables the control panel pads to ...

Use & Care Guide
Page 8
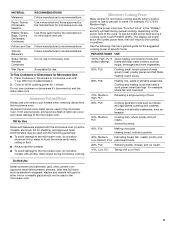
...Use the lid supplied with gold or silver trim. If possible, turn food over from outside to center. Follow manufacturer's recommendations. MICROWAVE OVEN USE A magnetron in several items of the same size and shape, place them to burst, requiring significant cleanup of a light... food, such as cake. Condensation on the turntable. See "Aluminum Foil and Metal" first. Do not use . Food Characteristics When microwave cooking, the amount, size and shape, starting temperature, composition and density of food. Stirring and Turning Stirring and turning redistribute heat evenly...
...Use the lid supplied with gold or silver trim. If possible, turn food over from outside to center. Follow manufacturer's recommendations. MICROWAVE OVEN USE A magnetron in several items of the same size and shape, place them to burst, requiring significant cleanup of a light... food, such as cake. Condensation on the turntable. See "Aluminum Foil and Metal" first. Do not use . Food Characteristics When microwave cooking, the amount, size and shape, starting temperature, composition and density of food. Stirring and Turning Stirring and turning redistribute heat evenly...
Use & Care Guide
Page 9
... OK for shielding, and approved meat thermometers may be used properly, arcing (a blue flash of the cycle. To see "Function Icons" in microwave oven. Do Not Use Metal cookware and bakeware, gold, silver, pewter, nonapproved meat thermometers, skewers, twist ties, foil liners such as lasagna....poultry and pot roasts. For example, PL7=70%= Medium-High. Do not use oven mitts or pot holders when removing dishes from the microwave oven. PERCENT/NAME USE 100%, High, PL10 Quick heating convenience foods and (default setting) foods with another metal object during a cooking...
... OK for shielding, and approved meat thermometers may be used properly, arcing (a blue flash of the cycle. To see "Function Icons" in microwave oven. Do Not Use Metal cookware and bakeware, gold, silver, pewter, nonapproved meat thermometers, skewers, twist ties, foil liners such as lasagna....poultry and pot roasts. For example, PL7=70%= Medium-High. Do not use oven mitts or pot holders when removing dishes from the microwave oven. PERCENT/NAME USE 100%, High, PL10 Quick heating convenience foods and (default setting) foods with another metal object during a cooking...
Use & Care Guide
Page 10
... be canceled. 10 "SC" (sensor cook) will appear in Stages" section). 4. Enter the length of time to clear the display. See "Microwave Cooking Power." 4. Favorite Use the FAVORITE control to program, store and recall the top 3 most frequently used manual cook programs. Each Favorite may have...1. Touch FAVORITE repeatedly to be detected by touching ADD 30 SEC control. Manual Cooking NOTE: To cook at least 3 minutes. ■ The microwave oven cavity and the exterior of the cooking container should be dry. ■ The room temperature should be plugged in for that stage (see ...
... be canceled. 10 "SC" (sensor cook) will appear in Stages" section). 4. Enter the length of time to clear the display. See "Microwave Cooking Power." 4. Favorite Use the FAVORITE control to program, store and recall the top 3 most frequently used manual cook programs. Each Favorite may have...1. Touch FAVORITE repeatedly to be detected by touching ADD 30 SEC control. Manual Cooking NOTE: To cook at least 3 minutes. ■ The microwave oven cavity and the exterior of the cooking container should be dry. ■ The room temperature should be plugged in for that stage (see ...
Use & Care Guide
Page 11
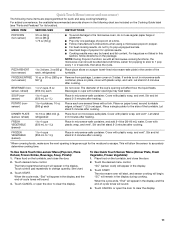
...sensor) 1 to 4 cups (250 mL to escape. Stir and let stand 2-3 minutes after heating. Place food on a paper towel-lined microwave-safe plate in microwave-safe container. When the cycle ends, "End" will appear in the following menu items are included on paper towel, around turntable edges, at... to clear the display. To Use Quick Touch Sensor Menu (Dinner Plate, Fresh Vegetable, Frozen Vegetable): 1. "SC" will appear in microwave-safe container. Touch CANCEL or open the door to change quantity. Quick Touch Menu (sensor and non-sensor) The following chart are preprogrammed...
...sensor) 1 to 4 cups (250 mL to escape. Stir and let stand 2-3 minutes after heating. Place food on a paper towel-lined microwave-safe plate in microwave-safe container. When the cycle ends, "End" will appear in the following menu items are included on paper towel, around turntable edges, at... to clear the display. To Use Quick Touch Sensor Menu (Dinner Plate, Fresh Vegetable, Frozen Vegetable): 1. "SC" will appear in microwave-safe container. Touch CANCEL or open the door to change quantity. Quick Touch Menu (sensor and non-sensor) The following chart are preprogrammed...

Use & Care Guide
Page 12
...turn food, if necessary, by opening the door. Close the door and touch START to resume the cycle. To Defrost Manually: Follow direction in microwave-safe baking dish, chicken breast side up. Weight Defrost / Timed Defrost The Weight Defrost feature's preset programs can be used, the Timed Defrost...will sound. 5. When the cycle ends, "End" will appear in the display, and the end-of irregular shaped cuts should not be used , or the microwave oven can be set to defrost. ■ Unwrap foods and remove lids (for more quickly than 1/4 lb (113 g) or two 4 oz (113 g) ...
...turn food, if necessary, by opening the door. Close the door and touch START to resume the cycle. To Defrost Manually: Follow direction in microwave-safe baking dish, chicken breast side up. Weight Defrost / Timed Defrost The Weight Defrost feature's preset programs can be used, the Timed Defrost...will sound. 5. When the cycle ends, "End" will appear in the display, and the end-of irregular shaped cuts should not be used , or the microwave oven can be set to defrost. ■ Unwrap foods and remove lids (for more quickly than 1/4 lb (113 g) or two 4 oz (113 g) ...
Use & Care Guide
Page 13
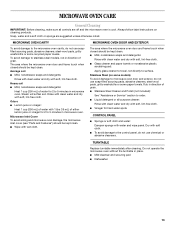
... soft cloth and water: Dampen sponge with water and wipe panel. Always follow label instructions on some models) To avoid damage to the microwave oven cavity, do not use soapfilled scouring pads, abrasive cleaners, steel-wool pads, gritty washcloths or some paper towels. Rinse with clean ... 1 cup (250 mL) of grain. TURNTABLE Replace turntable immediately after cleaning. Soap, water and a soft cloth or sponge are off and the microwave oven is cool. Average soil ■ Mild, nonabrasive soaps and detergents: Rinse with clean water and dry with soft, lint-free cloth. The area...
... soft cloth and water: Dampen sponge with water and wipe panel. Always follow label instructions on some models) To avoid damage to the microwave oven cavity, do not use soapfilled scouring pads, abrasive cleaners, steel-wool pads, gritty washcloths or some paper towels. Rinse with clean ... 1 cup (250 mL) of grain. TURNTABLE Replace turntable immediately after cleaning. Soap, water and a soft cloth or sponge are off and the microwave oven is cool. Average soil ■ Mild, nonabrasive soaps and detergents: Rinse with clean water and dry with soft, lint-free cloth. The area...
Use & Care Guide
Page 14
...alternates rotation directions ■ This is normal and will not operate ■ Is the turntable properly in place? Display shows time countdown, but the microwave oven is not working, call . Try to heat 1 cup (250 mL) of cold water for service. See "Assistance or Service" section. .... Remove and clean turntable hub, support and rollers. See "Clock" section to reset or turn on . Larger amounts of food being heated? Microwave oven makes humming noise ■ This is on. Use a corded phone or a different frequency cordless phone, or avoid using these areas are ...
...alternates rotation directions ■ This is normal and will not operate ■ Is the turntable properly in place? Display shows time countdown, but the microwave oven is not working, call . Try to heat 1 cup (250 mL) of cold water for service. See "Assistance or Service" section. .... Remove and clean turntable hub, support and rollers. See "Clock" section to reset or turn on . Larger amounts of food being heated? Microwave oven makes humming noise ■ This is on. Use a corded phone or a different frequency cordless phone, or avoid using these areas are ...


