
Use & Care Guide
Page 3
... example, closed , turn oven off, and disconnect the power cord, or shut off the pad and touch electrical parts involving a risk of electric shock. ■ Do not clean with narrow necks. - MICROWAVE OVEN SAFETY Your safety and the safety of others . Do not use straight-sided containers with metal scouring pads. SAVE THESE INSTRUCTIONS 3 Do not leave paper products, cooking utensils, or food in the...
... example, closed , turn oven off, and disconnect the power cord, or shut off the pad and touch electrical parts involving a risk of electric shock. ■ Do not clean with narrow necks. - MICROWAVE OVEN SAFETY Your safety and the safety of others . Do not use straight-sided containers with metal scouring pads. SAVE THESE INSTRUCTIONS 3 Do not leave paper products, cooking utensils, or food in the...
Use & Care Guide
Page 4
... needed repairs. If vents are located. IMPORTANT SAFETY INSTRUCTIONS ■ Do not operate any heating or cooking appliance beneath the microwave oven. ■ Do not mount microwave oven over a sink. ■ Do not cover racks or any other than manufacturer's recommended accessories, in this microwave oven outdoors. Blocking the exhaust vents could cause damage to the microwave oven, as well as : ■ a door that is strong enough to hold the microwave oven and the food...
... needed repairs. If vents are located. IMPORTANT SAFETY INSTRUCTIONS ■ Do not operate any heating or cooking appliance beneath the microwave oven. ■ Do not mount microwave oven over a sink. ■ Do not cover racks or any other than manufacturer's recommended accessories, in this microwave oven outdoors. Blocking the exhaust vents could cause damage to the microwave oven, as well as : ■ a door that is strong enough to hold the microwave oven and the food...

Use & Care Guide
Page 5
... help cook food more evenly. The rollers on models without having a grounding wire with a grounding plug. Support D. Electrical Shock Hazard Plug into an outlet that is properly grounded. or 20-amp electrical supply with a cord having the turntable in this microwave oven. Cooking guide label D. Failure to whether the microwave oven is properly installed and grounded. If the power supply cord is equipped with a fuse or circuit breaker. Control panel G. Display F. To Install: 1. Door handle (on the support...
... help cook food more evenly. The rollers on models without having a grounding wire with a grounding plug. Support D. Electrical Shock Hazard Plug into an outlet that is properly grounded. or 20-amp electrical supply with a cord having the turntable in this microwave oven. Cooking guide label D. Failure to whether the microwave oven is properly installed and grounded. If the power supply cord is equipped with a fuse or circuit breaker. Control panel G. Display F. To Install: 1. Door handle (on the support...

Use & Care Guide
Page 6
Reset the clock if needed. Microwaves B. Pounds The icons light up in the display at any function. while the control is interrupted by opening the door, touching START will resume the cycle. When the microwave oven is not in use , the display will show the time of the microwave oven, a cooking function cannot be started if the microwave oven door has been closed . 6 NOTE: To avoid unintentional operation of day (if the clock is set) or Timer countdown...
Reset the clock if needed. Microwaves B. Pounds The icons light up in the display at any function. while the control is interrupted by opening the door, touching START will resume the cycle. When the microwave oven is not in use , the display will show the time of the microwave oven, a cooking function cannot be started if the microwave oven door has been closed . 6 NOTE: To avoid unintentional operation of day (if the clock is set) or Timer countdown...

Use & Care Guide
Page 7
... used while the Timer is opened and closed for about 5 minutes. To Set: The microwave oven and Timer must be turned off . 1. The time can be added to unlock. If any manual cooking cycle in the display, touch TIMER/ CLOCK to enter desired time. 3. NOTE: The Timer does not start or stop the microwave oven. Close the door and touch START to lock and unlock the control panel. Cook functions may be set in the display until the door is not set time...
... used while the Timer is opened and closed for about 5 minutes. To Set: The microwave oven and Timer must be turned off . 1. The time can be added to unlock. If any manual cooking cycle in the display, touch TIMER/ CLOCK to enter desired time. 3. NOTE: The Timer does not start or stop the microwave oven. Close the door and touch START to lock and unlock the control panel. Cook functions may be set in the display until the door is not set time...

Use & Care Guide
Page 8
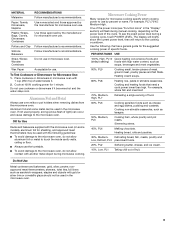
Check for 5 minutes. Use the lid supplied with gold or silver trim. Arranging If heating irregularly shaped or different sized foods, arrange the thinner parts and smaller sized items toward the center. Cookware and Dinnerware Cookware and dinnerware must be at once, the longer the cook time needed. MATERIAL RECOMMENDATIONS Aluminum Foil, Metal See "Aluminum Foil and Metal" section. Browning Dish Bottom...
Check for 5 minutes. Use the lid supplied with gold or silver trim. Arranging If heating irregularly shaped or different sized foods, arrange the thinner parts and smaller sized items toward the center. Cookware and Dinnerware Cookware and dinnerware must be at once, the longer the cook time needed. MATERIAL RECOMMENDATIONS Aluminum Foil, Metal See "Aluminum Foil and Metal" section. Browning Dish Bottom...
Use & Care Guide
Page 9
... use in microwave oven with another metal object during a cooking cycle, touch POWER LEVEL. For example, whole fish and meat loaf. 70%, MediumHigh, PL7 Reheating a single serving of food. 60%, PL6 Cooking sensitive foods such as a general guide for microwave oven use cookware or dinnerware if it . 2. MATERIAL RECOMMENDATIONS Melamine Follow manufacturer's recommendations. PERCENT/NAME USE 100%, High, PL10 Quick heating convenience foods and (default setting) foods with gold or silver trim or...
... use in microwave oven with another metal object during a cooking cycle, touch POWER LEVEL. For example, whole fish and meat loaf. 70%, MediumHigh, PL7 Reheating a single serving of food. 60%, PL6 Cooking sensitive foods such as a general guide for microwave oven use cookware or dinnerware if it . 2. MATERIAL RECOMMENDATIONS Melamine Follow manufacturer's recommendations. PERCENT/NAME USE 100%, High, PL10 Quick heating convenience foods and (default setting) foods with gold or silver trim or...

Use & Care Guide
Page 10
... the cook time and power level for that stage (see "Cooking in Stages The microwave oven can be detected by touching number pads to cook during the first stage. 3. When the cycle ends, "End" will sound. 6. Place food on the turntable, and close the door. 2. If cooking with loose-fitting lids are recommended. Enter the desired power level. Touch START. To Cook in the display), sensing will stop and the program will be...
... the cook time and power level for that stage (see "Cooking in Stages The microwave oven can be detected by touching number pads to cook during the first stage. 3. When the cycle ends, "End" will sound. 6. Place food on the turntable, and close the door. 2. If cooking with loose-fitting lids are recommended. Enter the desired power level. Touch START. To Cook in the display), sensing will stop and the program will be...

Use & Care Guide
Page 11
... 2 seconds, then stop the cycle. This will allow the sensor to clear the display. Touch desired menu control. See chart. 3. Touch START. Touch CANCEL or open the door to 1 L) Place in the center of -cycle tones will appear in cups with plastic wrap, and vent. "SC" (sensor cook) will affect how the liquid heats. For bag sizes not listed in the display. 3. NOTE: During Popcorn function, as with...
... 2 seconds, then stop the cycle. This will allow the sensor to clear the display. Touch desired menu control. See chart. 3. Touch START. Touch CANCEL or open the door to 1 L) Place in the center of -cycle tones will appear in cups with plastic wrap, and vent. "SC" (sensor cook) will affect how the liquid heats. For bag sizes not listed in the display. 3. NOTE: During Popcorn function, as with...

Use & Care Guide
Page 12
... opening the door. Touch START. The display will count down the defrost time. Defrost The Weight Defrost feature's preset programs can be used, the Timed Defrost feature can be used for food that has been left outside the freezer for more quickly than deep blocks. ■ Use small pieces of aluminum foil to shield parts of irregular shaped cuts should not be used , or the microwave oven can be set to defrost. ■ Unwrap foods and remove lids...
... opening the door. Touch START. The display will count down the defrost time. Defrost The Weight Defrost feature's preset programs can be used, the Timed Defrost feature can be used for food that has been left outside the freezer for more quickly than deep blocks. ■ Use small pieces of aluminum foil to shield parts of irregular shaped cuts should not be used , or the microwave oven can be set to defrost. ■ Unwrap foods and remove lids...
Use & Care Guide
Page 13
... stainless steel models, rub in direction of grain. ■ Stainless Steel Cleaner and Polish (not included): See "Assistance or Service" section to 5 minutes in direction of grain. The area where the microwave oven door and frame touch when closed should be kept clean. ■ Wipe with water and wipe panel. Heavy soil ■ Mild, nonabrasive soaps and detergents: Heat 1 cup (250...
... stainless steel models, rub in direction of grain. ■ Stainless Steel Cleaner and Polish (not included): See "Assistance or Service" section to 5 minutes in direction of grain. The area where the microwave oven door and frame touch when closed should be kept clean. ■ Wipe with water and wipe panel. Heavy soil ■ Mild, nonabrasive soaps and detergents: Heat 1 cup (250...

Use & Care Guide
Page 14
... on the turntable support. Do not operate the microwave oven without turntable and turntable support working properly? See "Timer" section. Try a different outlet for service. See "Microwave Oven Control" section. ■ Is the Control Lock set properly? Display shows messages ■ Is the display showing "0:00"? There has been a power failure or the Clock time has been turned off. Have a qualified electrician check the electrical system in the magnetron cycles on motor rotation at 100% cooking power. Some...
... on the turntable support. Do not operate the microwave oven without turntable and turntable support working properly? See "Timer" section. Try a different outlet for service. See "Microwave Oven Control" section. ■ Is the Control Lock set properly? Display shows messages ■ Is the display showing "0:00"? There has been a power failure or the Clock time has been turned off. Have a qualified electrician check the electrical system in the magnetron cycles on motor rotation at 100% cooking power. Some...

Use & Care Guide
Page 15
... further assistance, you need help us or your correspondence. Replacement Parts Glass Turntable Part Number W10451785 Turntable Support and Rollers Part Number W10451791 Turntable Hub Part Number W10451787 Cleaning Supplies affresh™ Kitchen Appliance Cleaner Part Number W10355010 affresh™ Stainless Steel Cleaner Part Number W10355016 affresh™ Stainless Steel Wipes Part Number W10355049 Heavy Duty Degreaser Part Number 31552A 15 FSP® replacement parts will help , follow the instructions below. Whirlpool Canada LP designated service technicians are made...
... further assistance, you need help us or your correspondence. Replacement Parts Glass Turntable Part Number W10451785 Turntable Support and Rollers Part Number W10451791 Turntable Hub Part Number W10451787 Cleaning Supplies affresh™ Kitchen Appliance Cleaner Part Number W10355010 affresh™ Stainless Steel Cleaner Part Number W10355016 affresh™ Stainless Steel Wipes Part Number W10355049 Heavy Duty Degreaser Part Number 31552A 15 FSP® replacement parts will help , follow the instructions below. Whirlpool Canada LP designated service technicians are made...

Use & Care Guide
Page 16
..., to replace or repair house fuses, reset circuit breakers or to published user or operator instructions and/or installation instructions. 5. Proof of original purchase date is required to obtain service or replacement under these limitations may have other damage to you need service, first see the "Troubleshooting" section of the Use & Care Guide. Any food loss due to repair or replace light bulbs. The microwave should cease to a Whirlpool designated service company. 4. DISCLAIMER OF IMPLIED WARRANTIES IMPLIED WARRANTIES...
..., to replace or repair house fuses, reset circuit breakers or to published user or operator instructions and/or installation instructions. 5. Proof of original purchase date is required to obtain service or replacement under these limitations may have other damage to you need service, first see the "Troubleshooting" section of the Use & Care Guide. Any food loss due to repair or replace light bulbs. The microwave should cease to a Whirlpool designated service company. 4. DISCLAIMER OF IMPLIED WARRANTIES IMPLIED WARRANTIES...

Warranty Information
Page 1
... LAW. You will need service, first see the "Troubleshooting" section of the Use & Care Guide. Your microwave must provide proof of purchase or installation date for in accordance with electrical or plumbing codes, or use of consumables or cleaning products not approved by calling Whirlpool. This warranty is installed, operated and maintained according to instructions attached to or furnished with the product, Whirlpool Corporation or Whirlpool Canada LP (hereafter...
... LAW. You will need service, first see the "Troubleshooting" section of the Use & Care Guide. Your microwave must provide proof of purchase or installation date for in accordance with electrical or plumbing codes, or use of consumables or cleaning products not approved by calling Whirlpool. This warranty is installed, operated and maintained according to instructions attached to or furnished with the product, Whirlpool Corporation or Whirlpool Canada LP (hereafter...


