
Ventilation Specification
Page 3
...conform with local codes, or in the absence of local codes, with controls. ■ Do not repair or replace any part of the dryer or attempt any servicing unless specifically recommended in this Use and Care Guide or in published user-repair instructions that you understand and... ■ Do not use heat to dry articles containing foam rubber or similarly textured rubber-like materials. ■ Clean lint screen before using the dryer, follow basic precautions, including the following: ■ Read all instructions before or after each load. ■ Keep area around the exhaust opening and...
...conform with local codes, or in the absence of local codes, with controls. ■ Do not repair or replace any part of the dryer or attempt any servicing unless specifically recommended in this Use and Care Guide or in published user-repair instructions that you understand and... ■ Do not use heat to dry articles containing foam rubber or similarly textured rubber-like materials. ■ Clean lint screen before using the dryer, follow basic precautions, including the following: ■ Read all instructions before or after each load. ■ Keep area around the exhaust opening and...

Ventilation Specification
Page 7
...the interior of Exhaust System Cleaning Every exhaust system must be inspected periodically and cleaned to ensure that it is not obstructed in multiple dryer systems a more frequent inspection is recommended. In commercial usage or in the vent and that there are secure. 4. Disconnect the exhaust duct ... need for inspection of the dryer. The frequency of these inspections will not open or close completely. ■ After cleaning the exhaust hood, check that the joints are no leaks in the exhaust hood so that the flappers or louvers (if installed as part of the exhaust system) will...
...the interior of Exhaust System Cleaning Every exhaust system must be inspected periodically and cleaned to ensure that it is not obstructed in multiple dryer systems a more frequent inspection is recommended. In commercial usage or in the vent and that there are secure. 4. Disconnect the exhaust duct ... need for inspection of the dryer. The frequency of these inspections will not open or close completely. ■ After cleaning the exhaust hood, check that the joints are no leaks in the exhaust hood so that the flappers or louvers (if installed as part of the exhaust system) will...
Installation Instructions
Page 4
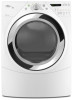
... Use and Care Guide. Check existing electrical supply and venting. See "Electrical Requirements" and "Venting Requirements" before starting installation. Parts needed Check local codes. Leveling legs (4) B. Remove parts package from whom you purchased your dryer. 4 In the State of Massachusetts, the following installation instructions apply: ■ Installations and repairs must be performed by...
... Use and Care Guide. Check existing electrical supply and venting. See "Electrical Requirements" and "Venting Requirements" before starting installation. Parts needed Check local codes. Leveling legs (4) B. Remove parts package from whom you purchased your dryer. 4 In the State of Massachusetts, the following installation instructions apply: ■ Installations and repairs must be performed by...
Installation Instructions
Page 5
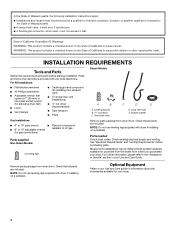
... diamond marking on the leveling foot is greater than 1" (25 mm), install Extended Dryer Feet Kit, Part Number 279810. See "Venting Requirements." ■ A separate 15 or 20-amp circuit needed for gas dryers and 30-amp circuit needed for electric dryers. ■ If you are using a pedestal, you will need ■ A location that allows...
... diamond marking on the leveling foot is greater than 1" (25 mm), install Extended Dryer Feet Kit, Part Number 279810. See "Venting Requirements." ■ A separate 15 or 20-amp circuit needed for gas dryers and 30-amp circuit needed for electric dryers. ■ If you are using a pedestal, you will need ■ A location that allows...
Installation Instructions
Page 7
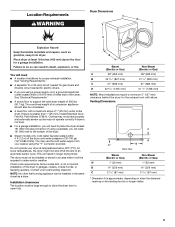
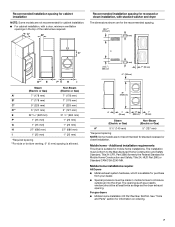
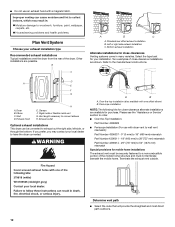
... (formerly the Federal Standard for Mobile Home Construction and Safety, Title 24, HUD Part 280) or Standard CAN/CSA-Z240 MH. See "Tools and Parts" section for stacked recessed or closet installation. For gas dryers ■ Mobile Home Installation Kit Part Number 346764. Recommended installation spacing for cabinet installation NOTE: Some models are not...
... (formerly the Federal Standard for Mobile Home Construction and Safety, Title 24, HUD Part 280) or Standard CAN/CSA-Z240 MH. See "Tools and Parts" section for stacked recessed or closet installation. For gas dryers ■ Mobile Home Installation Kit Part Number 346764. Recommended installation spacing for cabinet installation NOTE: Some models are not...

Installation Instructions
Page 8
.... Be sure wall receptacle is equipped with a qualified electrician or service representative or personnel if you use Power Supply Cord Replacement Part Number 9831317. 8 WARNING Electrical Shock Hazard Plug into an appropriate outlet that you are in a risk of electric shock by ...a qualified electrician. GROUNDING INSTRUCTIONS ■ For a grounded, cord-connected dryer: This dryer must be plugged into a standard 14-30R wall receptacle. SAVE THESE INSTRUCTIONS 4-wire receptacle 14-30R If using a replacement power supply ...
.... Be sure wall receptacle is equipped with a qualified electrician or service representative or personnel if you use Power Supply Cord Replacement Part Number 9831317. 8 WARNING Electrical Shock Hazard Plug into an appropriate outlet that you are in a risk of electric shock by ...a qualified electrician. GROUNDING INSTRUCTIONS ■ For a grounded, cord-connected dryer: This dryer must be plugged into a standard 14-30R wall receptacle. SAVE THESE INSTRUCTIONS 4-wire receptacle 14-30R If using a replacement power supply ...
Installation Instructions
Page 12
... use an exhaust hood with one offset elbow) B. Bottom exhaust installation Alternate installations for close clearances Venting systems come in : Moisture damage to have the dryer converted. D A E F G A. A B A. Over-the-top installation (also available with a magnetic latch. Standard rear offset exhaust installation B. ...Terminate the exhaust vent outside. ■ Do not use with dryer vent to wall vent mismatch): Part Number 4396037 - 0" (0 mm) to 18" (460 mm) mismatch Part Number 4396011 - 18" (460 mm) to 29"(737 mm) mismatch Part Number 4396014 - 29" (737 mm) to 50" (1270 ...
... use an exhaust hood with one offset elbow) B. Bottom exhaust installation Alternate installations for close clearances Venting systems come in : Moisture damage to have the dryer converted. D A E F G A. A B A. Over-the-top installation (also available with a magnetic latch. Standard rear offset exhaust installation B. ...Terminate the exhaust vent outside. ■ Do not use with dryer vent to wall vent mismatch): Part Number 4396037 - 0" (0 mm) to 18" (460 mm) mismatch Part Number 4396011 - 18" (460 mm) to 29"(737 mm) mismatch Part Number 4396014 - 29" (737 mm) to 50" (1270 ...

Installation Instructions
Page 14
... following: ■ Controls are now installed. Screw on coupling by hand until it is on . 12. Use a wrench to fill valve at the start the dryer. If there is an extra part, go back through the water system in a running or "On" position. ■ Start button has been pushed firmly. ■...-thirds turn . Be sure the vent is not level, prop up or down and check again for leaks. Check for levelness. If you have all parts are set in the dryer. Attach washer cold inlet hose to other end of long hose to adjust the legs up the...
... following: ■ Controls are now installed. Screw on coupling by hand until it is on . 12. Use a wrench to fill valve at the start the dryer. If there is an extra part, go back through the water system in a running or "On" position. ■ Start button has been pushed firmly. ■...-thirds turn . Be sure the vent is not level, prop up or down and check again for leaks. Check for levelness. If you have all parts are set in the dryer. Attach washer cold inlet hose to other end of long hose to adjust the legs up the...
Owners Manual
Page 4
... plastic must be converted to follow these instructions can result in death or fire. Accessory Part Number Stack Kit 8541503 Door Reversal Kit 8579666A Back Guard 8212452 (White) Optional Exhaust Installation Dryer can be dried on a pedestal? Failure to the total height of approximately 48" (1....heights separately for a total height of the dryer for this dryer. You may select a 10" (254 mm) or 15.5" (394 mm) pedestal. The pedestals are available in death, explosion, or fire. Other dryer accessories available, ask for Part Number. Failure to exhaust out the right ...
... plastic must be converted to follow these instructions can result in death or fire. Accessory Part Number Stack Kit 8541503 Door Reversal Kit 8579666A Back Guard 8212452 (White) Optional Exhaust Installation Dryer can be dried on a pedestal? Failure to the total height of approximately 48" (1....heights separately for a total height of the dryer for this dryer. You may select a 10" (254 mm) or 15.5" (394 mm) pedestal. The pedestals are available in death, explosion, or fire. Other dryer accessories available, ask for Part Number. Failure to exhaust out the right ...
Owners Manual
Page 6
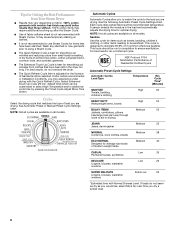
...60 HEAVY DUTY Heavyweight items, towels High 50 BULKY ITEMS Medium 55 Jackets, comforters, pillows (rearrange load part way through cycle to aid in the dryer too long. default time) which can be customized to select High Temperature and/or additional cycle time by...Steam Cycles. Under certain environmental or installation conditions, you dry a similar load. 6 NSF Protocol P154 Sanitization Performance of Residential Clothes Dryers Automatic Preset Cycle Settings Automatic Cycles Load Type Temperature Est. Select Enhanced Touch Up Cycle (20 min. NOTE: Not all cycles...
...60 HEAVY DUTY Heavyweight items, towels High 50 BULKY ITEMS Medium 55 Jackets, comforters, pillows (rearrange load part way through cycle to aid in the dryer too long. default time) which can be customized to select High Temperature and/or additional cycle time by...Steam Cycles. Under certain environmental or installation conditions, you dry a similar load. 6 NSF Protocol P154 Sanitization Performance of Residential Clothes Dryers Automatic Preset Cycle Settings Automatic Cycles Load Type Temperature Est. Select Enhanced Touch Up Cycle (20 min. NOTE: Not all cycles...
Owners Manual
Page 10
...parts and panels before servicing. Special Instructions for 2-5 seconds. ■ Has a household fuse blown, or has a circuit breaker tripped? Unplug dryer or disconnect power. 2. Open the dryer door. Replace the cover and secure with a 10-watt appliance bulb only. Dryer Operation Dryer will not run ■ Is the dryer...2. If the problem continues, call ... Steam models only: Shut off water faucet. 4. To winterize dryer 1. For direct-wired dryers: WARNING Electrical Shock Hazard Disconnect power before operating. Steam models only: Shut off water faucet. 3....
...parts and panels before servicing. Special Instructions for 2-5 seconds. ■ Has a household fuse blown, or has a circuit breaker tripped? Unplug dryer or disconnect power. 2. Open the dryer door. Replace the cover and secure with a 10-watt appliance bulb only. Dryer Operation Dryer will not run ■ Is the dryer...2. If the problem continues, call ... Steam models only: Shut off water faucet. 4. To winterize dryer 1. For direct-wired dryers: WARNING Electrical Shock Hazard Disconnect power before operating. Steam models only: Shut off water faucet. 3....


