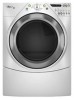
Use and Care Guide
Page 2
...: DANGER You can be killed or seriously injured if you don't follow instructions. Always read and obey all safety messages. TABLE OF CONTENTS DRYER SAFETY 2 INSTALLATION INSTRUCTIONS 4 Tools and Parts 4 Options 4 Location Requirements 5 Electrical Requirements 7 Gas Supply Requirements 7 Venting Requirements 8 Plan Vent System 9 Install Vent System 11 Install Leveling Legs 11 Make...
...: DANGER You can be killed or seriously injured if you don't follow instructions. Always read and obey all safety messages. TABLE OF CONTENTS DRYER SAFETY 2 INSTALLATION INSTRUCTIONS 4 Tools and Parts 4 Options 4 Location Requirements 5 Electrical Requirements 7 Gas Supply Requirements 7 Venting Requirements 8 Plan Vent System 9 Install Vent System 11 Install Leveling Legs 11 Make...
Use and Care Guide
Page 3
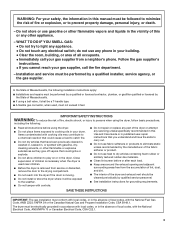
... and have been previously cleaned in, washed in, soaked in, or spotted with controls. ■ Do not repair or replace any part of the dryer or attempt any phone in this manual must be followed to minimize the risk of Massachusetts. ■ If using a ball valve, it... articles that could ignite or explode. ■ Do not allow children to play on or in published user-repair instructions that you cannot reach your dryer. In the State of Massachusetts, the following : ■ Read all occupants. • Immediately call the fire department. - Installation and service must...
... and have been previously cleaned in, washed in, soaked in, or spotted with controls. ■ Do not repair or replace any part of the dryer or attempt any phone in this manual must be followed to minimize the risk of Massachusetts. ■ If using a ball valve, it... articles that could ignite or explode. ■ Do not allow children to play on or in published user-repair instructions that you cannot reach your dryer. In the State of Massachusetts, the following : ■ Read all occupants. • Immediately call the fire department. - Installation and service must...
Use and Care Guide
Page 4
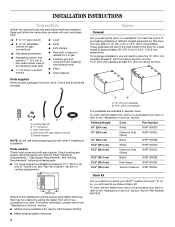
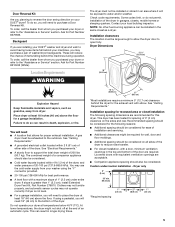
...to LP gas ■ Caulking gun and compound (for installing new exhaust vent) ■ Pliers ■ Tape measure Parts supplied Remove parts package from whom you purchased your dryer or refer to place the 10" (25.4 cm) pedestal at least 9" (22.9 cm) above the floor and... option of purchasing pedestals of approximately 48" (121.9 cm) or 53.5" (135.9 cm), respectively. To order, call the dealer from dryer drum. Parts needed Check local codes and with right-angle connector E. Options Pedestal Are you will need to the "Assistance or Service" section. "Y" connector...
...to LP gas ■ Caulking gun and compound (for installing new exhaust vent) ■ Pliers ■ Tape measure Parts supplied Remove parts package from whom you purchased your dryer or refer to place the 10" (25.4 cm) pedestal at least 9" (22.9 cm) above the floor and... option of purchasing pedestals of approximately 48" (121.9 cm) or 53.5" (135.9 cm), respectively. To order, call the dealer from dryer drum. Parts needed Check local codes and with right-angle connector E. Options Pedestal Are you will need to the "Assistance or Service" section. "Y" connector...
Use and Care Guide
Page 5
... above the floor. Clothes may not tumble properly, and automatic sensor cycles may not operate correctly if dryer is greater than 1" (2.5 cm), install Extended Dryer Feet Kit, Part Number 279810. This can result in garages, closets, mobile homes or sleeping quarters. Some codes limit,...To order, call the dealer from whom you are recommended for Part Number 8579666. See "Venting Requirements." ■ A grounded electrical outlet located within 4 ft (1.2 m) of the dryer, and water pressure of washer/dryer backguards. The combined weight of an automatic cycle. Do not operate...
... above the floor. Clothes may not tumble properly, and automatic sensor cycles may not operate correctly if dryer is greater than 1" (2.5 cm), install Extended Dryer Feet Kit, Part Number 279810. This can result in garages, closets, mobile homes or sleeping quarters. Some codes limit,...To order, call the dealer from whom you are recommended for Part Number 8579666. See "Venting Requirements." ■ A grounded electrical outlet located within 4 ft (1.2 m) of the dryer, and water pressure of washer/dryer backguards. The combined weight of an automatic cycle. Do not operate...
Use and Care Guide
Page 6
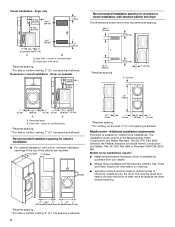
... must be at least twice as large as the dryer exhaust opening (such as a nearby window) should be made in mobile homes to the Manufactured Home Construction and Safety Standard, Title 24 CFR, Part 3280 (formerly the Federal Standard for the recommended spacing... dealer. ■ Mobile Home Installation Kit Part Number 346764. Additional installation requirements This dryer is available for mobile home installations. Dryer on ordering. ■ Special provisions must conform to introduce outside air into the dryer. Recommended installation spacing for recessed or closet installation...
... must be at least twice as large as the dryer exhaust opening (such as a nearby window) should be made in mobile homes to the Manufactured Home Construction and Safety Standard, Title 24 CFR, Part 3280 (formerly the Federal Standard for the recommended spacing... dealer. ■ Mobile Home Installation Kit Part Number 346764. Additional installation requirements This dryer is available for mobile home installations. Dryer on ordering. ■ Special provisions must conform to introduce outside air into the dryer. Recommended installation spacing for recessed or closet installation...

Use and Care Guide
Page 9
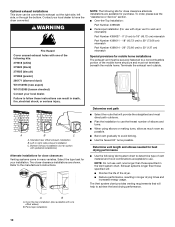
Louvered hood style B. Plan Vent System Choose your dealer or by calling Whirlpool Parts and Accessories. Dryer B. Wall D. Elbows 45° elbows provide better airflow than 90° elbows. Do not use plastic or metal foil vent. ■ 4" (10.2 ...cm) heavy metal exhaust vent and clamps must not be fully extended and supported when the dryer is recommended to connect elbows H. Rigid metal or flexible metal vent G. Clamps F. For more information, see the "Assistance or Service" section. B A 4" (10.2 cm) ...
Louvered hood style B. Plan Vent System Choose your dealer or by calling Whirlpool Parts and Accessories. Dryer B. Wall D. Elbows 45° elbows provide better airflow than 90° elbows. Do not use plastic or metal foil vent. ■ 4" (10.2 ...cm) heavy metal exhaust vent and clamps must not be fully extended and supported when the dryer is recommended to connect elbows H. Rigid metal or flexible metal vent G. Clamps F. For more information, see the "Assistance or Service" section. B A 4" (10.2 cm) ...
Use and Care Guide
Page 10
... best drying performance. Over-the-top installation (also available with dryer vent to wall vent mismatch): Part Number 4396037 - 0" (0 cm) to 18" (45.72 cm) mismatch Part Number 4396011 - 18" (45.72 cm) to 29" (73.66 cm) mismatch Part Number 4396014 - 29" (73.66 cm) to 50"... the exhaust vent outside. A B A. Select the type best for mobile home installations The exhaust vent must be converted to have the dryer converted. Bottom exhaust installation (not an option with one offset elbow) B. Standard rear offset exhaust installation B. Failure to follow these instructions can...
... best drying performance. Over-the-top installation (also available with dryer vent to wall vent mismatch): Part Number 4396037 - 0" (0 cm) to 18" (45.72 cm) mismatch Part Number 4396011 - 18" (45.72 cm) to 29" (73.66 cm) mismatch Part Number 4396014 - 29" (73.66 cm) to 50"... the exhaust vent outside. A B A. Select the type best for mobile home installations The exhaust vent must be converted to have the dryer converted. Bottom exhaust installation (not an option with one offset elbow) B. Standard rear offset exhaust installation B. Failure to follow these instructions can...
Use and Care Guide
Page 13
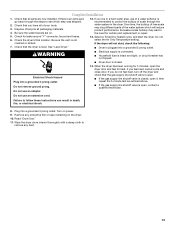
.... Turn on . 12. Check that the gas supply line shutoff valve is closed . Check the dryer's final location. Check that all packaging materials. 4. When the dryer has been running for certain part replacement or repair. 5. If you have all of lime scale may lead to control the buildup of... /recycle all parts are on power. 9. Be sure the water faucets are now installed. Check for heat. See "Level Dryer." 13. Complete Installation 1. Over time, the buildup of your tools. 3. Do not use ...
.... Turn on . 12. Check that the gas supply line shutoff valve is closed . Check the dryer's final location. Check that all packaging materials. 4. When the dryer has been running for certain part replacement or repair. 5. If you have all of lime scale may lead to control the buildup of... /recycle all parts are on power. 9. Be sure the water faucets are now installed. Check for heat. See "Level Dryer." 13. Complete Installation 1. Over time, the buildup of your tools. 3. Do not use ...

Use and Care Guide
Page 16
...dry level. Wet The Wet light will aid in the cycle. This indicator stays on . ■ When the dryer is off . If a Manual Cycle is cooling down part of minutes remaining in the drying process. WRINKLE SHIELD™ Feature The WRINKLE SHIELD™ feature light glows during the... cool down for a guide to increased shrinking or wrinkling. ■ If you dry sheets in a mixed load or large items in the dryer. This ...
...dry level. Wet The Wet light will aid in the cycle. This indicator stays on . ■ When the dryer is off . If a Manual Cycle is cooling down part of minutes remaining in the drying process. WRINKLE SHIELD™ Feature The WRINKLE SHIELD™ feature light glows during the... cool down for a guide to increased shrinking or wrinkling. ■ If you dry sheets in a mixed load or large items in the dryer. This ...

Use and Care Guide
Page 19
...change will be displayed for the Sanitize cycle. Press START to different installations, environmental conditions or personal preference. Ask for 5 seconds. Open dryer door. Drying Rack Option The drying rack is shown. NOTE: The Damp Dry Signal is not a selectable option for 1 second followed...current drying setting. 3. The Damp Dry Signal is available only with the Automatic Cycles. Press and hold the Dryness Level button for Part Number W10143399. The DAMP DRY SIGNAL is set to Off. Restart the selection process. Press and hold START. When the signal goes...
...change will be displayed for the Sanitize cycle. Press START to different installations, environmental conditions or personal preference. Ask for 5 seconds. Open dryer door. Drying Rack Option The drying rack is shown. NOTE: The Damp Dry Signal is not a selectable option for 1 second followed...current drying setting. 3. The Damp Dry Signal is available only with the Automatic Cycles. Press and hold the Dryness Level button for Part Number W10143399. The DAMP DRY SIGNAL is set to Off. Restart the selection process. Press and hold START. When the signal goes...

Use and Care Guide
Page 24
... at 1-800-253-1301, or your telephone directory Yellow Pages. For further assistance If you need replacement parts If you the cost of your dryer with any questions or concerns at www.whirlpoolparts.ca. In Canada Call the Whirlpool Canada LP Customer Interaction Centre toll free: 1-800-807-6777 or visit us at...
... at 1-800-253-1301, or your telephone directory Yellow Pages. For further assistance If you need replacement parts If you the cost of your dryer with any questions or concerns at www.whirlpoolparts.ca. In Canada Call the Whirlpool Canada LP Customer Interaction Centre toll free: 1-800-807-6777 or visit us at...


