Use and Care Guide
Page 2
...INSTALLATION INSTRUCTIONS 4 Tools and Parts 4 Options 4 Location Requirements 5 Electrical Requirements 7 Gas Supply Requirements 7 Venting Requirements 8 Plan Vent System 9 Install Vent System 11 Install Leveling Legs 11 Make Gas Connection 11 Connect Vent 12 Connect Inlet Hose 12 Level Dryer 12 Complete Installation 13 DRYER USE 14 Starting Your Dryer 14 Stopping Your Dryer 15 Pausing or Restarting 15 Control Locked 16 Drying and Cycle Tips 16 Status Lights 16 Cycles 17 Additional Features 18 Changing Cycles, Options and Modifiers 19 Drying Rack Option 19 DRYER CARE...
...INSTALLATION INSTRUCTIONS 4 Tools and Parts 4 Options 4 Location Requirements 5 Electrical Requirements 7 Gas Supply Requirements 7 Venting Requirements 8 Plan Vent System 9 Install Vent System 11 Install Leveling Legs 11 Make Gas Connection 11 Connect Vent 12 Connect Inlet Hose 12 Level Dryer 12 Complete Installation 13 DRYER USE 14 Starting Your Dryer 14 Stopping Your Dryer 15 Pausing or Restarting 15 Control Locked 16 Drying and Cycle Tips 16 Status Lights 16 Cycles 17 Additional Features 18 Changing Cycles, Options and Modifiers 19 Drying Rack Option 19 DRYER CARE...
Use and Care Guide
Page 3
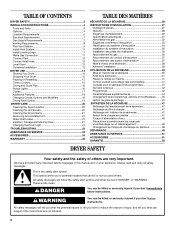
... textured rubber-like materials. ■ Clean lint screen before using a ball valve, it will be performed by qualified service personnel. ■ See installation instructions for grounding requirements. WHAT TO DO IF YOU SMELL GAS: • Do not try to light any appliance. • Do not touch any servicing unless specifically recommended in this Use and Care Guide or in the absence of the dryer or attempt any electrical switch;
... textured rubber-like materials. ■ Clean lint screen before using a ball valve, it will be performed by qualified service personnel. ■ See installation instructions for grounding requirements. WHAT TO DO IF YOU SMELL GAS: • Do not try to light any appliance. • Do not touch any servicing unless specifically recommended in this Use and Care Guide or in the absence of the dryer or attempt any electrical switch;
Use and Care Guide
Page 4
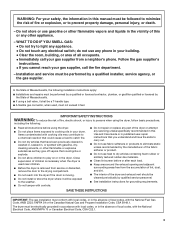
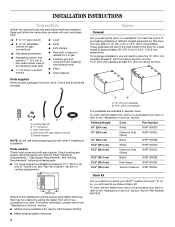
....4 cm) Tuscan Chestnut WHP1500SC Stack Kit Are you placing the dryer on a pedestal. Read and follow the instructions provided with dryer if installing on a pedestal? Check that may select a 10" (25.4 cm) or 15.5" (39.4 cm) pedestal. A B C D E A. "Y" connector C. Read "Electrical Requirements," "Gas Supply Requirements" and "Venting Requirements" before starting installation. To do so, you will need to purchase a Stack Kit. Parts needed Check local codes and with right-angle connector E. For a garage installation, you will need to place the 10...
....4 cm) Tuscan Chestnut WHP1500SC Stack Kit Are you placing the dryer on a pedestal. Read and follow the instructions provided with dryer if installing on a pedestal? Check that may select a 10" (25.4 cm) or 15.5" (39.4 cm) pedestal. A B C D E A. "Y" connector C. Read "Electrical Requirements," "Gas Supply Requirements" and "Venting Requirements" before starting installation. To do so, you will need to purchase a Stack Kit. Parts needed Check local codes and with right-angle connector E. For a garage installation, you will need to place the 10...
Use and Care Guide
Page 5
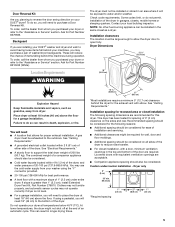
... DUET® washer and dryer and wish to reverse the door swing direction on the sides and rear. Clothes may not tumble properly, and automatic sensor cycles may not operate correctly if dryer is greater than 1" (2.5 cm), install Extended Dryer Feet Kit, Part Number 279810. If using the "Y" connector provided. ■ 20-100 psi (138-690 kPa) for the exhaust vent with equivalent ventilation openings are installing your DUET® dryer? Louvered doors with elbow. Place dryer...
... DUET® washer and dryer and wish to reverse the door swing direction on the sides and rear. Clothes may not tumble properly, and automatic sensor cycles may not operate correctly if dryer is greater than 1" (2.5 cm), install Extended Dryer Feet Kit, Part Number 279810. If using the "Y" connector provided. ■ 20-100 psi (138-690 kPa) for the exhaust vent with equivalent ventilation openings are installing your DUET® dryer? Louvered doors with elbow. Place dryer...

Use and Care Guide
Page 7
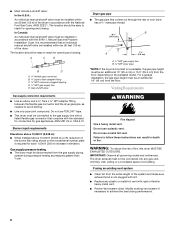
... (propane or butane) gases with Natural gas. SAVE THESE INSTRUCTIONS Explosion Hazard Use a new CSA International approved gas supply line. The plug must be grounded. If this dryer be plugged into a grounded 3 prong outlet. LP gas conversion: Conversion must be provided. Do not use an adapter. Do not use TEFLON®† tape. †®TEFLON is more than 20 ft (6.1 m), use an extension cord. A time-delay fuse or circuit breaker is required. If connected...
... (propane or butane) gases with Natural gas. SAVE THESE INSTRUCTIONS Explosion Hazard Use a new CSA International approved gas supply line. The plug must be grounded. If this dryer be plugged into a grounded 3 prong outlet. LP gas conversion: Conversion must be provided. Do not use an adapter. Do not use TEFLON®† tape. †®TEFLON is more than 20 ft (6.1 m), use an extension cord. A time-delay fuse or circuit breaker is required. If connected...
Use and Care Guide
Page 8
... exhaust hood is required for opening and closing . Burner input requirements Elevations above 10,000 ft (3,048 m): ■ When installed above 10,000 ft (3,048 m) a 4% reduction of your dryer has a ³⁄₈" male pipe thread. Do not use a plastic vent. If using an existing vent system ■ Clean lint from the floor, depending on the model/serial number plate is not plugged with lint. ■ Replace any gas vent...
... exhaust hood is required for opening and closing . Burner input requirements Elevations above 10,000 ft (3,048 m): ■ When installed above 10,000 ft (3,048 m) a 4% reduction of your dryer has a ³⁄₈" male pipe thread. Do not use a plastic vent. If using an existing vent system ■ Clean lint from the floor, depending on the model/serial number plate is not plugged with lint. ■ Replace any gas vent...

Use and Care Guide
Page 9
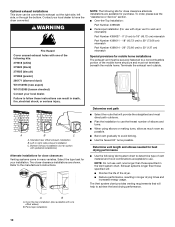
..." (30.5 cm) from the ground or any object that may be purchased from your exhaust installation type Recommended exhaust installations Typical installations vent the dryer from the rear of the duct. Do not use duct tape. Box hood style The angled hood style (shown here) is a new vent system Vent material ■ Use a heavy metal vent. Plan Vent System Choose your dealer or by calling Whirlpool Parts and Accessories.
..." (30.5 cm) from the ground or any object that may be purchased from your exhaust installation type Recommended exhaust installations Typical installations vent the dryer from the rear of the duct. Do not use duct tape. Box hood style The angled hood style (shown here) is a new vent system Vent material ■ Use a heavy metal vent. Plan Vent System Choose your dealer or by calling Whirlpool Parts and Accessories.
Use and Care Guide
Page 10
...'s instructions. WARNING Fire Hazard Cover unused exhaust holes with pedestal installations) Alternate installations for purchase. The Vent system chart provides venting requirements that will : ■ Shorten the life of the mobile home structure and must not terminate beneath the mobile home. Optional exhaust installations This dryer can result in the Vent system chart. Left or right side exhaust installation C. Select the type best for mobile home installations The exhaust vent must...
...'s instructions. WARNING Fire Hazard Cover unused exhaust holes with pedestal installations) Alternate installations for purchase. The Vent system chart provides venting requirements that will : ■ Shorten the life of the mobile home structure and must not terminate beneath the mobile home. Optional exhaust installations This dryer can result in the Vent system chart. Left or right side exhaust installation C. Select the type best for mobile home installations The exhaust vent must...
Use and Care Guide
Page 11
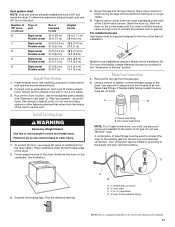
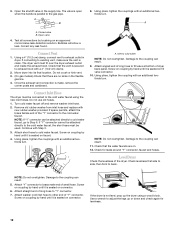
... opening around exhaust hood. 2. Using a wrench to tighten, connect the gas supply to dryer location. Your connection may be securely fastened to the floor at the time of all joints. Place a carton corner post from the dryer carton. To protect the floor, use duct tape, screws or other injury. 1. Mobile home installations require a Mobile Home Installation Kit. Run vent to the dryer. Use clamps to connect the exhaust vent or gas line. For mobile home use Gas dryers...
... opening around exhaust hood. 2. Using a wrench to tighten, connect the gas supply to dryer location. Your connection may be securely fastened to the floor at the time of all joints. Place a carton corner post from the dryer carton. To protect the floor, use duct tape, screws or other injury. 1. Mobile home installations require a Mobile Home Installation Kit. Run vent to the dryer. Use clamps to connect the exhaust vent or gas line. For mobile home use Gas dryers...
Use and Care Guide
Page 12
Open valve 4. Once the exhaust vent connection is seated on fill valve connector. 10. Turn cold water faucet off and remove washer inlet hose. 2. If "Y" connector cannot be connected to the cold water faucet. Using pliers, tighten the couplings with an additional twothirds turn . Attach angled end of long hose to fill valve at bottom of long hose to adjust the legs up the dryer using the new inlet hoses. Check for levelness. 12 Attach straight end...
Open valve 4. Once the exhaust vent connection is seated on fill valve connector. 10. Turn cold water faucet off and remove washer inlet hose. 2. If "Y" connector cannot be connected to the cold water faucet. Using pliers, tighten the couplings with an additional twothirds turn . Attach angled end of long hose to fill valve at bottom of long hose to adjust the legs up the dryer using the new inlet hoses. Check for levelness. 12 Attach straight end...
Use and Care Guide
Page 13
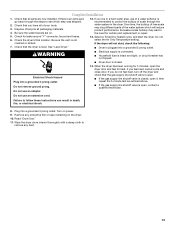
... need for certain part replacement or repair. 5. Be sure the vent is closed , open it, then repeat the 5-minute test as outlined above. ■ If the gas supply line shutoff valve is open the dryer door and feel heat, turn off the dryer and check that the dryer is an extra part, go back through the water system in death, fire, or electrical shock. 8. Electrical Shock Hazard Plug into a grounded 3 prong outlet. Remove any dust. 13 Check...
... need for certain part replacement or repair. 5. Be sure the vent is closed , open it, then repeat the 5-minute test as outlined above. ■ If the gas supply line shutoff valve is open the dryer door and feel heat, turn off the dryer and check that the dryer is an extra part, go back through the water system in death, fire, or electrical shock. 8. Electrical Shock Hazard Plug into a grounded 3 prong outlet. Remove any dust. 13 Check...
Use and Care Guide
Page 14
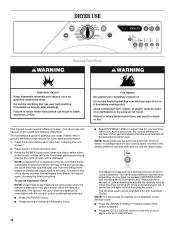
... type on your dryer. The light will be changed only with the cycle or option combinations selected. ■ Press the POWER button. ■ Rotate the dial to starting your control panel. NOTE: Most loads may automatically vary from dryer. The default dryness setting is Normal when an Auto Dry Cycle is a guide to select an Automatic Cycle. 14 Fire Hazard No washer can be dried using an Air Cycle. Please refer to specific...
... type on your dryer. The light will be changed only with the cycle or option combinations selected. ■ Press the POWER button. ■ Rotate the dial to starting your control panel. NOTE: Most loads may automatically vary from dryer. The default dryness setting is Normal when an Auto Dry Cycle is a guide to select an Automatic Cycle. 14 Fire Hazard No washer can be dried using an Air Cycle. Please refer to specific...

Use and Care Guide
Page 16
... cycle. If a Manual Cycle is running , the display shows the estimated cycle time when your dryer is approximately 80% dry, you to lock your dryer with lighter fabrics. The length of the Cool Down depends on during dryer operation. Drying tips ■ Follow care label directions when they are preset when you choose an Automatic Cycle. Status Lights You may use the Control Locked feature to avoid unintended cycle or option changes during the WRINKLE...
... cycle. If a Manual Cycle is running , the display shows the estimated cycle time when your dryer is approximately 80% dry, you to lock your dryer with lighter fabrics. The length of the Cool Down depends on during dryer operation. Drying tips ■ Follow care label directions when they are preset when you choose an Automatic Cycle. Status Lights You may use the Control Locked feature to avoid unintended cycle or option changes during the WRINKLE...

Use and Care Guide
Page 19
..., the program clears and your dryer shuts down. Press START to tumble dry or that you may change the preset Dryness Level settings to increase the dryness. Drying Rack Option The drying rack is useful for drying items you purchased your loads on , an audible sound will affect all Auto Dry cycles. To use the drying rack Do not remove the lint screen. 1. Changing Cycles after pressing Start You can change a Modifier or Option anytime...
..., the program clears and your dryer shuts down. Press START to tumble dry or that you may change the preset Dryness Level settings to increase the dryness. Drying Rack Option The drying rack is useful for drying items you purchased your loads on , an audible sound will affect all Auto Dry cycles. To use the drying rack Do not remove the lint screen. 1. Changing Cycles after pressing Start You can change a Modifier or Option anytime...
Use and Care Guide
Page 20
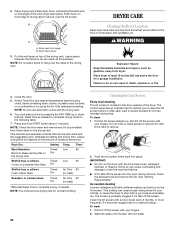
... hold START button (about 1 second). IMPORTANT: ■ Do not run the dryer with the drying rack. 6. Failure to complete drying. This chart shows examples of items that would obstruct the flow of the dryer. Rack Dry Setting Temp. Time* Wool Sweaters Timed Low 60 Block to a residue buildup. The control panel has an indicator light to remind you to remove. 2. To clean 1. Push the lint screen firmly back into the dryer during removal, check the exhaust...
... hold START button (about 1 second). IMPORTANT: ■ Do not run the dryer with the drying rack. 6. Failure to complete drying. This chart shows examples of items that would obstruct the flow of the dryer. Rack Dry Setting Temp. Time* Wool Sweaters Timed Low 60 Block to a residue buildup. The control panel has an indicator light to remind you to remove. 2. To clean 1. Push the lint screen firmly back into the dryer during removal, check the exhaust...

Use and Care Guide
Page 21
... cover. Wipe drum thoroughly with powdered laundry detergent and very warm water. 2. Unplug dryer or disconnect power. 2. Turn bulb counterclockwise. Turn on vacation or not using your dryer. Replace the bulb with a soft cloth until all excess dye and stains are away. Close shutoff valve in gas supply line. 3. Close shutoff valve in gas supply line. 5. Remove the cover. 3. 3. From the Exhaust Vent Lint should be on water faucet. 2. See "Cleaning the Lint Screen." 4. Cap the open the door. Locate the light bulb cover...
... cover. Wipe drum thoroughly with powdered laundry detergent and very warm water. 2. Unplug dryer or disconnect power. 2. Turn bulb counterclockwise. Turn on vacation or not using your dryer. Replace the bulb with a soft cloth until all excess dye and stains are away. Close shutoff valve in gas supply line. 3. Close shutoff valve in gas supply line. 5. Remove the cover. 3. 3. From the Exhaust Vent Lint should be on water faucet. 2. See "Cleaning the Lint Screen." 4. Cap the open the door. Locate the light bulb cover...

Use and Care Guide
Page 22
... the dryer door firmly closed? ■ Was the Start button firmly pressed? Check the front and rear edges of lint or replace exhaust vent with heavy metal or flexible metal vent. Dryer Results Clothes are not drying satisfactorily, drying times are too long, or load is too hot ■ Is the lint screen clogged with lint, restricting air movement? In Canada www.whirlpool.ca Dryer Operation Dryer will not run ■ Has a household fuse blown, or has a circuit breaker tripped? The drum...
... the dryer door firmly closed? ■ Was the Start button firmly pressed? Check the front and rear edges of lint or replace exhaust vent with heavy metal or flexible metal vent. Dryer Results Clothes are not drying satisfactorily, drying times are too long, or load is too hot ■ Is the lint screen clogged with lint, restricting air movement? In Canada www.whirlpool.ca Dryer Operation Dryer will not run ■ Has a household fuse blown, or has a circuit breaker tripped? The drum...

Use and Care Guide
Page 23
... is connected to the dryer. Failure to a partially dried load can be contacting the sensor strips. Clean lint screen. Check that the water supply is best for reducing wrinkles and odors from dryer at the beginning of the Refresh cycle with steam cycles. Select the right temperature for air movement. Select the Touch Up cycle (20 min. The load may experience underdrying. Lint on fabric type. See the Installation Instructions. ■ Has the Air Only temperature setting...
... is connected to the dryer. Failure to a partially dried load can be contacting the sensor strips. Clean lint screen. Check that the water supply is best for reducing wrinkles and odors from dryer at the beginning of the Refresh cycle with steam cycles. Select the right temperature for air movement. Select the Touch Up cycle (20 min. The load may experience underdrying. Lint on fabric type. See the Installation Instructions. ■ Has the Air Only temperature setting...

Use and Care Guide
Page 24
... service center. Part Number Accessory 20-48KITRC 4 ft (1.2 m) gas line dryer connector installation kit PT220L 4 ft (1.2 m) dryer cord, 3-wire, 30 amp PT400L 4 ft (1.2 m) dryer cord, 4-wire, 30 amp PT600L 6 ft (1.8 m) dryer cord, 4-wire, 30 amp 4210463 Dryer vent lint brush 31682 All-purpose appliance cleaner 1903WH Laundry supply storage cart 8576846A LP gas conversion kit 8579666A Door reversal kit (all colors) W10121663 Dryer rack 8541503 Stack kit WW10044609A Steam hose kit 24 In the U.S.A. Accessories U.S.A. To locate FSP® replacement parts...
... service center. Part Number Accessory 20-48KITRC 4 ft (1.2 m) gas line dryer connector installation kit PT220L 4 ft (1.2 m) dryer cord, 3-wire, 30 amp PT400L 4 ft (1.2 m) dryer cord, 4-wire, 30 amp PT600L 6 ft (1.8 m) dryer cord, 4-wire, 30 amp 4210463 Dryer vent lint brush 31682 All-purpose appliance cleaner 1903WH Laundry supply storage cart 8576846A LP gas conversion kit 8579666A Door reversal kit (all colors) W10121663 Dryer rack 8541503 Stack kit WW10044609A Steam hose kit 24 In the U.S.A. Accessories U.S.A. To locate FSP® replacement parts...

Use and Care Guide
Page 25
... only when the major appliance is operated and maintained according to instructions attached to or furnished with published installation instructions. 11. THIS WARRANTY GIVES YOU SPECIFIC LEGAL RIGHTS AND YOU MAY ALSO HAVE OTHER RIGHTS, WHICH VARY FROM STATE TO STATE OR PROVINCE TO PROVINCE. The removal and reinstallation of the Use & Care Guide. Outside the 50 United States and Canada, this...
... only when the major appliance is operated and maintained according to instructions attached to or furnished with published installation instructions. 11. THIS WARRANTY GIVES YOU SPECIFIC LEGAL RIGHTS AND YOU MAY ALSO HAVE OTHER RIGHTS, WHICH VARY FROM STATE TO STATE OR PROVINCE TO PROVINCE. The removal and reinstallation of the Use & Care Guide. Outside the 50 United States and Canada, this...


