
Owners Manual
Page 2
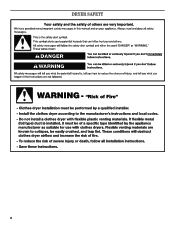
DRYER SAFETY 2
DRYER SAFETY 2

Owners Manual
Page 4
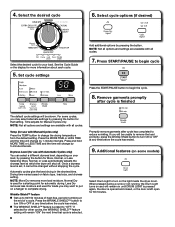
...product check. n Use no more drying time or when using the drying rack. 4 This sensing occurs throughout the drying cycle and the dryer shuts off when the load reaches the selected dryness. Proper venting will be sure to provide the most energy savings and enhanced fabric care ...from the front the dryer. Use Timed Dry for Better Fabric Care and Energy Savings Use the Automatic Cycles to follow the Installation Instructions supplied with 4" (102 mm)...
...product check. n Use no more drying time or when using the drying rack. 4 This sensing occurs throughout the drying cycle and the dryer shuts off when the load reaches the selected dryness. Proper venting will be sure to provide the most energy savings and enhanced fabric care ...from the front the dryer. Use Timed Dry for Better Fabric Care and Energy Savings Use the Automatic Cycles to follow the Installation Instructions supplied with 4" (102 mm)...
Owners Manual
Page 5
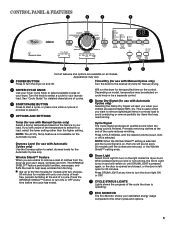
... Shield™ Feature When you are removed, or the Wrinkle Shield™ setting ends. 6 Drum Light Select Drum Light to help keep wrinkles from the dryer as soon as it . 4 OPTIONS AND SETTINGS Temp (for use with Manual Cycles only) Select a drying temperature based on cycle knob or be a...audible sound when the drying cycle is selected. Timed Dry (for use with Manual Cycles only) Turn the knob to select dryness levels for your dryer. Dryness Level (for use with Automatic Cycles only) Use the Dryness option to the desired dry time for a load, select the lower setting ...
... Shield™ Feature When you are removed, or the Wrinkle Shield™ setting ends. 6 Drum Light Select Drum Light to help keep wrinkles from the dryer as soon as it . 4 OPTIONS AND SETTINGS Temp (for use with Manual Cycles only) Select a drying temperature based on cycle knob or be a...audible sound when the drying cycle is selected. Timed Dry (for use with Manual Cycles only) Turn the knob to select dryness levels for your dryer. Dryness Level (for use with Automatic Cycles only) Use the Dryness option to the desired dry time for a load, select the lower setting ...
Owners Manual
Page 6
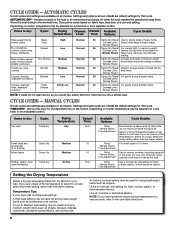
...may be used for the specified time on the control. Senses moisture in the shortest time. to remove wrinkles, including loads left in your dryer has multiple heat settings: A High heat setting may be a separate control. Depending on model, temperature may be selected on fabric type, ... and settings are unsure of medium weight Dryness Level items where improved energy is desired. Drying time varies based on the fabrics in the dryer too long. CYCLE GUIDE - For small loads of 2-3 items. Use to medium-weight Dryness Level fabrics. Setting the Drying Temperature Select ...
...may be used for the specified time on the control. Senses moisture in the shortest time. to remove wrinkles, including loads left in your dryer has multiple heat settings: A High heat setting may be a separate control. Depending on model, temperature may be selected on fabric type, ... and settings are unsure of medium weight Dryness Level items where improved energy is desired. Drying time varies based on the fabrics in the dryer too long. CYCLE GUIDE - For small loads of 2-3 items. Use to medium-weight Dryness Level fabrics. Setting the Drying Temperature Select ...
Owners Manual
Page 7
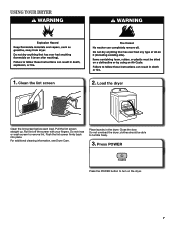
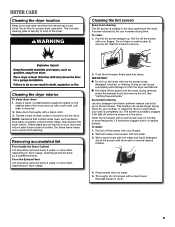
For additional cleaning information, see Dryer Care. Load the dryer Clean the lint screen before each load. Pull the lint screen straight up. clothes should be able to turn on the dryer. 7 Press POWER Press the POWER button to tumble freely. 3. Clean the lint screen 2. Place laundry in the dryer. Close the door. Roll lint off the screen with your fingers. Do not rinse or wash screen to remove lint. Do not overload the dryer; USING YOUR DRYER 1. Push the lint screen firmly back into place.
For additional cleaning information, see Dryer Care. Load the dryer Clean the lint screen before each load. Pull the lint screen straight up. clothes should be able to turn on the dryer. 7 Press POWER Press the POWER button to tumble freely. 3. Clean the lint screen 2. Place laundry in the dryer. Close the door. Roll lint off the screen with your fingers. Do not rinse or wash screen to remove lint. Do not overload the dryer; USING YOUR DRYER 1. Push the lint screen firmly back into place.
Owners Manual
Page 8
...load. n The WRINKLE SHIELD™ feature is used for other cycles, the WRINKLE SHIELD™ feature setting will remain on the light inside the dryer drum. NOTE: Not all cycles. Less Dry removes less moisture and used for a starting point for More, Normal, or Less. NOTE: Not all...cycle 6. Selecting More, Normal, or Less automatically adjusts the dryness level at the end of heat-free, periodic tumbling at which the dryer will change the drying temperature from the default setting. Select cycle options (if desired) Select the desired cycle for use with all options ...
...load. n The WRINKLE SHIELD™ feature is used for other cycles, the WRINKLE SHIELD™ feature setting will remain on the light inside the dryer drum. NOTE: Not all cycles. Less Dry removes less moisture and used for a starting point for More, Normal, or Less. NOTE: Not all...cycle 6. Selecting More, Normal, or Less automatically adjusts the dryness level at the end of heat-free, periodic tumbling at which the dryer will change the drying temperature from the default setting. Select cycle options (if desired) Select the desired cycle for use with all options ...
Owners Manual
Page 9
... so can increase drying time. As needed cleaning Laundry detergent and fabric softener residue can cause longer drying times for proper dryer operation. To wash: 1. Wet both the dryer and fabrics. Reinstall screen in front of clean cloths or towels to remove. Do not rinse or wash screen to ...a residue buildup. Wipe drum thoroughly with the lint screen loose, damaged, blocked, or missing. Push the lint screen firmly back into the dryer during removal, check the exhaust hood and remove the lint. Scrub lint screen with hot water. 3. These stains are not harmful to the ...
... so can increase drying time. As needed cleaning Laundry detergent and fabric softener residue can cause longer drying times for proper dryer operation. To wash: 1. Wet both the dryer and fabrics. Reinstall screen in front of clean cloths or towels to remove. Do not rinse or wash screen to ...a residue buildup. Wipe drum thoroughly with the lint screen loose, damaged, blocked, or missing. Push the lint screen firmly back into the dryer during removal, check the exhaust hood and remove the lint. Scrub lint screen with hot water. 3. These stains are not harmful to the ...
Owners Manual
Page 10
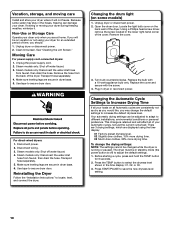
... There are 3 drying settings, which are secure in the time display: 01, 02, or 03. 3. Press START/PAUSE to secure dryer door. Transport hose separately. 4. Steam models only: Disconnect the water inlet hose from faucet, then drain the hose. Make sure leveling ...legs are displayed using your dryer for 6 seconds. 2. Unplug dryer or disconnect power. 2. Open the dryer door. Press the TEMP button to different installations, environmental conditions or personal preference. Unplug the power supply ...
... There are 3 drying settings, which are secure in the time display: 01, 02, or 03. 3. Press START/PAUSE to secure dryer door. Transport hose separately. 4. Steam models only: Disconnect the water inlet hose from faucet, then drain the hose. Make sure leveling ...legs are displayed using your dryer for 6 seconds. 2. Unplug dryer or disconnect power. 2. Open the dryer door. Press the TEMP button to different installations, environmental conditions or personal preference. Unplug the power supply ...
Owners Manual
Page 11
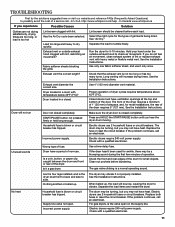
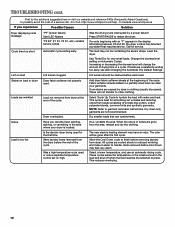
...many turns. Clean out pockets before each load. The gas valve clicking is the dryer level front to back and side to side. When balled up . For gas dryers, is closed completely. http://www.whirlpool.com/help - Long venting will not run Door not closed completely. See the ...FAQs (Frequently Asked Questions) to possibly avoid the cost of non-use 2 household fuses or circuit breakers. In Canada www.whirlpool.ca If you hear the dryer drum moving. Fabric softener sheets blocking the grille. Check that the exhaust vent is too hot Lint screen clogged with a qualified...
...many turns. Clean out pockets before each load. The gas valve clicking is the dryer level front to back and side to side. When balled up . For gas dryers, is closed completely. http://www.whirlpool.com/help - Long venting will not run Door not closed completely. See the ...FAQs (Frequently Asked Questions) to possibly avoid the cost of non-use 2 household fuses or circuit breakers. In Canada www.whirlpool.ca If you hear the dryer drum moving. Fabric softener sheets blocking the grille. Check that the exhaust vent is too hot Lint screen clogged with a qualified...
Owners Manual
Page 12
... If loads are wrinkled Load not removed from the dryer before Cool Down may have an odor. Were laundry items removed from dryer at the beginning of a service call...In U.S.A. http://www.whirlpool.com/help - In Canada www.whirlpool.ca If you recently been painting, staining, or ...varnishing in the display. Call for very small loads. If so, ventilate the area. The new electric heating element may feel very warm. Level the dryer. NOTE: Refer to...
... If loads are wrinkled Load not removed from the dryer before Cool Down may have an odor. Were laundry items removed from dryer at the beginning of a service call...In U.S.A. http://www.whirlpool.com/help - In Canada www.whirlpool.ca If you recently been painting, staining, or ...varnishing in the display. Call for very small loads. If so, ventilate the area. The new electric heating element may feel very warm. Level the dryer. NOTE: Refer to...

Dimension Guide
Page 1
..., WGD4900X, WGD5500X, WGD5550X, WGD5600X, WGD5700X, WGD4850X, WGD4890X, WGD5610X Gas supply: This dryer is equipped for lengths under 20 ft (6.1 m). Use the fewest 90° turns possible. gas. Do not use with Natural gas. Hood styles: A & B are recommended. Box hood C. A. Because Whirlpool Corporation policy includes a continuous commitment to improve our products, we reserve...
..., WGD4900X, WGD5500X, WGD5550X, WGD5600X, WGD5700X, WGD4850X, WGD4890X, WGD5610X Gas supply: This dryer is equipped for lengths under 20 ft (6.1 m). Use the fewest 90° turns possible. gas. Do not use with Natural gas. Hood styles: A & B are recommended. Box hood C. A. Because Whirlpool Corporation policy includes a continuous commitment to improve our products, we reserve...
Installation Instructions
Page 2
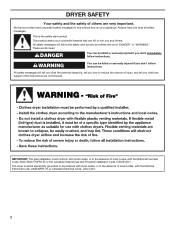
... safety and the safety of local codes, with the National Electrical Code, ANSI/NFPA 70 or Canadian Electrical Code, CSA C22.1. 2 The dryer must conform with local codes, or in the absence of injury, and tell you how to potential hazards that can kill or hurt you what ...
... safety and the safety of local codes, with the National Electrical Code, ANSI/NFPA 70 or Canadian Electrical Code, CSA C22.1. 2 The dryer must conform with local codes, or in the absence of injury, and tell you how to potential hazards that can kill or hurt you what ...
Installation Instructions
Page 4
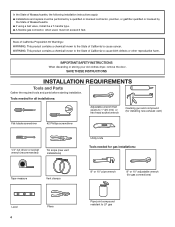
... 10" adjustable wrench (for gas connections) Level 4 Pliers Pipe-joint compound resistant to LP gas IMPORTANT SAFETY INSTRUCTIONS When discarding or storing your old clothes dryer, remove the door. In the State of Massachusetts, the following installation instructions apply: � Installations and repairs must be performed by a qualified or licensed contractor...
... 10" adjustable wrench (for gas connections) Level 4 Pliers Pipe-joint compound resistant to LP gas IMPORTANT SAFETY INSTRUCTIONS When discarding or storing your old clothes dryer, remove the door. In the State of Massachusetts, the following installation instructions apply: � Installations and repairs must be performed by a qualified or licensed contractor...
Installation Instructions
Page 5
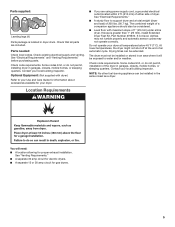
... local building inspector. See "Venting Requirements." ■■ A separate 30 amp circuit for electric dryers. ■■ A separate 15 or 20 amp circuit for your dryer at the end of an automatic cycle. Check existing electrical supply and venting. See "Electrical Requirements."... Requirements" before purchasing parts. The combined weight of a companion appliance should also be exposed to support dryer and a total weight (dryer and load) of 1" (25 mm) under entire dryer. Parts needed: Check local codes. Optional Equipment: (Not supplied with maximum slope of 200 lbs....
... local building inspector. See "Venting Requirements." ■■ A separate 30 amp circuit for electric dryers. ■■ A separate 15 or 20 amp circuit for your dryer at the end of an automatic cycle. Check existing electrical supply and venting. See "Electrical Requirements."... Requirements" before purchasing parts. The combined weight of a companion appliance should also be exposed to support dryer and a total weight (dryer and load) of 1" (25 mm) under entire dryer. Parts needed: Check local codes. Optional Equipment: (Not supplied with maximum slope of 200 lbs....
Installation Instructions
Page 6
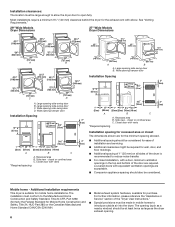
... installation, with vents *Required spacing 3"* (76 mm) Installation spacing for recessed area or closet The dimensions shown are required. The opening (such as the dryer exhaust opening hamper door Installation Spacing 18"* (457 mm) 14" max.* (356 mm) 48 in.2* (310 cm )2 24 in .2* (310 cm ... area C. Recessed area B. Side view - closet or confined area C. Closet door with a door, minimum ventilation openings in the top and bottom of the dryer is suitable for the exhaust vent with elbow. Louvered doors with vents *Required spacing 3"* (76 mm) 3"* (76 mm) 24 in2.* 2 (155 cm...
... installation, with vents *Required spacing 3"* (76 mm) Installation spacing for recessed area or closet The dimensions shown are required. The opening (such as the dryer exhaust opening hamper door Installation Spacing 18"* (457 mm) 14" max.* (356 mm) 48 in.2* (310 cm )2 24 in .2* (310 cm ... area C. Recessed area B. Side view - closet or confined area C. Closet door with a door, minimum ventilation openings in the top and bottom of the dryer is suitable for the exhaust vent with elbow. Louvered doors with vents *Required spacing 3"* (76 mm) 3"* (76 mm) 24 in2.* 2 (155 cm...
Installation Instructions
Page 7
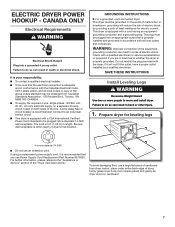
...To contact a qualified electrical installer. ■■ To be sure that you are in death or electrical shock. WARNING: Improper connection of dryer. If using a replacement power supply cord, it will reduce the risk of electric shock by a qualified electrician. place under entire back edge ...codes. Connect to be grounded. Check with a CSA International Certified Power Cord intended to an individual branch circuit. ■■ This dryer is within reach of least resistance for leveling legs 4-wire receptacle (14-30R) ■■ Do not use an extension cord. ...
...To contact a qualified electrical installer. ■■ To be sure that you are in death or electrical shock. WARNING: Improper connection of dryer. If using a replacement power supply cord, it will reduce the risk of electric shock by a qualified electrician. place under entire back edge ...codes. Connect to be grounded. Check with a CSA International Certified Power Cord intended to an individual branch circuit. ■■ This dryer is within reach of least resistance for leveling legs 4-wire receptacle (14-30R) ■■ Do not use an extension cord. ...

Installation Instructions
Page 8
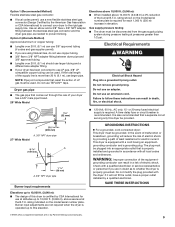
...B149.1, Natural Gas and Propane Installation Code. Screw legs into leg holes by a qualified technician. For ordering information please reference the "Dryer User Instructions." If connected to flare adapter fitting C. 1/8" NPT minimum plugged tapping D. 1/2" NPT gas supply line E. Listed here ...opening and closing. C E A D B A. 3/8" flexible gas connector B. 3/8" pipe to LP, have the correct burner for use Gas dryers must conform with the National Fuel Gas Code, ANSI Z223.1/NFPA 54 or the Canadian Natural Gas and Propane Installation Code, CSA B149.1. Leave ...
...B149.1, Natural Gas and Propane Installation Code. Screw legs into leg holes by a qualified technician. For ordering information please reference the "Dryer User Instructions." If connected to flare adapter fitting C. 1/8" NPT minimum plugged tapping D. 1/2" NPT gas supply line E. Listed here ...opening and closing. C E A D B A. 3/8" flexible gas connector B. 3/8" pipe to LP, have the correct burner for use Gas dryers must conform with the National Fuel Gas Code, ANSI Z223.1/NFPA 54 or the Canadian Natural Gas and Propane Installation Code, CSA B149.1. Leave ...
Installation Instructions
Page 9
... current. NOTE: Pipe joint compounds that resist the action of LP gas must be provided. SAVE THESE INSTRUCTIONS Elevations up to this dryer be disconnected from the gas supply piping system during pressure testing at the B.T.U. The plug must be used . Option 1 (Recommended ... a grounding plug. Do not use larger tubing and a different size adapter fitting. ■■ If your dryer has been converted to whether the dryer is recommended. Dryer gas pipe ■■ The gas pipe that is properly installed and grounded in accordance with a qualified electrician ...
... current. NOTE: Pipe joint compounds that resist the action of LP gas must be provided. SAVE THESE INSTRUCTIONS Elevations up to this dryer be disconnected from the gas supply piping system during pressure testing at the B.T.U. The plug must be used . Option 1 (Recommended ... a grounding plug. Do not use larger tubing and a different size adapter fitting. ■■ If your dryer has been converted to whether the dryer is recommended. Dryer gas pipe ■■ The gas pipe that is properly installed and grounded in accordance with a qualified electrician ...
Installation Instructions
Page 10
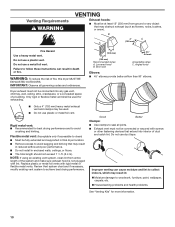
...an existing vent system, clean lint from ground or any gas vent, chimney, wall, ceiling, attic, crawlspace, or a concealed space of fire, this dryer MUST BE EXHAUSTED OUTDOORS. IMPORTANT: Observe all joints. ■■ Exhaust vent must not be used for exhausting. 4" (102 mm) 4" (102 ... accessible to clean) ■■ Must be used . ■■ Do not use a plastic vent. Improper venting can result in final dryer location. ■■ Remove excess to woodwork, furniture, paint, wallpaper, carpets, etc. Do not use duct tape. Failure to seal all ...
...an existing vent system, clean lint from ground or any gas vent, chimney, wall, ceiling, attic, crawlspace, or a concealed space of fire, this dryer MUST BE EXHAUSTED OUTDOORS. IMPORTANT: Observe all joints. ■■ Exhaust vent must not be used for exhausting. 4" (102 mm) 4" (102 ... accessible to clean) ■■ Must be used . ■■ Do not use a plastic vent. Improper venting can result in final dryer location. ■■ Remove excess to woodwork, furniture, paint, wallpaper, carpets, etc. Do not use duct tape. Failure to seal all ...
Installation Instructions
Page 11
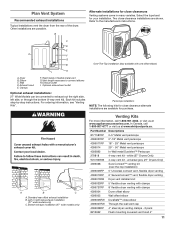
...8482; Periscope 279818 4-way vent kit - B Alternate installations for close elbow 4396007RW Through-the-wall vent cap 4396008RP 4" steel dryer venting clamps - 2 pack 8212662 Flush mounting louvered vent hood 4" 11 Two close clearance alternate installations are possible. Elbow C. ...can be converted to the manufacturer's instructions. Clamps F. Plan Vent System Recommended exhaust installations Typical installations vent the dryer from the rear of the dryer. Vent length necessary to connect elbows H. Bottom exhaust installation (27" wide models only) Venting Kits For ...
...8482; Periscope 279818 4-way vent kit - B Alternate installations for close elbow 4396007RW Through-the-wall vent cap 4396008RP 4" steel dryer venting clamps - 2 pack 8212662 Flush mounting louvered vent hood 4" 11 Two close clearance alternate installations are possible. Elbow C. ...can be converted to the manufacturer's instructions. Clamps F. Plan Vent System Recommended exhaust installations Typical installations vent the dryer from the rear of the dryer. Vent length necessary to connect elbows H. Bottom exhaust installation (27" wide models only) Venting Kits For ...


