
Owners Manual
Page 3
... they give off vapors that have been previously cleaned in, washed in, soaked in, or spotted with controls. ■ Do not repair or replace any part of this or any phone in this Use and Care Guide or in the dryer. State of California Proposition 65 Warnings: WARNING: This product contains...
... they give off vapors that have been previously cleaned in, washed in, soaked in, or spotted with controls. ■ Do not repair or replace any part of this or any phone in this Use and Care Guide or in the dryer. State of California Proposition 65 Warnings: WARNING: This product contains...

Owners Manual
Page 13
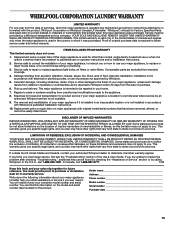
... accident, alteration, misuse, abuse, re, ood, acts of God, improper installation, installation not in accordance with Whirlpool's published installation instructions. 10. Repairs to parts or systems resulting from unauthorized modi cations made to province. This warranty gives you speci c legal rights, and you...exclusions may have been removed, altered, or cannot be found by checking the "Assistance or Service" section or by Whirlpool. 5. WHIRLPOOL CORPORATION LAUNDRY WARRANTY LIMITED WARRANTY For one year from the date of purchase, when this major appliance is operated and maintained...
... accident, alteration, misuse, abuse, re, ood, acts of God, improper installation, installation not in accordance with Whirlpool's published installation instructions. 10. Repairs to parts or systems resulting from unauthorized modi cations made to province. This warranty gives you speci c legal rights, and you...exclusions may have been removed, altered, or cannot be found by checking the "Assistance or Service" section or by Whirlpool. 5. WHIRLPOOL CORPORATION LAUNDRY WARRANTY LIMITED WARRANTY For one year from the date of purchase, when this major appliance is operated and maintained...
Warranty
Page 1
...major appliance, unless such damage results from defects in materials or workmanship and is reported to Whirlpool within 30 days from unauthorized modifications made to the appliance. 8. Replacement parts or repair labor if this major appliance is used in a manner that is inconsistent to ..., acts of God, improper installation, installation not in accordance with electrical or plumbing codes, or use of products not approved by Whirlpool. 5. Replacement parts or repair labor on the product. You will pay for product service if your major appliance is located in a remote area where...
...major appliance, unless such damage results from defects in materials or workmanship and is reported to Whirlpool within 30 days from unauthorized modifications made to the appliance. 8. Replacement parts or repair labor if this major appliance is used in a manner that is inconsistent to ..., acts of God, improper installation, installation not in accordance with electrical or plumbing codes, or use of products not approved by Whirlpool. 5. Replacement parts or repair labor on the product. You will pay for product service if your major appliance is located in a remote area where...
Installation Instructions
Page 4
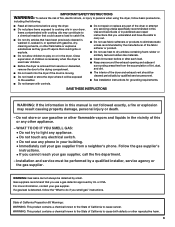
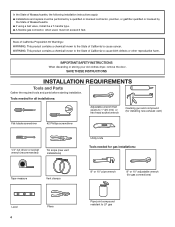
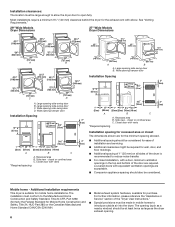
IMPORTANT SAFETY INSTRUCTIONS When discarding or storing your old clothes dryer, remove the door. SAVE THESE INSTRUCTIONS INSTALLATION REQUIREMENTS Tools and Parts Gather the required tools and parts before starting installation. Tools needed for all installations: Adjustable wrench that opens to 1" (25 mm) or hex-head socket wrench Caulking gun and compound (for...
IMPORTANT SAFETY INSTRUCTIONS When discarding or storing your old clothes dryer, remove the door. SAVE THESE INSTRUCTIONS INSTALLATION REQUIREMENTS Tools and Parts Gather the required tools and parts before starting installation. Tools needed for all installations: Adjustable wrench that opens to 1" (25 mm) or hex-head socket wrench Caulking gun and compound (for...
Installation Instructions
Page 5
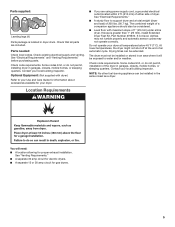
...clothes may not tumble properly and automatic sensor cycles may not operate correctly. Location Requirements You will be extended. Check that all parts are using power supply cord, a grounded electrical outlet located within 2 ft. (610 mm) of either side of 1" (...appliance can be exposed to water and/or weather. Parts supplied: Leveling legs (4) Parts package is greater than 1" (25 mm), install Extended Dryer Feet Kit, Part Number 279810. See "Electrical Requirements" and "Venting Requirements" before purchasing parts. Contact your local building inspector. See "Electrical ...
...clothes may not tumble properly and automatic sensor cycles may not operate correctly. Location Requirements You will be extended. Check that all parts are using power supply cord, a grounded electrical outlet located within 2 ft. (610 mm) of either side of 1" (...appliance can be exposed to water and/or weather. Parts supplied: Leveling legs (4) Parts package is greater than 1" (25 mm), install Extended Dryer Feet Kit, Part Number 279810. See "Electrical Requirements" and "Venting Requirements" before purchasing parts. Contact your local building inspector. See "Electrical ...
Installation Instructions
Page 6
... provisions must be made in mobile homes to the Manufactured Home Construction and Safety Standard, Title 24 CFR, Part 3280 (formerly the Federal Standard for Mobile Home Construction and Safety, Title 24, HUD Part 280) or the Canadian Manufactured Home Standard CAN/CSA-Z240 MH. ■■ Metal exhaust system hardware, available...
... provisions must be made in mobile homes to the Manufactured Home Construction and Safety Standard, Title 24 CFR, Part 3280 (formerly the Federal Standard for Mobile Home Construction and Safety, Title 24, HUD Part 280) or the Canadian Manufactured Home Standard CAN/CSA-Z240 MH. ■■ Metal exhaust system hardware, available...
Installation Instructions
Page 7
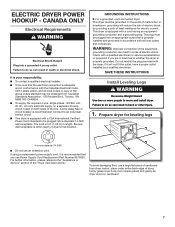
... lay dryer down on both sides of least resistance for leveling legs 4-wire receptacle (14-30R) ■■ Do not use Power Supply Cord Replacement Part Number 8579325. GROUNDING INSTRUCTIONS � For a grounded, cord-connected dryer: This dryer must be grounded. A time-delay fuse or circuit breaker is recommended that is...
... lay dryer down on both sides of least resistance for leveling legs 4-wire receptacle (14-30R) ■■ Do not use Power Supply Cord Replacement Part Number 8579325. GROUNDING INSTRUCTIONS � For a grounded, cord-connected dryer: This dryer must be grounded. A time-delay fuse or circuit breaker is recommended that is...
Installation Instructions
Page 11
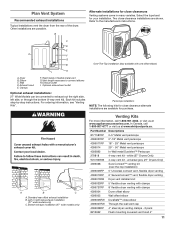
...-by-step instructions. Standard rear offset exhaust installation B. Other installations are shown. Dryer B. white (27" Dryers Only) W10186596 4-way vent kit - Refer to connect elbows H. Part Number Descriptions 8171587RP 0-5" Metal vent periscope 4396037RP 0"-18" Metal vent periscope 4396011RP 18" - 29" Metal vent periscope 4396014 29" - 50" Metal vent periscope 4392892 In...
...-by-step instructions. Standard rear offset exhaust installation B. Other installations are shown. Dryer B. white (27" Dryers Only) W10186596 4-way vent kit - Refer to connect elbows H. Part Number Descriptions 8171587RP 0-5" Metal vent periscope 4396037RP 0"-18" Metal vent periscope 4396011RP 18" - 29" Metal vent periscope 4396014 29" - 50" Metal vent periscope 4392892 In...
Installation Instructions
Page 14
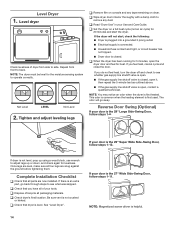
..., follow steps 1-11. Reverse Door Swing (Optional) If your door is level. If there is not crushed or kinked. Be sure vent is an extra part, go away. NOTE: The dryer must be level for heat. NOTE: You may notice an odor when the dryer is closed , open , contact a qualified technician.... ■■ Household fuse is intact and tight, or circuit breaker has not tripped. ■■ Dryer door is first heated. q Dispose of/recycle all parts are level, make sure all of dryer from front to side.
..., follow steps 1-11. Reverse Door Swing (Optional) If your door is level. If there is not crushed or kinked. Be sure vent is an extra part, go away. NOTE: The dryer must be level for heat. NOTE: You may notice an odor when the dryer is closed , open , contact a qualified technician.... ■■ Household fuse is intact and tight, or circuit breaker has not tripped. ■■ Dryer door is first heated. q Dispose of/recycle all parts are level, make sure all of dryer from front to side.

Installation Instructions
Page 15
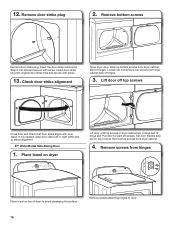
... are in bottom of dryer. Remove bottom screws from dryer cabinet. Check door strike alignment Lift door until top screws in cabinet are in large part of hinges. Pull door forward off top screws NOTE: Two people maybe needed , slide door catch left side of hinges. 3. Insert plugs into bottom holes...
... are in bottom of dryer. Remove bottom screws from dryer cabinet. Check door strike alignment Lift door until top screws in cabinet are in large part of hinges. Pull door forward off top screws NOTE: Two people maybe needed , slide door catch left side of hinges. 3. Insert plugs into bottom holes...

Installation Instructions
Page 16
... in 180º and set it back down on dryer, grasp sides of hinge slot. Rotate outer door Take outer door and rotate in large part of outer door and lift to avoid damaging the surface. 2. Insert 4 door screws.
... in 180º and set it back down on dryer, grasp sides of hinge slot. Rotate outer door Take outer door and rotate in large part of outer door and lift to avoid damaging the surface. 2. Insert 4 door screws.
Installation Instructions
Page 18
... door strike hole and secure with door catch. Insert door strike plug into hole and secure with screw. Insert the door strike removed in large part of dryer. 12. Set door (handle side up) on top of hinge slot. Lift door off screws. Pull door forward off top screws Close door...
... door strike hole and secure with door catch. Insert door strike plug into hole and secure with screw. Insert the door strike removed in large part of dryer. 12. Set door (handle side up) on top of hinge slot. Lift door off screws. Pull door forward off top screws Close door...


