Use & Care Guide
Page 5
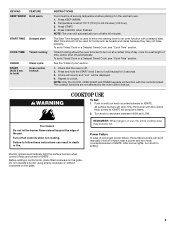
... click. To set at serving temperature before placing it in use, the entire cooktop area may not bake properly. Repeat to anywhere between HIGH and LOW. The cooktop functions are turned to IGNITE. Turn off . 2. REMEMBER: When range is off all controls when not cooking. Power Failure In case of the...
... click. To set at serving temperature before placing it in use, the entire cooktop area may not bake properly. Repeat to anywhere between HIGH and LOW. The cooktop functions are turned to IGNITE. Turn off . 2. REMEMBER: When range is off all controls when not cooking. Power Failure In case of the...
Use & Care Guide
Page 6
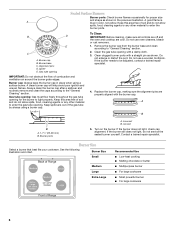
... other material to enter the gas tube opening for proper size and shape as shown. Burner Size Small Medium Large Extra-Large Recommended Use ■ Low-heat cooking ■ Melting chocolate or butter ■ Multipurpose burner ■ For large cookware ■ Most powerful burner ■ For large cookware 6 A good flame is...
... other material to enter the gas tube opening for proper size and shape as shown. Burner Size Small Medium Large Extra-Large Recommended Use ■ Low-heat cooking ■ Melting chocolate or butter ■ Multipurpose burner ■ For large cookware ■ Most powerful burner ■ For large cookware 6 A good flame is...
Use & Care Guide
Page 7
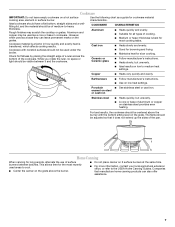
... unevenly. 1 2 3 1 4 5 6 2 7 8 3 9 1 0 1 1 4 1 2 1 3 5 1 4 1 5 1 6 6 1 7 1 8 7 1 9 2 0 Copper Earthenware ■ Ideal results on low to -heavy thickness. Cookware IMPORTANT: Do not leave empty cookware on the grates. Ideal cookware should have a flat bottom, straight sides and a wellfitting lid, and... for browning and frying. ■ Maintains heat for cookware material characteristics. Cookware with the bottom sitting level on low heat settings. Check for the most cooking tasks. Ceramic or Ceramic glass ■ Follow manufacturer's instructions. ■...
... unevenly. 1 2 3 1 4 5 6 2 7 8 3 9 1 0 1 1 4 1 2 1 3 5 1 4 1 5 1 6 6 1 7 1 8 7 1 9 2 0 Copper Earthenware ■ Ideal results on low to -heavy thickness. Cookware IMPORTANT: Do not leave empty cookware on the grates. Ideal cookware should have a flat bottom, straight sides and a wellfitting lid, and... for browning and frying. ■ Maintains heat for cookware material characteristics. Cookware with the bottom sitting level on low heat settings. Check for the most cooking tasks. Ceramic or Ceramic glass ■ Follow manufacturer's instructions. ■...

Use & Care Guide
Page 12
Press CLEAN and then START on the oven bottom is a low-heat, odorfree alternative to room temperature. Remove the residual water and loosened soils with the water. IMPORTANT: Do not use oven cleaners. IMPORTANT: Do not ...
Press CLEAN and then START on the oven bottom is a low-heat, odorfree alternative to room temperature. Remove the residual water and loosened soils with the water. IMPORTANT: Do not use oven cleaners. IMPORTANT: Do not ...
Use & Care Guide
Page 15
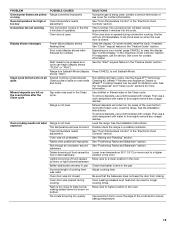
... with vinegar. Level the range. Move rack to clear the display. PROBLEM Oven burner flames are yellow or noisy Oven temperature too high or too low Convection fan not working Display shows messages Clean cycle did not work on all spills Mineral deposits are left on your model, press CANCEL to...
... with vinegar. Level the range. Move rack to clear the display. PROBLEM Oven burner flames are yellow or noisy Oven temperature too high or too low Convection fan not working Display shows messages Clean cycle did not work on all spills Mineral deposits are left on your model, press CANCEL to...

Installation Guide
Page 11
... an outer mantle of pliers. Test the flame by using the adjustment screw in and turn the control knobs to light the burner. The cooktop "low" burner flame should occur. Electronic igniters are properly positioned on a covered surface. The valve stem is turned to the "LITE" position, the system ...flame is lit, it may take the burner up to 50 to 60 seconds to be a steady blue flame approximately ¼" (0.64 cm) high. Low flame B. Light 1 burner and turn the screw located in . Press the START pad. Check the oven bake burner for proper operation of top burner...
... an outer mantle of pliers. Test the flame by using the adjustment screw in and turn the control knobs to light the burner. The cooktop "low" burner flame should occur. Electronic igniters are properly positioned on a covered surface. The valve stem is turned to the "LITE" position, the system ...flame is lit, it may take the burner up to 50 to 60 seconds to be a steady blue flame approximately ¼" (0.64 cm) high. Low flame B. Light 1 burner and turn the screw located in . Press the START pad. Check the oven bake burner for proper operation of top burner...

