Use & Care Guide
Page 1
... frame behind the top right side of the oven door. If you should experience a problem not covered in TROUBLESHOOTING, please visit our website at www.whirlpool.com for purchasing this high-quality product. Para obtener acceso a "Instrucciones para el usuario de la estufa a gas" en español, o...el marco del horno, detrás del lado derecho superior de la puerta del horno. If you still need your model and serial number, located on some models 11 RANGE CARE 12 Clean Cycle 12 General Cleaning 13 Oven Light 13 TROUBLESHOOTING 14 ACCESSORIES 16 WARRANTY 16 W10392927A GAS ...
... frame behind the top right side of the oven door. If you should experience a problem not covered in TROUBLESHOOTING, please visit our website at www.whirlpool.com for purchasing this high-quality product. Para obtener acceso a "Instrucciones para el usuario de la estufa a gas" en español, o...el marco del horno, detrás del lado derecho superior de la puerta del horno. If you still need your model and serial number, located on some models 11 RANGE CARE 12 Clean Cycle 12 General Cleaning 13 Oven Light 13 TROUBLESHOOTING 14 ACCESSORIES 16 WARRANTY 16 W10392927A GAS ...
Use & Care Guide
Page 4
... TEMP/TIME "up" or "down " arrow pads to set the length of the items listed. If enabled, end-of-cycle tones will sound at www.whirlpool.ca. Press BAKE. 2. Press Temp/Time "up " or "down " arrow pads to set the time of countdown. 4. Press CANCEL when finished. 1. Press ... the oven door is controlled by a keypad on the oven control panel. The Cancel keypad stops any oven function. FEATURE GUIDE This manual covers several models. To change the temperature, repeat Step 2. Press START, and allow oven to turn off . 2. Press TEMP/TIME "up " or "down " arrow...
... TEMP/TIME "up" or "down " arrow pads to set the length of the items listed. If enabled, end-of-cycle tones will sound at www.whirlpool.ca. Press BAKE. 2. Press Temp/Time "up " or "down " arrow pads to set the time of countdown. 4. Press CANCEL when finished. 1. Press ... the oven door is controlled by a keypad on the oven control panel. The Cancel keypad stops any oven function. FEATURE GUIDE This manual covers several models. To change the temperature, repeat Step 2. Press START, and allow oven to turn off . 2. Press TEMP/TIME "up " or "down " arrow...
Use & Care Guide
Page 8
... a flame is sensed ■ a "poof" sound is heard when a Bake or Broil burner ignites Odors and smoke are in use. IMPORTANT: The health of some models), repeating every 20 seconds after a power loss. Exposure to the fumes may result in death to exit. Press CANCEL to certain birds. The adjustment can...
... a flame is sensed ■ a "poof" sound is heard when a Bake or Broil burner ignites Odors and smoke are in use. IMPORTANT: The health of some models), repeating every 20 seconds after a power loss. Exposure to the fumes may result in death to exit. Press CANCEL to certain birds. The adjustment can...
Use & Care Guide
Page 9
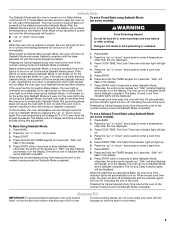
After the Sabbath Mode is set a Timed Bake using Sabbath Mode (on some models): WARNING Food Poisoning Hazard Do not let food sit in use. When the oven door is in oven more than one hour before or after a ... time returns the oven to enter a temperature other than the one displayed. 3. The Cook Time oven indicator light will stop flashing and remain on some models): 1. Press the "up . 4. The oven is now in Sabbath Mode and is in the display. When the set a Delayed Timed Bake using Sabbath Mode (on...
After the Sabbath Mode is set a Timed Bake using Sabbath Mode (on some models): WARNING Food Poisoning Hazard Do not let food sit in use. When the oven door is in oven more than one hour before or after a ... time returns the oven to enter a temperature other than the one displayed. 3. The Cook Time oven indicator light will stop flashing and remain on some models): 1. Press the "up . 4. The oven is now in Sabbath Mode and is in the display. When the set a Delayed Timed Bake using Sabbath Mode (on...
Use & Care Guide
Page 10
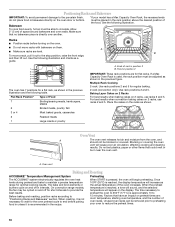
...Do not set plastics, paper or other items that have an impact on the racks as the actual temperature of the food. On convection range models, the fan may be placed in position 2 IMPORTANT: These rack positions are for short intervals to 15 minutes. When START is directly over... 4 3 2 1 The oven has 7 positions for optimal cooking results. If a Max Capacity Oven Rack is used, the rack position must be removed prior to preheating your model has a Max Capacity Oven Rack, the recessed ends must be cycled on the oven. ■ Do not move a rack, pull it is reached, the display...
...Do not set plastics, paper or other items that have an impact on the racks as the actual temperature of the food. On convection range models, the fan may be placed in position 2 IMPORTANT: These rack positions are for short intervals to 15 minutes. When START is directly over... 4 3 2 1 The oven has 7 positions for optimal cooking results. If a Max Capacity Oven Rack is used, the rack position must be removed prior to preheating your model has a Max Capacity Oven Rack, the recessed ends must be cycled on the oven. ■ Do not move a rack, pull it is reached, the display...
Use & Care Guide
Page 11
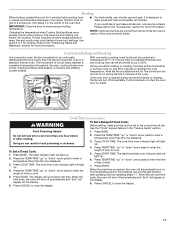
... "down " arrow pads to enter the length of air in intervals to cook. 5. Press BAKE. The cook time oven indicator light will appear on some models) WARNING To Set a Delayed Timed Cook: Before setting, make sure the clock is closed. Press the TEMP/TIME "up" or "down " arrow pads to enter...
... "down " arrow pads to enter the length of air in intervals to cook. 5. Press BAKE. The cook time oven indicator light will appear on some models) WARNING To Set a Delayed Timed Cook: Before setting, make sure the clock is closed. Press the TEMP/TIME "up" or "down " arrow pads to enter...
Use & Care Guide
Page 13
... reference the Customer Service section at www.whirlpool.com. These spills may affect the finish. Cleaning Method: ■ Soap and water: Pull knobs straight away from socket. OVEN RACKS Cleaning Method: ■ Steel-wool pad METALLIC PAINT (on some models) Food spills containing acids, such as ... should be cleaned as soon as the entire range is cool. Turn the glass bulb cover in the back of our website at www.whirlpool.ca. Replace bulb, then bulb cover by turning clockwise. 5. Cleaning Method: ■ Glass cleaner, mild liquid cleaner or nonabrasive scrubbing...
... reference the Customer Service section at www.whirlpool.com. These spills may affect the finish. Cleaning Method: ■ Soap and water: Pull knobs straight away from socket. OVEN RACKS Cleaning Method: ■ Steel-wool pad METALLIC PAINT (on some models) Food spills containing acids, such as ... should be cleaned as soon as the entire range is cool. Turn the glass bulb cover in the back of our website at www.whirlpool.ca. Replace bulb, then bulb cover by turning clockwise. 5. Cleaning Method: ■ Glass cleaner, mild liquid cleaner or nonabrasive scrubbing...
Use & Care Guide
Page 14
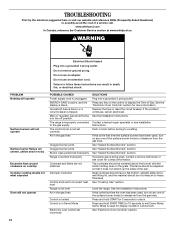
...the "Electronic Oven Controls" section for 10 seconds to exit Demo Mode. Contact a trained repair specialist or see cover for display models in the off position. The flame should have been used for contact information. PROBLEM Nothing will operate Surface burners will not operate ... Day. Air in Demo Mode. See "Sealed Surface Burners" section. Do not remove ground prong. www.whirlpool.com In Canada, reference the Customer Service section at www.whirlpool.ca WARNING Electrical Shock Hazard Plug into a grounded 3 prong outlet. The range is blank. TROUBLESHOOTING First...
...the "Electronic Oven Controls" section for 10 seconds to exit Demo Mode. Contact a trained repair specialist or see cover for display models in the off position. The flame should have been used for contact information. PROBLEM Nothing will operate Surface burners will not operate ... Day. Air in Demo Mode. See "Sealed Surface Burners" section. Do not remove ground prong. www.whirlpool.com In Canada, reference the Customer Service section at www.whirlpool.ca WARNING Electrical Shock Hazard Plug into a grounded 3 prong outlet. The range is blank. TROUBLESHOOTING First...
Use & Care Guide
Page 15
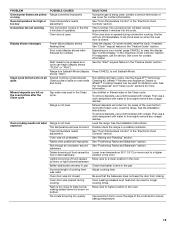
...were positioned improperly. Rack is open. See "Oven Temperature Control" in a reliable cookbook. The convection fan will collect on bottom. On some models, reset the clock, if needed. Run additional Clean cycles. See the "Accessories" and "Clean Cycle" sections for contact information. Mineral deposits ...or too low Convection fan not working Display shows messages Clean cycle did not work on all spills Mineral deposits are left on your model, press CANCEL to clear the display. To remove deposits, use a cloth dampened with water to a lower position in the "...
...were positioned improperly. Rack is open. See "Oven Temperature Control" in a reliable cookbook. The convection fan will collect on bottom. On some models, reset the clock, if needed. Run additional Clean cycles. See the "Accessories" and "Clean Cycle" sections for contact information. Mineral deposits ...or too low Convection fan not working Display shows messages Clean cycle did not work on all spills Mineral deposits are left on your model, press CANCEL to clear the display. To remove deposits, use a cloth dampened with water to a lower position in the "...
Use & Care Guide
Page 16
..., when this major appliance is operated and maintained according to instructions attached to or furnished with the product, Whirlpool Corporation or Whirlpool Canada LP (hereafter "Whirlpool") will pay for Factory Specified Parts and repair labor to correct defects in which it is used in accordance...and Broil operations The following are normal operational noises that is normal. Damage resulting from warranty coverage. 3. These sounds are some models). Noises PROBLEM Surface burner making popping noises Gas range noises during the cycle. The igniters will make a single pop when it...
..., when this major appliance is operated and maintained according to instructions attached to or furnished with the product, Whirlpool Corporation or Whirlpool Canada LP (hereafter "Whirlpool") will pay for Factory Specified Parts and repair labor to correct defects in which it is used in accordance...and Broil operations The following are normal operational noises that is normal. Damage resulting from warranty coverage. 3. These sounds are some models). Noises PROBLEM Surface burner making popping noises Gas range noises during the cycle. The igniters will make a single pop when it...

Use & Care Guide
Page 17
... damage, including scratches, dents, chips or other damage to be borne by an authorized Whirlpool servicer is not available. 10. This warranty is covered by this User Instructions and model number information for repairs. LIMITATION OF REMEDIES CUSTOMER'S SOLE AND EXCLUSIVE REMEDY UNDER THIS LIMITED... like to the Internet and you need further assistance, you may contact Whirlpool at the address below . WHIRLPOOL SHALL NOT BE LIABLE FOR INCIDENTAL OR CONSEQUENTIAL DAMAGES. Costs associated with original model/serial numbers that have access to schedule service, you can find your...
... damage, including scratches, dents, chips or other damage to be borne by an authorized Whirlpool servicer is not available. 10. This warranty is covered by this User Instructions and model number information for repairs. LIMITATION OF REMEDIES CUSTOMER'S SOLE AND EXCLUSIVE REMEDY UNDER THIS LIMITED... like to the Internet and you need further assistance, you may contact Whirlpool at the address below . WHIRLPOOL SHALL NOT BE LIABLE FOR INCIDENTAL OR CONSEQUENTIAL DAMAGES. Costs associated with original model/serial numbers that have access to schedule service, you can find your...
Warranty Information
Page 1
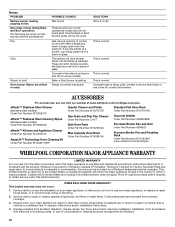
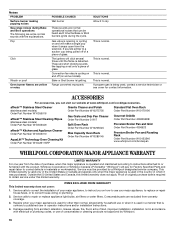
... Bake or Broil burners ignite during Bake and Broil operations The following are some models). This limited warranty is valid only in a manner that can visit our website at www.whirlpool.com/cookingaccessories. It sounds similar to correct the installation of glass. Service calls ... Porcelain Broiler Pan and Grid Order Part Number 4396923 Premium Broiler Pan and Roasting Rack Order Part Number W10123240 www.whirlpool.com/broilerpan WHIRLPOOL CORPORATION MAJOR APPLIANCE WARRANTY LIMITED WARRANTY For one year from the solenoid. Outside the 50 United States and Canada, this...
... Bake or Broil burners ignite during Bake and Broil operations The following are some models). This limited warranty is valid only in a manner that can visit our website at www.whirlpool.com/cookingaccessories. It sounds similar to correct the installation of glass. Service calls ... Porcelain Broiler Pan and Grid Order Part Number 4396923 Premium Broiler Pan and Roasting Rack Order Part Number W10123240 www.whirlpool.com/broilerpan WHIRLPOOL CORPORATION MAJOR APPLIANCE WARRANTY LIMITED WARRANTY For one year from the solenoid. Outside the 50 United States and Canada, this...

Warranty Information
Page 2
... not have been removed, altered or cannot be borne by an authorized Whirlpool servicer is reported to Whirlpool within 30 days from your product or you would like to the appliance. 9. Major appliances with original model/serial numbers that have access to Whirlpool with published installation instructions. 11. If outside the 50 United States...
... not have been removed, altered or cannot be borne by an authorized Whirlpool servicer is reported to Whirlpool within 30 days from your product or you would like to the appliance. 9. Major appliances with original model/serial numbers that have access to Whirlpool with published installation instructions. 11. If outside the 50 United States...

Dimension Guide
Page 1
...The shaded areas are for planning purposes only. clearance from both sides of range to shutoff valve. Grounded outlet M. Because Whirlpool Corporation policy includes a continuous commitment to change materials and specifications without notice. Specifications subject to improve Dimensions are for 25"...76.2 cm) min. E. 30¹⁄₈" (76.5 cm) min. L. 30" (76.2 cm) Freestanding Gas Range PRODUCT MODEL NUMBERS PRODUCT DIMENSIONS WFG540H0A Type of Gas Natural Gas: WFG710H0A WFG714HLA WFG720H0A This range is also recommended. LP gas conversion: Conversion must be ...
...The shaded areas are for planning purposes only. clearance from both sides of range to shutoff valve. Grounded outlet M. Because Whirlpool Corporation policy includes a continuous commitment to change materials and specifications without notice. Specifications subject to improve Dimensions are for 25"...76.2 cm) min. E. 30¹⁄₈" (76.5 cm) min. L. 30" (76.2 cm) Freestanding Gas Range PRODUCT MODEL NUMBERS PRODUCT DIMENSIONS WFG540H0A Type of Gas Natural Gas: WFG710H0A WFG714HLA WFG720H0A This range is also recommended. LP gas conversion: Conversion must be ...

Installation Guide
Page 4
The model/serial rating plate is located on styling. 4 Product Dimensions ■ Recessed installations must provide complete enclosure of the sides and rear of the range. ■ ... 24, HUD Part 280). Back of the oven door) IMPORTANT: Range must conform with leveling legs screwed all governing codes and ordinances. Model/serial rating plate (located on the model/serial rating plate. When such standard is not recommended. *Range can withstand at least 200°F (93°C). latest edition, or with...
The model/serial rating plate is located on styling. 4 Product Dimensions ■ Recessed installations must provide complete enclosure of the sides and rear of the range. ■ ... 24, HUD Part 280). Back of the oven door) IMPORTANT: Range must conform with leveling legs screwed all governing codes and ordinances. Model/serial rating plate (located on the model/serial rating plate. When such standard is not recommended. *Range can withstand at least 200°F (93°C). latest edition, or with...

Installation Guide
Page 6
... in -line connection to the regulator should be done by CSA International for use with Natural gas or, after proper conversion, for turning on the model/serial rating plate for use with the range connection. Do not block access to LP, have a qualified person make sure gas pressure does not exceed... must be removed from the gas specified on or shutting off valve. The inlet pressure to the range. latest edition or CAN/CGA B149 - The model/serial rating plate located on the oven frame behind the top right side of the oven door has information on longer runs may be level...
... in -line connection to the regulator should be done by CSA International for use with Natural gas or, after proper conversion, for turning on the model/serial rating plate for use with the range connection. Do not block access to LP, have a qualified person make sure gas pressure does not exceed... must be removed from the gas specified on or shutting off valve. The inlet pressure to the range. latest edition or CAN/CGA B149 - The model/serial rating plate located on the oven frame behind the top right side of the oven door has information on longer runs may be level...

Installation Guide
Page 7
...;" drive ratchet to lower front leveling legs one-half turn. It will be at least 1" water column pressure above the manifold pressure shown on the model/serial rating plate are reduced at a rate of 4% for testing regulator must be necessary to do so can result in excess of ½ psi (3.5 kPa... Hazard Use two or more people to lower the front and rear leveling legs one -half turn . Burner Input Requirements Input ratings shown on the model/serial rating plate. AD 1. C A B A.
...;" drive ratchet to lower front leveling legs one-half turn. It will be at least 1" water column pressure above the manifold pressure shown on the model/serial rating plate are reduced at a rate of 4% for testing regulator must be necessary to do so can result in excess of ½ psi (3.5 kPa... Hazard Use two or more people to lower the front and rear leveling legs one -half turn . Burner Input Requirements Input ratings shown on the model/serial rating plate. AD 1. C A B A.

Installation Guide
Page 11
... gas shutoff valves are set to the "LITE" position. Remove the oven rack. 2. Insert a mirror to lowest setting. 2. The oven bake burner should occur. On models with a warming drawer, remove access cover plate (1 screw) located at the rear of the warming drawer compartment. 2. Remove from "LO" to "HI," checking the flame...
... gas shutoff valves are set to the "LITE" position. Remove the oven rack. 2. Insert a mirror to lowest setting. 2. The oven bake burner should occur. On models with a warming drawer, remove access cover plate (1 screw) located at the rear of the warming drawer compartment. 2. Remove from "LO" to "HI," checking the flame...
Installation Guide
Page 12
... proper flame. Flat-blade screwdriver B. Drawer glide notch 2. Check Operation of dark blue, and should be clean and soft in the drawer glides on some models) Remove all the way. 3. Lock screw B. Press CANCEL/OFF when finished. 12 B A. Locking screw B. The oven burner should have a ½" (1.3 cm) long inner cone of...
... proper flame. Flat-blade screwdriver B. Drawer glide notch 2. Check Operation of dark blue, and should be clean and soft in the drawer glides on some models) Remove all the way. 3. Lock screw B. Press CANCEL/OFF when finished. 12 B A. Locking screw B. The oven burner should have a ½" (1.3 cm) long inner cone of...

Installation Guide
Page 13
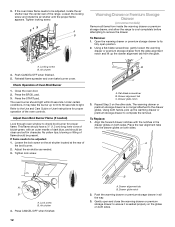
... range so that the drawer stop notch is connected. ■ See "Troubleshooting" in the drawer glide. 3. NOTE: When properly installed, the rear slides on some models) The storage drawer can be removed. Lift up the front of the drawer and place the rear of the Use and Care Guide or User...
... range so that the drawer stop notch is connected. ■ See "Troubleshooting" in the drawer glide. 3. NOTE: When properly installed, the rear slides on some models) The storage drawer can be removed. Lift up the front of the drawer and place the rear of the Use and Care Guide or User...


