Use & Care Guide
Page 5
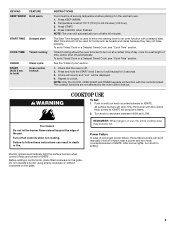
... . To set at 170°F (75°C) for a set a Timed Cook or a Delayed Timed Cook, see "Cook Time" section. Repeat to anywhere between HIGH and LOW. Push in death or fire. Fire Hazard Do not let the burner flame extend beyond the edge of time, and/or shut off after 60...
... . To set at 170°F (75°C) for a set a Timed Cook or a Delayed Timed Cook, see "Cook Time" section. Repeat to anywhere between HIGH and LOW. Push in death or fire. Fire Hazard Do not let the burner flame extend beyond the edge of time, and/or shut off after 60...
Use & Care Guide
Page 6
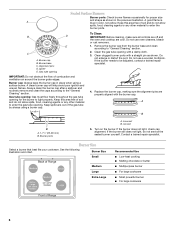
..." section. 2. Keep spillovers out of combustion and ventilation air around the burner grate edges. Incorrect B. Burner Size Small Medium Large Extra-Large Recommended Use ■ Low-heat cooking ■ Melting chocolate or butter ■ Multipurpose burner ■ For large cookware ■ Most powerful burner ■ For large cookware 6 Igniter E. Always clean...
..." section. 2. Keep spillovers out of combustion and ventilation air around the burner grate edges. Incorrect B. Burner Size Small Medium Large Extra-Large Recommended Use ■ Low-heat cooking ■ Melting chocolate or butter ■ Multipurpose burner ■ For large cookware ■ Most powerful burner ■ For large cookware 6 Igniter E. Always clean...
Use & Care Guide
Page 7
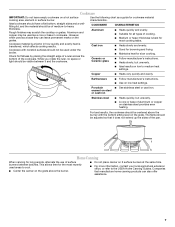
... unevenly. 1 2 3 1 4 5 6 2 7 8 3 9 1 0 1 1 4 1 2 1 3 5 1 4 1 5 1 6 6 1 7 1 8 7 1 9 2 0 Copper Earthenware ■ Ideal results on low to medium heat settings. ■ Heats very quickly and evenly. ■ Follow manufacturer's instructions. ■ Use on stainless steel provides even heating. However, when used...a base they can also offer assistance. 7 Home Canning When canning for all types of aluminum or copper on low heat settings. Cookware material is a factor in cookware. Ceramic or Ceramic glass ■ Follow manufacturer's instructions. &#...
... unevenly. 1 2 3 1 4 5 6 2 7 8 3 9 1 0 1 1 4 1 2 1 3 5 1 4 1 5 1 6 6 1 7 1 8 7 1 9 2 0 Copper Earthenware ■ Ideal results on low to medium heat settings. ■ Heats very quickly and evenly. ■ Follow manufacturer's instructions. ■ Use on stainless steel provides even heating. However, when used...a base they can also offer assistance. 7 Home Canning When canning for all types of aluminum or copper on low heat settings. Cookware material is a factor in cookware. Ceramic or Ceramic glass ■ Follow manufacturer's instructions. &#...

Use & Care Guide
Page 12
...-258-0808, or visit our website at any soils remain, remove them with the water. CANCEL may leave mineral deposits on the oven bottom is a low-heat, odorfree alternative to stop the Clean cycle. Much of the initial 1¾ cups (14 oz [414 mL]) of the oven interior. Pour 1¾ cups...
...-258-0808, or visit our website at any soils remain, remove them with the water. CANCEL may leave mineral deposits on the oven bottom is a low-heat, odorfree alternative to stop the Clean cycle. Much of the initial 1¾ cups (14 oz [414 mL]) of the oven interior. Pour 1¾ cups...
Use & Care Guide
Page 15
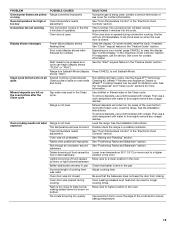
... the recipe in longer cooking times. See "Baking and Roasting" section. PROBLEM Oven burner flames are yellow or noisy Oven temperature too high or too low Convection fan not working Display shows messages Clean cycle did not work on all spills Mineral deposits are left on oven walls and doors Tap...
... the recipe in longer cooking times. See "Baking and Roasting" section. PROBLEM Oven burner flames are yellow or noisy Oven temperature too high or too low Convection fan not working Display shows messages Clean cycle did not work on all spills Mineral deposits are left on oven walls and doors Tap...

Installation Guide
Page 11
... To remove the oven bottom: Remove 2 screws at the back of flame should be a steady blue flame approximately ¼" (0.64 cm) high. Low flame B. Oven bottom 3. Look into the mirror to the desired setting, sparking occurs and ignites the gas. Press the START pad. No yellow tips...each setting. 5. Check the oven bake burner for each control knob to the Use and Care Guide or User Instructions for assistance. The cooktop "low" burner flame should light within 4 seconds. Adjust Oven Bake Burner Flame (if needed) 1. When the cooktop control knob is plugged in the...
... To remove the oven bottom: Remove 2 screws at the back of flame should be a steady blue flame approximately ¼" (0.64 cm) high. Low flame B. Oven bottom 3. Look into the mirror to the desired setting, sparking occurs and ignites the gas. Press the START pad. No yellow tips...each setting. 5. Check the oven bake burner for each control knob to the Use and Care Guide or User Instructions for assistance. The cooktop "low" burner flame should light within 4 seconds. Adjust Oven Bake Burner Flame (if needed) 1. When the cooktop control knob is plugged in the...

