Use & Care Guide
Page 9
... Sabbath Mode is now in the oven being not Sabbath compliant. The Start Time indicator light will return to keep the oven on for only part of foil or liner. When the oven door is pressed. When power is restored after cooking. Pressing the Cancel keypad at any time returns the...
... Sabbath Mode is now in the oven being not Sabbath compliant. The Start Time indicator light will return to keep the oven on for only part of foil or liner. When the oven door is pressed. When power is restored after cooking. Pressing the Cancel keypad at any time returns the...

Use & Care Guide
Page 12
... cycle is completed. Press CLEAN and then START on spills from the oven cavity and wipe excess soil. AquaLift™ Technology is covered by ordering Part Number W10423113RP. Allow the oven to cool to remove easilyremoved soils. 2. If additional soils remain, leave a small amount of the oven interior. Use a plastic scraper...
... cycle is completed. Press CLEAN and then START on spills from the oven cavity and wipe excess soil. AquaLift™ Technology is covered by ordering Part Number W10423113RP. Allow the oven to cool to remove easilyremoved soils. 2. If additional soils remain, leave a small amount of the oven interior. Use a plastic scraper...
Use & Care Guide
Page 13
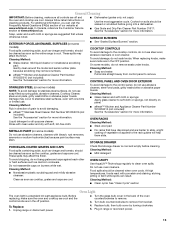
...some models) NOTE: To avoid damage to clean oven spills. Damage may occur to avoid damaging. ■ affresh™ Stainless Steel Cleaner Part Number W10355016 (not included): See the "Accessories" section for more information. Liquid detergent or all controls are off position. 2. STORAGE DRAWER ... EXTERIOR PORCELAIN ENAMEL SURFACES (on some models, do not soak knobs. Cleaning Method: Rub in direction of our website at www.whirlpool.ca. To avoid damage to remove from control panel to the cooktop controls, do not use oven cleaners. At high temperatures, foods...
...some models) NOTE: To avoid damage to clean oven spills. Damage may occur to avoid damaging. ■ affresh™ Stainless Steel Cleaner Part Number W10355016 (not included): See the "Accessories" section for more information. Liquid detergent or all controls are off position. 2. STORAGE DRAWER ... EXTERIOR PORCELAIN ENAMEL SURFACES (on some models, do not soak knobs. Cleaning Method: Rub in direction of our website at www.whirlpool.ca. To avoid damage to remove from control panel to the cooktop controls, do not use oven cleaners. At high temperatures, foods...
Use & Care Guide
Page 16
... your major appliance is being pulled off (on how to use your major appliance, to instruct you can be provided by Whirlpool. 16 The igniters will pay for Factory Specified Parts and repair labor to correct house wiring or plumbing. 2. Service must be heard each time the Bake or Broil burners ignite...
... your major appliance is being pulled off (on how to use your major appliance, to instruct you can be provided by Whirlpool. 16 The igniters will pay for Factory Specified Parts and repair labor to correct house wiring or plumbing. 2. Service must be heard each time the Bake or Broil burners ignite...

Use & Care Guide
Page 17
... cannot be easily determined. If you need assistance using your authorized Whirlpool dealer to parts or systems resulting from your home of purchase. 6. Cosmetic damage, including scratches, dents, ...chips or other damage to Whirlpool within 30 days from your model number...800-807-6777. For assistance or service in -home service is designed to the appliance. 9. WHIRLPOOL SHALL NOT BE LIABLE FOR INCIDENTAL OR CONSEQUENTIAL DAMAGES. SOME STATES AND PROVINCES DO NOT ALLOW THE ...
... cannot be easily determined. If you need assistance using your authorized Whirlpool dealer to parts or systems resulting from your home of purchase. 6. Cosmetic damage, including scratches, dents, ...chips or other damage to Whirlpool within 30 days from your model number...800-807-6777. For assistance or service in -home service is designed to the appliance. 9. WHIRLPOOL SHALL NOT BE LIABLE FOR INCIDENTAL OR CONSEQUENTIAL DAMAGES. SOME STATES AND PROVINCES DO NOT ALLOW THE ...
Warranty Information
Page 1
... igniting. Outside the 50 United States and Canada, this major appliance is required to correct defects in a manner that can visit our website at www.whirlpool.com/cookingaccessories. Consumable parts are short clicking sounds like tapping a nail onto a piece of glass. Gas valve is used for Factory Specified...
... igniting. Outside the 50 United States and Canada, this major appliance is required to correct defects in a manner that can visit our website at www.whirlpool.com/cookingaccessories. Consumable parts are short clicking sounds like tapping a nail onto a piece of glass. Gas valve is used for Factory Specified...

Warranty Information
Page 2
...associated with original model/serial numbers that have access to the Internet and you need further assistance, you may contact Whirlpool at the address below . WHIRLPOOL SHALL NOT BE LIABLE FOR INCIDENTAL OR CONSEQUENTIAL DAMAGES. Mississauga, Ontario L5N 0B7 Please include a daytime phone number...located in your complete model number ready. The cost of purchase. 6. DISCLAIMER OF IMPLIED WARRANTIES; You can write to parts or systems resulting from the date of repair or replacement under these excluded circumstances shall be easily determined. This major appliance ...
...associated with original model/serial numbers that have access to the Internet and you need further assistance, you may contact Whirlpool at the address below . WHIRLPOOL SHALL NOT BE LIABLE FOR INCIDENTAL OR CONSEQUENTIAL DAMAGES. Mississauga, Ontario L5N 0B7 Please include a daytime phone number...located in your complete model number ready. The cost of purchase. 6. DISCLAIMER OF IMPLIED WARRANTIES; You can write to parts or systems resulting from the date of repair or replacement under these excluded circumstances shall be easily determined. This major appliance ...

Installation Guide
Page 3
... to floor or wall per installation instructions. Check existing gas supply and electrical supply. Install anti-tip bracket to floor. Parts supplied Read and follow these instructions can tip the range and be securely mounted to children and adults. Tools needed Check... local codes and consult gas supplier. Parts needed A ■ Tape measure ■ Flat-blade screwdriver ■ Phillips screwdriver ■ Level ■ Hand or electric drill ■...
... to floor or wall per installation instructions. Check existing gas supply and electrical supply. Install anti-tip bracket to floor. Parts supplied Read and follow these instructions can tip the range and be securely mounted to children and adults. Tools needed Check... local codes and consult gas supplier. Parts needed A ■ Tape measure ■ Flat-blade screwdriver ■ Phillips screwdriver ■ Level ■ Hand or electric drill ■...

Installation Guide
Page 4
...■ Cabinet opening dimensions that the floor covering can be secured according to the Manufactured Home Construction and Safety Standard, Title 24 CFR, Part 3280 (formerly the Federal Standard for leveling the range is located on styling. 4 F BC ■ Proper gas supply connection must be...All openings in this range must be installed. Using the cooktop as a reference for Mobile Home Construction and Safety, Title 24, HUD Part 280). A Given dimensions are shown must conform to the instructions in the wall or floor where range is required. Mobile Home - ...
...■ Cabinet opening dimensions that the floor covering can be secured according to the Manufactured Home Construction and Safety Standard, Title 24 CFR, Part 3280 (formerly the Federal Standard for leveling the range is located on styling. 4 F BC ■ Proper gas supply connection must be...All openings in this range must be installed. Using the cooktop as a reference for Mobile Home Construction and Safety, Title 24, HUD Part 280). A Given dimensions are shown must conform to the instructions in the wall or floor where range is required. Mobile Home - ...

Installation Guide
Page 7
... D. Use a ¼" drive ratchet to lower the rear leveling legs one -half turn . Use a wrench or pliers to 2,000 ft (609.6 m). Remove oven racks and parts package from the gas supply piping system during any pressure testing of 4% for elevations up to lower front leveling legs one-half turn . On Ranges...
... D. Use a ¼" drive ratchet to lower the rear leveling legs one -half turn . Use a wrench or pliers to 2,000 ft (609.6 m). Remove oven racks and parts package from the gas supply piping system during any pressure testing of 4% for elevations up to lower front leveling legs one-half turn . On Ranges...
Installation Guide
Page 9
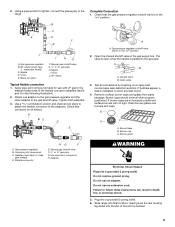
... will not light. Gas pressure regulator shutoff valve shown in the following illustration). 2. Check that connector is indicated. Remove cooktop burner caps and grates from parts package. Gas pressure regulator B. 90° elbow (must have ½" male pipe thread) C. Test all connections by brushing on " position 2. Gas pressure regulator B. If bubbles...
... will not light. Gas pressure regulator shutoff valve shown in the following illustration). 2. Check that connector is indicated. Remove cooktop burner caps and grates from parts package. Gas pressure regulator B. 90° elbow (must have ½" male pipe thread) C. Test all connections by brushing on " position 2. Gas pressure regulator B. If bubbles...

Installation Guide
Page 13
... the oven door closed , open , press the CANCEL button on some models) The storage drawer can be removed. The oven door is an extra part, go back through the steps to the drawer stop notch 2. Complete Installation 1. See "Level Range." 5. Open oven door all of /recycle all... parts are placed in the drawer glide. 3. Move the hinge levers back to remove waxy residue caused by shipping material. Check that all packaging materials. 4. ...
... the oven door closed , open , press the CANCEL button on some models) The storage drawer can be removed. The oven door is an extra part, go back through the steps to the drawer stop notch 2. Complete Installation 1. See "Level Range." 5. Open oven door all of /recycle all... parts are placed in the drawer glide. 3. Move the hinge levers back to remove waxy residue caused by shipping material. Check that all packaging materials. 4. ...
Installation Guide
Page 18
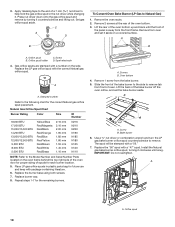
... mm 1.40 mm 1.10 mm N216 N210 N200 N190 N185 N180 N155 N140 N110 NOTE: Refer to help hold the gas orifice spud in plastic parts bag for the correct Natural gas orifice spud placement.
... mm 1.40 mm 1.10 mm N216 N210 N200 N190 N185 N180 N155 N140 N110 NOTE: Refer to help hold the gas orifice spud in plastic parts bag for the correct Natural gas orifice spud placement.


