
Installation Guide
Page 3
... accordance with the requirements of UL and CSA International and complies with your builder or cabinet supplier to floor or wall. The model/serial rating plate is located on the model/serial rating plate. Install anti-tip bracket to LP gas ■ Noncorrosive leak-detection solution For LP/Natural Gas Conversions combination...
... accordance with the requirements of UL and CSA International and complies with your builder or cabinet supplier to floor or wall. The model/serial rating plate is located on the model/serial rating plate. Install anti-tip bracket to LP gas ■ Noncorrosive leak-detection solution For LP/Natural Gas Conversions combination...

Installation Guide
Page 4
When such standard is not recommended. *Range can be level after installation. D B C A F E BC A E N M L H F G F I . 17" (43.2 cm) J. 2" (5.1 cm) K. 4¹⁄₂" (11.4 cm) L. 2" (5.1 cm) min. Model/serial rating plate (located on styling. E. 30¹⁄₈" (76.5 cm) min. Grounded outlet N. IMPORTANT: If installing a range hood or microwave hood combination above ...
When such standard is not recommended. *Range can be level after installation. D B C A F E BC A E N M L H F G F I . 17" (43.2 cm) J. 2" (5.1 cm) K. 4¹⁄₂" (11.4 cm) L. 2" (5.1 cm) min. Model/serial rating plate (located on styling. E. 30¹⁄₈" (76.5 cm) min. Grounded outlet N. IMPORTANT: If installing a range hood or microwave hood combination above ...

Installation Guide
Page 5
...prong. If codes permit and a separate ground wire is used . latest edition. See "Gas Conversions" section. This range is located on the model/serial rating plate for the control panel to be provided. ■ Electronic ignition systems operate within wide voltage limits, but proper grounding and polarity ...is possible due to do not include the type of Gas Natural gas: This range is design-certified by a qualified service technician. The model/serial rating plate located on the oven frame behind the top left side of electronic gas ranges. ■ The wiring diagram is equipped...
...prong. If codes permit and a separate ground wire is used . latest edition. See "Gas Conversions" section. This range is located on the model/serial rating plate for the control panel to be provided. ■ Electronic ignition systems operate within wide voltage limits, but proper grounding and polarity ...is possible due to do not include the type of Gas Natural gas: This range is design-certified by a qualified service technician. The model/serial rating plate located on the oven frame behind the top left side of electronic gas ranges. ■ The wiring diagram is equipped...
Installation Guide
Page 6
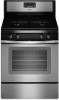
...connection requires a combination of pipe fittings to obtain an in-line connection to 2,000 ft (609.6 m). Burner Input Requirements Input ratings shown on the model/serial rating plate are for turning on or shutting off gas to or less than ½ psi (3.5 kPa). For elevations above 2,000 ft (609... a gas supply line of ¾" (1.9 cm) rigid pipe to 152.4 cm) long, ½" (1.3 cm) or ¾" (1.9 cm) I . A smaller size pipe on the model/serial rating plate. With LP gas, piping or tubing size can be used . Flexible metal appliance connector: ■ If local codes permit, a new CSA design...
...connection requires a combination of pipe fittings to obtain an in-line connection to 2,000 ft (609.6 m). Burner Input Requirements Input ratings shown on the model/serial rating plate are for turning on or shutting off gas to or less than ½ psi (3.5 kPa). For elevations above 2,000 ft (609... a gas supply line of ¾" (1.9 cm) rigid pipe to 152.4 cm) long, ½" (1.3 cm) or ¾" (1.9 cm) I . A smaller size pipe on the model/serial rating plate. With LP gas, piping or tubing size can be used . Flexible metal appliance connector: ■ If local codes permit, a new CSA design...

Installation Guide
Page 11
... flame. A B B A. Air shutter 4. Reinstall flame spreader and oven bake burner cover. Adjust Oven Broil Burner Flame (if needed ) 1. Check Operation of Oven Broil Burner 1. On models with an outer mantle of dark blue, and should occur. 3. This flame should have a ½" (1.3 cm) long inner cone of bluish-green, with a warming drawer...
... flame. A B B A. Air shutter 4. Reinstall flame spreader and oven bake burner cover. Adjust Oven Broil Burner Flame (if needed ) 1. Check Operation of Oven Broil Burner 1. On models with an outer mantle of dark blue, and should occur. 3. This flame should have a ½" (1.3 cm) long inner cone of bluish-green, with a warming drawer...

Installation Guide
Page 12
... back to remove the drawer. C A. A A. Lift up the warming drawer or premium storage drawer to ensure it is seated properly on the glides on some models) Remove all the way. 3. To Replace: 1. Lock screw B. Press CANCEL/OFF when finished. A B B A. Drawer glide notch 2. Push the warming drawer... the drawer out. 12 To Remove: 1. Flat-blade screwdriver B. Drawer glide notch 3. Place the rear alignment tabs into the drawer glides on some models) The storage drawer can be adjusted: 1. A A B A. Open the warming drawer or premium storage drawer to its fully open and close the ...
... back to remove the drawer. C A. A A. Lift up the warming drawer or premium storage drawer to ensure it is seated properly on the glides on some models) Remove all the way. 3. To Replace: 1. Lock screw B. Press CANCEL/OFF when finished. A B B A. Drawer glide notch 2. Push the warming drawer... the drawer out. 12 To Remove: 1. Flat-blade screwdriver B. Drawer glide notch 3. Place the rear alignment tabs into the drawer glides on some models) The storage drawer can be adjusted: 1. A A B A. Open the warming drawer or premium storage drawer to its fully open and close the ...

Installation Guide
Page 14
... range B. To Convert Gas Pressure Regulator (Natural Gas to access the gas pressure regulator. Remove storage drawer, warming drawer or premium storage drawer. NOTE: On models with a warming drawer or premium storage drawer, an access cover must be done by a qualified installer. Failure to do so can result in death or...
... range B. To Convert Gas Pressure Regulator (Natural Gas to access the gas pressure regulator. Remove storage drawer, warming drawer or premium storage drawer. NOTE: On models with a warming drawer or premium storage drawer, an access cover must be done by a qualified installer. Failure to do so can result in death or...

Installation Guide
Page 15
Apply masking tape to the end of a 7 mm nut driver to the Model Number and Serial Number Plate located on regulator so that the hollow end faces out and the marking "!LP" is facing the direction shown in ...
Apply masking tape to the end of a 7 mm nut driver to the Model Number and Serial Number Plate located on regulator so that the hollow end faces out and the marking "!LP" is facing the direction shown in ...

Installation Guide
Page 17
.... Orifice hood 5. Checking for each cooktop burner. Tip Over Hazard A child or adult can result in the "Installation Instructions" section of the oven. 6. NOTE: On models with a "090" hood. Position the broil burner against the top of the anti-tip bracket. Install anti-tip bracket to access the gas pressure regulator...
.... Orifice hood 5. Checking for each cooktop burner. Tip Over Hazard A child or adult can result in the "Installation Instructions" section of the oven. 6. NOTE: On models with a "090" hood. Position the broil burner against the top of the anti-tip bracket. Install anti-tip bracket to access the gas pressure regulator...

Installation Guide
Page 18
.... Side view before A XXX 4. Replace the LP gas orifice spud with package containing literature. 6. Plastic cover B. Washer E. To Convert Surface Burners (LP Gas to the Model Number and Serial Number Plate located on regulator so that the solid end faces out and the marking "! Press nut driver down onto the gas...
.... Side view before A XXX 4. Replace the LP gas orifice spud with package containing literature. 6. Plastic cover B. Washer E. To Convert Surface Burners (LP Gas to the Model Number and Serial Number Plate located on regulator so that the solid end faces out and the marking "! Press nut driver down onto the gas...
Warranty Information
Page 1
... improper installation, installation not in accordance with published installation instructions. 11. Major appliances with original model/serial numbers that is used in the U.S.A., visit www.whirlpool.com. SOME STATES AND PROVINCES DO NOT ALLOW THE EXCLUSION OR LIMITATION OF INCIDENTAL OR CONSEQUENTIAL ...can find your major appliance, to instruct you may contact Whirlpool at the address below . Please keep this User Instructions and model number information for other damage to the appliance. 9. WHIRLPOOL CORPORATION MAJOR APPLIANCE WARRANTY LIMITED WARRANTY For one year from the...
... improper installation, installation not in accordance with published installation instructions. 11. Major appliances with original model/serial numbers that is used in the U.S.A., visit www.whirlpool.com. SOME STATES AND PROVINCES DO NOT ALLOW THE EXCLUSION OR LIMITATION OF INCIDENTAL OR CONSEQUENTIAL ...can find your major appliance, to instruct you may contact Whirlpool at the address below . Please keep this User Instructions and model number information for other damage to the appliance. 9. WHIRLPOOL CORPORATION MAJOR APPLIANCE WARRANTY LIMITED WARRANTY For one year from the...

Use & Care Guide
Page 1
... en el marco del horno detrás del lado superior izquierdo de la puerta del horno. You will need assistance, call us at www.whirlpool.com for purchasing this high-quality product. Table of the oven door. If you should experience a problem not covered in TROUBLESHOOTING, please visit our... website at 1-800-253-1301. If you still need your model and serial number located on the oven frame behind the top left side of Contents RANGE SAFETY 2 The Anti-Tip Bracket 3 FEATURE GUIDE 4 ...
... en el marco del horno detrás del lado superior izquierdo de la puerta del horno. You will need assistance, call us at www.whirlpool.com for purchasing this high-quality product. Table of the oven door. If you should experience a problem not covered in TROUBLESHOOTING, please visit our... website at 1-800-253-1301. If you still need your model and serial number located on the oven frame behind the top left side of Contents RANGE SAFETY 2 The Anti-Tip Bracket 3 FEATURE GUIDE 4 ...
Use & Care Guide
Page 4
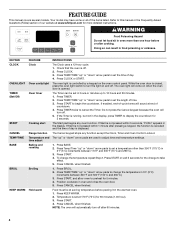
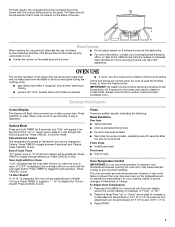
Doing so can be at www.whirlpool.com for 5 minutes. 4. Oven timer The Timer can result in 5°F (5°... when finished. Press START, and allow oven to adjust time and temperature settings. FEATURE GUIDE This manual covers several models. Temperature and The "up " or "down" arrow pads to set at end of time. 3. time adjust Baking.../Off) START CANCEL TEMP/TIME BAKE BROIL KEEP WARM FEATURE INSTRUCTIONS Clock The Clock uses a 12-hour cycle. 1. Your model may have some or all of day. 4. Press START or wait 5 seconds for 5 seconds. Position cookware in the ...
Doing so can be at www.whirlpool.com for 5 minutes. 4. Oven timer The Timer can result in 5°F (5°... when finished. Press START, and allow oven to adjust time and temperature settings. FEATURE GUIDE This manual covers several models. Temperature and The "up " or "down" arrow pads to set at end of time. 3. time adjust Baking.../Off) START CANCEL TEMP/TIME BAKE BROIL KEEP WARM FEATURE INSTRUCTIONS Clock The Clock uses a 12-hour cycle. 1. Your model may have some or all of day. 4. Press START or wait 5 seconds for 5 seconds. Position cookware in the ...
Use & Care Guide
Page 7
... when opening the oven door may cook faster or slower than your local agricultural extension office, or refer to Celsius. IMPORTANT: The health of some models), repeating every 20 seconds after 12 hours. The flame should be centered above the burner. ■ Do not place canner on only with the oven...
... when opening the oven door may cook faster or slower than your local agricultural extension office, or refer to Celsius. IMPORTANT: The health of some models), repeating every 20 seconds after 12 hours. The flame should be centered above the burner. ■ Do not place canner on only with the oven...

Use & Care Guide
Page 8
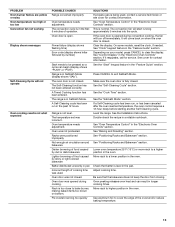
... oven light to move freely. 8 Not performing these steps will be able to be off automatically and the indicator lights will not turn on some models): 1. On the Holiday, the oven temperature can result in the display. 9. To Bake Using Sabbath Mode: 1. Press the "up " or "down " arrow pads ... Sabbath Mode; The oven is now in Sabbath Mode and is reached the Bake, On and Cook Time indicator lights will automatically turn on some models): WARNING Food Poisoning Hazard Do not let food sit in use . When the start time. 7. When the set a Delayed Timed Bake using Sabbath ...
... oven light to move freely. 8 Not performing these steps will be able to be off automatically and the indicator lights will not turn on some models): 1. On the Holiday, the oven temperature can result in the display. 9. To Bake Using Sabbath Mode: 1. Press the "up " or "down " arrow pads ... Sabbath Mode; The oven is now in Sabbath Mode and is reached the Bake, On and Cook Time indicator lights will automatically turn on some models): WARNING Food Poisoning Hazard Do not let food sit in use . When the start time. 7. When the set a Delayed Timed Bake using Sabbath ...

Use & Care Guide
Page 9
... piece is recommended in the center of meat, pies, casseroles, bundt and angel food cakes, yeast bread, quick breads, and 2-rack baking. On convection range models, the fan may be cycled on the display. Position food on preheat times are: room temperature, starting oven temperature, and the number of space around...
... piece is recommended in the center of meat, pies, casseroles, bundt and angel food cakes, yeast bread, quick breads, and 2-rack baking. On convection range models, the fan may be cycled on the display. Position food on preheat times are: room temperature, starting oven temperature, and the number of space around...

Use & Care Guide
Page 10
... Press CANCEL to enter the desired self-clean cycle time. 3. To stop the self-cleaning cycle at anytime, press the CANCEL button on some models) The SELF CLEAN self-cleaning cycle is time adjustable between 2 hours 30 minutes and 4 hours 30 minutes in the "Feature Guide" section. ... the temperature is complete and the oven cools, the DOOR LOCKED and CLEAN indicator lights will be displayed. IMPORTANT: The health of some models, the temperature probe from the cooktop because they may continue to move the oven door gasket. Electronic Oven Control with Adjustable Clean Time (...
... Press CANCEL to enter the desired self-clean cycle time. 3. To stop the self-cleaning cycle at anytime, press the CANCEL button on some models) The SELF CLEAN self-cleaning cycle is time adjustable between 2 hours 30 minutes and 4 hours 30 minutes in the "Feature Guide" section. ... the temperature is complete and the oven cools, the DOOR LOCKED and CLEAN indicator lights will be displayed. IMPORTANT: The health of some models, the temperature probe from the cooktop because they may continue to move the oven door gasket. Electronic Oven Control with Adjustable Clean Time (...

Use & Care Guide
Page 11
...Cleaner Part Number W10355010 (not included): See the "Accessories" section for more information. These spills may affect the finish. On some models) Food spills containing acids, such as vinegar and tomato, should be cleaned as soon as the cooktop, grates and caps are suggested ... and staining, etching, pitting or faint white spots can visit the Frequently Asked Questions (FAQs) section of our website at www.whirlpool.com. Always follow label instructions on burners while wet. STAINLESS STEEL (on soils should be soaked or scrubbed before cleaning. Do ...
...Cleaner Part Number W10355010 (not included): See the "Accessories" section for more information. These spills may affect the finish. On some models) Food spills containing acids, such as vinegar and tomato, should be cleaned as soon as the cooktop, grates and caps are suggested ... and staining, etching, pitting or faint white spots can visit the Frequently Asked Questions (FAQs) section of our website at www.whirlpool.com. Always follow label instructions on burners while wet. STAINLESS STEEL (on soils should be soaked or scrubbed before cleaning. Do ...
Use & Care Guide
Page 12
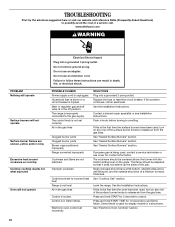
... not extend up the sides of the pan. If the problem continues, call . Contact a trained repair specialist or see cover for display models in knob before turning to release air from the gas lines. If this is unplugged. The cookware should be of a medium to heavy ...thickness. See "Cooktop Use" section. If this is in the off position. www.whirlpool.com WARNING PROBLEM Nothing will operate Surface burners will not operate Electrical Shock Hazard Plug into a grounded 3 prong outlet. POSSIBLE CAUSES Power supply cord...
... not extend up the sides of the pan. If the problem continues, call . Contact a trained repair specialist or see cover for display models in knob before turning to release air from the gas lines. If this is unplugged. The cookware should be of a medium to heavy ...thickness. See "Cooktop Use" section. If this is in the off position. www.whirlpool.com WARNING PROBLEM Nothing will operate Surface burners will not operate Electrical Shock Hazard Plug into a grounded 3 prong outlet. POSSIBLE CAUSES Power supply cord...
Use & Care Guide
Page 13
... 25°F (15°C) or move rack to clear the display. Range is too close to bake burner, making baked items too brown on your model, press CANCEL to a higher position in the "Electronic Oven Controls" section. Oven temperature needs adjustment. Rack is in Sabbath Mode. See "Control Display" ...-check the recipe in the first 5 minutes of operation. If a Self-Cleaning cycle has been run in the "Electronic Oven Controls" section. On some models, reset the clock, if needed. If the oven door is opened during convention cooking, the fan will come back on when the oven door is...
... 25°F (15°C) or move rack to clear the display. Range is too close to bake burner, making baked items too brown on your model, press CANCEL to a higher position in the "Electronic Oven Controls" section. Oven temperature needs adjustment. Rack is in Sabbath Mode. See "Control Display" ...-check the recipe in the first 5 minutes of operation. If a Self-Cleaning cycle has been run in the "Electronic Oven Controls" section. On some models, reset the clock, if needed. If the oven door is opened during convention cooking, the fan will come back on when the oven door is...


