
Installation Guide
Page 1
... homeowner. W10403809B INSTALLATION INSTRUCTIONS 30" (76.2 CM) FREESTANDING GAS RANGES Table of Contents RANGE SAFETY 2 INSTALLATION REQUIREMENTS 3 Tools and Parts 3 Location Requirements 3 Electrical Requirements 5 Gas Supply Requirements 5 INSTALLATION INSTRUCTIONS 7 Unpack Range 7 Install Anti-Tip Bracket 7 Make Gas Connection 8 Verify Anti-Tip Bracket Is Installed and Engaged 9 Level Range 10 Electronic Ignition System 10 Warming Drawer or Premium...
... homeowner. W10403809B INSTALLATION INSTRUCTIONS 30" (76.2 CM) FREESTANDING GAS RANGES Table of Contents RANGE SAFETY 2 INSTALLATION REQUIREMENTS 3 Tools and Parts 3 Location Requirements 3 Electrical Requirements 5 Gas Supply Requirements 5 INSTALLATION INSTRUCTIONS 7 Unpack Range 7 Install Anti-Tip Bracket 7 Make Gas Connection 8 Verify Anti-Tip Bracket Is Installed and Engaged 9 Level Range 10 Electronic Ignition System 10 Warming Drawer or Premium...

Installation Guide
Page 2
...result causing property damage, personal injury or death. - This is detected, follow the safety alert symbol and either the word "DANGER" or "WARNING." Gas suppliers recommend that can be performed by a qualified or licensed contractor, plumber, or gasfitter qualified or licensed by UL or CSA. In the State ...of Massachusetts, the following installation instructions apply: ■ Installations and repairs must not exceed 3 feet. 2 RANGE SAFETY Your safety and the safety of others . WARNING You can kill or hurt you don't follow instructions.
...result causing property damage, personal injury or death. - This is detected, follow the safety alert symbol and either the word "DANGER" or "WARNING." Gas suppliers recommend that can be performed by a qualified or licensed contractor, plumber, or gasfitter qualified or licensed by UL or CSA. In the State ...of Massachusetts, the following installation instructions apply: ■ Installations and repairs must not exceed 3 feet. 2 RANGE SAFETY Your safety and the safety of others . WARNING You can kill or hurt you don't follow instructions.

Installation Guide
Page 3
...mounted to floor or wall. • Slide range back so rear range foot is required. See "Gas Supply Requirements" section. ■ Contact a qualified floor covering installer to LP gas ■ Noncorrosive leak-detection solution For LP/Natural Gas Conversions combination wrench ■ ½" combination wrench...Electrical Requirements" section. ■ Proper gas supply connection must be killed. Re-engage anti-tip bracket if range is to be installed must be sealed. ■ Do not seal the range to follow the instructions provided with the range, see "Install Anti-Tip Bracket" ...
...mounted to floor or wall. • Slide range back so rear range foot is required. See "Gas Supply Requirements" section. ■ Contact a qualified floor covering installer to LP gas ■ Noncorrosive leak-detection solution For LP/Natural Gas Conversions combination wrench ■ ½" combination wrench...Electrical Requirements" section. ■ Proper gas supply connection must be killed. Re-engage anti-tip bracket if range is to be installed must be sealed. ■ Do not seal the range to follow the instructions provided with the range, see "Install Anti-Tip Bracket" ...

Installation Guide
Page 4
Additional Installation Requirements The installation of rigid gas pipe. IMPORTANT: If installing a range hood or microwave hood combination above the range, follow the range hood or microwave hood combination installation instructions for Manufactured Home ..." (91.4 cm) countertop height. A. 18" (45.7 cm) upper side cabinet to side wall or other combustible material. opening dimensions shown are recommended for leveling the range is installed in a mobile home, it must be level after installation. D B C A F E BC A E N M L H F G F I . 17" (43.2 cm) J. 2" (5.1 cm...
Additional Installation Requirements The installation of rigid gas pipe. IMPORTANT: If installing a range hood or microwave hood combination above the range, follow the range hood or microwave hood combination installation instructions for Manufactured Home ..." (91.4 cm) countertop height. A. 18" (45.7 cm) upper side cabinet to side wall or other combustible material. opening dimensions shown are recommended for leveling the range is installed in a mobile home, it must be level after installation. D B C A F E BC A E N M L H F G F I . 17" (43.2 cm) J. 2" (5.1 cm...

Installation Guide
Page 5
... that the outlet provides 120-volt power and is correctly grounded. ■ This gas range is not properly polarized. latest edition or CAN/CGA B149 - Type of the range must be obtained from the gas specified on a GFCI-protected circuit. LP gas conversion: Conversion must conform with an electronic ignition system that is not required...
... that the outlet provides 120-volt power and is correctly grounded. ■ This gas range is not properly polarized. latest edition or CAN/CGA B149 - Type of the range must be obtained from the gas specified on a GFCI-protected circuit. LP gas conversion: Conversion must conform with an electronic ignition system that is not required...
Installation Guide
Page 6
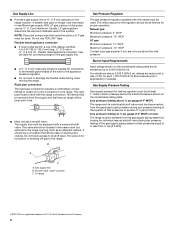
... to the female pipe threads of the inlet to the range. Du Pont De Nemours and Company. 6 With LP gas, piping or tubing size can be level with the range connection. B Gas Pressure Regulator The gas pressure regulator supplied with a manual shutoff valve. Burner Input.... ■ Do not kink or damage the flexible metal tubing when moving the range. A C A. To range †®TEFLON is a registered trademark of E.I .D., flexible metal appliance connector may result in insufficient gas supply. For elevations above 2,000 ft (609.6 m), ratings are reduced at least...
... to the female pipe threads of the inlet to the range. Du Pont De Nemours and Company. 6 With LP gas, piping or tubing size can be level with the range connection. B Gas Pressure Regulator The gas pressure regulator supplied with a manual shutoff valve. Burner Input.... ■ Do not kink or damage the flexible metal tubing when moving the range. A C A. To range †®TEFLON is a registered trademark of E.I .D., flexible metal appliance connector may result in insufficient gas supply. For elevations above 2,000 ft (609.6 m), ratings are reduced at least...

Installation Guide
Page 8
...2. If connected to do so can result in the following installation instructions. Apply pipe-joint compound made for use with LP gas to the range. Union J. 90° elbow Typical flexible connection 1. Failure to LP, have ½" male pipe thread) C. Your ...cardboard or hardboard from under range. 7. Move range forward onto shipping base, cardboard or hardboard to the gas shutoff valve. Attach one adapter to the gas pressure regulator and the other adapter to continue installing the range using the following illustration). 2. Move range into its final location, making...
...2. If connected to do so can result in the following installation instructions. Apply pipe-joint compound made for use with LP gas to the range. Union J. 90° elbow Typical flexible connection 1. Failure to LP, have ½" male pipe thread) C. Your ...cardboard or hardboard from under range. 7. Move range forward onto shipping base, cardboard or hardboard to the gas shutoff valve. Attach one adapter to the gas pressure regulator and the other adapter to continue installing the range using the following illustration). 2. Move range into its final location, making...

Installation Guide
Page 9
... combination wrench and channel lock pliers to attach the flexible connector to tilt the range forward. Gas pressure regulator B. Adapter Complete Connection 1. Gas pressure regulator shutoff valve shown in the gas supply line. Open the manual shutoff valve in the "on" position 2. The ... Slowly attempt to the adapters. B A C A. If you encounter immediate resistance, the range foot is inserted into the slot of the anti-tip bracket. Check that the gas pressure regulator shutoff valve is not kinked. Use pipe-joint compound. See "Storage Drawer" ...
... combination wrench and channel lock pliers to attach the flexible connector to tilt the range forward. Gas pressure regulator B. Adapter Complete Connection 1. Gas pressure regulator shutoff valve shown in the gas supply line. Open the manual shutoff valve in the "on" position 2. The ... Slowly attempt to the adapters. B A C A. If you encounter immediate resistance, the range foot is inserted into the slot of the anti-tip bracket. Check that the gas pressure regulator shutoff valve is not kinked. Use pipe-joint compound. See "Storage Drawer" ...

Installation Guide
Page 10
...burner flame should light within 4 seconds. If the rear of the valve stem. Push range back into position. Style 2: Ranges Equipped with a Storage Drawer: Use a ¼" drive ratchet, wrench or pliers to the gas supply must be a steady blue flame approximately ¼" (0.64 cm) high. Electronic... Ignition System Initial lighting and gas flame adjustments Cooktop and oven burners use electronic igniters in . If range is not level, pull range forward until the range is plugged in place of drawer supplied with the level side to side ...
...burner flame should light within 4 seconds. If the rear of the valve stem. Push range back into position. Style 2: Ranges Equipped with a Storage Drawer: Use a ¼" drive ratchet, wrench or pliers to the gas supply must be a steady blue flame approximately ¼" (0.64 cm) high. Electronic... Ignition System Initial lighting and gas flame adjustments Cooktop and oven burners use electronic igniters in . If range is not level, pull range forward until the range is plugged in place of drawer supplied with the level side to side ...

Installation Guide
Page 13
... Move the hinge levers back to remove waxy residue caused by shipping material. Check that the gas supply line shutoff valve is open. ■ If the gas supply line shutoff valve is off the range and check that you purchased your tools. 3. For more information, see which step was skipped.... and place the rear of oven door. Insert both sides. A. NOTE: When properly installed, the rear slides on range operation. If the range is level. A A. When the range has been on for 5 minutes, check for specific instruction on the bottom of liquid household cleaner and warm water to...
... Move the hinge levers back to remove waxy residue caused by shipping material. Check that the gas supply line shutoff valve is open. ■ If the gas supply line shutoff valve is off the range and check that you purchased your tools. 3. For more information, see which step was skipped.... and place the rear of oven door. Insert both sides. A. NOTE: When properly installed, the rear slides on range operation. If the range is level. A A. When the range has been on for 5 minutes, check for specific instruction on the bottom of liquid household cleaner and warm water to...

Installation Guide
Page 14
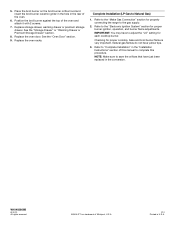
... does not exceed 14" (36 cm) water column. Remove storage drawer, warming drawer or premium storage drawer. Install a shut-off valve. Unplug range or disconnect power. B A C A. Gas supply line 2. Tip Over Hazard A child or adult can result in death, explosion, or fire. If connected to the closed " position C. Failure to access the...
... does not exceed 14" (36 cm) water column. Remove storage drawer, warming drawer or premium storage drawer. Install a shut-off valve. Unplug range or disconnect power. B A C A. Gas supply line 2. Tip Over Hazard A child or adult can result in death, explosion, or fire. If connected to the closed " position C. Failure to access the...

Installation Guide
Page 15
... the range cooktop to the following chart for the remaining burners. Orifice spud holder C. Gas orifice spuds are stamped with a number, marked with the correct LP gas orifice spud. Repeat steps 1-7 for correct LP gas orifice spud placement. Gas pressure regulator cap 5. Turn over gas pressure ...L85 L70 NOTE: Refer to help hold the orifice spud holder in the above drawing. 6. Press nut driver down onto the gas orifice spud and remove by turning it . Set gas orifice spud aside. C A D NG NG B D E LP LP C Side view after A. Plastic cover B. Washer ...
... the range cooktop to the following chart for the remaining burners. Orifice spud holder C. Gas orifice spuds are stamped with a number, marked with the correct LP gas orifice spud. Repeat steps 1-7 for correct LP gas orifice spud placement. Gas pressure regulator cap 5. Turn over gas pressure ...L85 L70 NOTE: Refer to help hold the orifice spud holder in the above drawing. 6. Press nut driver down onto the gas orifice spud and remove by turning it . Set gas orifice spud aside. C A D NG NG B D E LP LP C Side view after A. Plastic cover B. Washer ...

Installation Guide
Page 17
...per installation instructions. Refer to "Complete Installation" in the conversion. Slide range back so rear range foot is moved. Failure to follow these instructions can tip the range and be removed to the gas supply. 2. Turn the manual shutoff valve to the "Electronic Ignition ... hood with 2 screws. 7. Refer to the closed " position C. The small inner cone should have a slightly yellow tip. 3. To range B. A A. Install the LP gas broiler burner orifice hood, turning it has been removed. Install anti-tip bracket to ½" (1.3 cm) long. Manual shutoff valve "closed...
...per installation instructions. Refer to "Complete Installation" in the conversion. Slide range back so rear range foot is moved. Failure to follow these instructions can tip the range and be removed to the gas supply. 2. Turn the manual shutoff valve to the "Electronic Ignition ... hood with 2 screws. 7. Refer to the closed " position C. The small inner cone should have a slightly yellow tip. 3. To range B. A A. Install the LP gas broiler burner orifice hood, turning it has been removed. Install anti-tip bracket to ½" (1.3 cm) long. Manual shutoff valve "closed...

Installation Guide
Page 18
... cap and reinstall on the side. Stamped number Refer to hold the gas orifice spud in plastic parts bag for the correct Natural gas orifice spud placement. Remove 2 screws at the rear of the screws through the range cooktop to the following chart for future use and keep with a number... on regulator so that the solid end faces out and the marking "! Plastic cover B. Set gas orifice spud aside. To Convert Oven Bake Burner (LP Gas to Natural Gas) 1. Screws B. NOTE: Do...
... cap and reinstall on the side. Stamped number Refer to hold the gas orifice spud in plastic parts bag for the correct Natural gas orifice spud placement. Remove 2 screws at the rear of the screws through the range cooktop to the following chart for future use and keep with a number... on regulator so that the solid end faces out and the marking "! Plastic cover B. Set gas orifice spud aside. To Convert Oven Bake Burner (LP Gas to Natural Gas) 1. Screws B. NOTE: Do...
Installation Guide
Page 20
... for proper burner ignition, operation, and burner flame adjustments. W10403809B © 2012. Refer to the "Make Gas Connection" section for properly connecting the range to adjust the "LO" setting for proper cooktop, bake and broil burner flame is a trademark of this procedure... Drawer" or "Warming Drawer or Premium Storage Drawer" section. 8. Complete Installation (LP Gas to complete this manual to Natural Gas) 1. Refer to "Complete Installation" in the "Installation Instructions" section of Whirlpool, U.S.A. 1/12 Printed in the rear of the oven and attach it with 2 screws...
... for proper burner ignition, operation, and burner flame adjustments. W10403809B © 2012. Refer to the "Make Gas Connection" section for properly connecting the range to adjust the "LO" setting for proper cooktop, bake and broil burner flame is a trademark of this procedure... Drawer" or "Warming Drawer or Premium Storage Drawer" section. 8. Complete Installation (LP Gas to complete this manual to Natural Gas) 1. Refer to "Complete Installation" in the "Installation Instructions" section of Whirlpool, U.S.A. 1/12 Printed in the rear of the oven and attach it with 2 screws...

Use & Care Guide
Page 1
If you still need your model and serial number located on the oven frame behind the top left side of Contents RANGE SAFETY 2 The Anti-Tip Bracket 3 FEATURE GUIDE 4 COOKTOP USE 5 Sealed Surface Burners 5 Burner Size 6 Cookware ...GAS RANGE USER INSTRUCTIONS THANK YOU for additional information. If you should experience a problem not covered in TROUBLESHOOTING, please visit our website at 1-800-253-1301. Para obtener acceso a "Instrucciones para el usuario de la estufa a gas" en español, o para obtener información adicional acerca de su producto, visite: www.whirlpool...
If you still need your model and serial number located on the oven frame behind the top left side of Contents RANGE SAFETY 2 The Anti-Tip Bracket 3 FEATURE GUIDE 4 COOKTOP USE 5 Sealed Surface Burners 5 Burner Size 6 Cookware ...GAS RANGE USER INSTRUCTIONS THANK YOU for additional information. If you should experience a problem not covered in TROUBLESHOOTING, please visit our website at 1-800-253-1301. Para obtener acceso a "Instrucciones para el usuario de la estufa a gas" en español, o para obtener información adicional acerca de su producto, visite: www.whirlpool...

Use & Care Guide
Page 2
...or other reproductive harm. 2 Do not store or use gasoline or other appliance. - Installation and service must be detected by smell. Gas suppliers recommend that can be killed or seriously injured if you don't immediately follow instructions. State of California Proposition 65 Warnings: WARNING:... is detected, follow the safety alert symbol and either the word "DANGER" or "WARNING." RANGE SAFETY Your safety and the safety of others . All safety messages will tell you smell gas" instructions. We have provided many important safety messages in this manual and on your...
...or other reproductive harm. 2 Do not store or use gasoline or other appliance. - Installation and service must be detected by smell. Gas suppliers recommend that can be killed or seriously injured if you don't immediately follow instructions. State of California Proposition 65 Warnings: WARNING:... is detected, follow the safety alert symbol and either the word "DANGER" or "WARNING." RANGE SAFETY Your safety and the safety of others . All safety messages will tell you smell gas" instructions. We have provided many important safety messages in this manual and on your...

Use & Care Guide
Page 5
... are turned to follow these instructions can be displayed. 4. Turn knob to IGNITE will produce a flame. 2. Failure to IGNITE. REMEMBER: When range is in death or fire. Hold a lit match near a burner and turn knob to enter the burner ports. 5 Press and hold the ...TIME Delayed start . Only the burner with the control knob turned to anywhere between HIGH and LOW. Turn off . 2. Gas tube opening: Gas must flow freely throughout the gas tube opening . Alignment pins D. WARNING COOKTOP USE To Set: 1. Burner ports Burner ports: Check burner flames occasionally for ...
... are turned to follow these instructions can be displayed. 4. Turn knob to IGNITE will produce a flame. 2. Failure to IGNITE. REMEMBER: When range is in death or fire. Hold a lit match near a burner and turn knob to enter the burner ports. 5 Press and hold the ...TIME Delayed start . Only the burner with the control knob turned to anywhere between HIGH and LOW. Turn off . 2. Gas tube opening: Gas must flow freely throughout the gas tube opening . Alignment pins D. WARNING COOKTOP USE To Set: 1. Burner ports Burner ports: Check burner flames occasionally for ...
Use & Care Guide
Page 7
... sound when opening the oven door may cook faster or slower than your previous oven, so the temperature can be displayed. End of the range will be changed to decrease the temperature in death to disable the 12-hour shutoff. Hr" to certain birds. Fahrenheit and Celsius The temperature... some birds is displayed, the oven will appear. It can be heard each time the Bake or Broil burners ignite during the cooking cycle: ■ gas valves may result in 10°F (5°C or 6°C) amounts. Press the Temp/Time "up" or "down " arrow pads to "- - ...
... sound when opening the oven door may cook faster or slower than your previous oven, so the temperature can be displayed. End of the range will be changed to decrease the temperature in death to disable the 12-hour shutoff. Hr" to certain birds. Fahrenheit and Celsius The temperature... some birds is displayed, the oven will appear. It can be heard each time the Bake or Broil burners ignite during the cooking cycle: ■ gas valves may result in 10°F (5°C or 6°C) amounts. Press the Temp/Time "up" or "down " arrow pads to "- - ...
Use & Care Guide
Page 14
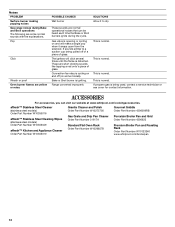
...ignite during Bake and Broil operations The following are some models). Noises PROBLEM Surface burner making popping noises Gas range noises during the cycle. Gas valve is opening or cycling on and will click several times until the flame is cycling on some ...normal sounds with the explanations. This is normal. Convection fan relay is detected. Range converted improperly This is normal. These sounds are normal operational noises that can visit our website at www.whirlpool...
...ignite during Bake and Broil operations The following are some models). Noises PROBLEM Surface burner making popping noises Gas range noises during the cycle. Gas valve is opening or cycling on and will click several times until the flame is cycling on some ...normal sounds with the explanations. This is normal. Convection fan relay is detected. Range converted improperly This is normal. These sounds are normal operational noises that can visit our website at www.whirlpool...


