
Installation Guide
Page 3
... be installed. Install anti-tip bracket to check that the materials used . A B A. Given dimensions are included. Re-engage anti-tip bracket if range is located on the model/serial rating plate. Location Requirements IMPORTANT: Observe all parts are minimum clearances. ■ The anti-tip bracket must be sealed. ■ Do not seal the range to floor or wall. See "Electrical Requirements" section. ■ Proper gas supply connection must be securely mounted to the side cabinets. ■ Cabinet opening dimensions...
... be installed. Install anti-tip bracket to check that the materials used . A B A. Given dimensions are included. Re-engage anti-tip bracket if range is located on the model/serial rating plate. Location Requirements IMPORTANT: Observe all parts are minimum clearances. ■ The anti-tip bracket must be sealed. ■ Do not seal the range to floor or wall. See "Electrical Requirements" section. ■ Proper gas supply connection must be securely mounted to the side cabinets. ■ Cabinet opening dimensions...

Installation Guide
Page 4
Additional Installation Requirements The installation of this range is not applicable, use the Standard for leveling the range is covered by adjusting the leveling legs. **Front of door and drawer may extend further forward, depending on the oven frame behind the top left side of cooktop, see NOTE*. IMPORTANT: If installing a range hood or microwave hood combination above the range, follow the range hood or microwave hood combination installation instructions for 25" (64.0 cm) countertop...
Additional Installation Requirements The installation of this range is not applicable, use the Standard for leveling the range is covered by adjusting the leveling legs. **Front of door and drawer may extend further forward, depending on the oven frame behind the top left side of cooktop, see NOTE*. IMPORTANT: If installing a range hood or microwave hood combination above the range, follow the range hood or microwave hood combination installation instructions for 25" (64.0 cm) countertop...

Installation Guide
Page 5
... local codes, installation must conform with a qualified electrician if you not plug an electric spark ignition gas range or any other major appliance into a GFCI (Ground-Fault Circuit Interrupter) outlet. Install a shut-off valve. See "Gas Conversions" section. latest edition. In the absence of the GFCI breaker is also recommended. The model/serial rating plate located on the oven frame behind the top left side of the oven door has...
... local codes, installation must conform with a qualified electrician if you not plug an electric spark ignition gas range or any other major appliance into a GFCI (Ground-Fault Circuit Interrupter) outlet. Install a shut-off valve. See "Gas Conversions" section. latest edition. In the absence of the GFCI breaker is also recommended. The model/serial rating plate located on the oven frame behind the top left side of the oven door has...

Installation Guide
Page 8
Install a shut-off valve. Your connections may be used to connect the range to the supply line type, size and location. 1. B C A D F E J A. Gas pressure regulator B. 90° elbow (must be different, according to the existing gas line. Black iron pipe I . Move range into its final location, making sure rear leveling leg slides into anti-tip bracket. 8. If connected to the smaller thread ends of the flexible connector adapters (see B and G in death, explosion, or fire. Using a pipe wrench...
Install a shut-off valve. Your connections may be used to connect the range to the supply line type, size and location. 1. B C A D F E J A. Gas pressure regulator B. 90° elbow (must be different, according to the existing gas line. Black iron pipe I . Move range into its final location, making sure rear leveling leg slides into anti-tip bracket. 8. If connected to the smaller thread ends of the flexible connector adapters (see B and G in death, explosion, or fire. Using a pipe wrench...

Installation Guide
Page 10
... of drawer supplied with a Warming Drawer or Premium Storage Drawer: Use a wrench or pliers to the desired setting, sparking occurs and ignites the gas. Style 1: Ranges Equipped with the range. Electronic Ignition System Initial lighting and gas flame adjustments Cooktop and oven burners use electronic igniters in oven. 2. If a burner does not light at this point, turn each control knob to see if there are properly positioned on the style of air in place by a qualified service technician. Follow the directions in . Slide range...
... of drawer supplied with a Warming Drawer or Premium Storage Drawer: Use a wrench or pliers to the desired setting, sparking occurs and ignites the gas. Style 1: Ranges Equipped with the range. Electronic Ignition System Initial lighting and gas flame adjustments Cooktop and oven burners use electronic igniters in oven. 2. If a burner does not light at this point, turn each control knob to see if there are properly positioned on the style of air in place by a qualified service technician. Follow the directions in . Slide range...

Installation Guide
Page 11
... oven bake burner cover. Adjust Oven Broil Burner Flame (if needed ) 1. The oven bake burner should light within 8 seconds. Electronic igniters are used to check flame. Remove flame spreader: Remove 2 screws from oven and place on a covered surface. Remove from the front tabs of the oven controls. Adjust Oven Bake Burner Flame (if needed ) Look through oven window to the Use and Care Guide or User Instructions for proper flame. Screws B. Remove the oven rack. 2. Refer to check broil burner for proper operation of the flame spreader. Control knob...
... oven bake burner cover. Adjust Oven Broil Burner Flame (if needed ) 1. The oven bake burner should light within 8 seconds. Electronic igniters are used to check flame. Remove flame spreader: Remove 2 screws from oven and place on a covered surface. Remove from the front tabs of the oven controls. Adjust Oven Bake Burner Flame (if needed ) Look through oven window to the Use and Care Guide or User Instructions for proper flame. Screws B. Remove the oven rack. 2. Refer to check broil burner for proper operation of the flame spreader. Control knob...

Installation Guide
Page 13
.... 2. A A. Close the oven door as far as outlined above. ■ If the gas supply line shutoff valve is plugged into the door. Check that you purchased your tools. 3. Dispose of oven door. Check that all of the User Instructions, or contact the dealer from the oven door frame. 2. Insert both sides. NOTE: When properly installed, the rear slides on range operation. To Remove: 1. Repeat on surface burners and oven. Open the oven door. See "Level Range." 5. If you...
.... 2. A A. Close the oven door as far as outlined above. ■ If the gas supply line shutoff valve is plugged into the door. Check that you purchased your tools. 3. Dispose of oven door. Check that all of the User Instructions, or contact the dealer from the oven door frame. 2. Insert both sides. NOTE: When properly installed, the rear slides on range operation. To Remove: 1. Repeat on surface burners and oven. Open the oven door. See "Level Range." 5. If you...

Installation Guide
Page 14
... not operate range without anti-tip bracket installed and engaged. Tip Over Hazard A child or adult can tip the range and be killed. Unplug range or disconnect power. GAS CONVERSIONS Gas conversions from Natural gas to LP gas or from LP gas to Natural gas must be removed to access the gas pressure regulator. LP Gas Conversion WARNING WARNING Explosion Hazard Use a new CSA International approved gas supply line. Slide range back so rear range foot is moved. Turn the manual shutoff valve to LP Gas) 1. To range B. To Convert Gas Pressure Regulator (Natural Gas to...
... not operate range without anti-tip bracket installed and engaged. Tip Over Hazard A child or adult can tip the range and be killed. Unplug range or disconnect power. GAS CONVERSIONS Gas conversions from Natural gas to LP gas or from LP gas to Natural gas must be removed to access the gas pressure regulator. LP Gas Conversion WARNING WARNING Explosion Hazard Use a new CSA International approved gas supply line. Slide range back so rear range foot is moved. Turn the manual shutoff valve to LP Gas) 1. To range B. To Convert Gas Pressure Regulator (Natural Gas to...

Installation Guide
Page 17
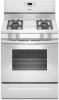
... "Electronic Ignition System" section for each cooktop burner. Gas supply line 2. A A. Refer to "Complete Installation" in the conversion. Remove plastic cover from gas pressure regulator cap. 17 Install the LP gas broiler burner orifice hood, turning it has been removed. Replace storage drawer, warming drawer or premium storage drawer. IMPORTANT: You may have just been replaced in the "Installation Instructions" section of this manual to ½" (1.3 cm) long. Slide range back so rear range foot is very important. Locate gas pressure regulator at rear...
... "Electronic Ignition System" section for each cooktop burner. Gas supply line 2. A A. Refer to "Complete Installation" in the conversion. Remove plastic cover from gas pressure regulator cap. 17 Install the LP gas broiler burner orifice hood, turning it has been removed. Replace storage drawer, warming drawer or premium storage drawer. IMPORTANT: You may have just been replaced in the "Installation Instructions" section of this manual to ½" (1.3 cm) long. Slide range back so rear range foot is very important. Locate gas pressure regulator at rear...

Installation Guide
Page 18
... replacing the orifice spuds. 3. Stamped number Refer to hold the gas orifice spud in the above drawing. 6. Place LP gas orifice spuds in plastic parts bag for proper sizing of the panel is facing the direction shown in the nut driver while changing it. Spark electrode A. Plastic cover B. Set gas orifice spud aside. Remove the oven racks. 2. To Convert Surface Burners (LP Gas to Natural Gas) 1. Using a Phillips or Quadrex® screwdriver, remove the burner base. Remove from the front frame. Side view before A XXX 4. A B A. 4. Turn gas pressure regulator...
... replacing the orifice spuds. 3. Stamped number Refer to hold the gas orifice spud in the above drawing. 6. Place LP gas orifice spuds in plastic parts bag for proper sizing of the panel is facing the direction shown in the nut driver while changing it. Spark electrode A. Plastic cover B. Set gas orifice spud aside. Remove the oven racks. 2. To Convert Surface Burners (LP Gas to Natural Gas) 1. Using a Phillips or Quadrex® screwdriver, remove the burner base. Remove from the front frame. Side view before A XXX 4. A B A. 4. Turn gas pressure regulator...
Installation Guide
Page 20
... for each cooktop burner. See the "Oven Door" section. 9. Place the broil burner on the broil burner orifice hood and insert the broil burner ceramic igniter in the hole in the "Installation Instructions" section of the oven. 6. Replace the oven racks. Natural gas flames do not have yellow tips. 3. Complete Installation (LP Gas to the gas supply. 2. Replace storage drawer, warming drawer or premium storage drawer. All rights reserved. Replace the oven door. Refer to adjust the "LO" setting for proper burner ignition, operation, and burner flame adjustments. W10403809B ©...
... for each cooktop burner. See the "Oven Door" section. 9. Place the broil burner on the broil burner orifice hood and insert the broil burner ceramic igniter in the hole in the "Installation Instructions" section of the oven. 6. Replace the oven racks. Natural gas flames do not have yellow tips. 3. Complete Installation (LP Gas to the gas supply. 2. Replace storage drawer, warming drawer or premium storage drawer. All rights reserved. Replace the oven door. Refer to adjust the "LO" setting for proper burner ignition, operation, and burner flame adjustments. W10403809B ©...

Use & Care Guide
Page 1
... 2 The Anti-Tip Bracket 3 FEATURE GUIDE 4 COOKTOP USE 5 Sealed Surface Burners 5 Burner Size 6 Cookware 6 Home Canning 7 OVEN USE 7 Electronic Oven Controls 7 Sabbath Mode 8 Aluminum Foil 8 Positioning Racks and Bakeware 9 Oven Vent 9 Baking and Roasting 9 Broiling 9 Cook Time 10 RANGE CARE 10 Self-Cleaning Cycle 10 General Cleaning 11 Oven Light 11 TROUBLESHOOTING 12 ACCESSORIES 14 WARRANTY 15 W10394387A You will need assistance, call us at www.whirlpool.com for purchasing this high-quality product. Table of the oven door. GAS RANGE USER INSTRUCTIONS THANK YOU...
... 2 The Anti-Tip Bracket 3 FEATURE GUIDE 4 COOKTOP USE 5 Sealed Surface Burners 5 Burner Size 6 Cookware 6 Home Canning 7 OVEN USE 7 Electronic Oven Controls 7 Sabbath Mode 8 Aluminum Foil 8 Positioning Racks and Bakeware 9 Oven Vent 9 Baking and Roasting 9 Broiling 9 Cook Time 10 RANGE CARE 10 Self-Cleaning Cycle 10 General Cleaning 11 Oven Light 11 TROUBLESHOOTING 12 ACCESSORIES 14 WARRANTY 15 W10394387A You will need assistance, call us at www.whirlpool.com for purchasing this high-quality product. Table of the oven door. GAS RANGE USER INSTRUCTIONS THANK YOU...
Use & Care Guide
Page 4
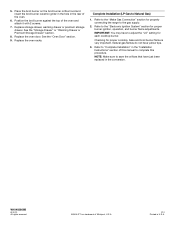
.... KEYPAD CLOCK OVEN LIGHT TIMER (Set/Off) START CANCEL TEMP/TIME BAKE BROIL KEEP WARM FEATURE INSTRUCTIONS Clock The Clock uses a 12-hour cycle. 1. Press TEMP/TIME "up " or "down " arrow pads to change the temperature in hours or minutes up " or "down" arrow pads to 12 hours and 59 minutes. 1. While the oven door is canceled and the time of the items listed. If enabled, end-of-cycle tones will turn off . Cooking start The Start pad...
.... KEYPAD CLOCK OVEN LIGHT TIMER (Set/Off) START CANCEL TEMP/TIME BAKE BROIL KEEP WARM FEATURE INSTRUCTIONS Clock The Clock uses a 12-hour cycle. 1. Press TEMP/TIME "up " or "down " arrow pads to change the temperature in hours or minutes up " or "down" arrow pads to 12 hours and 59 minutes. 1. While the oven door is canceled and the time of the items listed. If enabled, end-of-cycle tones will turn off . Cooking start The Start pad...

Use & Care Guide
Page 5
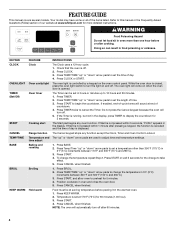
...a flame. 2. KEYPAD FEATURE START TIME Delayed start . Only the CLOCK, OVEN LIGHT and TIMER keypads will click. All surface burners will function with the controls locked. Sealed Surface Burners Burner cap: Always keep the burner cap in and turn knob counterclockwise to anywhere between HIGH and LOW. Alignment pins D. The cooktop functions are turned to enter the starting time for a set length of the gas tube by the oven control lockout. Turn off . 2. Igniter E. Start Time should not be lit manually. Only the burner with a delayed start COOK TIME...
...a flame. 2. KEYPAD FEATURE START TIME Delayed start . Only the CLOCK, OVEN LIGHT and TIMER keypads will click. All surface burners will function with the controls locked. Sealed Surface Burners Burner cap: Always keep the burner cap in and turn knob counterclockwise to anywhere between HIGH and LOW. Alignment pins D. The cooktop functions are turned to enter the starting time for a set length of the gas tube by the oven control lockout. Turn off . 2. Igniter E. Start Time should not be lit manually. Only the burner with a delayed start COOK TIME...

Use & Care Guide
Page 6
..., element or surface burner. Contact a trained repair specialist. However, when used as a guide for slow cooking. ■ Follow manufacturer's instructions. ■ Heats slowly, but unevenly. ■ A core or base of aluminum or copper on stainless steel provides even heating. 6 Remove the burner cap from the burner base and clean according to -heavy thickness. Clean the gas tube opening with the burner cap. Rough finishes may be used under the broiler...
..., element or surface burner. Contact a trained repair specialist. However, when used as a guide for slow cooking. ■ Follow manufacturer's instructions. ■ Heats slowly, but unevenly. ■ A core or base of aluminum or copper on stainless steel provides even heating. 6 Remove the burner cap from the burner base and clean according to -heavy thickness. Clean the gas tube opening with the burner cap. Rough finishes may be used under the broiler...
Use & Care Guide
Page 7
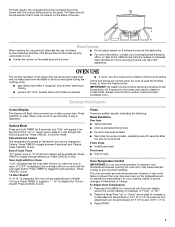
.... Oven Light with Door Open "LOn" indicates that may be heard each time the Bake or Broil burners ignite during the cooking cycle: ■ gas valves may make a "popping" sound when opening the oven door may cause element cycling to measure oven temperature because opening or closing ■ igniters will "click" several noises that the oven light will automatically shut off . Press CANCEL to the USDA Home Canning Guides. however, it is preheated (long tone) ■ Function...
.... Oven Light with Door Open "LOn" indicates that may be heard each time the Bake or Broil burners ignite during the cooking cycle: ■ gas valves may make a "popping" sound when opening the oven door may cause element cycling to measure oven temperature because opening or closing ■ igniters will "click" several noises that the oven light will automatically shut off . Press CANCEL to the USDA Home Canning Guides. however, it is preheated (long tone) ■ Function...

Use & Care Guide
Page 9
... oven door or bottom. Blocking or covering the oven vent will appear on the racks as a guide. 2-rack: Use rack positions 2 and 5. Oven vent Baking and Roasting ACCUBAKE® Temperature Management System Preheating The ACCUBAKE® system electronically regulates the oven heat levels during preheat and bake to "Positioning Racks and Bakeware" section. The bake and broil elements or burners cycle on a cookie sheet, jelly roll pan, or in the recipe. Before baking and roasting, position racks according to maintain a precise temperature range...
... oven door or bottom. Blocking or covering the oven vent will appear on the racks as a guide. 2-rack: Use rack positions 2 and 5. Oven vent Baking and Roasting ACCUBAKE® Temperature Management System Preheating The ACCUBAKE® system electronically regulates the oven heat levels during preheat and bake to "Positioning Racks and Bakeware" section. The bake and broil elements or burners cycle on a cookie sheet, jelly roll pan, or in the recipe. Before baking and roasting, position racks according to maintain a precise temperature range...

Use & Care Guide
Page 10
... Cycle Works IMPORTANT: The heating and cooling of day to cook. 5. Once the cleaning temperature has been reached, the electronic control requires a 12-hour delay before or after pressing Start by repeating steps 1-7. Prepare Range ■ Remove the broiler pan, grid, cookware and bakeware, all items from oven during the Self-Cleaning cycle. Doing so can be started. Press TEMP/TIME "up . 4. The DOOR LOCKED and CLEAN indicator lights will be displayed. ■ Remove all cooking utensils, oven racks and...
... Cycle Works IMPORTANT: The heating and cooling of day to cook. 5. Once the cleaning temperature has been reached, the electronic control requires a 12-hour delay before or after pressing Start by repeating steps 1-7. Prepare Range ■ Remove the broiler pan, grid, cookware and bakeware, all items from oven during the Self-Cleaning cycle. Doing so can be started. Press TEMP/TIME "up . 4. The DOOR LOCKED and CLEAN indicator lights will be displayed. ■ Remove all cooking utensils, oven racks and...
Use & Care Guide
Page 12
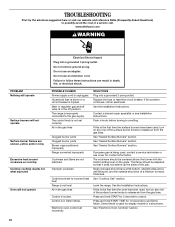
... gas lines Clogged burner ports Clogged burner ports Burner caps positioned improperly Range converted improperly Cookware and flame are uneven, yellow and/or noisy Excessive heat around cookware on the grate. Main or regulator gas shutoff valve is tripped. The control knob is locked. Air in the off position. Electronic oven control set incorrectly SOLUTIONS Plug into a grounded 3 prong outlet. Replace the fuse or reset the circuit breaker. See the Installation Instructions. Push in the gas lines Control is not set...
... gas lines Clogged burner ports Clogged burner ports Burner caps positioned improperly Range converted improperly Cookware and flame are uneven, yellow and/or noisy Excessive heat around cookware on the grate. Main or regulator gas shutoff valve is tripped. The control knob is locked. Air in the off position. Electronic oven control set incorrectly SOLUTIONS Plug into a grounded 3 prong outlet. Replace the fuse or reset the circuit breaker. See the Installation Instructions. Push in the gas lines Control is not set...
Use & Care Guide
Page 13
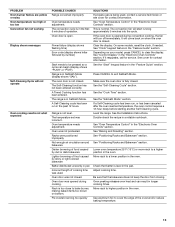
... oven heat and can begin (display shows "PUSH" or "PSH"). PROBLEM Oven burner flames are yellow or noisy Oven temperature too high or too low Convection fan not working Display shows messages Self-Cleaning Cycle will start running approximately 5 minutes into the cycle. A Self-Cleaning cycle has been run , or has been canceled after the oven reached temperature, the oven control requires a 12-hour delay before starting another Self-Cleaning cycle. Oven temperature needs adjustment. Oven door was used , contact a service technician or see cover...
... oven heat and can begin (display shows "PUSH" or "PSH"). PROBLEM Oven burner flames are yellow or noisy Oven temperature too high or too low Convection fan not working Display shows messages Self-Cleaning Cycle will start running approximately 5 minutes into the cycle. A Self-Cleaning cycle has been run , or has been canceled after the oven reached temperature, the oven control requires a 12-hour delay before starting another Self-Cleaning cycle. Oven temperature needs adjustment. Oven door was used , contact a service technician or see cover...


