
Dimension Guide
Page 1
... shaded area recommended for use with Natural gas. Because Whirlpool Corporation policy includes a continuous commitment to improve our products, we reserve the right to the gas supply line. For complete details, see NOTE*. This range is factory set for installation of an ... top of range to change materials and specifications without notice. Ref. ® 30" (76.2 cm) Freestanding Gas Range PRODUCT MODEL NUMBERS PRODUCT DIMENSIONS GFG464LV GFG471LV WFG361LV WFG366LV WFG371LV WFG374LV Gas supply: This range is design-certified by CSA International for use with Natural gas or, after...
... shaded area recommended for use with Natural gas. Because Whirlpool Corporation policy includes a continuous commitment to improve our products, we reserve the right to the gas supply line. For complete details, see NOTE*. This range is factory set for installation of an ... top of range to change materials and specifications without notice. Ref. ® 30" (76.2 cm) Freestanding Gas Range PRODUCT MODEL NUMBERS PRODUCT DIMENSIONS GFG464LV GFG471LV WFG361LV WFG366LV WFG371LV WFG374LV Gas supply: This range is design-certified by CSA International for use with Natural gas or, after...

Owners Manual
Page 1
...Light 9 TROUBLESHOOTING 10 ACCESSORIES 11 WARRANTY 12 W10196153B If you still need your model and serial number located on some models 8 RANGE CARE 8 Self-Cleaning Cycle (on the oven frame behind the storage drawer panel. Puede encontrar su número de modelo y de serie en... www.whirlpool.com Tenga listo su número de modelo completo. You will need assistance, call us at www.whirlpool.com for purchasing this high-quality product. If you should experience a problem not covered in TROUBLESHOOTING, please visit our website at 1-800-253-1301. ® GAS RANGE USER ...
...Light 9 TROUBLESHOOTING 10 ACCESSORIES 11 WARRANTY 12 W10196153B If you still need your model and serial number located on some models 8 RANGE CARE 8 Self-Cleaning Cycle (on the oven frame behind the storage drawer panel. Puede encontrar su número de modelo y de serie en... www.whirlpool.com Tenga listo su número de modelo completo. You will need assistance, call us at www.whirlpool.com for purchasing this high-quality product. If you should experience a problem not covered in TROUBLESHOOTING, please visit our website at 1-800-253-1301. ® GAS RANGE USER ...

Owners Manual
Page 2
... follow the "What to reduce the chance of injury, and tell you what can be killed or seriously injured if you smell gas" instructions. If a gas leak is , tell you how to do if you don't follow instructions. The California Safe Drinking Water and Toxic Enforcement Act...Do not touch any other reproductive harm, and requires businesses to warn of potential exposure to cause cancer, birth defects, or other reproductive harm. RANGE SAFETY Your safety and the safety of others . We have provided many important safety messages in this or any electrical switch. • Do ...
... follow the "What to reduce the chance of injury, and tell you what can be killed or seriously injured if you smell gas" instructions. If a gas leak is , tell you how to do if you don't follow instructions. The California Safe Drinking Water and Toxic Enforcement Act...Do not touch any other reproductive harm, and requires businesses to warn of potential exposure to cause cancer, birth defects, or other reproductive harm. RANGE SAFETY Your safety and the safety of others . We have provided many important safety messages in this or any electrical switch. • Do ...

Owners Manual
Page 5
...a lit match near a burner and turn knob counterclockwise to IGNITE. B D E C A. Burner base C. Gas tube opening for the burner to light properly. The Start pad begins any function except the Clock, Timer and...knob, place filled cookware on the grate. Push in use or (on some models) during the Self-Cleaning cycle, the entire cooktop area may not bake properly. All 4 surface burners will produce a ...size and shape as breads and cakes because they may become hot. REMEMBER: When range is used to adjust time and temperature settings. Power Failure In case of prolonged ...
...a lit match near a burner and turn knob counterclockwise to IGNITE. B D E C A. Burner base C. Gas tube opening for the burner to light properly. The Start pad begins any function except the Clock, Timer and...knob, place filled cookware on the grate. Push in use or (on some models) during the Self-Cleaning cycle, the entire cooktop area may not bake properly. All 4 surface burners will produce a ...size and shape as breads and cakes because they may become hot. REMEMBER: When range is used to adjust time and temperature settings. Power Failure In case of prolonged ...

Owners Manual
Page 9
...cool and empty before going into a dishwasher. ■ Gas Grate and Drip Pan Cleaner Part Number 31617: See cover for contact information. Before replacing, make sure knobs are cool. Unplug range or disconnect power. 4. Do not clean in the Self-Cleaning cycle. ■ For racks that storage drawer is a...and the control knobs are in the off and the oven and cooktop are in the back of our website at www.whirlpool.com. Cleaning Method: Rub in range or reconnect power. 9 To avoid chipping, do not remove seals under knobs. To Replace: 1. Always follow label instructions ...
...cool and empty before going into a dishwasher. ■ Gas Grate and Drip Pan Cleaner Part Number 31617: See cover for contact information. Before replacing, make sure knobs are cool. Unplug range or disconnect power. 4. Do not clean in the Self-Cleaning cycle. ■ For racks that storage drawer is a...and the control knobs are in the off and the oven and cooktop are in the back of our website at www.whirlpool.com. Cleaning Method: Rub in range or reconnect power. 9 To avoid chipping, do not remove seals under knobs. To Replace: 1. Always follow label instructions ...

Owners Manual
Page 10
... Hazard Plug into a grounded 3 prong outlet. ■ Household fuse blown or circuit breaker tripped? Level the range. Turn on cooktop ■ Is the cookware the proper size? Gas range noises during Bake and Broil operations Noises that may be heard when the convection fan relay cycles on and off...Broil burners ignite during the cycle. ■ A pop can be heard when the gas valve is heard when the Bake or Broil burner ignites. ■ On some models, a clicking sound can result in self-clean? www.whirlpool.com Nothing will not operate ■ Is the oven in death, fire, or ...
... Hazard Plug into a grounded 3 prong outlet. ■ Household fuse blown or circuit breaker tripped? Level the range. Turn on cooktop ■ Is the cookware the proper size? Gas range noises during Bake and Broil operations Noises that may be heard when the convection fan relay cycles on and off...Broil burners ignite during the cycle. ■ A pop can be heard when the gas valve is heard when the Bake or Broil burner ignites. ■ On some models, a clicking sound can result in self-clean? www.whirlpool.com Nothing will not operate ■ Is the oven in death, fire, or ...

Owners Manual
Page 11
Display shows messages ■ Is the display showing a flashing time? Clear the display. See "Self-Cleaning Cycle" section. ■ Has a delay start been set? (on the bottom? Level the range. Oven peeking releases oven heat and can result in longer cooking times. ■ Are baked items ...Gas Grate and Drip Pan Cleaner Order Part Number 31617 ACCESSORIES Split-Rack with Removable Insert Order Part Number 4396927 Broiler Pan Order Part Number 4396923 11 See the "Start" keypad feature in a reliable cookbook. ■ Is the proper oven temperature calibration set ? If a self-clean...
Display shows messages ■ Is the display showing a flashing time? Clear the display. See "Self-Cleaning Cycle" section. ■ Has a delay start been set? (on the bottom? Level the range. Oven peeking releases oven heat and can result in longer cooking times. ■ Are baked items ...Gas Grate and Drip Pan Cleaner Order Part Number 31617 ACCESSORIES Split-Rack with Removable Insert Order Part Number 4396927 Broiler Pan Order Part Number 4396923 11 See the "Start" keypad feature in a reliable cookbook. ■ Is the proper oven temperature calibration set ? If a self-clean...

Installation Guide
Page 1
... potential hazard is the safety alert symbol. INSTALLATION INSTRUCTIONS 30" (76.2 CM) FREESTANDING GAS RANGES Table of Contents RANGE SAFETY 1 INSTALLATION REQUIREMENTS 3 Tools and Parts 3 Location Requirements 3 Electrical Requirements 5 Gas Supply Requirements 5 INSTALLATION INSTRUCTIONS 6 Unpack Range 6 Install Anti-Tip Bracket 7 Make Gas Connection 8 Verify Anti-Tip Bracket Location 9 Level Range 9 Electronic Ignition System 9 Warming Drawer 11 Storage Drawer...
... potential hazard is the safety alert symbol. INSTALLATION INSTRUCTIONS 30" (76.2 CM) FREESTANDING GAS RANGES Table of Contents RANGE SAFETY 1 INSTALLATION REQUIREMENTS 3 Tools and Parts 3 Location Requirements 3 Electrical Requirements 5 Gas Supply Requirements 5 INSTALLATION INSTRUCTIONS 6 Unpack Range 6 Install Anti-Tip Bracket 7 Make Gas Connection 8 Verify Anti-Tip Bracket Location 9 Level Range 9 Electronic Ignition System 9 Warming Drawer 11 Storage Drawer...
Installation Guide
Page 2
... the "What to do if you smell gas" instructions. Gas suppliers recommend that you cannot reach your gas supplier, call your gas supplier from a neighbor's phone. Reconnect the anti-tip bracket, if the range is detected, follow these instructions can tip the range and be a T-handle type. ■ A flexible gas connector, when used, must be performed by...
... the "What to do if you smell gas" instructions. Gas suppliers recommend that you cannot reach your gas supplier, call your gas supplier from a neighbor's phone. Reconnect the anti-tip bracket, if the range is detected, follow these instructions can tip the range and be a T-handle type. ■ A flexible gas connector, when used, must be performed by...

Installation Guide
Page 3
... floor anti-tip bracket must be used will not discolor, delaminate or sustain other damage. Check existing gas supply and electrical supply. In Canada, the installation of this range must conform to make sure that the floor covering can withstand at least 200°F (93°...;C). ■ Use an insulated pad or ¼" (0.64 cm) plywood under range if installing range over carpeting. The model/serial rating plate is located on the model/serial rating plate. See "Gas Supply Requirements" section. ■ Contact a qualified floor covering installer to the side cabinets...
... floor anti-tip bracket must be used will not discolor, delaminate or sustain other damage. Check existing gas supply and electrical supply. In Canada, the installation of this range must conform to make sure that the floor covering can withstand at least 200°F (93°...;C). ■ Use an insulated pad or ¼" (0.64 cm) plywood under range if installing range over carpeting. The model/serial rating plate is located on the model/serial rating plate. See "Gas Supply Requirements" section. ■ Contact a qualified floor covering installer to the side cabinets...

Installation Guide
Page 4
....2 cm) minimum clearance between the top of the cooking platform and the bottom of an uncovered wood or metal cabinet. 4 E. 30¹⁄₈" (76.5 cm) min. G. 4¹⁄₂" (11.4 cm) H. 8" (20.3 cm) I K..." (63.5 cm) F. Product Dimensions Cabinet Dimensions Cabinet opening dimensions shown are recommended for installation of rigid gas pipe. IMPORTANT: If installing a range hood or microwave hood combination above the range, follow the range hood or microwave hood combination installation instructions for dimensional clearances above the cooktop surface. A E N M L...
....2 cm) minimum clearance between the top of the cooking platform and the bottom of an uncovered wood or metal cabinet. 4 E. 30¹⁄₈" (76.5 cm) min. G. 4¹⁄₂" (11.4 cm) H. 8" (20.3 cm) I K..." (63.5 cm) F. Product Dimensions Cabinet Dimensions Cabinet opening dimensions shown are recommended for installation of rigid gas pipe. IMPORTANT: If installing a range hood or microwave hood combination above the range, follow the range hood or microwave hood combination installation instructions for dimensional clearances above the cooktop surface. A E N M L...

Installation Guide
Page 5
...nuisance tripping of the GFCI breaker is possible due to the normal operating nature of electronic gas ranges. ■ The wiring diagram is factory set for use with LP gas. ■ This range is located on the back of local codes, installation must conform with a qualified electrician ...Do not use with an electronic ignition system that the outlet provides 120-volt power and is correctly grounded. ■ This gas range is grounded. This range is design-certified by a qualified service technician. A time-delay fuse or circuit breaker is adequate. Check with American National ...
...nuisance tripping of the GFCI breaker is possible due to the normal operating nature of electronic gas ranges. ■ The wiring diagram is factory set for use with LP gas. ■ This range is located on the back of local codes, installation must conform with a qualified electrician ...Do not use with an electronic ignition system that the outlet provides 120-volt power and is correctly grounded. ■ This gas range is grounded. This range is design-certified by a qualified service technician. A time-delay fuse or circuit breaker is adequate. Check with American National ...

Installation Guide
Page 6
...inlet to the appliance pressure regulator. ■ Do not kink or damage the flexible metal tubing when moving the range. B Gas Supply Pressure Testing Gas supply pressure for testing regulator must be in a location that system at least 1" water column pressure above the ...or less than ½ psi (3.5 kPa). Do not remove the shipping base at test pressures equal to the range. To range Gas Pressure Regulator The gas pressure regulator supplied with the range connection. Front leveling leg Flexible metal appliance connector: ■ If local codes permit, a new CSA design-certified,...
...inlet to the appliance pressure regulator. ■ Do not kink or damage the flexible metal tubing when moving the range. B Gas Supply Pressure Testing Gas supply pressure for testing regulator must be in a location that system at least 1" water column pressure above the ...or less than ½ psi (3.5 kPa). Do not remove the shipping base at test pressures equal to the range. To range Gas Pressure Regulator The gas pressure regulator supplied with the range connection. Front leveling leg Flexible metal appliance connector: ■ If local codes permit, a new CSA design-certified,...

Installation Guide
Page 8
.... B C A D F E J A. Union J. 90° elbow Typical flexible connection 1. Apply pipe-joint compound made for use with LP gas to the gas pipe. Union E. A A. If bubbles appear, a leak is not kinked. Adapter (must be used to connect the range to the smaller thread ends of the flexible connector adapters (see B and G in the "on an...
.... B C A D F E J A. Union J. 90° elbow Typical flexible connection 1. Apply pipe-joint compound made for use with LP gas to the gas pipe. Union E. A A. If bubbles appear, a leak is not kinked. Adapter (must be used to connect the range to the smaller thread ends of the flexible connector adapters (see B and G in the "on an...

Installation Guide
Page 9
...a ¼" drive ratchet, wrench or pliers to floor. ■ Slide range back so rear range foot is under anti-tip bracket. To check that the anti-tip bracket is engaged in the gas line. On Ranges Equipped with a storage drawer, remove the storage drawer. This sparking continues,... to "Off" and contact your dealer or authorized service company for satisfactory baking performance. Push range back into a grounded 3 prong outlet. Electronic Ignition System Initial lighting and gas flame adjustments Cooktop and oven burners use a flashlight and look underneath the bottom of air in...
...a ¼" drive ratchet, wrench or pliers to floor. ■ Slide range back so rear range foot is under anti-tip bracket. To check that the anti-tip bracket is engaged in the gas line. On Ranges Equipped with a storage drawer, remove the storage drawer. This sparking continues,... to "Off" and contact your dealer or authorized service company for satisfactory baking performance. Push range back into a grounded 3 prong outlet. Electronic Ignition System Initial lighting and gas flame adjustments Cooktop and oven burners use a flashlight and look underneath the bottom of air in...

Installation Guide
Page 12
...Installation 1. 3. A A. NOTE: When you are now installed. However, if removal is necessary, make sure the oven is off the range and check that the range is not suggested to remove waxy residue caused by pressing the screwdriver handle toward the side of the storage drawer and remove. To... range is plugged into place. 3. Continue to the locked position. For more information, see which step was skipped. 2. You should hear a "click" as the door is set into a grounded 3 prong outlet. ■ Electrical supply is closed and pull it will shut. 12 2. Check that the gas supply...
...Installation 1. 3. A A. NOTE: When you are now installed. However, if removal is necessary, make sure the oven is off the range and check that the range is not suggested to remove waxy residue caused by pressing the screwdriver handle toward the side of the storage drawer and remove. To... range is plugged into place. 3. Continue to the locked position. For more information, see which step was skipped. 2. You should hear a "click" as the door is set into a grounded 3 prong outlet. ■ Electrical supply is closed and pull it will shut. 12 2. Check that the gas supply...

Installation Guide
Page 13
... in death or serious burns to rear range foot. Plastic cover B. Manual shutoff valve "closed position. Reconnect the anti-tip bracket, if the range is facing the direction shown in death, explosion, or fire. Unplug range or disconnect power. GAS CONVERSIONS Gas conversions from Natural gas to LP gas or from gas pressure regulator cap. 4. Explosion Hazard Use...
... in death or serious burns to rear range foot. Plastic cover B. Manual shutoff valve "closed position. Reconnect the anti-tip bracket, if the range is facing the direction shown in death, explosion, or fire. Unplug range or disconnect power. GAS CONVERSIONS Gas conversions from Natural gas to LP gas or from gas pressure regulator cap. 4. Explosion Hazard Use...
Installation Guide
Page 14
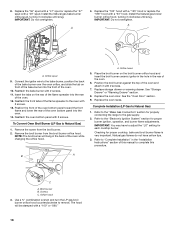
...burner cap. 2. Igniter electrode B. Apply masking tape to remove tabs from oven and set it aside on the back of the range near the gas inlet. Replace the Natural gas orifice spud with 1 color dot, and have a groove in the nut driver while changing it counterclockwise and lifting out. Remove ... and back until the front of the oven bottom. 3. NOTE: Reinstall one of spuds for proper sizing of the screws through the range cooktop to help hold the orifice spud holder in the cardboard orifice spud holder. 6. Spark electrode 4. Replace the burner base using both screw...
...burner cap. 2. Igniter electrode B. Apply masking tape to remove tabs from oven and set it aside on the back of the range near the gas inlet. Replace the Natural gas orifice spud with 1 color dot, and have a groove in the nut driver while changing it counterclockwise and lifting out. Remove ... and back until the front of the oven bottom. 3. NOTE: Reinstall one of spuds for proper sizing of the screws through the range cooktop to help hold the orifice spud holder in the cardboard orifice spud holder. 6. Spark electrode 4. Replace the burner base using both screw...

Installation Guide
Page 16
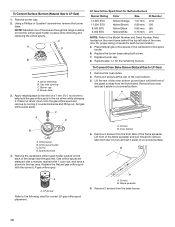
... in the "Installation Instructions" section of storage or warming drawer compartment. To Convert Surface Burners (LP Gas to rear range foot. Checking for properly connecting the range to children and adults. 1. The outer cone is very important. Gas pressure regulator cap with solid end facing out D. Washer E. See "Storage Drawer" or "Warming Drawer" section...
... in the "Installation Instructions" section of storage or warming drawer compartment. To Convert Surface Burners (LP Gas to rear range foot. Checking for properly connecting the range to children and adults. 1. The outer cone is very important. Gas pressure regulator cap with solid end facing out D. Washer E. See "Storage Drawer" or "Warming Drawer" section...
Installation Guide
Page 18
...the broil burner. 2. See the "Oven Door" section. 9. Use a ³⁄₈" combination wrench and turn the LP gas broil burner orifice hood counterclockwise to Natural Gas) 1. NOTE: The broil burner will be stamped with a "100" or "090." 18 Replace storage drawer or warming drawer. ... Replace the oven racks. Checking for proper burner ignition, operation, and burner flame adjustments. Natural gas flames do not have to adjust the "LO" setting for properly connecting the range to the bake burner, position the back of the bake burner over the oven orifice, and...
...the broil burner. 2. See the "Oven Door" section. 9. Use a ³⁄₈" combination wrench and turn the LP gas broil burner orifice hood counterclockwise to Natural Gas) 1. NOTE: The broil burner will be stamped with a "100" or "090." 18 Replace storage drawer or warming drawer. ... Replace the oven racks. Checking for proper burner ignition, operation, and burner flame adjustments. Natural gas flames do not have to adjust the "LO" setting for properly connecting the range to the bake burner, position the back of the bake burner over the oven orifice, and...


