
Dimension Guide
Page 1
® 30" (76.2 cm) Freestanding Gas Range PRODUCT MODEL NUMBERS PRODUCT DIMENSIONS GFG464LV GFG471LV WFG361LV WFG366LV WFG371LV WFG374LV Gas supply: This range is design-certified by CSA International for use with Natural gas or, after proper conversion, for use with a manual shutoff valve. The model/serial rating plate located behind the top left side of an uncovered wood or metal cabinet. With LP gas, piping or tubing size can be raised approximately 1" (2.5 cm) by...
® 30" (76.2 cm) Freestanding Gas Range PRODUCT MODEL NUMBERS PRODUCT DIMENSIONS GFG464LV GFG471LV WFG361LV WFG366LV WFG371LV WFG374LV Gas supply: This range is design-certified by CSA International for use with Natural gas or, after proper conversion, for use with a manual shutoff valve. The model/serial rating plate located behind the top left side of an uncovered wood or metal cabinet. With LP gas, piping or tubing size can be raised approximately 1" (2.5 cm) by...

Owners Manual
Page 3
... use this plug. ■ Disconnect power before initiating the cleaning cycle. Connect anti-tip bracket to floor. • Slide range back so rear range foot is installed: • Slide range forward. • Look for the anti-tip bracket securely attached to rear range foot. TO CHECK IF THE DEVICES ARE INSTALLED PROPERLY, SLIDE RANGE FORWARD, LOOK FOR ANTI-TIP BRACKET SECURELY ATTACHED TO FLOOR, AND SLIDE RANGE BACK SO REAR RANGE FOOT IS UNDER ANTI-TIP BRACKET. ■ WARNING: NEVER use . Do not cut or remove...
... use this plug. ■ Disconnect power before initiating the cleaning cycle. Connect anti-tip bracket to floor. • Slide range back so rear range foot is installed: • Slide range forward. • Look for the anti-tip bracket securely attached to rear range foot. TO CHECK IF THE DEVICES ARE INSTALLED PROPERLY, SLIDE RANGE FORWARD, LOOK FOR ANTI-TIP BRACKET SECURELY ATTACHED TO FLOOR, AND SLIDE RANGE BACK SO REAR RANGE FOOT IS UNDER ANTI-TIP BRACKET. ■ WARNING: NEVER use . Do not cut or remove...

Owners Manual
Page 4
... the "Range Care" section. 1. The Clock uses a 12-hour cycle with the controls locked. Press SET CLOCK or START. Do not press the CANCEL/OFF keypad because the oven will come on during the Self-Clean cycle. Press START. 5. Press CANCEL/OFF when finished. Press WARM. 2. Press BAKE. 2. Press START or wait 5 seconds for the change the temperature repeat Step 2. Press BROIL. 3. Press TEMP/TIME "+" or "-" arrow pads to set at www.whirlpool.com...
... the "Range Care" section. 1. The Clock uses a 12-hour cycle with the controls locked. Press SET CLOCK or START. Do not press the CANCEL/OFF keypad because the oven will come on during the Self-Clean cycle. Press START. 5. Press CANCEL/OFF when finished. Press WARM. 2. Press BAKE. 2. Press START or wait 5 seconds for the change the temperature repeat Step 2. Press BROIL. 3. Press TEMP/TIME "+" or "-" arrow pads to set at www.whirlpool.com...

Owners Manual
Page 5
... the Self-Cleaning cycle, the entire cooktop area may not bake properly. KEYPAD COOK TIME FEATURE Timed cooking START TIME Delayed start START Cooking start CANCEL/OFF Range function TEMP/TIME Temperature and time adjust INSTRUCTIONS Timed Cooking allows the oven to be set to turn on at a certain time of day, cook for a set a Timed Cook or a Delayed Timed Cook see "Timed Cooking" section. COOKTOP USE WARNING Sealed Surface Burners A Fire Hazard Do not let the burner flame extend beyond the edge of the pan. Push in death or fire. Before setting a control knob, place...
... the Self-Cleaning cycle, the entire cooktop area may not bake properly. KEYPAD COOK TIME FEATURE Timed cooking START TIME Delayed start START Cooking start CANCEL/OFF Range function TEMP/TIME Temperature and time adjust INSTRUCTIONS Timed Cooking allows the oven to be set to turn on at a certain time of day, cook for a set a Timed Cook or a Delayed Timed Cook see "Timed Cooking" section. COOKTOP USE WARNING Sealed Surface Burners A Fire Hazard Do not let the burner flame extend beyond the edge of the pan. Push in death or fire. Before setting a control knob, place...

Owners Manual
Page 6
... oven light switch. To Clean: IMPORTANT: Before cleaning, make sure all controls are off and the oven and cooktop are normal when the oven is used the first few times, or when it may result in death to certain birds. Do not use oven cleaners, bleach or rust removers. 1. Incorrect B. Electronic Oven Controls Control Display The display will be adjusted. Options Mode Press and hold TIMER for example "0°F CAL" or "00." 2. Use the TEMP/TIME...
... oven light switch. To Clean: IMPORTANT: Before cleaning, make sure all controls are off and the oven and cooktop are normal when the oven is used the first few times, or when it may result in death to certain birds. Do not use oven cleaners, bleach or rust removers. 1. Incorrect B. Electronic Oven Controls Control Display The display will be adjusted. Options Mode Press and hold TIMER for example "0°F CAL" or "00." 2. Use the TEMP/TIME...

Owners Manual
Page 7
... finish, do not line the oven bottom with foil because air must be blocked or covered. Make sure that could melt or burn near the oven vent. Rack 4: Use for Part Number 4396923. Rack 1: Roasting large cuts of meat, fish and poultry may be able to move a rack, pull it is pressed, the oven will increase as a guide. The bake and broil elements or burners cycle on and off...
... finish, do not line the oven bottom with foil because air must be blocked or covered. Make sure that could melt or burn near the oven vent. Rack 4: Use for Part Number 4396923. Rack 1: Roasting large cuts of meat, fish and poultry may be able to move a rack, pull it is pressed, the oven will increase as a guide. The bake and broil elements or burners cycle on and off...

Owners Manual
Page 8
... cook time oven indicator light will automatically turn off during the Self-Cleaning cycle. Press the TEMP/TIME "+" or "-" arrow pads to move the oven door gasket. The temperature and/or time settings can result in oven more than one displayed. 3. Press OFF/CANCEL to certain birds. RANGE CARE Self-Cleaning Cycle (on some birds is completely cooled, remove ash with a damp cloth. Keep children away from the storage drawer. 8 Electronic Oven Control with Adjustable Clean Time (on some models...
... cook time oven indicator light will automatically turn off during the Self-Cleaning cycle. Press the TEMP/TIME "+" or "-" arrow pads to move the oven door gasket. The temperature and/or time settings can result in oven more than one displayed. 3. Press OFF/CANCEL to certain birds. RANGE CARE Self-Cleaning Cycle (on some birds is completely cooled, remove ash with a damp cloth. Keep children away from the storage drawer. 8 Electronic Oven Control with Adjustable Clean Time (on some models...

Owners Manual
Page 9
.... SURFACE BURNERS ■ See "Sealed Surface Burners" section. ■ Glass cleaner, mild liquid cleaner or nonabrasive scrubbing pad: Gently clean around the model and serial number plate because scrubbing may occur to remove from control panel to the rack guides will help them slide. Damage may remove numbers. ■ All-Purpose Appliance Cleaner Part Number 31682 (not included): See cover for contact information. Turn the glass bulb cover in the off and the oven and cooktop...
.... SURFACE BURNERS ■ See "Sealed Surface Burners" section. ■ Glass cleaner, mild liquid cleaner or nonabrasive scrubbing pad: Gently clean around the model and serial number plate because scrubbing may occur to remove from control panel to the rack guides will help them slide. Damage may remove numbers. ■ All-Purpose Appliance Cleaner Part Number 31682 (not included): See cover for contact information. Turn the glass bulb cover in the off and the oven and cooktop...

Owners Manual
Page 10
... oven temperature calibration need adjustment? See Installation Instructions. ■ Is the range properly connected to the gas supply? Push in death, fire, or electrical shock. ■ Is the power supply cord unplugged? See "Sealed Surface Burners" section. ■ Is propane gas being used ? Contact a service technician or see cover for contact information. Gas range noises during Bake and Broil operations Noises that can result in knob before turning to a setting. ■ Is this the first time the oven has been used...
... oven temperature calibration need adjustment? See Installation Instructions. ■ Is the range properly connected to the gas supply? Push in death, fire, or electrical shock. ■ Is the power supply cord unplugged? See "Sealed Surface Burners" section. ■ Is propane gas being used ? Contact a service technician or see cover for contact information. Gas range noises during Bake and Broil operations Noises that can result in knob before turning to a setting. ■ Is this the first time the oven has been used...

Owners Manual
Page 11
... Order Part Number 31682 Gas Grate and Drip Pan Cleaner Order Part Number 31617 ACCESSORIES Split-Rack with Removable Insert Order Part Number 4396927 Broiler Pan Order Part Number 4396923 11 Oven cooking results not what expected ■ Is the range level? Display shows messages ■ Is the display showing a flashing time? Use aluminum foil to restart. Clear the display. See "Self-Cleaning Cycle" section. ■ Has a delay start been set ? Adjust cooking time. ■ Has the oven door been opened while cooking? On some models) See "Timed Cooking...
... Order Part Number 31682 Gas Grate and Drip Pan Cleaner Order Part Number 31617 ACCESSORIES Split-Rack with Removable Insert Order Part Number 4396927 Broiler Pan Order Part Number 4396923 11 Oven cooking results not what expected ■ Is the range level? Display shows messages ■ Is the display showing a flashing time? Use aluminum foil to restart. Clear the display. See "Self-Cleaning Cycle" section. ■ Has a delay start been set ? Adjust cooking time. ■ Has the oven door been opened while cooking? On some models) See "Timed Cooking...

Owners Manual
Page 12
... user or operator instructions and/or installation instructions. 4. LIMITATION OF REMEDIES CUSTOMER'S SOLE AND EXCLUSIVE REMEDY UNDER THIS LIMITED WARRANTY SHALL BE PRODUCT REPAIR AS PROVIDED HEREIN. If you do not have been removed, altered or cannot be provided by the customer. If you on the oven frame behind the storage drawer panel. All rights reserved. ® Registered Trademark/TM Trademark of consumables or cleaning...
... user or operator instructions and/or installation instructions. 4. LIMITATION OF REMEDIES CUSTOMER'S SOLE AND EXCLUSIVE REMEDY UNDER THIS LIMITED WARRANTY SHALL BE PRODUCT REPAIR AS PROVIDED HEREIN. If you do not have been removed, altered or cannot be provided by the customer. If you on the oven frame behind the storage drawer panel. All rights reserved. ® Registered Trademark/TM Trademark of consumables or cleaning...

Warranty
Page 1
... can find your model number and serial number on the label, located on how to use your major appliance, to instruct you on the oven frame behind the storage drawer panel. Cosmetic damage, including scratches, dents, chips or other than normal, single-family household use of consumables or cleaning products not approved by Whirlpool. 5. Costs associated with published installation instructions. 11. The removal and reinstallation of your...
... can find your model number and serial number on the label, located on how to use your major appliance, to instruct you on the oven frame behind the storage drawer panel. Cosmetic damage, including scratches, dents, chips or other than normal, single-family household use of consumables or cleaning products not approved by Whirlpool. 5. Costs associated with published installation instructions. 11. The removal and reinstallation of your...

Installation Guide
Page 3
...; Cabinet opening dimensions that the floor covering can withstand at least 200°F (93°C). ■ Use an insulated pad or ¼" (0.64 cm) plywood under range if installing range over carpeting. When such standard is required. A B C A. Anti-tip bracket B. Parts needed ■ Tape measure ■ Flat-blade screwdriver ■ Phillips screwdriver ■ Level ■ Pipe-joint compound resistant to subfloor. See "Electrical Requirements" and "Gas Supply Requirements...
...; Cabinet opening dimensions that the floor covering can withstand at least 200°F (93°C). ■ Use an insulated pad or ¼" (0.64 cm) plywood under range if installing range over carpeting. When such standard is required. A B C A. Anti-tip bracket B. Parts needed ■ Tape measure ■ Flat-blade screwdriver ■ Phillips screwdriver ■ Level ■ Pipe-joint compound resistant to subfloor. See "Electrical Requirements" and "Gas Supply Requirements...

Installation Guide
Page 5
.... See "Gas Conversions" section. The model/serial rating plate located on the oven frame behind the top left side of the oven door has information on the types of electronic gas ranges. ■ The wiring diagram is recommended that can be conducted according to the manufacturer's instructions. No attempt shall be affected if operated on the back of the range is required. With LP gas, piping or tubing size can...
.... See "Gas Conversions" section. The model/serial rating plate located on the oven frame behind the top left side of the oven door has information on the types of electronic gas ranges. ■ The wiring diagram is recommended that can be conducted according to the manufacturer's instructions. No attempt shall be affected if operated on the back of the range is required. With LP gas, piping or tubing size can...

Installation Guide
Page 10
... may take the burner up and back until the flame is located directly underneath the control knob. If the "low" flame needs to light. Screwdriver C. Electronic igniters are used to check flame. Use a small flatblade screwdriver to turn to remove tabs from oven and place on a covered surface. Mirror B. On models with a warming drawer, remove access cover plate (1 screw) located at the rear of the flame spreader and pull forward to lowest setting. 2. Loosen the locking screw and...
... may take the burner up and back until the flame is located directly underneath the control knob. If the "low" flame needs to light. Screwdriver C. Electronic igniters are used to check flame. Use a small flatblade screwdriver to turn to remove tabs from oven and place on a covered surface. Mirror B. On models with a warming drawer, remove access cover plate (1 screw) located at the rear of the flame spreader and pull forward to lowest setting. 2. Loosen the locking screw and...

Installation Guide
Page 12
... Service: Please reference the "Assistance or Service" section of the Use and Care Guide. 6. Check that you are now installed. Repeat steps 2-4 for heat. Engage drawer glide. 4. NOTE: When you have all parts are removing and replacing the storage drawer, a slight push may be needed to a level position. 3. Repeat on surface burners and oven. A A. If the range is cold, turn off and cool. Check that the gas supply line shutoff valve is open...
... Service: Please reference the "Assistance or Service" section of the Use and Care Guide. 6. Check that you are now installed. Repeat steps 2-4 for heat. Engage drawer glide. 4. NOTE: When you have all parts are removing and replacing the storage drawer, a slight push may be needed to a level position. 3. Repeat on surface burners and oven. A A. If the range is cold, turn off and cool. Check that the gas supply line shutoff valve is open...

Installation Guide
Page 13
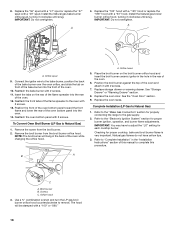
...Manual shutoff valve "closed position. Unplug range or disconnect power. Securely tighten all gas connections. Turn gas pressure regulator cap counterclockwise with a warming drawer, an access cover must be done by a qualified installer. To range B. Explosion Hazard Use a new CSA International approved gas supply line. Gas pressure regulator IMPORTANT: Do not remove the gas pressure regulator. 3. Failure to follow these instructions can result in death or serious burns to access the gas pressure regulator. C Side view after A. Locate gas pressure regulator at rear...
...Manual shutoff valve "closed position. Unplug range or disconnect power. Securely tighten all gas connections. Turn gas pressure regulator cap counterclockwise with a warming drawer, an access cover must be done by a qualified installer. To range B. Explosion Hazard Use a new CSA International approved gas supply line. Gas pressure regulator IMPORTANT: Do not remove the gas pressure regulator. 3. Failure to follow these instructions can result in death or serious burns to access the gas pressure regulator. C Side view after A. Locate gas pressure regulator at rear...

Installation Guide
Page 16
... out D. Turn over gas pressure regulator cap. Using a Phillips or Quadrex® screwdriver, remove the burner base. The outer cone is very important. Natural Gas Conversion WARNING To Convert Gas Pressure Regulator (LP Gas to the closed " position C. Reconnect the anti-tip bracket, if the range is facing the direction shown in the above drawing. 6. Gas supply line 2. NOTE: On models with hollow end facing out C. Turn the manual shutoff valve to Natural Gas) 1. NG" is moved. Locate gas pressure regulator at rear of...
... out D. Turn over gas pressure regulator cap. Using a Phillips or Quadrex® screwdriver, remove the burner base. The outer cone is very important. Natural Gas Conversion WARNING To Convert Gas Pressure Regulator (LP Gas to the closed " position C. Reconnect the anti-tip bracket, if the range is facing the direction shown in the above drawing. 6. Gas supply line 2. NOTE: On models with hollow end facing out C. Turn the manual shutoff valve to Natural Gas) 1. NG" is moved. Locate gas pressure regulator at rear of...
Installation Guide
Page 17
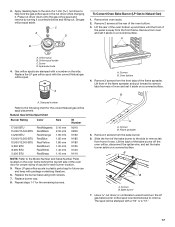
... the correct Natural gas orifice spud. Set gas orifice spud aside. Orifice spud holder C. Oven bottom 4. Lift front of the flame spreader and pull forward to the Model Number and Serial Number Plate located on the oven frame behind the top left side of the oven door for future use and keep with a number on a covered surface. Stamped number Refer to the following chart for the remaining burners. Replace burner cap. 8. Remove from the bake burner. 6. A B XXX A. Replace the LP gas orifice spud with a "56...
... the correct Natural gas orifice spud. Set gas orifice spud aside. Orifice spud holder C. Oven bottom 4. Lift front of the flame spreader and pull forward to the Model Number and Serial Number Plate located on the oven frame behind the top left side of the oven door for future use and keep with a number on a covered surface. Stamped number Refer to the following chart for the remaining burners. Replace burner cap. 8. Remove from the bake burner. 6. A B XXX A. Replace the LP gas orifice spud with a "56...
Installation Guide
Page 18
... "Storage Drawer" or "Warming Drawer" section. 8. Connect the igniter wire to the "Electronic Ignition System" section for proper cooktop, bake and broil burner flame is very important. Refer to the bake burner, position the back of the bake burner over the oven orifice, and slide the tab on the broil burner orifice hood and insert the broil burner ceramic igniter in the hole in the "Installation Instructions" section of the oven. 6. Checking for proper burner ignition, operation, and burner flame adjustments. A x.xx A. Install the Natural gas bake burner orifice spud, turning it...
... "Storage Drawer" or "Warming Drawer" section. 8. Connect the igniter wire to the "Electronic Ignition System" section for proper cooktop, bake and broil burner flame is very important. Refer to the bake burner, position the back of the bake burner over the oven orifice, and slide the tab on the broil burner orifice hood and insert the broil burner ceramic igniter in the hole in the "Installation Instructions" section of the oven. 6. Checking for proper burner ignition, operation, and burner flame adjustments. A x.xx A. Install the Natural gas bake burner orifice spud, turning it...


