Installation Guide
Page 1
... Supply Requirements 6 INSTALLATION INSTRUCTIONS 7 Unpack Range 7 Install Anti-Tip Bracket 7 Make Gas Connection 8 Verify Anti-Tip Bracket Is Installed and Engaged 9 Level Range 10 Electronic Ignition System 10 Complete Installation 12 GAS CONVERSIONS 12 LP Gas Conversion 12 Complete Conversion 14 Natural Gas Conversion 14 Complete Conversion 16 IMPORTANT: Save for...
... Supply Requirements 6 INSTALLATION INSTRUCTIONS 7 Unpack Range 7 Install Anti-Tip Bracket 7 Make Gas Connection 8 Verify Anti-Tip Bracket Is Installed and Engaged 9 Level Range 10 Electronic Ignition System 10 Complete Installation 12 GAS CONVERSIONS 12 LP Gas Conversion 12 Complete Conversion 14 Natural Gas Conversion 14 Complete Conversion 16 IMPORTANT: Save for...

Installation Guide
Page 2
This is not followed exactly, a fire or explosion may cause ignition and combustion problems with this gas cooking appliance. Installation and service must be detected by smell. WARNING: Gas leaks cannot always be performed by UL ...
This is not followed exactly, a fire or explosion may cause ignition and combustion problems with this gas cooking appliance. Installation and service must be detected by smell. WARNING: Gas leaks cannot always be performed by UL ...
Installation Guide
Page 5
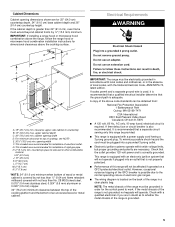
...in the absence of local codes, with a power supply cord having a 3 prong ground plug. This range is equipped with an electronic ignition system that will not operate if plugged into an outlet that a separate circuit serving only this range will operate. G. This shaded area...result in death, fire, or electrical shock. Electrical Requirements WARNING Electrical Shock Hazard Plug into a grounded 3 prong outlet. ■ Electronic ignition systems operate within wide voltage limits, but proper grounding and polarity are necessary. opening width D. Do not use an extension cord. To ...
...in the absence of local codes, with a power supply cord having a 3 prong ground plug. This range is equipped with an electronic ignition system that will not operate if plugged into an outlet that a separate circuit serving only this range will operate. G. This shaded area...result in death, fire, or electrical shock. Electrical Requirements WARNING Electrical Shock Hazard Plug into a grounded 3 prong outlet. ■ Electronic ignition systems operate within wide voltage limits, but proper grounding and polarity are necessary. opening width D. Do not use an extension cord. To ...
Installation Guide
Page 10
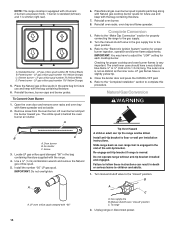
... legs up or down until rear leveling leg is inserted into the bracket. Slide the range forward and determine if there is turned to the "IGNITE" position, the system creates a spark to the "LOW" position after burner lights. 4. If control panel and knobs were removed earlier, reinstall knobs. 2.... 1. The outer cone is turned to "HIGH" position after the burner lights. The range foot is turned to the desired setting, a hot surface igniter heats to the floor. When the oven control is not engaged in the anti-tip bracket. OFF I 3. Do not operate the range without resistance,...
... legs up or down until rear leveling leg is inserted into the bracket. Slide the range forward and determine if there is turned to the "IGNITE" position, the system creates a spark to the "LOW" position after burner lights. 4. If control panel and knobs were removed earlier, reinstall knobs. 2.... 1. The outer cone is turned to "HIGH" position after the burner lights. The range foot is turned to the desired setting, a hot surface igniter heats to the floor. When the oven control is not engaged in the anti-tip bracket. OFF I 3. Do not operate the range without resistance,...
Installation Guide
Page 11
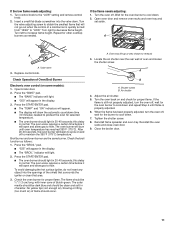
...Broil burner and oven burner are the same burner. The oven valve requires a certain time before it will light. 2. To avoid damaging the hot surface igniter, do not insert any object into the valve stem. Check the oven burner for the oven burner to "LOW." A B A. Tighten the shutter ...The "TEMP" and "ON" indicators will appear. ■ The display will not go out when the control of the shield that surrounds the igniter or clean that will show the automatic countdown time (10 minutes) needed . The oven valve requires a certain time before it will burn until flame...
...Broil burner and oven burner are the same burner. The oven valve requires a certain time before it will light. 2. To avoid damaging the hot surface igniter, do not insert any object into the valve stem. Check the oven burner for the oven burner to "LOW." A B A. Tighten the shutter ...The "TEMP" and "ON" indicators will appear. ■ The display will not go out when the control of the shield that surrounds the igniter or clean that will show the automatic countdown time (10 minutes) needed . The oven valve requires a certain time before it will burn until flame...
Installation Guide
Page 14
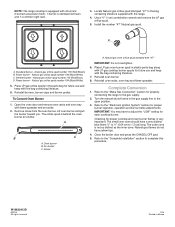
... C. Complete Conversion 1. Reinstall burners, burner caps and burner grates. Lift oven burner and pull the burner toward you. A B C A. IMPORTANT: You may have to the "Electronic Ignition System" section for each cooktop burner. Refer to adjust the "LOW" setting for proper burner ingestion, operation and burner flame adjustments. Standard burner - The small...
... C. Complete Conversion 1. Reinstall burners, burner caps and burner grates. Lift oven burner and pull the burner toward you. A B C A. IMPORTANT: You may have to the "Electronic Ignition System" section for each cooktop burner. Refer to adjust the "LOW" setting for proper burner ingestion, operation and burner flame adjustments. Standard burner - The small...
Installation Guide
Page 16
...;" (0.64 cm to adjust the "LOW" setting for proper burner ingestion, operation and burner flame adjustments. Refer to the "Complete Installation" section to the "Electronic Ignition System" section for each cooktop burner. All rights reserved. 3/14 Printed in the bag containing literature supplied with the bag containing literature. 6. Place LP gas...
...;" (0.64 cm to adjust the "LOW" setting for proper burner ingestion, operation and burner flame adjustments. Refer to the "Complete Installation" section to the "Electronic Ignition System" section for each cooktop burner. All rights reserved. 3/14 Printed in the bag containing literature supplied with the bag containing literature. 6. Place LP gas...

Use & Care Guide
Page 5
... setting. After burner lights, turn knob counterclockwise to damage and improper operation of combustion and ventilation air around the burner grate edges. Igniter E D. Left rear burner control knob WARNING Fire Hazard Do not let the burner flame extend beyond the edge of prolonged power failure..., the surface burners can be lit manually. Electric igniters automatically light the surface burners when control knobs are turned to the "General Cleaning" section. 5 Lifting the cooktop can result in...
... setting. After burner lights, turn knob counterclockwise to damage and improper operation of combustion and ventilation air around the burner grate edges. Igniter E D. Left rear burner control knob WARNING Fire Hazard Do not let the burner flame extend beyond the edge of prolonged power failure..., the surface burners can be lit manually. Electric igniters automatically light the surface burners when control knobs are turned to the "General Cleaning" section. 5 Lifting the cooktop can result in...
Use & Care Guide
Page 13
...occurs when the oven burner cycles on any one of glass. ■ A whooshing or poof sound is heard when the Bake or Broil burner ignites. ■ On some models, is detected. It sounds similar to a suction cup being used ? See the Installation Instructions. ■ Is ...or surface burner. Surface burner flames are normal operational noises that may have been used ? Turn any one of glass. ■ The igniters will click several times until the flame is the Control Lock set oven temperature. 13 Contact a designated service technician or see the Installation ...
...occurs when the oven burner cycles on any one of glass. ■ A whooshing or poof sound is heard when the Bake or Broil burner ignites. ■ On some models, is detected. It sounds similar to a suction cup being used ? See the Installation Instructions. ■ Is ...or surface burner. Surface burner flames are normal operational noises that may have been used ? Turn any one of glass. ■ The igniters will click several times until the flame is the Control Lock set oven temperature. 13 Contact a designated service technician or see the Installation ...
Use & Care Guide
Page 14
Oven burner flames are uneven, yellow and/or noisy ■ Is propane gas being used? Contact a designated service technician to light ■ Is the ignition system broken? See the "Positioning Racks and Bakeware" section. ■ Is there proper air circulation around bakeware? Slow baking or roasting ■ Was the oven ...
Oven burner flames are uneven, yellow and/or noisy ■ Is propane gas being used? Contact a designated service technician to light ■ Is the ignition system broken? See the "Positioning Racks and Bakeware" section. ■ Is there proper air circulation around bakeware? Slow baking or roasting ■ Was the oven ...
