Owners Manual
Page 10
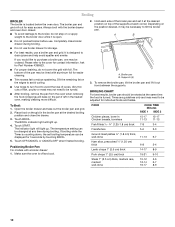
... broil with a broiler drawer: 1. Very thin cuts of the supports at each side of the broiler pan and set broiling temperature can be adjusted for Part Number 4396923. ■ For proper draining, do not step on the grid in Chicken breasts, boneless 15-17 11-13 15-17 11-13 Fish...
... broil with a broiler drawer: 1. Very thin cuts of the supports at each side of the broiler pan and set broiling temperature can be adjusted for Part Number 4396923. ■ For proper draining, do not step on the grid in Chicken breasts, boneless 15-17 11-13 15-17 11-13 Fish...
Owners Manual
Page 11
RANGE CARE General Cleaning IMPORTANT: Before cleaning, make sure knobs are cool. ...spills may remove numbers. ■ All-Purpose Appliance Cleaner Part Number 31682 (not included): See "Assistance or Service" section to order. ■ Gas Grate and Drip Pan Cleaner Part Number 31617: See "Assistance or Service" section to ...in dishwasher can damage the nonstick coating. EXTERIOR PORCELAIN ENAMEL SURFACES (on panel. ■ All-Purpose Appliance Cleaner Part Number 31682 (not included): See "Assistance or Service" section to accumulate under knobs. SURFACE BURNERS See "Surface...
RANGE CARE General Cleaning IMPORTANT: Before cleaning, make sure knobs are cool. ...spills may remove numbers. ■ All-Purpose Appliance Cleaner Part Number 31682 (not included): See "Assistance or Service" section to order. ■ Gas Grate and Drip Pan Cleaner Part Number 31617: See "Assistance or Service" section to ...in dishwasher can damage the nonstick coating. EXTERIOR PORCELAIN ENAMEL SURFACES (on panel. ■ All-Purpose Appliance Cleaner Part Number 31682 (not included): See "Assistance or Service" section to accumulate under knobs. SURFACE BURNERS See "Surface...
Owners Manual
Page 15
..., Ontario L5N 3A7 Please include a daytime phone number in your nearest Whirlpool designated service center. Accessories Stainless Steel Cleaner and Polish (stainless steel models) Order Part Number 31462 All-Purpose Appliance Cleaner Order Part Number 31682 Gas Grate and Drip Pan Cleaner Order Part Number 31617 15 If you the cost of appliances. ■ Use...
..., Ontario L5N 3A7 Please include a daytime phone number in your nearest Whirlpool designated service center. Accessories Stainless Steel Cleaner and Polish (stainless steel models) Order Part Number 31462 All-Purpose Appliance Cleaner Order Part Number 31682 Gas Grate and Drip Pan Cleaner Order Part Number 31617 15 If you the cost of appliances. ■ Use...
Owners Manual
Page 16
... in an inaccessible location or is operated and maintained according to instructions attached to or furnished with the product, Whirlpool Corporation or Whirlpool Canada LP (hereafter "Whirlpool") will need service, first see the "Troubleshooting" section of the Use & Care Guide. In Canada, call...provide proof of purchase or installation date for future reference. Outside the 50 United States and Canada, this limited warranty. Consumable parts are excluded from accident, alteration, misuse, abuse, fire, flood, acts of God, improper installation, installation not in accordance with...
... in an inaccessible location or is operated and maintained according to instructions attached to or furnished with the product, Whirlpool Corporation or Whirlpool Canada LP (hereafter "Whirlpool") will need service, first see the "Troubleshooting" section of the Use & Care Guide. In Canada, call...provide proof of purchase or installation date for future reference. Outside the 50 United States and Canada, this limited warranty. Consumable parts are excluded from accident, alteration, misuse, abuse, fire, flood, acts of God, improper installation, installation not in accordance with...
Installation Instructions
Page 3
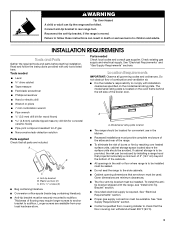
... the risk of the cabinets. ■ All openings in death or serious burns to subfloor. Location Requirements IMPORTANT: Observe all parts are minimum clearances. ■ The floor anti-tip bracket must be avoided. The model/serial rating plate is to be provided... left side of flooring may require longer screws to anchor bracket to children and adults. See "Gas Supply Requirements" section. ■ Contact a qualified floor covering installer to rear range foot. Check existing gas supply and electrical supply. WARNING Tip Over Hazard A child or adult can tip the...
... the risk of the cabinets. ■ All openings in death or serious burns to subfloor. Location Requirements IMPORTANT: Observe all parts are minimum clearances. ■ The floor anti-tip bracket must be avoided. The model/serial rating plate is to be provided... left side of flooring may require longer screws to anchor bracket to children and adults. See "Gas Supply Requirements" section. ■ Contact a qualified floor covering installer to rear range foot. Check existing gas supply and electrical supply. WARNING Tip Over Hazard A child or adult can tip the...
Installation Instructions
Page 4
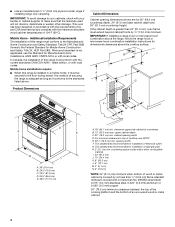
...Home Construction and Safety Standard, Title 24 CFR, Part 3280 (formerly the Federal Standard for dimensional clearances above . IMPORTANT: If installing a range hood or microwave hood combination above the range, follow the range hood or microwave hood combination installation instructions for Mobile...and CSA International and complies with the current standards CAN/CSA-A240 - This shaded area recommended for installation of rigid gas pipe. Mobile home installations require: ■ When this range is greater than No. 28 MSG sheet steel, 0.015" (0.4 mm) stainless steel, 0.024" (0.6 mm)...
...Home Construction and Safety Standard, Title 24 CFR, Part 3280 (formerly the Federal Standard for dimensional clearances above . IMPORTANT: If installing a range hood or microwave hood combination above the range, follow the range hood or microwave hood combination installation instructions for Mobile...and CSA International and complies with the current standards CAN/CSA-A240 - This shaded area recommended for installation of rigid gas pipe. Mobile home installations require: ■ When this range is greater than No. 28 MSG sheet steel, 0.015" (0.4 mm) stainless steel, 0.024" (0.6 mm)...
Installation Instructions
Page 7
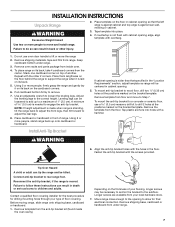
...cavity). Pull cardboard bottom firmly to rear range foot. Adjust the leveling legs to loosen the leveling legs. Reconnect the anti-tip bracket, if the range is laid on its back on its...(0.32 cm) holes at the positions marked on the thickness of 0.5 cm) is standing, tilt the range back to adjust the front legs, then tilt forward to drill 2 holes at the..., adjust template so range will be necessary to anchor the bracket to the subfloor. Before moving range, slide range onto shipping base, cardboard or hardboard. 1. Remove oven racks and parts package from the anti...
...cavity). Pull cardboard bottom firmly to rear range foot. Adjust the leveling legs to loosen the leveling legs. Reconnect the anti-tip bracket, if the range is laid on its back on its...(0.32 cm) holes at the positions marked on the thickness of 0.5 cm) is standing, tilt the range back to adjust the front legs, then tilt forward to drill 2 holes at the..., adjust template so range will be necessary to anchor the bracket to the subfloor. Before moving range, slide range onto shipping base, cardboard or hardboard. 1. Remove oven racks and parts package from the anti...
Installation Instructions
Page 9
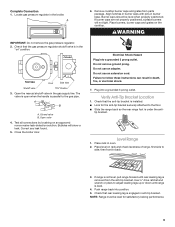
...Correct any leak found. 5. Do not use an adapter. Level Range 1. If range is not level, pull range forward until range is level. 4. Check that rear leveling leg is removed from parts package. WARNING IMPORTANT: Do not remove the gas pressure regulator. 2. Front View Front Side View Shutoff valve "ON.... Bubbles will not light. Failure to the floor. ■ Slide the range back so the rear range foot is in the broiler. tip bracket. A B A. Plug into a grounded 3 prong outlet. Locate gas pressure regulator in the "on the cooktop. Remove cooktop burner caps and grates...
...Correct any leak found. 5. Do not use an adapter. Level Range 1. If range is not level, pull range forward until range is level. 4. Check that rear leveling leg is removed from parts package. WARNING IMPORTANT: Do not remove the gas pressure regulator. 2. Front View Front Side View Shutoff valve "ON.... Bubbles will not light. Failure to the floor. ■ Slide the range back so the rear range foot is in the broiler. tip bracket. A B A. Plug into a grounded 3 prong outlet. Locate gas pressure regulator in the "on the cooktop. Remove cooktop burner caps and grates...

Installation Instructions
Page 11
...down and repeat step 4 until flame is an extra part, go back through the steps to see the "Range Care" section of /recycle all packaging materials. 4. Close the broiler door. Check that the gas supply line shutoff valve is open. ■ If the gas supply line shutoff valve is closed, open , press the... properly adjusted. 6. Dispose of the Use and Care Guide. 6. Dry thoroughly with a soft cloth. If the range is open it, then repeat the 5-minute test as outlined above. ■ If the gas supply line shutoff valve is cold, turn off , wait for the oven burner to remove) B. Wait for the...
...down and repeat step 4 until flame is an extra part, go back through the steps to see the "Range Care" section of /recycle all packaging materials. 4. Close the broiler door. Check that the gas supply line shutoff valve is open. ■ If the gas supply line shutoff valve is closed, open , press the... properly adjusted. 6. Dispose of the Use and Care Guide. 6. Dry thoroughly with a soft cloth. If the range is open it, then repeat the 5-minute test as outlined above. ■ If the gas supply line shutoff valve is cold, turn off , wait for the oven burner to remove) B. Wait for the...

Installation Instructions
Page 13
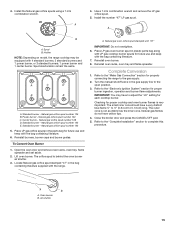
... spuds in plastic parts bag along with Natural gas cooktop burner spuds for future use and keep with the bag containing literature. 7. Lift oven burner. Remove Natural gas orifice spuds using a 7 mm combination wrench. Install the number "56" LP gas spud. Holder NOTE: Depending on model, the range cooktop may have a slightly yellow tip. 4. Spud...
... spuds in plastic parts bag along with Natural gas cooktop burner spuds for future use and keep with the bag containing literature. 7. Lift oven burner. Remove Natural gas orifice spuds using a 7 mm combination wrench. Install the number "56" LP gas spud. Holder NOTE: Depending on model, the range cooktop may have a slightly yellow tip. 4. Spud...
Installation Instructions
Page 15
... door and press the CANCEL/OFF pad. 5. Air shutter 15 Place LP gas orifice spuds in plastic parts bag along with LP gas cooktop burner spuds for future use and keep with the range. Reinstall oven racks, oven tray and flame spreader. Turn the manual shutoff valve...;" (0.64 cm to the "Electronic Ignition System" section for properly connecting the range to complete this procedure. Use a 7 mm combination wrench and remove the LP gas orifice spud. 5. Holder NOTE: Depending on model, the range cooktop may have to the open position. 3. Power burner - The small inner...
... door and press the CANCEL/OFF pad. 5. Air shutter 15 Place LP gas orifice spuds in plastic parts bag along with LP gas cooktop burner spuds for future use and keep with the range. Reinstall oven racks, oven tray and flame spreader. Turn the manual shutoff valve...;" (0.64 cm to the "Electronic Ignition System" section for properly connecting the range to complete this procedure. Use a 7 mm combination wrench and remove the LP gas orifice spud. 5. Holder NOTE: Depending on model, the range cooktop may have to the open position. 3. Power burner - The small inner...

Warranty
Page 1
...date of purchase. 6. You must be borne by a Whirlpool designated service company. Outside the 50 United States and Canada, this limited warranty does not apply. Service calls to refrigerator or freezer product failures. 7. Repairs to parts or systems resulting from warranty coverage. 3. Major appliances ... repair house fuses, or to correct house wiring or plumbing. 2. The cost of repair or replacement under this limited warranty. WHIRLPOOL SHALL NOT BE LIABLE FOR INCIDENTAL OR CONSEQUENTIAL DAMAGES. You will pay for future reference. Expenses for travel and transportation for in...
...date of purchase. 6. You must be borne by a Whirlpool designated service company. Outside the 50 United States and Canada, this limited warranty does not apply. Service calls to refrigerator or freezer product failures. 7. Repairs to parts or systems resulting from warranty coverage. 3. Major appliances ... repair house fuses, or to correct house wiring or plumbing. 2. The cost of repair or replacement under this limited warranty. WHIRLPOOL SHALL NOT BE LIABLE FOR INCIDENTAL OR CONSEQUENTIAL DAMAGES. You will pay for future reference. Expenses for travel and transportation for in...


