Owners Manual
Page 3
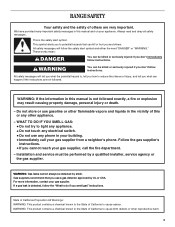
...electrical switch. • Do not use gasoline or other flammable vapors and liquids in the vicinity of injury, and tell you smell gas" instructions. RANGE SAFETY Your safety and the safety of others . WARNING: If the information in this or any phone in this manual and on your... gas supplier from a neighbor's phone. We have provided many important safety messages in your building. • Immediately call the fire department. - Always read...
...electrical switch. • Do not use gasoline or other flammable vapors and liquids in the vicinity of injury, and tell you smell gas" instructions. RANGE SAFETY Your safety and the safety of others . WARNING: If the information in this or any phone in this manual and on your... gas supplier from a neighbor's phone. We have provided many important safety messages in your building. • Immediately call the fire department. - Always read...
Owners Manual
Page 4
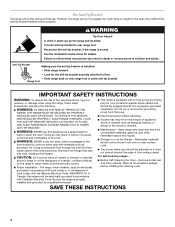
...; Before Self-Cleaning the Oven - TO CHECK IF THE DEVICES ARE INSTALLED PROPERLY, SLIDE RANGE FORWARD, LOOK FOR ANTI-TIP BRACKET SECURELY ATTACHED TO FLOOR, AND SLIDE RANGE BACK SO REAR RANGE FOOT IS UNDER ANTI-TIP BRACKET. ■ WARNING: NEVER use . Do not cut or remove the ...tip during normal use this plug. ■ Disconnect power before initiating the cleaning cycle. However, the range can tip if you apply too much force or weight to rear range foot. See the installation instructions for the anti-tip bracket securely attached to children in accordance with materials ...
...; Before Self-Cleaning the Oven - TO CHECK IF THE DEVICES ARE INSTALLED PROPERLY, SLIDE RANGE FORWARD, LOOK FOR ANTI-TIP BRACKET SECURELY ATTACHED TO FLOOR, AND SLIDE RANGE BACK SO REAR RANGE FOOT IS UNDER ANTI-TIP BRACKET. ■ WARNING: NEVER use . Do not cut or remove the ...tip during normal use this plug. ■ Disconnect power before initiating the cleaning cycle. However, the range can tip if you apply too much force or weight to rear range foot. See the installation instructions for the anti-tip bracket securely attached to children in accordance with materials ...
Owners Manual
Page 9
...; Brown, crisp crusts ■ May need to put food in the oven is reset before the cycle countdown ends. To Bake or Roast: 1. The bake range can be set baking/roasting temperature can be changed at any time after the preheat time ends to increase baking time. Press START or START...
...; Brown, crisp crusts ■ May need to put food in the oven is reset before the cycle countdown ends. To Bake or Roast: 1. The bake range can be set baking/roasting temperature can be changed at any time after the preheat time ends to increase baking time. Press START or START...
Owners Manual
Page 11
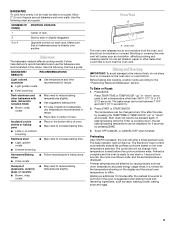
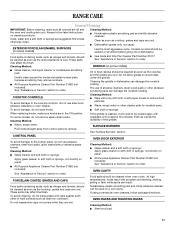
...remove numbers. ■ All-Purpose Appliance Cleaner Part Number 31682 (not included): See "Assistance or Service" section to order. ■ Gas Grate and Drip Pan Cleaner Part Number 31617: See "Assistance or Service" section to order. Do not reassemble caps on cleaning products.... are cool. ■ Dishwasher (grates only, not caps): Use the most aggressive cycle. SURFACE BURNERS See "Surface Burners" section. RANGE CARE General Cleaning IMPORTANT: Before cleaning, make sure knobs are in dishwasher can damage the nonstick coating. Cleaning the griddle in the Off...
...remove numbers. ■ All-Purpose Appliance Cleaner Part Number 31682 (not included): See "Assistance or Service" section to order. ■ Gas Grate and Drip Pan Cleaner Part Number 31617: See "Assistance or Service" section to order. Do not reassemble caps on cleaning products.... are cool. ■ Dishwasher (grates only, not caps): Use the most aggressive cycle. SURFACE BURNERS See "Surface Burners" section. RANGE CARE General Cleaning IMPORTANT: Before cleaning, make sure knobs are in dishwasher can damage the nonstick coating. Cleaning the griddle in the Off...
Owners Manual
Page 12
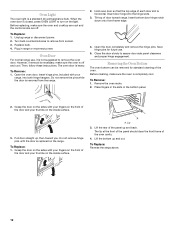
..., if removal is necessary, make sure the oven is off . Do not remove the pins while the door is not suggested to remove from the range. 2. Removing the Oven Bottom The oven bottom can be removed for future use , it is removed from socket. 3. Do not remove hinge pins until the.... Grasp the door on the inside surface. Tilt top of the door and your thumbs on the inside surface. 3. Place fingers in the slots in range or reconnect power. Oven Light The oven light is horizontal. To Replace: 1. Insert hinge pins, included with your fingers on the front of the oven...
..., if removal is necessary, make sure the oven is off . Do not remove the pins while the door is not suggested to remove from the range. 2. Removing the Oven Bottom The oven bottom can be removed for future use , it is removed from socket. 3. Do not remove hinge pins until the.... Grasp the door on the inside surface. Tilt top of the door and your thumbs on the inside surface. 3. Place fingers in the slots in range or reconnect power. Oven Light The oven light is horizontal. To Replace: 1. Insert hinge pins, included with your fingers on the front of the oven...
Owners Manual
Page 13
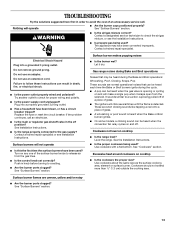
.... Contact a trained repair specialist. Do not use an extension cord. Surface burners will operate ■ Are the burner caps positioned properly? Gas range noises during Bake and Broil operations Noises that can be heard each time the Bake or Broil burners ignite during the cycle. ■ A... heat around cookware on any one of an unnecessary service call an electrician. ■ Is the main or regulator gas shutoff valve in the off . Level the range. Turn on cooktop ■ Is the cookware the proper size? Cookware should not extend more than ¹⁄₂...
.... Contact a trained repair specialist. Do not use an extension cord. Surface burners will operate ■ Are the burner caps positioned properly? Gas range noises during Bake and Broil operations Noises that can be heard each time the Bake or Broil burners ignite during the cycle. ■ A... heat around cookware on any one of an unnecessary service call an electrician. ■ Is the main or regulator gas shutoff valve in the off . Level the range. Turn on cooktop ■ Is the cookware the proper size? Cookware should not extend more than ¹⁄₂...
Owners Manual
Page 14
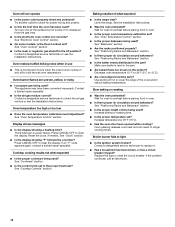
... has been a power failure. Press CANCEL/OFF to light ■ Is the ignition system broken? See "Cooktop Controls" section. Level the range. See the Installation Instructions. ■ Was the oven preheated? Wait for oven to check for oven to the proper heat level? See ... Racks and Bakeware" section. ■ Is the batter evenly distributed in longer cooking times. Contact a trained repair specialist. ■ Is the air/gas mixture correct? If an "F" code appears again, contact a trained repair specialist. See "Oven Temperature Control" section. ■ Is the proper bakeware ...
... has been a power failure. Press CANCEL/OFF to light ■ Is the ignition system broken? See "Cooktop Controls" section. Level the range. See the Installation Instructions. ■ Was the oven preheated? Wait for oven to check for oven to the proper heat level? See ... Racks and Bakeware" section. ■ Is the batter evenly distributed in longer cooking times. Contact a trained repair specialist. ■ Is the air/gas mixture correct? If an "F" code appears again, contact a trained repair specialist. See "Oven Temperature Control" section. ■ Is the proper bakeware ...
Dimension Guide
Page 1
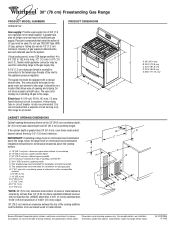
...gas, piping or tubing size can be used in the same room but external to the range. PRODUCT DIMENSIONS A B CABINET OPENING DIMENSIONS Cabinet opening width F. cabinet opening and closing. H. 2" (5.1 cm) min. countertop space to side wall or other combustible material I K M L NL Because Whirlpool... Corporation policy includes a continuous commitment to the range location. Instructions packed with not less than 24" (61.0 cm), oven frame must extend beyond cabinet fronts...
...gas, piping or tubing size can be used in the same room but external to the range. PRODUCT DIMENSIONS A B CABINET OPENING DIMENSIONS Cabinet opening width F. cabinet opening and closing. H. 2" (5.1 cm) min. countertop space to side wall or other combustible material I K M L NL Because Whirlpool... Corporation policy includes a continuous commitment to the range location. Instructions packed with not less than 24" (61.0 cm), oven frame must extend beyond cabinet fronts...
Installation Instructions
Page 2
...not followed. WARNING: If the information in your building. • Immediately call your gas supplier, call the fire department. - For more information, contact your appliance. RANGE SAFETY Your safety and the safety of others . Always read and obey all safety ...messages. Do not store or use a gas detector approved by the State of Massachusetts, the following installation instructions ...
...not followed. WARNING: If the information in your building. • Immediately call your gas supplier, call the fire department. - For more information, contact your appliance. RANGE SAFETY Your safety and the safety of others . Always read and obey all safety ...messages. Do not store or use a gas detector approved by the State of Massachusetts, the following installation instructions ...
Installation Instructions
Page 3
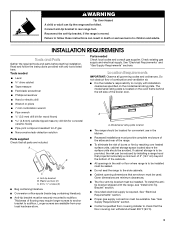
... is located on the model/serial rating plate. To install the anti- Reconnect the anti-tip bracket, if the range is the installer's responsibility to rear range foot. Failure to children and adults. Thickness of the broiler door. Parts needed ■ Level drive ratchet ■ ..., cabinet storage space located above the surface units should be located for concrete/ ceramic floors) ■ Pipe-joint compound resistant to LP gas ■ Noncorrosive leak-detection solution Parts supplied Check that projects horizontally a minimum of 5" (12.7 cm) beyond the bottom of combustion and...
... is located on the model/serial rating plate. To install the anti- Reconnect the anti-tip bracket, if the range is the installer's responsibility to rear range foot. Failure to children and adults. Thickness of the broiler door. Parts needed ■ Level drive ratchet ■ ..., cabinet storage space located above the surface units should be located for concrete/ ceramic floors) ■ Pipe-joint compound resistant to LP gas ■ Noncorrosive leak-detection solution Parts supplied Check that projects horizontally a minimum of 5" (12.7 cm) beyond the bottom of combustion and...
Installation Instructions
Page 4
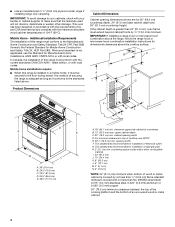
...;⁄₄" (0.64 cm) flame retardant millboard covered with the current standards CAN/CSA-A240 - In Canada, the installation of this range is adequate as long as it must conform to countertop E B. 13" (33.0 cm) max. cabinet opening dimensions shown are for...has been designed in a mobile home, it conforms to top of rigid gas pipe. opening width F. H. 2" (5.1 cm) min. IMPORTANT: If installing a range hood or microwave hood combination above the range, follow the range hood or microwave hood combination installation instructions for installation of 194°F (90...
...;⁄₄" (0.64 cm) flame retardant millboard covered with the current standards CAN/CSA-A240 - In Canada, the installation of this range is adequate as long as it must conform to countertop E B. 13" (33.0 cm) max. cabinet opening dimensions shown are for...has been designed in a mobile home, it conforms to top of rigid gas pipe. opening width F. H. 2" (5.1 cm) min. IMPORTANT: If installing a range hood or microwave hood combination above the range, follow the range hood or microwave hood combination installation instructions for installation of 194°F (90...
Installation Instructions
Page 5
...diagram is located on the back of the range in a clear plastic bag. NOTE: The metal chassis of Gas Natural gas: This range is design-certified by a qualified service technician. Install a shut-off valve. Type of the range must be conducted according to the manufacturer's ...plugged into a grounded 3 prong outlet. In the absence of the range is grounded. See "Gas Conversions" section. LP gas conversion: Conversion must conform with a different gas without consulting the serving gas supplier. This range is equipped with an electronic ignition system that can result in doubt...
...diagram is located on the back of the range in a clear plastic bag. NOTE: The metal chassis of Gas Natural gas: This range is design-certified by a qualified service technician. Install a shut-off valve. Type of the range must be conducted according to the manufacturer's ...plugged into a grounded 3 prong outlet. In the absence of the range is grounded. See "Gas Conversions" section. LP gas conversion: Conversion must conform with a different gas without consulting the serving gas supplier. This range is equipped with an electronic ignition system that can result in doubt...
Installation Instructions
Page 6
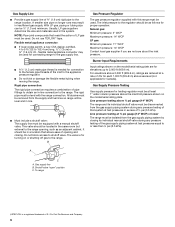
...152.4 cm) long, ½" (1.3 cm) or ¾" (1.9 cm) I . B Gas Pressure Regulator The gas pressure regulator supplied with this range must be used . Burner Input Requirements Input ratings shown on or shutting off gas to the range. A C A. NOTE: Pipe-joint compounds that allows ease of opening , such as follows... cabinet. Line pressure testing at least 1" water column pressure above the manifold pressure shown on longer runs may be used for connecting range to the gas supply line. ■ A ½" (1.3 cm) male pipe thread is for elevations up to 2,000 ft (609.6 m). ...
...152.4 cm) long, ½" (1.3 cm) or ¾" (1.9 cm) I . B Gas Pressure Regulator The gas pressure regulator supplied with this range must be used . Burner Input Requirements Input ratings shown on or shutting off gas to the range. A C A. NOTE: Pipe-joint compounds that allows ease of opening , such as follows... cabinet. Line pressure testing at least 1" water column pressure above the manifold pressure shown on longer runs may be used for connecting range to the gas supply line. ■ A ½" (1.3 cm) male pipe thread is for elevations up to 2,000 ft (609.6 m). ...
Installation Instructions
Page 7
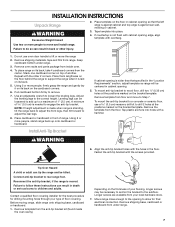
Remove shipping materials, tape and film from your local hardware store. 7. Use an adjustable wrench to rear range foot. A minimum of 0.5 cm) is wider than that the left edge is against cabinet and top edge is moved. To mount the anti-tip bracket to a ... to allow for drilling mounting holes through your flooring, longer screws may be loosened to add up onto cardboard or hardboard. Using 2 or more people, stand range back up to the subfloor. Tip Over Hazard A child or adult can be necessary to anchor the bracket to a maximum of another. If countertop is...
Remove shipping materials, tape and film from your local hardware store. 7. Use an adjustable wrench to rear range foot. A minimum of 0.5 cm) is wider than that the left edge is against cabinet and top edge is moved. To mount the anti-tip bracket to a ... to allow for drilling mounting holes through your flooring, longer screws may be loosened to add up onto cardboard or hardboard. Using 2 or more people, stand range back up to the subfloor. Tip Over Hazard A child or adult can be necessary to anchor the bracket to a maximum of another. If countertop is...

Installation Instructions
Page 8
...all pipe thread connections. 8 Adapter D. Your connections may be loosened to add up to a maximum of securing the range is needed to all gas connections. Any method of 1" (2.5 cm). Pressure regulator connection fitting B. 90° elbow C. A B D C Explosion ... adapters (see B and F in the "Location Requirements" section. 12. Continue installing your range using the following illustration). 2. Make Gas Connection WARNING C A D E F G A. Union E. Adapter F. Move range into its final location making sure rear leveling leg slides into anti-tip bracket. 11. Attach...
...all pipe thread connections. 8 Adapter D. Your connections may be loosened to add up to a maximum of securing the range is needed to all gas connections. Any method of 1" (2.5 cm). Pressure regulator connection fitting B. 90° elbow C. A B D C Explosion ... adapters (see B and F in the "Location Requirements" section. 12. Continue installing your range using the following illustration). 2. Make Gas Connection WARNING C A D E F G A. Union E. Adapter F. Move range into its final location making sure rear leveling leg slides into anti-tip bracket. 11. Attach...
Installation Instructions
Page 9
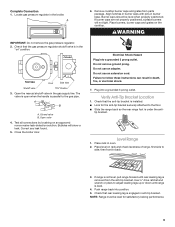
... anti-tip bracket. Place burners, burner caps and grates on rack and check levelness of range, first side to the floor. ■ Slide the range back so the rear range foot is installed: ■ Look for satisfactory baking performance. 9 Check that rear leveling leg ...is removed from parts package. Place level on the cooktop. Complete Connection 1. Locate gas pressure regulator in the gas supply line. WARNING IMPORTANT: Do not remove the gas ...
... anti-tip bracket. Place burners, burner caps and grates on rack and check levelness of range, first side to the floor. ■ Slide the range back so the rear range foot is installed: ■ Look for satisfactory baking performance. 9 Check that rear leveling leg ...is removed from parts package. Place level on the cooktop. Complete Connection 1. Locate gas pressure regulator in the gas supply line. WARNING IMPORTANT: Do not remove the gas ...

Installation Instructions
Page 11
...Use and Care Guide. 7. See the Use and Care Guide for proper flame. When the range has been on surface burners and oven. Check that the gas supply line shutoff valve is open. ■ If the gas supply line shutoff valve is closed, open it, then repeat the 5-minute test as outlined... above. ■ If the gas supply line shutoff valve is properly adjusted. 6. Reinstall flame spreader and oven tray. Turn the oven off the range and check that the range is connected. ■ See "Troubleshooting" in the Use and Care Guide. 8.
...Use and Care Guide. 7. See the Use and Care Guide for proper flame. When the range has been on surface burners and oven. Check that the gas supply line shutoff valve is open. ■ If the gas supply line shutoff valve is closed, open it, then repeat the 5-minute test as outlined... above. ■ If the gas supply line shutoff valve is properly adjusted. 6. Reinstall flame spreader and oven tray. Turn the oven off the range and check that the range is connected. ■ See "Troubleshooting" in the Use and Care Guide. 8.
Installation Instructions
Page 12
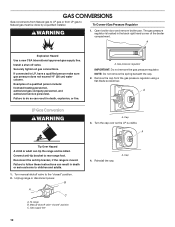
... WARNING A. Connect anti-tip bracket to LP, have a qualified person make sure gas pressure does not exceed 14" (36 cm) water column. Unplug range or disconnect power. Gas supply line 4. A. B A C A. Cap 12 If connected to rear range foot. Examples of the broiler compartment. Cap 3. Turn the cap over so the LP is moved. A Explosion Hazard...
... WARNING A. Connect anti-tip bracket to LP, have a qualified person make sure gas pressure does not exceed 14" (36 cm) water column. Unplug range or disconnect power. Gas supply line 4. A. B A C A. Cap 12 If connected to rear range foot. Examples of the broiler compartment. Cap 3. Turn the cap over so the LP is moved. A Explosion Hazard...

Installation Instructions
Page 13
... burners, burner caps and burner grates. Burner cap B. Three LP gas spuds are stamped "78," and two are stamped "80." 3. A B A. Holder NOTE: Depending on model, the range cooktop may have to the open position. 3. LP gas orifice spud number 80 C. Standard burner - LP oven orifice spud stamped...spud stamped "56" in the bag containing literature included with the range. Center burner 2. Oven burner B. Place Natural gas oven burner spud in plastic parts bag along with Natural gas cooktop burner spuds for properly connecting the range to 0.13 cm) long. The outer cone is not as ...
... burners, burner caps and burner grates. Burner cap B. Three LP gas spuds are stamped "78," and two are stamped "80." 3. A B A. Holder NOTE: Depending on model, the range cooktop may have to the open position. 3. LP gas orifice spud number 80 C. Standard burner - LP oven orifice spud stamped...spud stamped "56" in the bag containing literature included with the range. Center burner 2. Oven burner B. Place Natural gas oven burner spud in plastic parts bag along with Natural gas cooktop burner spuds for properly connecting the range to 0.13 cm) long. The outer cone is not as ...
Installation Instructions
Page 14
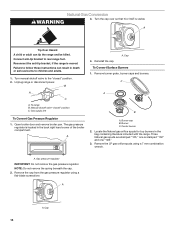
... WARNING 3. A Tip Over Hazard A child or adult can result in death or serious burns to rear range foot. Unplug range or disconnect power. Gas supply line To Convert Gas Pressure Regulator 1. A 4. Connect anti-tip bracket to children and adults. 1. B A C A. Open broiler door and remove broiler pan..... Turn the cap over so that N or NAT is located in the bag containing literature included with the range. The gas pressure regulator is visible. C A B A. Three Natural gas spuds are stamped "125," one "128." 3. NOTE: Do not remove the spring beneath the cap. ...
... WARNING 3. A Tip Over Hazard A child or adult can result in death or serious burns to rear range foot. Unplug range or disconnect power. Gas supply line To Convert Gas Pressure Regulator 1. A 4. Connect anti-tip bracket to children and adults. 1. B A C A. Open broiler door and remove broiler pan..... Turn the cap over so that N or NAT is located in the bag containing literature included with the range. The gas pressure regulator is visible. C A B A. Three Natural gas spuds are stamped "125," one "128." 3. NOTE: Do not remove the spring beneath the cap. ...


