Owners Manual
Page 3
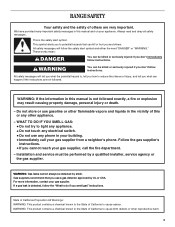
... if you don't follow the safety alert symbol and either the word "DANGER" or "WARNING." If a gas leak is , tell you how to cause birth defects or other reproductive harm. 3 RANGE SAFETY Your safety and the safety of others . WARNING: If the information in your building. • Immediately...of California to light any appliance. • Do not touch any other flammable vapors and liquids in this manual and on your gas supplier, call your gas supplier. WHAT TO DO IF YOU SMELL GAS: • Do not try to cause cancer. This is not followed exactly, a fire or explosion may...
... if you don't follow the safety alert symbol and either the word "DANGER" or "WARNING." If a gas leak is , tell you how to cause birth defects or other reproductive harm. 3 RANGE SAFETY Your safety and the safety of others . WARNING: If the information in your building. • Immediately...of California to light any appliance. • Do not touch any other flammable vapors and liquids in this manual and on your gas supplier, call your gas supplier. WHAT TO DO IF YOU SMELL GAS: • Do not try to cause cancer. This is not followed exactly, a fire or explosion may...
Owners Manual
Page 5
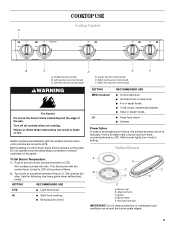
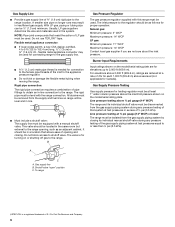
... Only the burner with the control knob turned to LITE. HI ■ Start food cooking. ■ Bring liquid to follow these instructions can be lit manually. Igniter D. Surface burner locator B. Left front burner control knob D. Turn off all controls when not cooking. To Set Burner Temperature: 1. SETTING RECOMMENDED USE... In case of the pan. Hold a lit match near a burner and turn knob counterclockwise to anywhere between HI and LO. Alignment pins C. Gas tube opening IMPORTANT: Do not obstruct the flow of combustion and ventilation air around the burner grate edges. 5
... Only the burner with the control knob turned to LITE. HI ■ Start food cooking. ■ Bring liquid to follow these instructions can be lit manually. Igniter D. Surface burner locator B. Left front burner control knob D. Turn off all controls when not cooking. To Set Burner Temperature: 1. SETTING RECOMMENDED USE... In case of the pan. Hold a lit match near a burner and turn knob counterclockwise to anywhere between HI and LO. Alignment pins C. Gas tube opening IMPORTANT: Do not obstruct the flow of combustion and ventilation air around the burner grate edges. 5
Dimension Guide
Page 1
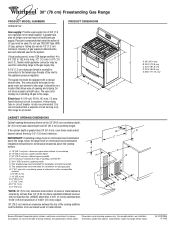
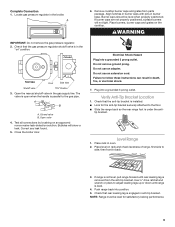
...gas supply. Instructions packed with not less than 24" (61.0 cm), oven frame must extend beyond cabinet fronts by 1/2" (13.0 mm) minimum. The supply line must be equipped with a manual...range. ® 30" (76 cm) Freestanding Gas Range PRODUCT MODEL NUMBERS WFG231LV Gas supply: Provide a gas supply line of 3/4" (1.9 cm) rigid pipe to the range. A smaller size pipe on or shutting off gas...to side wall or other combustible material I K M L NL Because Whirlpool Corporation policy includes a continuous commitment to change materials and specifications without ...
...gas supply. Instructions packed with not less than 24" (61.0 cm), oven frame must extend beyond cabinet fronts by 1/2" (13.0 mm) minimum. The supply line must be equipped with a manual...range. ® 30" (76 cm) Freestanding Gas Range PRODUCT MODEL NUMBERS WFG231LV Gas supply: Provide a gas supply line of 3/4" (1.9 cm) rigid pipe to the range. A smaller size pipe on or shutting off gas...to side wall or other combustible material I K M L NL Because Whirlpool Corporation policy includes a continuous commitment to change materials and specifications without ...
Installation Instructions
Page 2
... not touch any other flammable vapors and liquids in this manual and on your gas supplier from a neighbor's phone. We have provided many important safety messages in the vicinity of this manual is the safety alert symbol. RANGE SAFETY Your safety and the safety of others . WARNING ...You can kill or hurt you cannot reach your gas supplier. All safety messages will follow the "What to ...
... not touch any other flammable vapors and liquids in this manual and on your gas supplier from a neighbor's phone. We have provided many important safety messages in the vicinity of this manual is the safety alert symbol. RANGE SAFETY Your safety and the safety of others . WARNING ...You can kill or hurt you cannot reach your gas supplier. All safety messages will follow the "What to ...
Installation Instructions
Page 6
...) male pipe thread is needed for Canada). Do not block access to the range location. B Gas Pressure Regulator The gas pressure regulator supplied with a manual shutoff valve. Gas Supply Pressure Testing Gas supply pressure for proper operation: Natural gas: Minimum pressure: 5" WCP Maximum pressure: 14" WCP LP gas: Minimum pressure: 11" WCP Maximum pressure: 14" WCP Contact local...
...) male pipe thread is needed for Canada). Do not block access to the range location. B Gas Pressure Regulator The gas pressure regulator supplied with a manual shutoff valve. Gas Supply Pressure Testing Gas supply pressure for proper operation: Natural gas: Minimum pressure: 5" WCP Maximum pressure: 14" WCP LP gas: Minimum pressure: 11" WCP Maximum pressure: 14" WCP Contact local...

Installation Instructions
Page 8
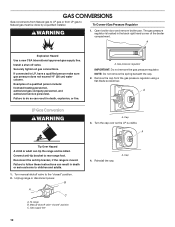
... the floor. Use pipe-joint compound G. Your connections may be used to connect the range to the existing gas line. Use a ³⁄₈" drive ratchet to the adapters. Rear leveling leg A. Nipple F. Manual shutoff valve G. ½" or ¾" gas pipe Typical flexible connection 1. Flexible connector E F G H E. B 2. Front leveling leg 9. A minimum of the flexible connector...
... the floor. Use pipe-joint compound G. Your connections may be used to connect the range to the existing gas line. Use a ³⁄₈" drive ratchet to the adapters. Rear leveling leg A. Nipple F. Manual shutoff valve G. ½" or ¾" gas pipe Typical flexible connection 1. Flexible connector E F G H E. B 2. Front leveling leg 9. A minimum of the flexible connector...
Installation Instructions
Page 9
... not use an extension cord. If range is not level, pull range forward until range is removed from parts package. NOTE: Range must be level when properly positioned. Locate gas pressure regulator in the gas supply line. A 6. Open the manual shutoff valve in the broiler. Verify ... prong. Place level on " position. WARNING IMPORTANT: Do not remove the gas pressure regulator. 2. Correct any leak found. 5. tip bracket. then front to the floor. ■ Slide the range back so the rear range foot is engaged in death, fire, or electrical shock. 7. Electrical Shock Hazard...
... not use an extension cord. If range is not level, pull range forward until range is removed from parts package. NOTE: Range must be level when properly positioned. Locate gas pressure regulator in the gas supply line. A 6. Open the manual shutoff valve in the broiler. Verify ... prong. Place level on " position. WARNING IMPORTANT: Do not remove the gas pressure regulator. 2. Correct any leak found. 5. tip bracket. then front to the floor. ■ Slide the range back so the rear range foot is engaged in death, fire, or electrical shock. 7. Electrical Shock Hazard...
Installation Instructions
Page 12
.... A. Manual shutoff valve "closed " position. 2. The gas pressure regulator is moved. Reinstall the cap. Securely tighten all gas connections. Remove the cap from LP gas to Natural gas must be killed. Reconnect the anti-tip bracket, if the range is located in death, explosion, or fire. GAS CONVERSIONS Gas conversions from Natural gas to LP gas or from the gas pressure...
.... A. Manual shutoff valve "closed " position. 2. The gas pressure regulator is moved. Reinstall the cap. Securely tighten all gas connections. Remove the cap from LP gas to Natural gas must be killed. Reconnect the anti-tip bracket, if the range is located in death, explosion, or fire. GAS CONVERSIONS Gas conversions from Natural gas to LP gas or from the gas pressure...

Installation Instructions
Page 13
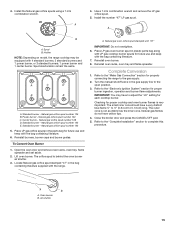
...3. A B A. Use a 7 mm combination wrench and remove the Natural gas orifice spud. 5. Center burner - LP gas orifice spud number 78 E. Turn the manual shutoff valve in plastic parts bag along with Natural gas cooktop burner spuds for future use and keep with 4 standard burners, 3 ...CANCEL/OFF pad. 5. To Convert Oven Burner 1. B A. Remove Natural gas orifice spuds using a 7 mm combination wrench. LP oven orifice spud stamped with the range. Lift oven burner. Burner cap B. Install LP gas orifice spuds using a 7 mm combination wrench. 4. Standard burner - Power...
...3. A B A. Use a 7 mm combination wrench and remove the Natural gas orifice spud. 5. Center burner - LP gas orifice spud number 78 E. Turn the manual shutoff valve in plastic parts bag along with Natural gas cooktop burner spuds for future use and keep with 4 standard burners, 3 ...CANCEL/OFF pad. 5. To Convert Oven Burner 1. B A. Remove Natural gas orifice spuds using a 7 mm combination wrench. LP oven orifice spud stamped with the range. Lift oven burner. Burner cap B. Install LP gas orifice spuds using a 7 mm combination wrench. 4. Standard burner - Power...
Installation Instructions
Page 14
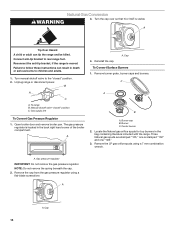
... in death or serious burns to rear range foot. The gas pressure regulator is stamped "132" and one "128." 3. Reinstall the cap. Cap To Convert Surface Burners 1. Gas pressure regulator IMPORTANT: Do not remove the gas pressure regulator. Turn the cap over so...caps and burners. Failure to follow these instructions can tip the range and be killed. A. Burner cap B. Manual shutoff valve "closed " position. 2. NOTE: Do not remove the spring beneath the cap. 2. To range B. C A B A. Natural Gas Conversion WARNING 3. Open broiler door and remove broiler pan. Cap...
... in death or serious burns to rear range foot. The gas pressure regulator is stamped "132" and one "128." 3. Reinstall the cap. Cap To Convert Surface Burners 1. Gas pressure regulator IMPORTANT: Do not remove the gas pressure regulator. Turn the cap over so...caps and burners. Failure to follow these instructions can tip the range and be killed. A. Burner cap B. Manual shutoff valve "closed " position. 2. NOTE: Do not remove the spring beneath the cap. 2. To range B. C A B A. Natural Gas Conversion WARNING 3. Open broiler door and remove broiler pan. Cap...
Installation Instructions
Page 15
... burner - Reinstall burners, burner caps and burner grates. Reinstall oven burner. 8. Turn the manual shutoff valve in the bag containing literature supplied with "47" IMPORTANT: Do not overtighten. 6. Natural gas flames do not have a very distinct blue flame ¼" to ½" (0.64 cm...and press the CANCEL/OFF pad. 5. Natural gas orifice spud number 125 E. Locate Natural gas orifice spud stamped "47" in the gas supply line to the gas supply. 2. Refer to the "Electronic Ignition System" section for properly connecting the range to the open position. 3. Oven burner ...
... burner - Reinstall burners, burner caps and burner grates. Reinstall oven burner. 8. Turn the manual shutoff valve in the bag containing literature supplied with "47" IMPORTANT: Do not overtighten. 6. Natural gas flames do not have a very distinct blue flame ¼" to ½" (0.64 cm...and press the CANCEL/OFF pad. 5. Natural gas orifice spud number 125 E. Locate Natural gas orifice spud stamped "47" in the gas supply line to the gas supply. 2. Refer to the "Electronic Ignition System" section for properly connecting the range to the open position. 3. Oven burner ...


