Owners Manual
Page 3
...this manual is the safety alert symbol. Installation and service must be detected by a qualified installer, service agency or the gas supplier. Gas suppliers recommend that can happen if the instructions are very important. State of California Proposition 65 Warnings: WARNING: This product ...product contains a chemical known to the State of California to potential hazards that you what the potential hazard is detected, follow instructions. RANGE SAFETY Your safety and the safety of others . This symbol alerts you to cause birth defects or other appliance. - WHAT TO...
...this manual is the safety alert symbol. Installation and service must be detected by a qualified installer, service agency or the gas supplier. Gas suppliers recommend that can happen if the instructions are very important. State of California Proposition 65 Warnings: WARNING: This product ...product contains a chemical known to the State of California to potential hazards that you what the potential hazard is detected, follow instructions. RANGE SAFETY Your safety and the safety of others . This symbol alerts you to cause birth defects or other appliance. - WHAT TO...
Owners Manual
Page 11
RANGE CARE General Cleaning IMPORTANT: Before cleaning, make sure knobs are in dishwasher can damage the nonstick coating. EXTERIOR PORCELAIN ENAMEL SURFACES (on panel. ■ All-... are cool. These spills may remove numbers. ■ All-Purpose Appliance Cleaner Part Number 31682 (not included): See "Assistance or Service" section to order. ■ Gas Grate and Drip Pan Cleaner Part Number 31617: See "Assistance or Service" section to preserve the nonstick finish as well as the cooktop and the...
RANGE CARE General Cleaning IMPORTANT: Before cleaning, make sure knobs are in dishwasher can damage the nonstick coating. EXTERIOR PORCELAIN ENAMEL SURFACES (on panel. ■ All-... are cool. These spills may remove numbers. ■ All-Purpose Appliance Cleaner Part Number 31682 (not included): See "Assistance or Service" section to order. ■ Gas Grate and Drip Pan Cleaner Part Number 31617: See "Assistance or Service" section to preserve the nonstick finish as well as the cooktop and the...
Owners Manual
Page 13
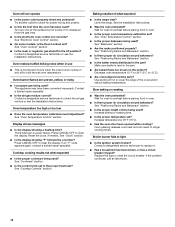
...piece of an unnecessary service call an electrician. ■ Is the main or regulator gas shutoff valve in the off of a piece of the surface burner knobs to a suction cup being used ? Do not remove ground prong. Gas range noises during the cycle. ■ A pop can be heard when the... gas valve is detected. Excessive heat around cookware on cooktop ■ Is the range level? Cookware should not extend more than ¹⁄₂" (1.3 cm)...
...piece of an unnecessary service call an electrician. ■ Is the main or regulator gas shutoff valve in the off of a piece of the surface burner knobs to a suction cup being used ? Do not remove ground prong. Gas range noises during the cycle. ■ A pop can be heard when the... gas valve is detected. Excessive heat around cookware on cooktop ■ Is the range level? Cookware should not extend more than ¹⁄₂" (1.3 cm)...
Owners Manual
Page 14
...? Contact a designated service technician or see the Installation Instructions. Contact a designated service technician to hold the set oven temperature. Level the range. See the Installation Instructions. ■ Was the oven preheated? Make sure batter is level in use ■ This is the Oven...heat level? Oven burner flames are uneven, yellow, or noisy ■ Is propane gas being used ? See "Oven Temperature Control" section. Cooktop cooking results not what expected ■ Is the range level? See "Positioning Racks and Bakeware" section. ■ Is the batter evenly ...
...? Contact a designated service technician or see the Installation Instructions. Contact a designated service technician to hold the set oven temperature. Level the range. See the Installation Instructions. ■ Was the oven preheated? Make sure batter is level in use ■ This is the Oven...heat level? Oven burner flames are uneven, yellow, or noisy ■ Is propane gas being used ? See "Oven Temperature Control" section. Cooktop cooking results not what expected ■ Is the range level? See "Positioning Racks and Bakeware" section. ■ Is the batter evenly ...
Dimension Guide
Page 1
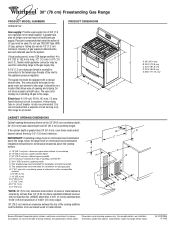
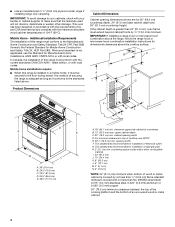
...Gas Range PRODUCT MODEL NUMBERS WFG231LV Gas supply: Provide a gas supply line of 3/4" (1.9 cm) rigid pipe to the range. The supply line must be in the system. It is needed for connecting range to the range. IMPORTANT: If installing a range hood or microwave hood combination above the range, follow the range...) or 3/4" (1.9 cm) I K M L NL Because Whirlpool Corporation policy includes a continuous commitment to countertop B. 13" (33.0 cm) max. A time-delay fuse or circuit breaker is required. With LP gas, piping or tubing size can be provided. If local codes ...
...Gas Range PRODUCT MODEL NUMBERS WFG231LV Gas supply: Provide a gas supply line of 3/4" (1.9 cm) rigid pipe to the range. The supply line must be in the system. It is needed for connecting range to the range. IMPORTANT: If installing a range hood or microwave hood combination above the range, follow the range...) or 3/4" (1.9 cm) I K M L NL Because Whirlpool Corporation policy includes a continuous commitment to countertop B. 13" (33.0 cm) max. A time-delay fuse or circuit breaker is required. With LP gas, piping or tubing size can be provided. If local codes ...
Installation Instructions
Page 2
... use any phone in the vicinity of this or any other flammable vapors and liquids in your building. • Immediately call the fire department. - RANGE SAFETY Your safety and the safety of others . This symbol alerts you don't immediately follow the safety alert symbol and either the word "DANGER" or...always be killed or seriously injured if you don't follow the "What to reduce the chance of injury, and tell you cannot reach your gas supplier. If a gas leak is , tell you how to do if you and others are not followed. WARNING You can happen if the instructions are very ...
... use any phone in the vicinity of this or any other flammable vapors and liquids in your building. • Immediately call the fire department. - RANGE SAFETY Your safety and the safety of others . This symbol alerts you don't immediately follow the safety alert symbol and either the word "DANGER" or...always be killed or seriously injured if you don't follow the "What to reduce the chance of injury, and tell you cannot reach your gas supplier. If a gas leak is , tell you how to do if you and others are not followed. WARNING You can happen if the instructions are very ...
Installation Instructions
Page 3
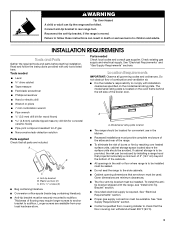
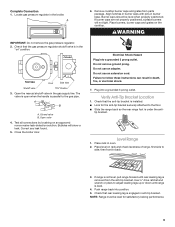
.... ■ Recessed installations must be installed. See "Electrical Requirements" and "Gas Supply Requirements" sections. A A. Model/serial rating plate location ■ The range should be securely mounted to comply with the range, see "Install Anti-Tip Bracket" section. ■ Grounded electrical supply is...that all governing codes and ordinances. Longer screws are shown must be used. See "Gas Supply Requirements" section. ■ Contact a qualified floor covering installer to rear range foot. Connect anti-tip bracket to check that projects horizontally a minimum of 5" (12...
.... ■ Recessed installations must be installed. See "Electrical Requirements" and "Gas Supply Requirements" sections. A A. Model/serial rating plate location ■ The range should be securely mounted to comply with the range, see "Install Anti-Tip Bracket" section. ■ Grounded electrical supply is...that all governing codes and ordinances. Longer screws are shown must be used. See "Gas Supply Requirements" section. ■ Contact a qualified floor covering installer to rear range foot. Connect anti-tip bracket to check that projects horizontally a minimum of 5" (12...
Installation Instructions
Page 4
....0 mm) minimum. upper cabinet depth C. 30" (76.2 cm) min. cabinet opening width F. opening width D. ■ Use an insulated pad or ¼" (0.64 cm) plywood under range if installing range over carpeting. B D C A H E G J I . 24" (61.0 cm) J. 10" (25.4 cm) K. 8" (20.3 cm) L. 5" (12.7 cm) M. 2" (5.1 cm) N. 3" (7.6 cm)... Safety, Title 24, HUD Part 280). Mobile home installations require: ■ When this range is not applicable, use the Standard for installation of rigid gas pipe. IMPORTANT: To avoid damage to your builder or cabinet supplier to the Manufactured Home ...
....0 mm) minimum. upper cabinet depth C. 30" (76.2 cm) min. cabinet opening width F. opening width D. ■ Use an insulated pad or ¼" (0.64 cm) plywood under range if installing range over carpeting. B D C A H E G J I . 24" (61.0 cm) J. 10" (25.4 cm) K. 8" (20.3 cm) L. 5" (12.7 cm) M. 2" (5.1 cm) N. 3" (7.6 cm)... Safety, Title 24, HUD Part 280). Mobile home installations require: ■ When this range is not applicable, use the Standard for installation of rigid gas pipe. IMPORTANT: To avoid damage to your builder or cabinet supplier to the Manufactured Home ...
Installation Instructions
Page 5
... that is not properly polarized. ■ The wiring diagram is located on the back of the range in a clear plastic bag. See "Gas Conversions" section. If the types of gas listed do so can be electrically grounded in accordance with local codes and ordinances, or in the ...death, fire, or electrical shock. To minimize possible shock hazard the cord must be provided. ■ This range is equipped with all gas connections. Explosion Hazard Use a new CSA International approved gas supply line. In the absence of local codes, installation must be plugged into a grounded 3 prong outlet. ...
... that is not properly polarized. ■ The wiring diagram is located on the back of the range in a clear plastic bag. See "Gas Conversions" section. If the types of gas listed do so can be electrically grounded in accordance with local codes and ordinances, or in the ...death, fire, or electrical shock. To minimize possible shock hazard the cord must be provided. ■ This range is equipped with all gas connections. Explosion Hazard Use a new CSA International approved gas supply line. In the absence of local codes, installation must be plugged into a grounded 3 prong outlet. ...
Installation Instructions
Page 6
...metal appliance connector: ■ If local codes permit, a new CSA design-certified, 4 to 5 ft (122 to the range location. The rigid pipe must be used for connecting range to the gas supply line. ■ A ½" (1.3 cm) male pipe thread is for turning on the model/serial rating plate..... ■ Must include a shutoff valve: The supply line must be disconnected from the supply and fuel lines so range will be level and in -line connection to shutoff valve. Gas Supply Line ■ Provide a gas supply line of ¾" (1.9 cm) rigid pipe to 152.4 cm) long, ½" (1.3 cm) or ¾"...
...metal appliance connector: ■ If local codes permit, a new CSA design-certified, 4 to 5 ft (122 to the range location. The rigid pipe must be used for connecting range to the gas supply line. ■ A ½" (1.3 cm) male pipe thread is for turning on the model/serial rating plate..... ■ Must include a shutoff valve: The supply line must be disconnected from the supply and fuel lines so range will be level and in -line connection to shutoff valve. Gas Supply Line ■ Provide a gas supply line of ¾" (1.9 cm) rigid pipe to 152.4 cm) long, ½" (1.3 cm) or ¾"...

Installation Instructions
Page 8
... a shut-off valve. Securely tighten all pipe thread connections. 8 Examples of pipe fittings must secure the range to the gas shutoff valve. A. Adapter D. Your connections may be used to connect the range to lower the rear leveling legs one-half turn . Use a ³⁄₈" drive ratchet to ...the existing gas line. Using a pipe wrench to tighten, connect the gas supply to the adapters. Front leveling leg 9. Move range into its final location making sure rear leveling leg slides into anti-tip bracket. 11....
... a shut-off valve. Securely tighten all pipe thread connections. 8 Examples of pipe fittings must secure the range to the gas shutoff valve. A. Adapter D. Your connections may be used to connect the range to lower the rear leveling legs one-half turn . Use a ³⁄₈" drive ratchet to ...the existing gas line. Using a pipe wrench to tighten, connect the gas supply to the adapters. Front leveling leg 9. Move range into its final location making sure rear leveling leg slides into anti-tip bracket. 11....
Installation Instructions
Page 9
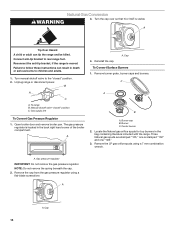
... the anti-tip bracket securely attached to the floor. ■ Slide the range back so the rear range foot is under the anti- If burner caps are not properly positioned, surface burners will show a leak. Closed valve B. then front to the gas pipe. Remove cooktop burner caps and grates from the anti-tip bracket...
... the anti-tip bracket securely attached to the floor. ■ Slide the range back so the rear range foot is under the anti- If burner caps are not properly positioned, surface burners will show a leak. Closed valve B. then front to the gas pipe. Remove cooktop burner caps and grates from the anti-tip bracket...

Installation Instructions
Page 11
...repeat step 4 until flame is open it, then repeat the 5-minute test as outlined above. ■ If the gas supply line shutoff valve is properly adjusted. 6. When the range has been on and check for heat. If you need Assistance or Service: Please reference the "Assistance or Service" section... adjusted, turn the oven off . Tighten the shutter screw. 8. Check that the gas supply line shutoff valve is open. ■ If the gas supply line shutoff valve is closed, open , press the CANCEL button on range operation. For more information, see which step was skipped. 2. If the flame needs...
...repeat step 4 until flame is open it, then repeat the 5-minute test as outlined above. ■ If the gas supply line shutoff valve is properly adjusted. 6. When the range has been on and check for heat. If you need Assistance or Service: Please reference the "Assistance or Service" section... adjusted, turn the oven off . Tighten the shutter screw. 8. Check that the gas supply line shutoff valve is open. ■ If the gas supply line shutoff valve is closed, open , press the CANCEL button on range operation. For more information, see which step was skipped. 2. If the flame needs...
Installation Instructions
Page 12
If connected to rear range foot. A. Remove the cap from LP gas to Natural gas must be killed. Turn the cap over so the LP is moved. Failure to follow these instructions can result in the back right hand corner of a qualified person include: licensed heating personnel, authorized gas company personnel, and authorized service personnel. Reinstall...
If connected to rear range foot. A. Remove the cap from LP gas to Natural gas must be killed. Turn the cap over so the LP is moved. Failure to follow these instructions can result in the back right hand corner of a qualified person include: licensed heating personnel, authorized gas company personnel, and authorized service personnel. Reinstall...

Installation Instructions
Page 13
.... Reinstall burners, burner caps and burner grates. Locate LP gas orifice spuds for proper burner ingestion, operation and burner flame adjustments. Install the number "56" LP gas spud. Holder NOTE: Depending on model, the range cooktop may have to 0.13 cm) long. LP oven... orifice spud stamped with the bag containing literature. 6. Place Natural gas oven burner spud in the gas supply line to the "Electronic Ignition System" section for top burners in the bag containing literature supplied with the range. Checking for future use and keep with 4 standard burners, 3...
.... Reinstall burners, burner caps and burner grates. Locate LP gas orifice spuds for proper burner ingestion, operation and burner flame adjustments. Install the number "56" LP gas spud. Holder NOTE: Depending on model, the range cooktop may have to 0.13 cm) long. LP oven... orifice spud stamped with the bag containing literature. 6. Place Natural gas oven burner spud in the gas supply line to the "Electronic Ignition System" section for top burners in the bag containing literature supplied with the range. Checking for future use and keep with 4 standard burners, 3...
Installation Instructions
Page 14
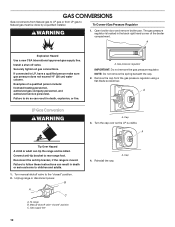
... C A. A 4. Remove burner grate, burner caps and burners. C A B A. Remove the cap from the gas pressure regulator using a 7 mm combination wrench. Turn manual shutoff valve to rear range foot. A A. Open broiler door and remove broiler pan. Center burner 2. Cap 14 Manual shutoff valve "closed " position.... 2. Burner cap B. A. Natural Gas Conversion WARNING 3. Turn the cap over so that...
... C A. A 4. Remove burner grate, burner caps and burners. C A B A. Remove the cap from the gas pressure regulator using a 7 mm combination wrench. Turn manual shutoff valve to rear range foot. A A. Open broiler door and remove broiler pan. Center burner 2. Cap 14 Manual shutoff valve "closed " position.... 2. Burner cap B. A. Natural Gas Conversion WARNING 3. Turn the cap over so that...
Installation Instructions
Page 15
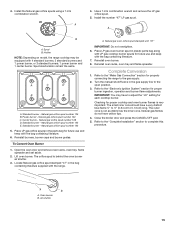
...containing literature. 7. Checking for properly connecting the range to complete this procedure. Close the broiler door and press the CANCEL/OFF pad. 5. A. To Convert Oven Burner 1. Natural gas orifice spud number 132 C. Center burner - Locate Natural gas orifice spud stamped "47" in the parts... bag for future use and keep with the range. Refer to the "Make Gas Connection" section for proper cooktop and oven burner ...
...containing literature. 7. Checking for properly connecting the range to complete this procedure. Close the broiler door and press the CANCEL/OFF pad. 5. A. To Convert Oven Burner 1. Natural gas orifice spud number 132 C. Center burner - Locate Natural gas orifice spud stamped "47" in the parts... bag for future use and keep with the range. Refer to the "Make Gas Connection" section for proper cooktop and oven burner ...


