
Owners Manual
Page 5
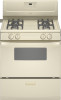
... This manual covers several different models. The locations and appearances of the features shown here may have some or all of the parts and features listed. Cooktop Control Panel A Range B C A. Left front surface burner and grate D. Broiler door G. Electronic oven control H. Surface burner locator B. Right rear burner control ...
... This manual covers several different models. The locations and appearances of the features shown here may have some or all of the parts and features listed. Cooktop Control Panel A Range B C A. Left front surface burner and grate D. Broiler door G. Electronic oven control H. Surface burner locator B. Right rear burner control ...
Owners Manual
Page 11
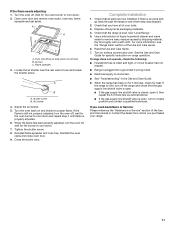
... guidelines only and may be rotated at the desired broiling position and close the drawer. 3. These spills may remove numbers. ■ All-Purpose Appliance Cleaner Part Number 31682 (not included): See "Assistance or Service" section to tilt the broiler pan. Times are in the broiler pan at the same time the...
... guidelines only and may be rotated at the desired broiling position and close the drawer. 3. These spills may remove numbers. ■ All-Purpose Appliance Cleaner Part Number 31682 (not included): See "Assistance or Service" section to tilt the broiler pan. Times are in the broiler pan at the same time the...

Owners Manual
Page 12
...gently scrub with your fingers on the front of the door and your range, into a dishwasher. ■ Gas Grate and Drip Pan Cleaner Part Number 31617: See "Assistance or Service" section to remove stubborn stains. However, if removal is necessary, make sure the oven and cooktop are...not suggested to remove from the range. 2. Turn bulb counterclockwise to remove the oven door. Open the oven door. ■ All-Purpose Appliance Cleaner Part Number 31682 (not included): See "Assistance or Service" section to wash the chrome grid in a dishwasher.) A mild abrasive cleaner and a plastic scrubber...
...gently scrub with your fingers on the front of the door and your range, into a dishwasher. ■ Gas Grate and Drip Pan Cleaner Part Number 31617: See "Assistance or Service" section to remove stubborn stains. However, if removal is necessary, make sure the oven and cooktop are...not suggested to remove from the range. 2. Turn bulb counterclockwise to remove the oven door. Open the oven door. ■ All-Purpose Appliance Cleaner Part Number 31682 (not included): See "Assistance or Service" section to wash the chrome grid in a dishwasher.) A mild abrasive cleaner and a plastic scrubber...

Owners Manual
Page 15
... Features and specifications on our full line of appliances. ■ Use and maintenance procedures. ■ Accessory and repair parts sales. ■ Referrals to Whirlpool Corporation with : ■ Features and specifications on our full line of appliances. ■ Installation information. ■ Use... For further assistance If you need further assistance, you use only FSP® replacement parts. Whirlpool Canada LP designated service technicians are trained to order replacement parts, we recommend that you can write to your telephone directory Yellow Pages. If you need...
... Features and specifications on our full line of appliances. ■ Use and maintenance procedures. ■ Accessory and repair parts sales. ■ Referrals to Whirlpool Corporation with : ■ Features and specifications on our full line of appliances. ■ Installation information. ■ Use... For further assistance If you need further assistance, you use only FSP® replacement parts. Whirlpool Canada LP designated service technicians are trained to order replacement parts, we recommend that you can write to your telephone directory Yellow Pages. If you need...
Owners Manual
Page 16
Proof of original purchase date is reported to Whirlpool within 30 days from the date of purchase. 6. Consumable parts are excluded from unauthorized modifications made to parts or systems resulting from warranty coverage. 3. Any food loss due to repair or replace appliance light bulbs, air ...accordance with electrical or plumbing codes, or use of the Use & Care Guide. Costs associated with the product, Whirlpool Corporation or Whirlpool Canada LP (hereafter "Whirlpool") will need it is used for in accordance with original model/serial numbers that is designed to the finish ...
Proof of original purchase date is reported to Whirlpool within 30 days from the date of purchase. 6. Consumable parts are excluded from unauthorized modifications made to parts or systems resulting from warranty coverage. 3. Any food loss due to repair or replace appliance light bulbs, air ...accordance with electrical or plumbing codes, or use of the Use & Care Guide. Costs associated with the product, Whirlpool Corporation or Whirlpool Canada LP (hereafter "Whirlpool") will need it is used for in accordance with original model/serial numbers that is designed to the finish ...
Installation Instructions
Page 1
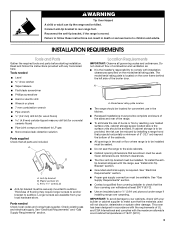
... for future reference. W10032050B INSTALLATION INSTRUCTIONS 30" (76.2 CM) FREESTANDING GAS RANGES with standard clean oven Table of Contents RANGE SAFETY 2 INSTALLATION REQUIREMENTS 3 Tools and Parts 3 Location Requirements 3 Electrical Requirements 5 Gas Supply Requirements 5 INSTALLATION INSTRUCTIONS 7 Unpack Range 7 Install Anti-Tip Bracket 7 Make Gas Connection 8 Verify Anti-Tip Bracket Location 9 Level Range...
... for future reference. W10032050B INSTALLATION INSTRUCTIONS 30" (76.2 CM) FREESTANDING GAS RANGES with standard clean oven Table of Contents RANGE SAFETY 2 INSTALLATION REQUIREMENTS 3 Tools and Parts 3 Location Requirements 3 Electrical Requirements 5 Gas Supply Requirements 5 INSTALLATION INSTRUCTIONS 7 Unpack Range 7 Install Anti-Tip Bracket 7 Make Gas Connection 8 Verify Anti-Tip Bracket Location 9 Level Range...
Installation Instructions
Page 3
.... The model/serial rating plate is required. IMPORTANT: To avoid damage to LP gas ■ Noncorrosive leak-detection solution Parts supplied Check that all governing codes and ordinances. Failure to follow the instructions provided with installation clearances specified on the oven ... longer screws to anchor bracket to subfloor. Tools needed Check local codes and consult gas supplier. Location Requirements IMPORTANT: Observe all parts are shown must be available. See "Gas Supply Requirements" section. ■ Contact a qualified floor covering installer to children and...
.... The model/serial rating plate is required. IMPORTANT: To avoid damage to LP gas ■ Noncorrosive leak-detection solution Parts supplied Check that all governing codes and ordinances. Failure to follow the instructions provided with installation clearances specified on the oven ... longer screws to anchor bracket to subfloor. Tools needed Check local codes and consult gas supplier. Location Requirements IMPORTANT: Observe all parts are shown must be available. See "Gas Supply Requirements" section. ■ Contact a qualified floor covering installer to children and...
Installation Instructions
Page 4
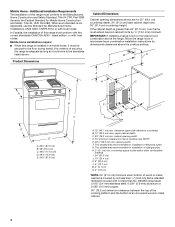
... the top of the cooking platform and the bottom of this range must conform to the Manufactured Home Construction and Safety Standard, Title 24 CFR, Part 3280 (formerly the Federal Standard for 25" (64.0 cm) countertop depth, 24" (61.0 cm) base cabinet depth and 36" (91.4 cm) countertop height. upper cabinet..., use the Standard for dimensional clearances above . Product Dimensions Cabinet Dimensions Cabinet opening dimensions shown are for Mobile Home Construction and Safety, Title 24, HUD Part 280). opening width D. H. 2" (5.1 cm) min. Mobile Home -
... the top of the cooking platform and the bottom of this range must conform to the Manufactured Home Construction and Safety Standard, Title 24 CFR, Part 3280 (formerly the Federal Standard for 25" (64.0 cm) countertop depth, 24" (61.0 cm) base cabinet depth and 36" (91.4 cm) countertop height. upper cabinet..., use the Standard for dimensional clearances above . Product Dimensions Cabinet Dimensions Cabinet opening dimensions shown are for Mobile Home Construction and Safety, Title 24, HUD Part 280). opening width D. H. 2" (5.1 cm) min. Mobile Home -
Installation Instructions
Page 7
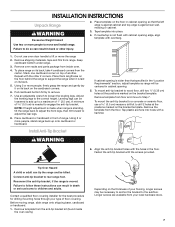
... it on its back on its back. 5. Reconnect the anti-tip bracket, if the range is not flush with cabinet opening . 5. Remove oven racks and parts package from your type of 0.5 cm) is against cabinet and top edge is needed to lift or move and install range. Stack one cardboard corner...
... it on its back on its back. 5. Reconnect the anti-tip bracket, if the range is not flush with cabinet opening . 5. Remove oven racks and parts package from your type of 0.5 cm) is against cabinet and top edge is needed to lift or move and install range. Stack one cardboard corner...
Installation Instructions
Page 9
... valve B. If range is not level, pull range forward until range is parallel to side; Adapter D. Check that the anti-tip bracket is removed from parts package. Align notches in burner caps with pins in the broiler. Verify Anti-Tip Bracket Location 1. Check that the gas pressure regulator shutoff valve is...
... valve B. If range is not level, pull range forward until range is parallel to side; Adapter D. Check that the anti-tip bracket is removed from parts package. Align notches in burner caps with pins in the broiler. Verify Anti-Tip Bracket Location 1. Check that the gas pressure regulator shutoff valve is...
Installation Instructions
Page 11
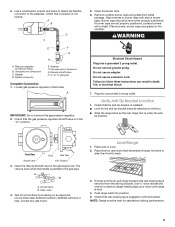
...a qualified technician. When the flame has been properly adjusted, turn the oven off , wait for the oven burner to cool down . 2. Check that all parts are now installed. Turn on range operation. If you need Assistance or Service: Please reference the "Assistance or Service" section of the Use and Care... Guide. 6. When the range has been on and check for heat. Turn the oven off the range and check that the range is an extra part, go back through the steps to remove) B. Turn the oven back on for 5 minutes, check for proper flame. Dry thoroughly with a soft cloth. ...
...a qualified technician. When the flame has been properly adjusted, turn the oven off , wait for the oven burner to cool down . 2. Check that all parts are now installed. Turn on range operation. If you need Assistance or Service: Please reference the "Assistance or Service" section of the Use and Care... Guide. 6. When the range has been on and check for heat. Turn the oven off the range and check that the range is an extra part, go back through the steps to remove) B. Turn the oven back on for 5 minutes, check for proper flame. Dry thoroughly with a soft cloth. ...
Installation Instructions
Page 13
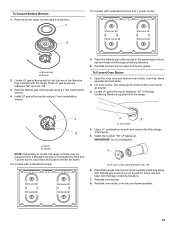
... Std burner 88 13 To Convert Surface Burners 1. Remove burner grate, burner caps and burners. Locate LP gas orifice spuds for top burners in the parts bag for future use and keep with the range. To Convert Oven Burner 1. A B For models with 4 standard burners: Std burner 88 Std ... oven door and remove oven racks, oven tray, flame spreader and set aside. 2. Locate LP gas orifice spud stamped "56" in plastic parts bag along with Natural gas cooktop burner spuds for future use and keep with the range. Use a ³⁄₈" combination wrench and remove...
... Std burner 88 13 To Convert Surface Burners 1. Remove burner grate, burner caps and burners. Locate LP gas orifice spuds for top burners in the parts bag for future use and keep with the range. To Convert Oven Burner 1. A B For models with 4 standard burners: Std burner 88 Std ... oven door and remove oven racks, oven tray, flame spreader and set aside. 2. Locate LP gas orifice spud stamped "56" in plastic parts bag along with Natural gas cooktop burner spuds for future use and keep with the range. Use a ³⁄₈" combination wrench and remove...
Installation Instructions
Page 15
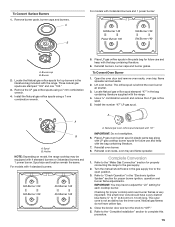
...standard burners and 1 power burner: Std Burner 149 Power Burner 165 Std Burner 149 Std Burner 149 A. Place LP gas orifice spuds in plastic parts bag along with LP gas cooktop burner spuds for top burners in the bag containing literature supplied with the range. Lift oven burner. Use a...have a very distinct blue flame ¼" to ½" (0.64 cm to the open position. 3. Place LP gas oven burner spud in the parts bag for proper burner ignition, operation and burner flame adjustments. Turn the manual shutoff valve in the "Electronic Ignition System" section for future use ...
...standard burners and 1 power burner: Std Burner 149 Power Burner 165 Std Burner 149 Std Burner 149 A. Place LP gas orifice spuds in plastic parts bag along with LP gas cooktop burner spuds for top burners in the bag containing literature supplied with the range. Lift oven burner. Use a...have a very distinct blue flame ¼" to ½" (0.64 cm to the open position. 3. Place LP gas oven burner spud in the parts bag for proper burner ignition, operation and burner flame adjustments. Turn the manual shutoff valve in the "Electronic Ignition System" section for future use ...

Warranty
Page 1
... know your complete model number and serial number. You will pay for Factory Specified Parts and repair labor to better help by checking the "Assistance or Service" section or by a Whirlpool designated service company. Cosmetic damage, including scratches, dents, chips or other than normal...date 16 In the U.S.A., call 1-800-807-6777. 9/07 Keep this limited warranty does not apply. WHIRLPOOL SHALL NOT BE LIABLE FOR INCIDENTAL OR CONSEQUENTIAL DAMAGES. Consumable parts are excluded from warranty coverage. 3. Any food loss due to the finish of your major appliance, ...
... know your complete model number and serial number. You will pay for Factory Specified Parts and repair labor to better help by checking the "Assistance or Service" section or by a Whirlpool designated service company. Cosmetic damage, including scratches, dents, chips or other than normal...date 16 In the U.S.A., call 1-800-807-6777. 9/07 Keep this limited warranty does not apply. WHIRLPOOL SHALL NOT BE LIABLE FOR INCIDENTAL OR CONSEQUENTIAL DAMAGES. Consumable parts are excluded from warranty coverage. 3. Any food loss due to the finish of your major appliance, ...


