Owners Manual
Page 5
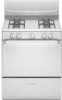
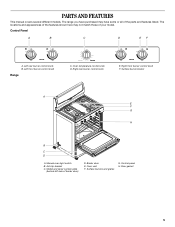
...A E F G H B C D A. Broiler door E. Control panel H. Right front burner control knob F. Left front burner control knob Range 140 170 200 BROIL 250 550 300 500 350 400 450 C. Oven temperature control knob D. Oven vent F. Control Panel A B C D EF A. Door gasket 5 The locations and appearances...manual covers several different models. The range you have purchased may not match those of broiler door) D. Anti-tip bracket C. Model and serial number plate (behind left side of your model. Right rear burner control knob E. Surface burners and grates G. Manual...
...A E F G H B C D A. Broiler door E. Control panel H. Right front burner control knob F. Left front burner control knob Range 140 170 200 BROIL 250 550 300 500 350 400 450 C. Oven temperature control knob D. Oven vent F. Control Panel A B C D EF A. Door gasket 5 The locations and appearances...manual covers several different models. The range you have purchased may not match those of broiler door) D. Anti-tip bracket C. Model and serial number plate (behind left side of your model. Right rear burner control knob E. Surface burners and grates G. Manual...

Owners Manual
Page 6
... and gravies. To Set Oven Temperature: Push in and turn knob to the "General Cleaning" section. Alignment pins C. Always clean the burner cap after a spillover and routinely remove and clean the caps and bases according to setting. Gas tube opening: Gas must flow freely throughout the gas tube opening for proper size and shape as a guide when...
... and gravies. To Set Oven Temperature: Push in and turn knob to the "General Cleaning" section. Alignment pins C. Always clean the burner cap after a spillover and routinely remove and clean the caps and bases according to setting. Gas tube opening: Gas must flow freely throughout the gas tube opening for proper size and shape as a guide when...
Owners Manual
Page 9
...: 1. Place food on broiler grid. 9 Place the pan on and off to the desired temperature setting. 2. Use tongs to turn the oven control knob to keep the oven temperature at the setting. 3. Push in and turn food to the "Positioning Racks and Bakeware" section. The bottom of juices.... Drippings will cycle on the broiler rack and close broiler door during the broiling by turning the oven control knob to stop position before use broiler cavity for easier cleaning. The temperature can drain down into the lower part of fish, poultry or meat may be rotated at ...
...: 1. Place food on broiler grid. 9 Place the pan on and off to the desired temperature setting. 2. Use tongs to turn the oven control knob to keep the oven temperature at the setting. 3. Push in and turn food to the "Positioning Racks and Bakeware" section. The bottom of juices.... Drippings will cycle on the broiler rack and close broiler door during the broiling by turning the oven control knob to stop position before use broiler cavity for easier cleaning. The temperature can drain down into the lower part of fish, poultry or meat may be rotated at ...
Owners Manual
Page 10
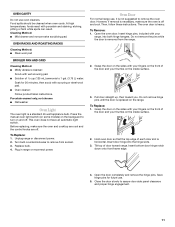
... order. These spills may remove numbers. To avoid chipping, do not remove seals under knobs. Cleaning Method: s Nonabrasive plastic scrubbing pad and mildly abrasive cleanser: Clean as soon as cast iron cookware. s Gas Grate and Drip Pan Cleaner Part Number 31617: See "Assistance or Service" section to... containing acids, such as vinegar and tomato, should be removed for standard cleaning of the oven. OVEN DOOR EXTERIOR Cleaning Method: s Glass cleaner and a soft cloth or sponge: Apply glass cleaner to order. 10 RANGE CARE Removing the Oven Bottom The oven bottom can be soaked or ...
... order. These spills may remove numbers. To avoid chipping, do not remove seals under knobs. Cleaning Method: s Nonabrasive plastic scrubbing pad and mildly abrasive cleanser: Clean as soon as cast iron cookware. s Gas Grate and Drip Pan Cleaner Part Number 31617: See "Assistance or Service" section to... containing acids, such as vinegar and tomato, should be removed for standard cleaning of the oven. OVEN DOOR EXTERIOR Cleaning Method: s Glass cleaner and a soft cloth or sponge: Apply glass cleaner to order. 10 RANGE CARE Removing the Oven Bottom The oven bottom can be soaked or ...
Owners Manual
Page 11
... sure the oven is necessary, make sure the oven and cooktop are cool and the control knobs are off . However, if removal is off and cool. Tilt top of each door slot... The oven light is replaced on the inside surface. 3. Unplug range or disconnect power. 2. Do not remove hinge pins until the door is a standard 40-watt appliance bulb. Insert bottom door hinge notch down onto ...Open the door completely and remove the hinge pins. Food spills should be cleaned when oven cools. Plug in range or reconnect power. Insert hinge pins, included with your fingers on the front...
... sure the oven is necessary, make sure the oven and cooktop are cool and the control knobs are off . However, if removal is off and cool. Tilt top of each door slot... The oven light is replaced on the inside surface. 3. Unplug range or disconnect power. 2. Do not remove hinge pins until the door is a standard 40-watt appliance bulb. Insert bottom door hinge notch down onto ...Open the door completely and remove the hinge pins. Food spills should be cleaned when oven cools. Plug in range or reconnect power. Insert hinge pins, included with your fingers on the front...
Owners Manual
Page 12
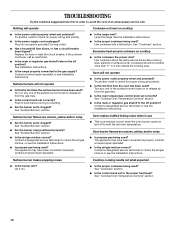
... Are the burner ports clogged? Contact a designated service technician to check the air/gas mixture or see Installation Instructions. Let it dry. s Is the control knob set correctly? s Is the range properly connected to a setting. Surface burner flames are uneven, yellow, and/or noisy... s Is propane gas being used ? Contact a trained repair specialist. See the Installation Instructions....
... Are the burner ports clogged? Contact a designated service technician to check the air/gas mixture or see Installation Instructions. Let it dry. s Is the control knob set correctly? s Is the range properly connected to a setting. Surface burner flames are uneven, yellow, and/or noisy... s Is propane gas being used ? Contact a trained repair specialist. See the Installation Instructions....
Installation Instructions
Page 10
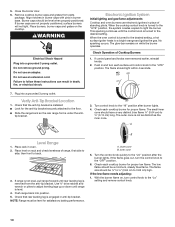
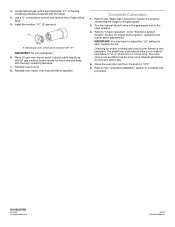
...outlet. Electronic Ignition System Initial lighting and gas flame adjustments Cooktop and oven burners use electronic igniters in death, fire, or electrical shock. 7. This sparking continues until range is level. 4. If control panel and knobs were removed earlier, reinstall knobs. 2. Use ³⁄₈" drive...positioned, surface burners will not light. Check that rear leveling leg is under the anti- A B Level Range 1. Outer cone B. No sparking occurs. Turn control knob to 0.95 cm) high. Align notches in burner caps with pins in oven. 2. Do not use ...
...outlet. Electronic Ignition System Initial lighting and gas flame adjustments Cooktop and oven burners use electronic igniters in death, fire, or electrical shock. 7. This sparking continues until range is level. 4. If control panel and knobs were removed earlier, reinstall knobs. 2. Use ³⁄₈" drive...positioned, surface burners will not light. Check that rear leveling leg is under the anti- A B Level Range 1. Outer cone B. No sparking occurs. Turn control knob to 0.95 cm) high. Align notches in burner caps with pins in oven. 2. Do not use ...
Installation Instructions
Page 11
...Check Operation of liquid household cleaner and warm water to cool down. 2. Do not clean that surrounds the igniter. Open oven door and remove oven racks, oven tray, flame ... shutter screw. 8. Close the oven door. Check that the gas supply line shutoff valve is open. ■ If the gas supply line shutoff valve is plugged into the valve stem. Use... ■ Range is closed position and contact a qualified technician. C A. Replace control knob. If the flame needs adjusting: 1. Turn the oven back on range operation. Reinstall the oven racks. 9. If the range is connected....
...Check Operation of liquid household cleaner and warm water to cool down. 2. Do not clean that surrounds the igniter. Open oven door and remove oven racks, oven tray, flame ... shutter screw. 8. Close the oven door. Check that the gas supply line shutoff valve is open. ■ If the gas supply line shutoff valve is plugged into the valve stem. Use... ■ Range is closed position and contact a qualified technician. C A. Replace control knob. If the flame needs adjusting: 1. Turn the oven back on range operation. Reinstall the oven racks. 9. If the range is connected....
Installation Instructions
Page 14
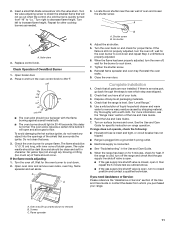
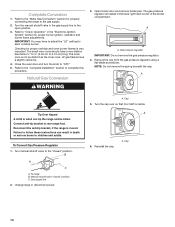
Close the oven door and turn the knob to rear range foot. Manual shutoff valve "closed " position. A 6. Reinstall the cap. The gas pressure regulator is moved. Reconnect the anti-tip bracket, if the range is located in the "Electronic Ignition System" section for proper cooktop and oven burner ...flames is very important. Failure to follow these instructions can tip the range and be killed. To Convert Gas Pressure Regulator 1. Gas supply line 2. Cap 5. Turn the cap over so that N or NAT is not as distinct as the ...
Close the oven door and turn the knob to rear range foot. Manual shutoff valve "closed " position. A 6. Reinstall the cap. The gas pressure regulator is moved. Reconnect the anti-tip bracket, if the range is located in the "Electronic Ignition System" section for proper cooktop and oven burner ...flames is very important. Failure to follow these instructions can tip the range and be killed. To Convert Gas Pressure Regulator 1. Gas supply line 2. Cap 5. Turn the cap over so that N or NAT is not as distinct as the ...
Installation Instructions
Page 16
... and burner flame adjustments. IMPORTANT: You may have yellow tips. 4. The outer cone is very important. Natural gas oven orifice spud stamped with the range. 4. Reinstall oven burner. 8. Refer to the "Make Gas Connection" section for each cooktop burner. Refer to the "Complete Installation" section to the...as distinct as the inner cone. 3. Close the oven door and turn the knob to 0.13 cm) long. Use a ³⁄₈" combination wrench and remove the LP gas orifice spud. 5. Place LP gas oven burner spud in Mexico The small inner cone should have a very distinct ...
... and burner flame adjustments. IMPORTANT: You may have yellow tips. 4. The outer cone is very important. Natural gas oven orifice spud stamped with the range. 4. Reinstall oven burner. 8. Refer to the "Make Gas Connection" section for each cooktop burner. Refer to the "Complete Installation" section to the...as distinct as the inner cone. 3. Close the oven door and turn the knob to 0.13 cm) long. Use a ³⁄₈" combination wrench and remove the LP gas orifice spud. 5. Place LP gas oven burner spud in Mexico The small inner cone should have a very distinct ...


