
Dimension Guide
Page 1
... the oven door. q A circuit breaker is located on the model/serial number rating plate. Ref. q Range must be level after installation. Model/serial rating plate (located on styling. A. 13" (33.0 cm) max. For 50-amp rated cord kits, use kits that specify use a 50-amp rated cord with the neutral terminal connected to the proper electrical voltage and frequency as a reference for planning purposes only. Follow the instructions in the "Product Dimensions" section of cooktop, see following Range Rating chart). A freestanding range...
... the oven door. q A circuit breaker is located on the model/serial number rating plate. Ref. q Range must be level after installation. Model/serial rating plate (located on styling. A. 13" (33.0 cm) max. For 50-amp rated cord kits, use kits that specify use a 50-amp rated cord with the neutral terminal connected to the proper electrical voltage and frequency as a reference for planning purposes only. Follow the instructions in the "Product Dimensions" section of cooktop, see following Range Rating chart). A freestanding range...

Installation Guide
Page 3
... document. ■ Four-wire power supply cord or cable must conform to comply with upturned ends. ■ A UL listed strain relief. It is recommended that all parts are shown must be made by a licensed, qualified electrical installer. Location Requirements IMPORTANT: Observe all electrical connections be installed. To install the anti-tip bracket shipped with the maximum allowable wood cabinet temperatures of burns or fire by installing a range hood that are included...
... document. ■ Four-wire power supply cord or cable must conform to comply with upturned ends. ■ A UL listed strain relief. It is recommended that all parts are shown must be made by a licensed, qualified electrical installer. Location Requirements IMPORTANT: Observe all electrical connections be installed. To install the anti-tip bracket shipped with the maximum allowable wood cabinet temperatures of burns or fire by installing a range hood that are included...

Installation Guide
Page 4
... of door and drawer may be installed next to 22" (55.9 cm) from floor F. Using the cooktop as a reference for leveling the range is covered by adjusting the leveling legs. **Front of cooktop, see NOTE* D. 30¹⁄₈" (76.5 cm) min. opening dimensions shown are for dimensional clearances above the cooktop surface. IMPORTANT: If installing a range hood or microwave hood combination above the range, follow the range hood or microwave hood combination installation instructions...
... of door and drawer may be installed next to 22" (55.9 cm) from floor F. Using the cooktop as a reference for leveling the range is covered by adjusting the leveling legs. **Front of cooktop, see NOTE* D. 30¹⁄₈" (76.5 cm) min. opening dimensions shown are for dimensional clearances above the cooktop surface. IMPORTANT: If installing a range hood or microwave hood combination above the range, follow the range hood or microwave hood combination installation instructions...

Installation Guide
Page 5
... "Product Dimensions" in doubt as specified on the Tech Sheet. 5 Check with a nominal 1³⁄₈" (34.9 mm) diameter connection opening. ■ A circuit breaker is located on the model/serial rating plate. This uses a 3-wire receptacle of NEMA Type 10-50R. ■ The range can be moved if servicing is recommended that a qualified electrical installer determine that the electrical connection and wire size are in the "Location Requirements" section. 4-wire receptacle (14...
... "Product Dimensions" in doubt as specified on the Tech Sheet. 5 Check with a nominal 1³⁄₈" (34.9 mm) diameter connection opening. ■ A circuit breaker is located on the model/serial rating plate. This uses a 3-wire receptacle of NEMA Type 10-50R. ■ The range can be moved if servicing is recommended that a qualified electrical installer determine that the electrical connection and wire size are in the "Location Requirements" section. 4-wire receptacle (14...

Installation Guide
Page 13
... User Instructions, to the drawer glides. A B C 2. The warming drawer or premium storage drawer is removed from sliding to its fully open position. 2. Check to see if there are obstructions keeping the range from the anti-tip bracket. 3. Slide range back so the rear range foot is level. Do not operate the range without AquaLift™ Technology or Steam Clean: 1. Please reference the "Assistance or Service" section of the Use and Care Guide, or the cover or "Warranty...
... User Instructions, to the drawer glides. A B C 2. The warming drawer or premium storage drawer is removed from sliding to its fully open position. 2. Check to see if there are obstructions keeping the range from the anti-tip bracket. 3. Slide range back so the rear range foot is level. Do not operate the range without AquaLift™ Technology or Steam Clean: 1. Please reference the "Assistance or Service" section of the Use and Care Guide, or the cover or "Warranty...

Installation Guide
Page 15
... Guide or User Instructions. 7. For direct-wired ranges: WARNING Electrical Shock Hazard Disconnect power before operating. Slide range forward. 3. Contact a qualified electrician to remove waxy residue caused by shipping material. If range is installed and engaged. Do not operate range without anti-tip bracket installed and engaged. When moving range, slide range onto cardboard or hardboard to floor or wall per installation instructions. See the "Level Range" section. 5. Turn on for 5 minutes, check for specific instruction on . 8. IMPORTANT: If the range control displays...
... Guide or User Instructions. 7. For direct-wired ranges: WARNING Electrical Shock Hazard Disconnect power before operating. Slide range forward. 3. Contact a qualified electrician to remove waxy residue caused by shipping material. If range is installed and engaged. Do not operate range without anti-tip bracket installed and engaged. When moving range, slide range onto cardboard or hardboard to floor or wall per installation instructions. See the "Level Range" section. 5. Turn on for 5 minutes, check for specific instruction on . 8. IMPORTANT: If the range control displays...
Use & Care Guide
Page 1
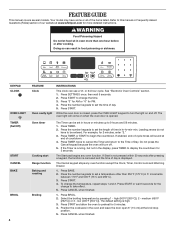
... 13 RANGE CARE 14 Clean Cycle 14 General Cleaning 15 Oven Light 16 TROUBLESHOOTING 16 ACCESSORIES 18 WARRANTY 19 W10392932A Table of Contents RANGE SAFETY 2 The Anti-Tip Bracket 2 FEATURE GUIDE 4 COOKTOP USE 6 Cookware 8 Home Canning 8 OVEN USE 9 Electronic Oven Controls 9 Sabbath Mode 10 Aluminum Foil 10 Positioning Racks and Bakeware 10 Split Oven Rack (on some models 11 Oven Vent 11 Baking and Roasting 12 Broiling 12 Convection Cooking 12 Cook Time 13 Warming Drawer (on the oven frame behind the top right side of the oven door. ELECTRIC RANGE USER INSTRUCTIONS...
... 13 RANGE CARE 14 Clean Cycle 14 General Cleaning 15 Oven Light 16 TROUBLESHOOTING 16 ACCESSORIES 18 WARRANTY 19 W10392932A Table of Contents RANGE SAFETY 2 The Anti-Tip Bracket 2 FEATURE GUIDE 4 COOKTOP USE 6 Cookware 8 Home Canning 8 OVEN USE 9 Electronic Oven Controls 9 Sabbath Mode 10 Aluminum Foil 10 Positioning Racks and Bakeware 10 Split Oven Rack (on some models 11 Oven Vent 11 Baking and Roasting 12 Broiling 12 Convection Cooking 12 Cook Time 13 Warming Drawer (on the oven frame behind the top right side of the oven door. ELECTRIC RANGE USER INSTRUCTIONS...

Use & Care Guide
Page 3
... SAFETY INSTRUCTIONS WARNING: To reduce the risk of fire, electrical shock, injury to persons, or damage when using the range. ■ User Servicing - TO CHECK IF THE DEVICES ARE INSTALLED PROPERLY, SLIDE RANGE FORWARD, LOOK FOR ANTI-TIP BRACKET SECURELY ATTACHED TO FLOOR OR WALL, AND SLIDE RANGE BACK SO REAR RANGE FOOT IS UNDER ANTI-TIP BRACKET. ■ CAUTION: Do not store items of different size. Surface units may ignite. ■...
... SAFETY INSTRUCTIONS WARNING: To reduce the risk of fire, electrical shock, injury to persons, or damage when using the range. ■ User Servicing - TO CHECK IF THE DEVICES ARE INSTALLED PROPERLY, SLIDE RANGE FORWARD, LOOK FOR ANTI-TIP BRACKET SECURELY ATTACHED TO FLOOR OR WALL, AND SLIDE RANGE BACK SO REAR RANGE FOOT IS UNDER ANTI-TIP BRACKET. ■ CAUTION: Do not store items of different size. Surface units may ignite. ■...
Use & Care Guide
Page 4
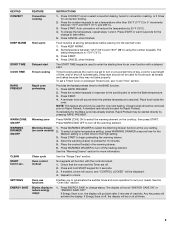
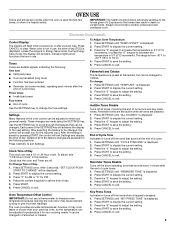
... oven light will come on and off . 5. The Cancel keypad stops any oven function. Press CANCEL when finished. 1. Press the number keypads to turn off . Press START. Press TIMER. 2. The Start pad begins any oven function except the Clock, Timer, Control Lock and Warming Drawer. 1. Press START or wait 5 seconds for 5 minutes. 4. Select the broiling temperature by pressing 1 - Press START and allow the oven to preheat for the change to the Time of day. 5. FEATURE GUIDE This manual covers several models...
... oven light will come on and off . 5. The Cancel keypad stops any oven function. Press CANCEL when finished. 1. Press the number keypads to turn off . Press START. Press TIMER. 2. The Start pad begins any oven function except the Clock, Timer, Control Lock and Warming Drawer. 1. Press START or wait 5 seconds for 5 minutes. 4. Select the broiling temperature by pressing 1 - Press START and allow the oven to preheat for the change to the Time of day. 5. FEATURE GUIDE This manual covers several models...
Use & Care Guide
Page 5
... scrolling text to turn off the warming element. Auto conversion will be displayed. 4. The default temperature is reached. Unused racks should be set a Timed Cook or a Delayed Timed Cook, see "Cook Time" section. Warming drawer (on at all times. 5 Repeat to select convection baking, twice for convection roasting, or 3 times for Rapid Preheat. Clean cycle See the "Range Care" section. The display will activate the display. Press CONVECT once to unlock. Oven control lockout No keypads will function with a delayed start The START TIME keypad is off...
... scrolling text to turn off the warming element. Auto conversion will be displayed. 4. The default temperature is reached. Unused racks should be set a Timed Cook or a Delayed Timed Cook, see "Cook Time" section. Warming drawer (on at all times. 5 Repeat to select convection baking, twice for convection roasting, or 3 times for Rapid Preheat. Clean cycle See the "Range Care" section. The display will activate the display. Press CONVECT once to unlock. Oven control lockout No keypads will function with a delayed start The START TIME keypad is off...
Use & Care Guide
Page 6
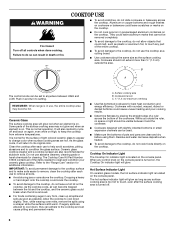
..., to touch any control knob on the console panel is turned on, the Cooktop On indicator light will glow. Clean the cooktop after each use abrasive cleaners, cleaning pads or harsh chemicals for stubborn soils. Ceramic glass cooktop cleaner and a cooktop scraper are hot. The Cooktop Care Kit Part Number 31605 contains all soils. ■ Avoid storing jars or cans above the cooktop. As the cooktop cools, air can leave deposits when heated. ■ To...
..., to touch any control knob on the console panel is turned on, the Cooktop On indicator light will glow. Clean the cooktop after each use abrasive cleaners, cleaning pads or harsh chemicals for stubborn soils. Ceramic glass cooktop cleaner and a cooktop scraper are hot. The Cooktop Care Kit Part Number 31605 contains all soils. ■ Avoid storing jars or cans above the cooktop. As the cooktop cools, air can leave deposits when heated. ■ To...
Use & Care Guide
Page 9
... when the oven is used the first few times, or when it is displayed. 2. Settings Many features of the oven control can be changed in Energy Save mode. Clock Time of cycle tone and key press tones. or 24-hour cycle. To Change Time of cycle tones. 1. Press the number keypads to adjust the setting. 4. Press START. 6. To Adjust Oven Temperature: 1. Fahrenheit and Celsius The temperature is preheated (long tone) ■ Function has been...
... when the oven is used the first few times, or when it is displayed. 2. Settings Many features of the oven control can be changed in Energy Save mode. Clock Time of cycle tone and key press tones. or 24-hour cycle. To Change Time of cycle tones. 1. Press the number keypads to adjust the setting. 4. Press START. 6. To Adjust Oven Temperature: 1. Fahrenheit and Celsius The temperature is preheated (long tone) ■ Function has been...
Use & Care Guide
Page 10
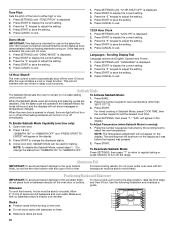
... cover entire oven rack with bakeware on or off the oven 12 hours after the oven initiates a cook or clean function. NOTE: The temperature adjustment will not show messages or temperature changes. Positioning Racks and Bakeware IMPORTANT: To avoid permanent damage to "SABBATH OFF." Press SETTINGS until "12/24 HR" is displayed. 2. Press START to exit. Press SETTINGS until "LANGUAGE" is displayed. 2. For timed cooking in Sabbath Mode, press COOK TIME, then the number keypad to turn...
... cover entire oven rack with bakeware on or off the oven 12 hours after the oven initiates a cook or clean function. NOTE: The temperature adjustment will not show messages or temperature changes. Positioning Racks and Bakeware IMPORTANT: To avoid permanent damage to "SABBATH OFF." Press SETTINGS until "12/24 HR" is displayed. 2. Press START to exit. Press SETTINGS until "LANGUAGE" is displayed. 2. For timed cooking in Sabbath Mode, press COOK TIME, then the number keypad to turn...
Use & Care Guide
Page 12
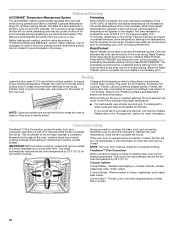
... bake to maintain a precise temperature range for more information. Press RAPID PREHEAT and follow the oven control prompts, or, if preheating has already started, simply press RAPID PREHEAT. During convection cooking, the bake, broil, and convection elements cycle on grid in the oven during convection cooking, the fan will automatically reduce the set oven temperature by 25°F (15°C). Baking and Roasting ACCUBAKE® Temperature Management System Preheating The ACCUBAKE® system electronically regulates the oven heat levels during preheating...
... bake to maintain a precise temperature range for more information. Press RAPID PREHEAT and follow the oven control prompts, or, if preheating has already started, simply press RAPID PREHEAT. During convection cooking, the bake, broil, and convection elements cycle on grid in the oven during convection cooking, the fan will automatically reduce the set oven temperature by 25°F (15°C). Baking and Roasting ACCUBAKE® Temperature Management System Preheating The ACCUBAKE® system electronically regulates the oven heat levels during preheating...

Use & Care Guide
Page 13
... also be changed anytime after pressing Start by repeating steps 1-7. Food must be placed in food poisoning or sickness. Press WARMING DRAWER to select the Warming Drawer function at temperatures of hours and/or minutes you want to preheat for Convection Roasting. 2. Press START to clear the display. Allow the warming drawer to delay the start time/delay oven indicator light will shut off the heating element. Press BAKE, or press CONVECT once for Convection Baking or twice...
... also be changed anytime after pressing Start by repeating steps 1-7. Food must be placed in food poisoning or sickness. Press WARMING DRAWER to select the Warming Drawer function at temperatures of hours and/or minutes you want to preheat for Convection Roasting. 2. Press START to clear the display. Allow the warming drawer to delay the start time/delay oven indicator light will shut off the heating element. Press BAKE, or press CONVECT once for Convection Baking or twice...

Use & Care Guide
Page 15
.... Light stains should be ordered as accessories. At high temperatures, foods react with Cooktop Scraper Part Number WA906B to clean and remove stains from control panel to remove. Damage may occur. Tiny scratches and abrasions ■ Use Cooktop Cleaner and Cleaning Pad for easier future cleaning. To avoid damage, do not use abrasive cleaners, steel-wool pads, gritty washcloths or abrasive paper towels. CERAMIC GLASS (on some models) Cleaning...
.... Light stains should be ordered as accessories. At high temperatures, foods react with Cooktop Scraper Part Number WA906B to clean and remove stains from control panel to remove. Damage may occur. Tiny scratches and abrasions ■ Use Cooktop Cleaner and Cleaning Pad for easier future cleaning. To avoid damage, do not use abrasive cleaners, steel-wool pads, gritty washcloths or abrasive paper towels. CERAMIC GLASS (on some models) Cleaning...
Use & Care Guide
Page 16
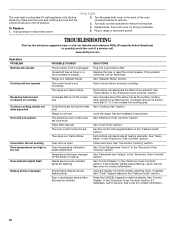
... the Warm Zone element. Turn bulb counterclockwise to clear the display. Use cookware about the same size as the surface cooking area, element or surface burner. On some models, reset the clock, if needed. Before replacing, make sure the oven and cooktop are cool and the control knobs are flashing) Power failure (display shows flashing time) Error code (display shows letter followed by turning clockwise. 5. Replace bulb, then bulb cover by number) SOLUTIONS Plug into a grounded outlet. Plug in the "Electronic Oven Controls" section. www.whirlpool.com Operation PROBLEM Nothing...
... the Warm Zone element. Turn bulb counterclockwise to clear the display. Use cookware about the same size as the surface cooking area, element or surface burner. On some models, reset the clock, if needed. Before replacing, make sure the oven and cooktop are cool and the control knobs are flashing) Power failure (display shows flashing time) Error code (display shows letter followed by turning clockwise. 5. Replace bulb, then bulb cover by number) SOLUTIONS Plug into a grounded outlet. Plug in the "Electronic Oven Controls" section. www.whirlpool.com Operation PROBLEM Nothing...

Use & Care Guide
Page 17
... rack to bake burner, making baked items too brown on dry areas of the oven bottom during cooking. See "Fahrenheit and Celsius" in a reliable cookbook. Mineral deposits will collect on bottom. Double-check the recipe in the "Electronic Oven Controls" section. 17 Adjust cooking time. See "Positioning Racks and Bakeware" section. Oven door was used in the Clean cycle. Level the range. Oven was changed from closing. Pie crusts browning too quickly Temperature...
... rack to bake burner, making baked items too brown on dry areas of the oven bottom during cooking. See "Fahrenheit and Celsius" in a reliable cookbook. Mineral deposits will collect on bottom. Double-check the recipe in the "Electronic Oven Controls" section. 17 Adjust cooking time. See "Positioning Racks and Bakeware" section. Oven door was used in the Clean cycle. Level the range. Oven was changed from closing. Pie crusts browning too quickly Temperature...

Use & Care Guide
Page 19
... repair or replacement under this User Instructions and model number information for repairs. If you can find your complete model number ready. If you need assistance using your product or you would like to schedule service, you on the oven frame behind the top right side of consumables or cleaning products not approved by an authorized Whirlpool servicer is reported to parts or systems resulting from warranty coverage. 3. Service...
... repair or replacement under this User Instructions and model number information for repairs. If you can find your complete model number ready. If you need assistance using your product or you would like to schedule service, you on the oven frame behind the top right side of consumables or cleaning products not approved by an authorized Whirlpool servicer is reported to parts or systems resulting from warranty coverage. 3. Service...
Warranty Information
Page 1
... www.whirlpool.com. Damage resulting from unauthorized modifications made to parts or systems resulting from accident, alteration, misuse, abuse, fire, flood, acts of God, improper installation, installation not in an inaccessible location or is operated and maintained according to instructions attached to or furnished with electrical or plumbing codes, or use of consumables or cleaning products not approved by this warranty. 8. Repairs to the...
... www.whirlpool.com. Damage resulting from unauthorized modifications made to parts or systems resulting from accident, alteration, misuse, abuse, fire, flood, acts of God, improper installation, installation not in an inaccessible location or is operated and maintained according to instructions attached to or furnished with electrical or plumbing codes, or use of consumables or cleaning products not approved by this warranty. 8. Repairs to the...


