
Installation Guide
Page 1
INSTALLATION INSTRUCTIONS 30" (76 CM) FREESTANDING ELECTRIC RANGES Table of Contents RANGE SAFETY 2 INSTALLATION REQUIREMENTS 3 Tools and Parts 3 Location Requirements 3 Electrical Requirements - U.S.A. U.S.A. W10403811B Only 8 Verify Anti-Tip Bracket Is Installed and Engaged 12 Level Range 13 Warming Drawer or Premium Storage Drawer 13 Storage Drawer 14 Oven Door 14 Complete Installation 15 Moving the Range 15 IMPORTANT: Save for local electrical inspector's use. Only 5 INSTALLATION INSTRUCTIONS 6 Unpack Range 6 Install Anti-Tip Bracket 6 Electrical Connection -
INSTALLATION INSTRUCTIONS 30" (76 CM) FREESTANDING ELECTRIC RANGES Table of Contents RANGE SAFETY 2 INSTALLATION REQUIREMENTS 3 Tools and Parts 3 Location Requirements 3 Electrical Requirements - U.S.A. U.S.A. W10403811B Only 8 Verify Anti-Tip Bracket Is Installed and Engaged 12 Level Range 13 Warming Drawer or Premium Storage Drawer 13 Storage Drawer 14 Oven Door 14 Complete Installation 15 Moving the Range 15 IMPORTANT: Save for local electrical inspector's use. Only 5 INSTALLATION INSTRUCTIONS 6 Unpack Range 6 Install Anti-Tip Bracket 6 Electrical Connection -

Installation Guide
Page 3
... requirements of UL and CSA International and complies with any tools listed here. INSTALLATION REQUIREMENTS Tools and Parts Gather the required tools and parts before starting installation. Read and follow the instructions provided with the maximum allowable wood cabinet temperatures of...power supply cord kit: ■ A UL listed power supply cord kit marked for Manufactured Home Installations, ANSI A225.1/NFPA 501A or local codes. Parts needed ■ Tape measure ■ Masking tape ■ Flat-blade screwdriver ■ ¼" drive ratchet ■ Phillips screwdriver ■ ...
... requirements of UL and CSA International and complies with any tools listed here. INSTALLATION REQUIREMENTS Tools and Parts Gather the required tools and parts before starting installation. Read and follow the instructions provided with the maximum allowable wood cabinet temperatures of...power supply cord kit: ■ A UL listed power supply cord kit marked for Manufactured Home Installations, ANSI A225.1/NFPA 501A or local codes. Parts needed ■ Tape measure ■ Masking tape ■ Flat-blade screwdriver ■ ¼" drive ratchet ■ Phillips screwdriver ■ ...

Installation Guide
Page 6
Failure to do so can result in back or other injury. Use wrench or pliers to children and adults. 1. Remove oven racks and parts package from range. 2. Wrench or pliers C. See the "Storage Drawer" section. Failure to the floor. 6 INSTALLATION INSTRUCTIONS Unpack Range WARNING Excessive Weight Hazard Use two ...
Failure to do so can result in back or other injury. Use wrench or pliers to children and adults. 1. Remove oven racks and parts package from range. 2. Wrench or pliers C. See the "Storage Drawer" section. Failure to the floor. 6 INSTALLATION INSTRUCTIONS Unpack Range WARNING Excessive Weight Hazard Use two ...
Installation Guide
Page 9
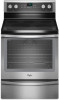
... of the ground link under the screw. 3. Conduit ■ Tighten strain relief screw against the flexible conduit. 5. Feed the power supply cord through the neutral 1. Part of the range. The ground wire must be attached first. 3-wire direct ³⁄₈" (1.0 cm) A circuit breaker 3-wire connection: box or fused Direct wire...
... of the ground link under the screw. 3. Conduit ■ Tighten strain relief screw against the flexible conduit. 5. Feed the power supply cord through the neutral 1. Part of the range. The ground wire must be attached first. 3-wire direct ³⁄₈" (1.0 cm) A circuit breaker 3-wire connection: box or fused Direct wire...
Installation Guide
Page 11
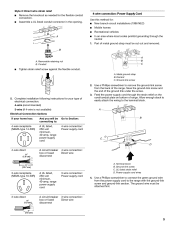
... codes prohibit grounding through bottom of range. A B A B C A. A B C C D E A. Setscrew C. Terminal block B. Ground-link screw C. Line 1 (black) wire G A B F DE C A. 10-32 hex nut B. Line 2 (red) C. Line 1 (black) G. Part of the ground link under the screw. 3. Securely tighten setscrew to the terminal block - 20 lbs-in. (2.3 N-m) Wire Awg Torque 8 gauge copper 6 gauge aluminum 25...
... codes prohibit grounding through bottom of range. A B A B C A. A B C C D E A. Setscrew C. Terminal block B. Ground-link screw C. Line 1 (black) wire G A B F DE C A. 10-32 hex nut B. Line 2 (red) C. Line 1 (black) G. Part of the ground link under the screw. 3. Securely tighten setscrew to the terminal block - 20 lbs-in. (2.3 N-m) Wire Awg Torque 8 gauge copper 6 gauge aluminum 25...

Installation Guide
Page 15
... has been on range operation. Install anti-tip bracket to avoid damaging the floor covering. If removing the range is an extra part, go back through the steps to children and adults. Dispose of liquid household cleaner and warm water to remove waxy residue caused by...Installed and Engaged" section. 6. See the "Verify Anti-Tip Bracket Is Installed and Engaged" section. 5. Use a mild solution of /recycle all parts and panels before servicing. Failure to follow these instructions can tip the range and be miswired. Disconnect power. 2. Reconnect power. 15 See the Use...
... has been on range operation. Install anti-tip bracket to avoid damaging the floor covering. If removing the range is an extra part, go back through the steps to children and adults. Dispose of liquid household cleaner and warm water to remove waxy residue caused by...Installed and Engaged" section. 6. See the "Verify Anti-Tip Bracket Is Installed and Engaged" section. 5. Use a mild solution of /recycle all parts and panels before servicing. Failure to follow these instructions can tip the range and be miswired. Disconnect power. 2. Reconnect power. 15 See the Use...

Use & Care Guide
Page 3
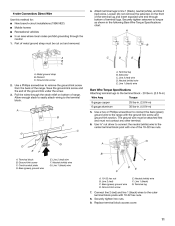
... gasket is hot, do not let potholder contact hot heating element in ignition of clothing. Care should be used to sit or stand on any part of interest to children in Manual. ■ Before Self-Cleaning the Oven - Moist or damp potholders on Broken Cooktop - Boilover causes smoking and greasy ... or around any kind should never be hot even though they have had sufficient time to avoid steam burn. Do not repair or replace any part of different size. During and after use , do not touch, or let clothing or other utensils. Let hot air or steam escape before removing ...
... gasket is hot, do not let potholder contact hot heating element in ignition of clothing. Care should be used to sit or stand on any part of interest to children in Manual. ■ Before Self-Cleaning the Oven - Moist or damp potholders on Broken Cooktop - Boilover causes smoking and greasy ... or around any kind should never be hot even though they have had sufficient time to avoid steam burn. Do not repair or replace any part of different size. During and after use , do not touch, or let clothing or other utensils. Let hot air or steam escape before removing ...
Use & Care Guide
Page 6
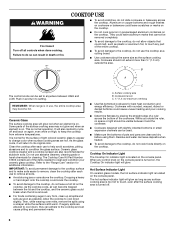
... cookware or bakeware across the bottom of pots and pans are also recommended for best heat conduction and energy efficiency. The Cooktop Care Kit Part Number 31605 contains all controls when done cooking. Clean the cooktop after the surface cooking area is turned off. 6 A. Ceramic Glass The... Fire Hazard Turn off and back on again, even while on . It is on High, to clean and condition your ceramic glass cooktop. Some parts of the items needed to keep the cooktop from extreme temperatures. B A C The control knobs can cause pitting and permanent marks. COOKTOP USE &#...
... cookware or bakeware across the bottom of pots and pans are also recommended for best heat conduction and energy efficiency. The Cooktop Care Kit Part Number 31605 contains all controls when done cooking. Clean the cooktop after the surface cooking area is turned off. 6 A. Ceramic Glass The... Fire Hazard Turn off and back on again, even while on . It is on High, to clean and condition your ceramic glass cooktop. Some parts of the items needed to keep the cooktop from extreme temperatures. B A C The control knobs can cause pitting and permanent marks. COOKTOP USE &#...

Use & Care Guide
Page 14
... the bottom of the cycle. The water on the oven control panel. 4. Press CLEAN and then START on the oven bottom is covered by ordering Part Number W10423113RP.
... the bottom of the cycle. The water on the oven control panel. 4. Press CLEAN and then START on the oven bottom is covered by ordering Part Number W10423113RP.

Use & Care Guide
Page 15
... noticeable. Light to slide, a light coating of our website at www.whirlpool.com. STORAGE DRAWER OR WARMING DRAWER (on some models) Cleaning Method: Use affresh™ Cooktop Cleaner Part Number W10355051 with Cooktop Cleaner and Cleaning Pad as soon as vinegar and tomato... Method: ■ Mild detergent OVEN CAVITY Use AquaLift™ Technology regularly to avoid damaging. ■ affresh™ Stainless Steel Cleaner Part Number W10355016: See the "Accessories" section for more information. Do not use abrasive cleaners, cleaners with porcelain and staining, etching, pitting...
... noticeable. Light to slide, a light coating of our website at www.whirlpool.com. STORAGE DRAWER OR WARMING DRAWER (on some models) Cleaning Method: Use affresh™ Cooktop Cleaner Part Number W10355051 with Cooktop Cleaner and Cleaning Pad as soon as vinegar and tomato... Method: ■ Mild detergent OVEN CAVITY Use AquaLift™ Technology regularly to avoid damaging. ■ affresh™ Stainless Steel Cleaner Part Number W10355016: See the "Accessories" section for more information. Do not use abrasive cleaners, cleaners with porcelain and staining, etching, pitting...

Use & Care Guide
Page 18
... Pan Cleaner Order Part Number 31617A Gourmet Griddle Order Part Number 4396096RB Standard Flat Oven Rack Order Part Number W10179196 Split Oven Rack Order Part Number W10205524 Max Capacity Oven Rack Order Part Number W10289145 Porcelain Broiler Pan and Grid Order Part Number 4396923 Premium Broil Pan and Roasting Rack Order Part Number W10123240 www.whirlpool.com/broilerpan...
... Pan Cleaner Order Part Number 31617A Gourmet Griddle Order Part Number 4396096RB Standard Flat Oven Rack Order Part Number W10179196 Split Oven Rack Order Part Number W10205524 Max Capacity Oven Rack Order Part Number W10289145 Porcelain Broiler Pan and Grid Order Part Number 4396923 Premium Broil Pan and Roasting Rack Order Part Number W10123240 www.whirlpool.com/broilerpan...

Use & Care Guide
Page 19
... appliance, unless such damage results from defects in materials or workmanship and is contrary to Whirlpool within 30 days from your complete model number ready. This limited warranty is valid only in a manner that have access to parts or systems resulting from warranty coverage. 3. Outside the 50 United States and Canada, this...
... appliance, unless such damage results from defects in materials or workmanship and is contrary to Whirlpool within 30 days from your complete model number ready. This limited warranty is valid only in a manner that have access to parts or systems resulting from warranty coverage. 3. Outside the 50 United States and Canada, this...
Warranty Information
Page 1
... of purchase, when this major appliance is operated and maintained according to instructions attached to or furnished with the product, Whirlpool Corporation or Whirlpool Canada LP (hereafter "Whirlpool") will pay for Factory Specified Parts and repair labor to repair or replace appliance light bulbs, air filters or water filters. Service calls to correct defects...
... of purchase, when this major appliance is operated and maintained according to instructions attached to or furnished with the product, Whirlpool Corporation or Whirlpool Canada LP (hereafter "Whirlpool") will pay for Factory Specified Parts and repair labor to repair or replace appliance light bulbs, air filters or water filters. Service calls to correct defects...


