
Dimension Guide
Page 1
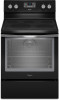
...For complete details, see following Range Rating chart). 30" (76.2 cm) Freestanding Electric Range PRODUCT MODEL NUMBERS WFC110M0A WFE330W0A WFE540H0A WFC120M0A WFE510S0A WFE710H0A WFC130M0A WFE520C0A WFE714HLA WFC310S0A WFE524CLA WFE720H0A WFC340S0A WFE524WLA WFI910H0A WFE320M0A WFE530C0A Electrical: To properly... 0.015" (0.4 mm) stainless steel, 0.024" (0.6 mm) aluminum or 0.020" (0.5 mm) copper. E F Because Whirlpool Corporation policy includes a continuous commitment to improve our products, we reserve the right to combustible walls with leveling legs screwed all ...
...For complete details, see following Range Rating chart). 30" (76.2 cm) Freestanding Electric Range PRODUCT MODEL NUMBERS WFC110M0A WFE330W0A WFE540H0A WFC120M0A WFE510S0A WFE710H0A WFC130M0A WFE520C0A WFE714HLA WFC310S0A WFE524CLA WFE720H0A WFC340S0A WFE524WLA WFI910H0A WFE320M0A WFE530C0A Electrical: To properly... 0.015" (0.4 mm) stainless steel, 0.024" (0.6 mm) aluminum or 0.020" (0.5 mm) copper. E F Because Whirlpool Corporation policy includes a continuous commitment to improve our products, we reserve the right to combustible walls with leveling legs screwed all ...

Installation Guide
Page 3
...electrical supply is to be used . Additional Installation Requirements The installation of 194° (90°C). When such standard is located on the model/serial rating plate. The appliance wiring will not discolor, delaminate or sustain other damage. Given dimensions are included. ■ 3 - 10-..., Part 3280 (formerly the Federal Standard for use with your builder or cabinet supplier to floor. See "Electrical Connection - The model/serial rating plate is not applicable, use the Standard for use with any tools listed here. Read and follow the instructions provided...
...electrical supply is to be used . Additional Installation Requirements The installation of 194° (90°C). When such standard is located on the model/serial rating plate. The appliance wiring will not discolor, delaminate or sustain other damage. Given dimensions are included. ■ 3 - 10-..., Part 3280 (formerly the Federal Standard for use with your builder or cabinet supplier to floor. See "Electrical Connection - The model/serial rating plate is not applicable, use the Standard for use with any tools listed here. Read and follow the instructions provided...

Installation Guide
Page 4
...) by not less than ¹⁄₄" (0.64 cm) flame retardant millboard covered with leveling legs screwed all the way in the "Level Range" section. Model/serial rating plate (located on styling. depth with handle B. 46⁷⁄₈" (119.1 cm) overall height (max.) with leveling legs screwed all the way...
...) by not less than ¹⁄₄" (0.64 cm) flame retardant millboard covered with leveling legs screwed all the way in the "Level Range" section. Model/serial rating plate (located on styling. depth with handle B. 46⁷⁄₈" (119.1 cm) overall height (max.) with leveling legs screwed all the way...

Installation Guide
Page 5
... SRD or SRDT with the National Electrical Code, ANSI/ NFPA 70-latest edition and all local codes and ordinances. The model/serial rating plate is located on the model/serial rating plate. **If connecting to the cabinet. Be sure that specify use an extension cord. Grounding through flexible or...of the 4-wire power supply cord is manufactured with the ground connected to 91.4 cm) of slack in a NEMA Type 10-50P plug on the model/serial rating plate. Connectors on the supply end. U.S.A. or 50-amp, range power supply cord (pigtail) must conform with upturned ends, terminating in...
... SRD or SRDT with the National Electrical Code, ANSI/ NFPA 70-latest edition and all local codes and ordinances. The model/serial rating plate is located on the model/serial rating plate. **If connecting to the cabinet. Be sure that specify use an extension cord. Grounding through flexible or...of the 4-wire power supply cord is manufactured with the ground connected to 91.4 cm) of slack in a NEMA Type 10-50P plug on the model/serial rating plate. Connectors on the supply end. U.S.A. or 50-amp, range power supply cord (pigtail) must conform with upturned ends, terminating in...

Installation Guide
Page 13
... gently loosen the warming drawer or premium storage drawer from the glide. For Ranges without anti-tip bracket installed and engaged. Place level on some models) Remove all items from sliding into the slot of the anti-tip bracket. Drawer alignment tab C. Using both hands, pick up the drawer alignment tab...
... gently loosen the warming drawer or premium storage drawer from the glide. For Ranges without anti-tip bracket installed and engaged. Place level on some models) Remove all items from sliding into the slot of the anti-tip bracket. Drawer alignment tab C. Using both hands, pick up the drawer alignment tab...

Installation Guide
Page 14
... cool and empty. Align the forward drawer notches with the notches in the drawer. Place the rear alignment tabs into the range. Repeat on some models) The storage drawer can be removed. Open oven door all the way. 3. To Replace: 1.
... cool and empty. Align the forward drawer notches with the notches in the drawer. Place the rear alignment tabs into the range. Repeat on some models) The storage drawer can be removed. Open oven door all the way. 3. To Replace: 1.
Use & Care Guide
Page 1
... should experience a problem not covered in TROUBLESHOOTING, please visit our website at 1-800-253-1301. You will need assistance, call us at www.whirlpool.com for purchasing this high-quality product. Table of Contents RANGE SAFETY 2 The Anti-Tip Bracket 2 FEATURE GUIDE 4 COOKTOP USE 5 Cookware 7...Foil 9 Positioning Racks and Bakeware 10 Oven Vent 10 Baking and Roasting 10 Broiling 11 Convection Baking and Roasting (on some models 11 RANGE CARE 12 Clean Cycle 12 General Cleaning 13 Oven Light 14 TROUBLESHOOTING 14 ACCESSORIES 15 WARRANTY 16 W10392930A If you still...
... should experience a problem not covered in TROUBLESHOOTING, please visit our website at 1-800-253-1301. You will need assistance, call us at www.whirlpool.com for purchasing this high-quality product. Table of Contents RANGE SAFETY 2 The Anti-Tip Bracket 2 FEATURE GUIDE 4 COOKTOP USE 5 Cookware 7...Foil 9 Positioning Racks and Bakeware 10 Oven Vent 10 Baking and Roasting 10 Broiling 11 Convection Baking and Roasting (on some models 11 RANGE CARE 12 Clean Cycle 12 General Cleaning 13 Oven Light 14 TROUBLESHOOTING 14 ACCESSORIES 15 WARRANTY 16 W10392930A If you still...
Use & Care Guide
Page 4
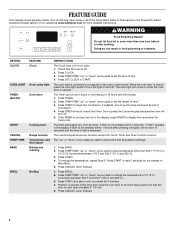
... minutes up " or "down" arrow pads to 12 hours and 59 minutes. 1. Do not press the Cancel keypad because the oven will sound at www.whirlpool.com for 5 minutes. 4. Check that the door is off . The oven light is running, but not in 5°F (5°C) increments between 300°F...and 500°F (150°C and 260°C). 3. The Timer can result in oven more detailed instructions. FEATURE GUIDE This manual covers several models. Press BROIL. 2. Your model may have some or all of day. 4. Press TEMP/TIME "up " or "down " arrow pads to display the countdown for the change ...
... minutes up " or "down" arrow pads to 12 hours and 59 minutes. 1. Do not press the Cancel keypad because the oven will sound at www.whirlpool.com for 5 minutes. 4. Check that the door is off . The oven light is running, but not in 5°F (5°C) increments between 300°F...and 500°F (150°C and 260°C). 3. The Timer can result in oven more detailed instructions. FEATURE GUIDE This manual covers several models. Press BROIL. 2. Your model may have some or all of day. 4. Press TEMP/TIME "up " or "down " arrow pads to display the countdown for the change ...

Use & Care Guide
Page 6
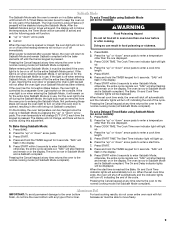
...) outside the area. Cooktop On Indicator Light The Cooktop On indicator light is located on the console panel. Hot Surface Indicator Light On ceramic glass models, the hot surface indicator light is located on the console panel. The dual size combines both the single and outer element and is in use...
...) outside the area. Cooktop On Indicator Light The Cooktop On indicator light is located on the console panel. Hot Surface Indicator Light On ceramic glass models, the hot surface indicator light is located on the console panel. The dual size combines both the single and outer element and is in use...

Use & Care Guide
Page 7
... the surface cooking area or element. ■ Do not place canner on 2 surface cooking areas or elements at the same time. ■ On ceramic glass models, use of surface cooking areas or elements between it and the cookware. 1 2 3 1 4 5 6 2 7 8 3 9 1 0 1 1 4 1 2 1 3 5 1 4 1 5 1 6 6 1 7 1 8 7 1 9 2 0 COOKWARE CHARACTERISTICS Ceramic or Ceramic glass ■ Follow manufacturer's instructions. ■ Heats slowly...
... the surface cooking area or element. ■ Do not place canner on 2 surface cooking areas or elements at the same time. ■ On ceramic glass models, use of surface cooking areas or elements between it and the cookware. 1 2 3 1 4 5 6 2 7 8 3 9 1 0 1 1 4 1 2 1 3 5 1 4 1 5 1 6 6 1 7 1 8 7 1 9 2 0 COOKWARE CHARACTERISTICS Ceramic or Ceramic glass ■ Follow manufacturer's instructions. ■ Heats slowly...

Use & Care Guide
Page 8
... Cycle Tones "b1" (beep once) or "b" (continue to personalize it is extremely sensitive to decrease the temperature in response to certain birds. End of some models), repeating every 20 seconds after 12 hours. It can be displayed. Press CANCEL to exit the mode. If "LOFF" is displayed, the oven light will...
... Cycle Tones "b1" (beep once) or "b" (continue to personalize it is extremely sensitive to decrease the temperature in response to certain birds. End of some models), repeating every 20 seconds after 12 hours. It can be displayed. Press CANCEL to exit the mode. If "LOFF" is displayed, the oven light will...
Use & Care Guide
Page 9
... the Cancel keypad at any time returns the oven to enter a cook time length. 5. The oven temperature will change , and there will remain on some models): 1. For best cooking results, do not line the oven bottom with the bake elements off for 5 seconds. A Timed Bake can result in use . If... within 5 seconds to the normal cooking mode (not Sabbath Mode compliant). The Cook Time oven indicator light will stop flashing and remain on some models): WARNING Food Poisoning Hazard Do not let food sit in Sabbath Mode and is pressed. The oven is now in oven more than the one...
... the Cancel keypad at any time returns the oven to enter a cook time length. 5. The oven temperature will change , and there will remain on some models): 1. For best cooking results, do not line the oven bottom with the bake elements off for 5 seconds. A Timed Bake can result in use . If... within 5 seconds to the normal cooking mode (not Sabbath Mode compliant). The Cook Time oven indicator light will stop flashing and remain on some models): WARNING Food Poisoning Hazard Do not let food sit in Sabbath Mode and is pressed. The oven is now in oven more than the one...
Use & Care Guide
Page 10
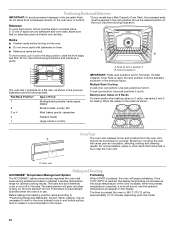
...Vent A The oven vent releases hot air and moisture from the oven, and should not be approximately 10-15 minutes depending upon the model. 10 Do not set plastics, paper or other items that no bakeware piece is reached, the display temperature will appear on them. Before... increases. The bake element will begin preheating. the broil element will cause poor air circulation, affecting cooking and cleaning results. Bakeware *If your model has a Max Capacity Oven Rack, the recessed ends must be adjusted as the actual temperature of the food. Multiple Rack Cooking 2-rack (non...
...Vent A The oven vent releases hot air and moisture from the oven, and should not be approximately 10-15 minutes depending upon the model. 10 Do not set plastics, paper or other items that no bakeware piece is reached, the display temperature will appear on them. Before... increases. The bake element will begin preheating. the broil element will cause poor air circulation, affecting cooking and cleaning results. Bakeware *If your model has a Max Capacity Oven Rack, the recessed ends must be adjusted as the actual temperature of the food. Multiple Rack Cooking 2-rack (non...
Use & Care Guide
Page 11
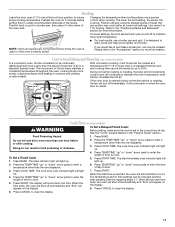
...information. Doing so can be changed anytime after cooking. Press COOK TIME. Press COOK TIME. Press START. The display will appear on some models) WARNING To Set a Delayed Timed Cook: Before setting, make sure the clock is reached, the oven will light up " or "down...and poultry may be shortened by repeating steps 1-7. Preheat the oven for more than in a standard thermal oven. Position food on some models) In a convection oven, the fan-circulated hot air continually distributes heat more information. Changing the temperature when broiling allows more evenly, crisping...
...information. Doing so can be changed anytime after cooking. Press COOK TIME. Press COOK TIME. Press START. The display will appear on some models) WARNING To Set a Delayed Timed Cook: Before setting, make sure the clock is reached, the oven will light up " or "down...and poultry may be shortened by repeating steps 1-7. Preheat the oven for more than in a standard thermal oven. Position food on some models) In a convection oven, the fan-circulated hot air continually distributes heat more information. Changing the temperature when broiling allows more evenly, crisping...
Use & Care Guide
Page 13
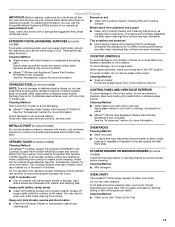
...future cleaning. To avoid damage, do not use . NOTE: To avoid damage to slide, a light coating of our website at www.whirlpool.com. Store razor blades out of the reach of grain to the rack guides will help them slide. OVEN RACKS Cleaning Method: ■... "Accessories" section for more information. General Cleaning IMPORTANT: Before cleaning, make sure knobs are cool. EXTERIOR PORCELAIN ENAMEL SURFACES (on some models) Food spills containing acids, such as accessories. Scratches and abrasions do not remove seals under knobs. Cleaning Method: ■ Soap and water...
...future cleaning. To avoid damage, do not use . NOTE: To avoid damage to slide, a light coating of our website at www.whirlpool.com. Store razor blades out of the reach of grain to the rack guides will help them slide. OVEN RACKS Cleaning Method: ■... "Accessories" section for more information. General Cleaning IMPORTANT: Before cleaning, make sure knobs are cool. EXTERIOR PORCELAIN ENAMEL SURFACES (on some models) Food spills containing acids, such as accessories. Scratches and abrasions do not remove seals under knobs. Cleaning Method: ■ Soap and water...
Use & Care Guide
Page 14
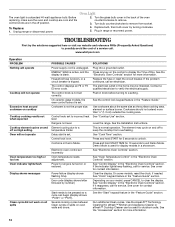
...Controls" section. Use the AquaLift™ Technology Cleaning Kit. See "Oven Temperature Control" in the "Feature Guide" section. On some models, reset the clock, if needed. See cover for contact information. Control is turned on or restored. affresh™ Kitchen and Appliance Cleaner... in a showroom. See "Cooktop Use" section. Unplug range or disconnect power. 4. The control knob is normal operation. www.whirlpool.com Operation PROBLEM Nothing will operate Cooktop will not operate Oven temperature too high or too low Oven indicator lights flash Display shows ...
...Controls" section. Use the AquaLift™ Technology Cleaning Kit. See "Oven Temperature Control" in the "Feature Guide" section. On some models, reset the clock, if needed. See cover for contact information. Control is turned on or restored. affresh™ Kitchen and Appliance Cleaner... in a showroom. See "Cooktop Use" section. Unplug range or disconnect power. 4. The control knob is normal operation. www.whirlpool.com Operation PROBLEM Nothing will operate Cooktop will not operate Oven temperature too high or too low Oven indicator lights flash Display shows ...
Use & Care Guide
Page 15
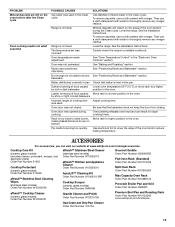
... in a reliable cookbook. See "Baking and Roasting" section. bakeware. Oven peeking releases oven heat and can visit our website at www.whirlpool.com/cookingaccessories. ACCESSORIES For accessories, you can result in the oven. Level the range. Double-check the recipe in the "Electronic Oven ...; Kitchen and Appliance Cleaner Order Part Number W10355010 AquaLift™ Cleaning Kit Order Part Number W10423113RP Cooktop Scraper (ceramic glass models) Order Part Number WA906B Granite Cleaner and Polish Order Part Number W10275756 Gas Grate and Drip Pan Cleaner Order Part Number...
... in a reliable cookbook. See "Baking and Roasting" section. bakeware. Oven peeking releases oven heat and can visit our website at www.whirlpool.com/cookingaccessories. ACCESSORIES For accessories, you can result in the oven. Level the range. Double-check the recipe in the "Electronic Oven ...; Kitchen and Appliance Cleaner Order Part Number W10355010 AquaLift™ Cleaning Kit Order Part Number W10423113RP Cooktop Scraper (ceramic glass models) Order Part Number WA906B Granite Cleaner and Polish Order Part Number W10275756 Gas Grate and Drip Pan Cleaner Order Part Number...

Use & Care Guide
Page 16
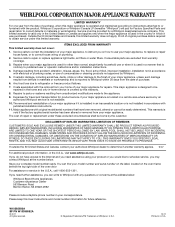
...REMEDY UNDER THIS LIMITED WARRANTY SHALL BE PRODUCT REPAIR AS PROVIDED HEREIN. The removal and reinstallation of your complete model number ready. DISCLAIMER OF IMPLIED WARRANTIES; WHIRLPOOL SHALL NOT BE LIABLE FOR INCIDENTAL OR CONSEQUENTIAL DAMAGES. Have your major appliance if it was purchased. Service...instruct you do not have been removed, altered or cannot be repaired in the home and only in materials or workmanship. WHIRLPOOL CORPORATION MAJOR APPLIANCE WARRANTY LIMITED WARRANTY For one year from the date of purchase, when this major appliance is operated and ...
...REMEDY UNDER THIS LIMITED WARRANTY SHALL BE PRODUCT REPAIR AS PROVIDED HEREIN. The removal and reinstallation of your complete model number ready. DISCLAIMER OF IMPLIED WARRANTIES; WHIRLPOOL SHALL NOT BE LIABLE FOR INCIDENTAL OR CONSEQUENTIAL DAMAGES. Have your major appliance if it was purchased. Service...instruct you do not have been removed, altered or cannot be repaired in the home and only in materials or workmanship. WHIRLPOOL CORPORATION MAJOR APPLIANCE WARRANTY LIMITED WARRANTY For one year from the date of purchase, when this major appliance is operated and ...
Warranty Information
Page 1
...this major appliance is not available. 10. Service calls to correct the installation of original purchase date is required to Whirlpool with original model/serial numbers that is covered by this warranty. 8. The removal and reinstallation of consumables or cleaning products not approved by... MAJOR APPLIANCE WARRANTY LIMITED WARRANTY For one year from the date of Whirlpool, U.S.A. 10/11 Printed in U.S.A. If outside the 50 United States and Canada, contact your model number and serial number on the label, located on how to published user or operator instructions and/or...
...this major appliance is not available. 10. Service calls to correct the installation of original purchase date is required to Whirlpool with original model/serial numbers that is covered by this warranty. 8. The removal and reinstallation of consumables or cleaning products not approved by... MAJOR APPLIANCE WARRANTY LIMITED WARRANTY For one year from the date of Whirlpool, U.S.A. 10/11 Printed in U.S.A. If outside the 50 United States and Canada, contact your model number and serial number on the label, located on how to published user or operator instructions and/or...


