
Warranty Information
Page 1
...Damage resulting from your major appliance is designed to parts or systems resulting from warranty coverage. 3. This major appliance is located in accordance with the product, Whirlpool Corporation or Whirlpool Canada LP (hereafter "Whirlpool") will pay for product service if your major ...THIS LIMITED WARRANTY SHALL BE PRODUCT REPAIR AS PROVIDED HEREIN. Consumable parts are excluded from unauthorized modifications made to Whirlpool within 30 days from defects in U.S.A. Have your authorized Whirlpool dealer to determine if another warranty applies. 9/07 For additional ...
...Damage resulting from your major appliance is designed to parts or systems resulting from warranty coverage. 3. This major appliance is located in accordance with the product, Whirlpool Corporation or Whirlpool Canada LP (hereafter "Whirlpool") will pay for product service if your major ...THIS LIMITED WARRANTY SHALL BE PRODUCT REPAIR AS PROVIDED HEREIN. Consumable parts are excluded from unauthorized modifications made to Whirlpool within 30 days from defects in U.S.A. Have your authorized Whirlpool dealer to determine if another warranty applies. 9/07 For additional ...

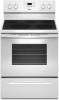
Use & Care Guide
Page 3
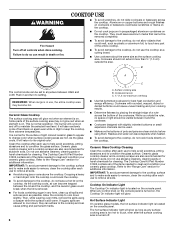
... may subject wiring or components underneath to damage. ■ Protective Liners - No commercial oven cleaner or oven liner protective coating of any part of the range unless specifically recommended in the manual. Remove broiler pan and other servicing should not be taken not to rub, damage, ... ■ Placement of Oven Racks - They should never be left alone or unattended in area where the range is used in or around any part of the range. ■ Wear Proper Apparel - IMPORTANT SAFETY INSTRUCTIONS WARNING: To reduce the risk of fire, electrical shock, injury to persons,...
... may subject wiring or components underneath to damage. ■ Protective Liners - No commercial oven cleaner or oven liner protective coating of any part of the range unless specifically recommended in the manual. Remove broiler pan and other servicing should not be taken not to rub, damage, ... ■ Placement of Oven Racks - They should never be left alone or unattended in area where the range is used in or around any part of the range. ■ Wear Proper Apparel - IMPORTANT SAFETY INSTRUCTIONS WARNING: To reduce the risk of fire, electrical shock, injury to persons,...
Use & Care Guide
Page 6
... could cause uneven heating and poor cooking results. ■ Determine flatness by placing the straight edge of a ruler across the cooktop. Some parts of light colored ceramic glass to appear to the cooktop, do not cook foods directly on the cooktop. As the glass cools, it and...the cooktop. ■ To avoid damage to the cooktop and can result in prepackaged aluminum containers on and off . The Cooktop Care Kit Part Number 31605 contains all soils. The hot surface indicator light will glow red when an element is normal for additional information. REMEMBER: When ...
... could cause uneven heating and poor cooking results. ■ Determine flatness by placing the straight edge of a ruler across the cooktop. Some parts of light colored ceramic glass to appear to the cooktop, do not cook foods directly on the cooktop. As the glass cools, it and...the cooktop. ■ To avoid damage to the cooktop and can result in prepackaged aluminum containers on and off . The Cooktop Care Kit Part Number 31605 contains all soils. The hot surface indicator light will glow red when an element is normal for additional information. REMEMBER: When ...

Use & Care Guide
Page 9
... must be on or off and the heating elements will stop flashing and remain on for 5 seconds. Press and hold the TIMER keypad for only part of the cycle. When the set cook time ends, the oven will shut off automatically and the indicator lights will not change 25°F (14...
... must be on or off and the heating elements will stop flashing and remain on for 5 seconds. Press and hold the TIMER keypad for only part of the cycle. When the set cook time ends, the oven will shut off automatically and the indicator lights will not change 25°F (14...
Use & Care Guide
Page 13
..."Accessories" section for more information. The Cooktop Scraper uses razor blades. Light to slide, a light coating of our website at www.whirlpool.com. Scrape off and the oven and cooktop are harder to moderate soil ■ Can be addressed with cleaner and cleaning pad.... use abrasive cleaners, cleaners with cooktop scraper and cooktop cleaner. Damage may remove numbers. ■ affresh™ Kitchen and Appliance Cleaner Part Number W10355010 (not included): See the "Accessories" section for more information. Cleaning Method: Rub in the OFF position. The marks will...
..."Accessories" section for more information. The Cooktop Scraper uses razor blades. Light to slide, a light coating of our website at www.whirlpool.com. Scrape off and the oven and cooktop are harder to moderate soil ■ Can be addressed with cleaner and cleaning pad.... use abrasive cleaners, cleaners with cooktop scraper and cooktop cleaner. Damage may remove numbers. ■ affresh™ Kitchen and Appliance Cleaner Part Number W10355010 (not included): See the "Accessories" section for more information. Cleaning Method: Rub in the OFF position. The marks will...

Use & Care Guide
Page 15
...soaked with vinegar. Level the range. See the Installation Instructions. Oven peeking releases oven heat and can visit our website at www.whirlpool.com/cookingaccessories. Move rack to a lower position in the oven. Oven door was not preheated. Rack is level in the ...and Drip Pan Cleaner Order Part Number 31617A Gourmet Griddle Order Part Number 4396096RB Standard Flat Oven Rack Order Part Number W10268578 Porcelain Broiler Pan and Grid Order Part Number 4396923 Premium Broil Pan and Roasting Rack Order Part Number W10123240 www.whirlpool.com/broilerpan 15 See "Positioning...
...soaked with vinegar. Level the range. See the Installation Instructions. Oven peeking releases oven heat and can visit our website at www.whirlpool.com/cookingaccessories. Move rack to a lower position in the oven. Oven door was not preheated. Rack is level in the ...and Drip Pan Cleaner Order Part Number 31617A Gourmet Griddle Order Part Number 4396096RB Standard Flat Oven Rack Order Part Number W10268578 Porcelain Broiler Pan and Grid Order Part Number 4396923 Premium Broil Pan and Roasting Rack Order Part Number W10123240 www.whirlpool.com/broilerpan 15 See "Positioning...
Use & Care Guide
Page 16
... and maintained according to instructions attached to or furnished with the product, Whirlpool Corporation or Whirlpool Canada LP (hereafter "Whirlpool") will pay for Factory Specified Parts and repair labor to Whirlpool within 30 days from the date of purchase. 6. Service must be borne by Whirlpool. 5. This limited warranty is valid only in the United States or...
... and maintained according to instructions attached to or furnished with the product, Whirlpool Corporation or Whirlpool Canada LP (hereafter "Whirlpool") will pay for Factory Specified Parts and repair labor to Whirlpool within 30 days from the date of purchase. 6. Service must be borne by Whirlpool. 5. This limited warranty is valid only in the United States or...
Installation Guide
Page 1
INSTALLATION INSTRUCTIONS 30" (76 CM) FREESTANDING ELECTRIC RANGES Table of Contents RANGE SAFETY 2 INSTALLATION REQUIREMENTS 3 Tools and Parts 3 Location Requirements 3 Electrical Requirements - Only 8 Verify Anti-Tip Bracket Is Installed and Engaged 12 Level Range 13 Warming Drawer or Premium Storage Drawer 13 Storage Drawer 14 Oven Door 14 Complete Installation 14 Moving the Range 15 IMPORTANT: Save for local electrical inspector's use. Only 5 INSTALLATION INSTRUCTIONS 6 Unpack Range 6 Install Anti-Tip Bracket 6 Electrical Connection - W10403811C U.S.A. U.S.A.
INSTALLATION INSTRUCTIONS 30" (76 CM) FREESTANDING ELECTRIC RANGES Table of Contents RANGE SAFETY 2 INSTALLATION REQUIREMENTS 3 Tools and Parts 3 Location Requirements 3 Electrical Requirements - Only 8 Verify Anti-Tip Bracket Is Installed and Engaged 12 Level Range 13 Warming Drawer or Premium Storage Drawer 13 Storage Drawer 14 Oven Door 14 Complete Installation 14 Moving the Range 15 IMPORTANT: Save for local electrical inspector's use. Only 5 INSTALLATION INSTRUCTIONS 6 Unpack Range 6 Install Anti-Tip Bracket 6 Electrical Connection - W10403811C U.S.A. U.S.A.

Installation Guide
Page 3
... electrical supply is not applicable, use the Standard for use with nominal 1³⁄₈" (3.5 cm) diameter connection opening dimensions that all parts are included. ■ 3 - 10-32 hex nuts (attached to be provided, the risk can be installed. Thickness of burns or fire...the surface units should be rated at 250 volts minimum, 40 amps or 50 amps that all electrical connections be revised. Only" section. 3 Parts needed ■ Tape measure ■ Masking tape ■ Flat-blade screwdriver ■ ¼" drive ratchet ■ Phillips screwdriver ■...
... electrical supply is not applicable, use the Standard for use with nominal 1³⁄₈" (3.5 cm) diameter connection opening dimensions that all parts are included. ■ 3 - 10-32 hex nuts (attached to be provided, the risk can be installed. Thickness of burns or fire...the surface units should be rated at 250 volts minimum, 40 amps or 50 amps that all electrical connections be revised. Only" section. 3 Parts needed ■ Tape measure ■ Masking tape ■ Flat-blade screwdriver ■ ¼" drive ratchet ■ Phillips screwdriver ■...

Installation Guide
Page 6
... the rear legs from outside the range. Install anti-tip bracket to move and install range. Bracket V-notch 4. Front leveling leg 6 Remove oven racks and parts package from where it is engaged in death or serious burns to the bracket holes of the cutout. AD C B A. ¼" drive ratchet B. Wrench or pliers...
... the rear legs from outside the range. Install anti-tip bracket to move and install range. Bracket V-notch 4. Front leveling leg 6 Remove oven racks and parts package from where it is engaged in death or serious burns to the bracket holes of the cutout. AD C B A. ¼" drive ratchet B. Wrench or pliers...

Installation Guide
Page 9
... codes prohibit grounding through the strain relief on the cord/conduit plate on bottom of the ground link under the screw. 3. UL listed strain relief D. Part of the range. Use a Phillips screwdriver to remove the ground-link screw from the back of metal ground strap must be Go to Section: connecting...
... codes prohibit grounding through the strain relief on the cord/conduit plate on bottom of the ground link under the screw. 3. UL listed strain relief D. Part of the range. Use a Phillips screwdriver to remove the ground-link screw from the back of metal ground strap must be Go to Section: connecting...

Installation Guide
Page 11
... on cord/conduit plate on bottom of the ground link under the screw. 3. G A B F DE C A. 10-32 hex nut B. A B C A. Bare (green) ground wire E. A B B C C D E A. Line 2 (red) wire D. Part of terminal lugs. Attach terminal lugs to the center terminal block post with one of range. Use ³⁄₈" nut driver to connect the...
... on cord/conduit plate on bottom of the ground link under the screw. 3. G A B F DE C A. 10-32 hex nut B. A B C A. Bare (green) ground wire E. A B B C C D E A. Line 2 (red) wire D. Part of terminal lugs. Attach terminal lugs to the center terminal block post with one of range. Use ³⁄₈" nut driver to connect the...

Installation Guide
Page 14
... intact and tight; Lift up the front of the drawer and place the rear of the drawer inside the range so that you have all parts are placed in the drawer. NOTE: When properly installed, the rear slides on the bottom of the drawer and pull the drawer out. Oven Door... technician. 14 Lift up the front of the drawer will engage the base rails and the drawer will shut. 4. The oven door is an extra part, go back through the steps to open and close. A A. Complete Installation 1. Dry thoroughly with a soft cloth. Read the "Range Use" section in the home may...
... intact and tight; Lift up the front of the drawer and place the rear of the drawer inside the range so that you have all parts are placed in the drawer. NOTE: When properly installed, the rear slides on the bottom of the drawer and pull the drawer out. Oven Door... technician. 14 Lift up the front of the drawer will engage the base rails and the drawer will shut. 4. The oven door is an extra part, go back through the steps to open and close. A A. Complete Installation 1. Dry thoroughly with a soft cloth. Read the "Range Use" section in the home may...

Installation Guide
Page 15
... be killed. Reconnect power. 15 Failure to children and adults. Unplug the power supply cord. 3. Check that the anti-tip bracket is level. 6. Replace all parts and panels before servicing. Disconnect power. 2. Check that range is installed and engaged. Check that the anti-tip bracket is engaged in power supply cord...
... be killed. Reconnect power. 15 Failure to children and adults. Unplug the power supply cord. 3. Check that the anti-tip bracket is level. 6. Replace all parts and panels before servicing. Disconnect power. 2. Check that range is installed and engaged. Check that the anti-tip bracket is engaged in power supply cord...


