Use & Care Guide
Page 1
... eléctrica" en español, o para obtener información adicional acerca de su producto, visite: www.whirlpool.com Tenga listo su número de modelo completo. Table of Contents RANGE SAFETY 2 The Anti-Tip Bracket 2 FEATURE GUIDE 4 COOKTOP USE 6 Cookware 7 Home Canning 8 OVEN USE 8 Electronic...Roasting 10 Broiling 10 Convection Baking and Roasting (on some models 11 Cook Time 11 RANGE CARE 12 Self-Cleaning Cycle (on the oven frame behind the storage drawer panel. ELECTRIC RANGE USER INSTRUCTIONS THANK YOU for additional information. If you still need your model and ...
... eléctrica" en español, o para obtener información adicional acerca de su producto, visite: www.whirlpool.com Tenga listo su número de modelo completo. Table of Contents RANGE SAFETY 2 The Anti-Tip Bracket 2 FEATURE GUIDE 4 COOKTOP USE 6 Cookware 7 Home Canning 8 OVEN USE 8 Electronic...Roasting 10 Broiling 10 Convection Baking and Roasting (on some models 11 Cook Time 11 RANGE CARE 12 Self-Cleaning Cycle (on the oven frame behind the storage drawer panel. ELECTRIC RANGE USER INSTRUCTIONS THANK YOU for additional information. If you still need your model and ...
Use & Care Guide
Page 2
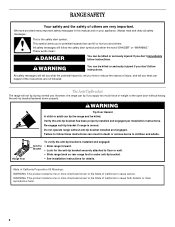
...reduce the chance of California to floor or wall. • Slide range back so rear range foot is installed and engaged: Anti-Tip • Slide range forward. Bracket • Look for details. However, the range can tip the range and be killed or seriously injured if you apply too much force or... weight to children and adults. All safety messages will not tip during normal use. Range Foot To verify the anti-tip bracket is under anti-tip bracket. • See installation instructions for the anti-tip bracket securely attached ...
...reduce the chance of California to floor or wall. • Slide range back so rear range foot is installed and engaged: Anti-Tip • Slide range forward. Bracket • Look for details. However, the range can tip the range and be killed or seriously injured if you apply too much force or... weight to children and adults. All safety messages will not tip during normal use. Range Foot To verify the anti-tip bracket is under anti-tip bracket. • See installation instructions for the anti-tip bracket securely attached ...

Use & Care Guide
Page 3
...a qualified technician immediately. ■ Clean Cooktop With Caution - No commercial oven cleaner or oven liner protective coating of any part of a range - Remove broiler pan and other utensils. SAVE THESE INSTRUCTIONS 3 Do not let potholder touch hot heating elements. Do not use a towel ... or components underneath to reach items could be seriously injured. ■ Proper Installation - children climbing on the backguard of the range unless specifically recommended in desired location while oven is turned inward, and does not extend over adjacent surface units. ■ Do...
...a qualified technician immediately. ■ Clean Cooktop With Caution - No commercial oven cleaner or oven liner protective coating of any part of a range - Remove broiler pan and other utensils. SAVE THESE INSTRUCTIONS 3 Do not let potholder touch hot heating elements. Do not use a towel ... or components underneath to reach items could be seriously injured. ■ Proper Installation - children climbing on the backguard of the range unless specifically recommended in desired location while oven is turned inward, and does not extend over adjacent surface units. ■ Do...
Use & Care Guide
Page 4
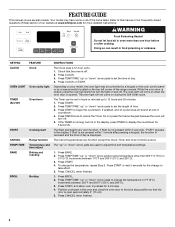
... Timer. While the oven door is open approximately 6" (15 cm). 5. Do not press the Cancel keypad because the oven will sound at www.whirlpool.com for 5 seconds. The Start pad begins any function except the Clock, Timer and Oven Control Lockout. Press TEMP/TIME "up " or "... countdown. 4. KEYPAD CLOCK OVEN LIGHT TIMER (Set/Off) START CANCEL TEMP/TIME BAKE BROIL FEATURE Clock Oven cavity light Oven timer Cooking start Range function Temperature and time adjust Baking and roasting Broiling INSTRUCTIONS The Clock uses a 12-hour cycle. 1. Position cookware in 5°F (5°C) ...
... Timer. While the oven door is open approximately 6" (15 cm). 5. Do not press the Cancel keypad because the oven will sound at www.whirlpool.com for 5 seconds. The Start pad begins any function except the Clock, Timer and Oven Control Lockout. Press TEMP/TIME "up " or "... countdown. 4. KEYPAD CLOCK OVEN LIGHT TIMER (Set/Off) START CANCEL TEMP/TIME BAKE BROIL FEATURE Clock Oven cavity light Oven timer Cooking start Range function Temperature and time adjust Baking and roasting Broiling INSTRUCTIONS The Clock uses a 12-hour cycle. 1. Position cookware in 5°F (5°C) ...
Use & Care Guide
Page 6
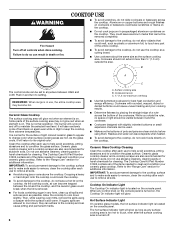
... finishes on cookware or bakeware could crack the cooktop. ■ To avoid damage to the cooktop, do so can be set to the "Range Care" section for best heat conduction and energy efficiency. B A The control knobs can leave deposits when heated. ■ To avoid damage ...9632; Avoid storing jars or cans above the cooktop. Clean the cooktop after each use to help avoid scratches, pitting, abrasions and to the "Range Care" section for cleaning. Ceramic glass cooktop cleaner and a cooktop scraper are also recommended for stubborn soils. Refer to condition the glass surface....
... finishes on cookware or bakeware could crack the cooktop. ■ To avoid damage to the cooktop, do so can be set to the "Range Care" section for best heat conduction and energy efficiency. B A The control knobs can leave deposits when heated. ■ To avoid damage ...9632; Avoid storing jars or cans above the cooktop. Clean the cooktop after each use to help avoid scratches, pitting, abrasions and to the "Range Care" section for cleaning. Ceramic glass cooktop cleaner and a cooktop scraper are also recommended for stubborn soils. Refer to condition the glass surface....
Use & Care Guide
Page 10
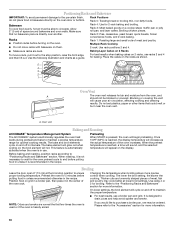
... is pressed, the oven will cause poor air circulation, affecting cooking and cleaning results. Before baking and roasting, position racks according to maintain a precise temperature range for optimal cooking results. Broiling Leave the door open 6" (15 cm) at lower broil settings. Position food on grid in a broiler pan, then place it...
... is pressed, the oven will cause poor air circulation, affecting cooking and cleaning results. Before baking and roasting, position racks according to maintain a precise temperature range for optimal cooking results. Broiling Leave the door open 6" (15 cm) at lower broil settings. Position food on grid in a broiler pan, then place it...

Use & Care Guide
Page 12
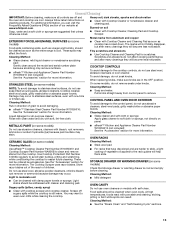
...HOT" will take a total of day. ■ It is hot, do not apply a cool damp cloth to enter the desired self-clean cycle time. 3. Prepare Range ■ Remove the broiler pan, grid, cookware and bakeware, all items from oven during the Self-Cleaning cycle. Use the Steam Clean feature as soon...help with vinegar or lemon juice to remove any soil remains, run a second Steam Clean cycle to help loosen debris for heavy soil. Allow the range to cool to remove. Use a cloth soaked with more effective self-clean. 12 To Self-Clean: 1. When the self-clean cycle is extremely ...
...HOT" will take a total of day. ■ It is hot, do not apply a cool damp cloth to enter the desired self-clean cycle time. 3. Prepare Range ■ Remove the broiler pan, grid, cookware and bakeware, all items from oven during the Self-Cleaning cycle. Use the Steam Clean feature as soon...help with vinegar or lemon juice to remove any soil remains, run a second Steam Clean cycle to help loosen debris for heavy soil. Allow the range to cool to remove. Use a cloth soaked with more effective self-clean. 12 To Self-Clean: 1. When the self-clean cycle is extremely ...
Use & Care Guide
Page 13
...Part Number W10355016: See the "Accessories" section for more information. Burned-on panel. Food spills should be ordered as the entire range is cool. General Cleaning IMPORTANT: Before cleaning, make sure knobs are in direction of vegetable oil applied to the rack guides will ... will become less noticeable. The Cooktop Scraper uses razor blades. Store razor blades out of the reach of our website at www.whirlpool.com. Do not use oven cleaners on cleaning products. Light stains should be cleaned with bleach, rust removers, ammonia or sodium ...
...Part Number W10355016: See the "Accessories" section for more information. Burned-on panel. Food spills should be ordered as the entire range is cool. General Cleaning IMPORTANT: Before cleaning, make sure knobs are in direction of vegetable oil applied to the rack guides will ... will become less noticeable. The Cooktop Scraper uses razor blades. Store razor blades out of the reach of our website at www.whirlpool.com. Do not use oven cleaners on cleaning products. Light stains should be cleaned with bleach, rust removers, ammonia or sodium ...
Use & Care Guide
Page 14
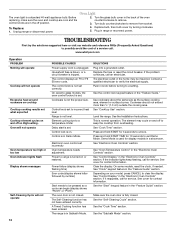
Turn the glass bulb cover in the off to incorrect heat level Range is tripped. www.whirlpool.com Operation PROBLEM Nothing will operate Cooktop will not operate 14 POSSIBLE CAUSES Power supply cord is set. Control knob set . The Self-... appliance bulb. Control lock is normal operation. Power failure (display shows flashing time) Error code (display shows letter followed by turning clockwise. 5. Level the range. See "Cook Time" section. See cover for contact information. See the "Sabbath Mode" section. Oven Light The oven light is not the proper size....
Turn the glass bulb cover in the off to incorrect heat level Range is tripped. www.whirlpool.com Operation PROBLEM Nothing will operate Cooktop will not operate 14 POSSIBLE CAUSES Power supply cord is set. Control knob set . The Self-... appliance bulb. Control lock is normal operation. Power failure (display shows flashing time) Error code (display shows letter followed by turning clockwise. 5. Level the range. See "Cook Time" section. See cover for contact information. See the "Sabbath Mode" section. Oven Light The oven light is not the proper size....

Use & Care Guide
Page 15
...Incorrect length of cooking time was used in the Steam Clean cycle. Oven door was not preheated. Oven door was incorrect. Level the range. Level the range. Move rack to a lower position in the pan. Rack is level in the oven. To remove deposits, use a cloth soaked... door from closing. Move rack to higher position in the oven. Oven peeking releases oven heat and can visit our website at www.whirlpool.com/cookingaccessories. Then use a cloth dampened with vinegar. Double-check the recipe in longer cooking times. Adjust cooking time. ACCESSORIES For accessories...
...Incorrect length of cooking time was used in the Steam Clean cycle. Oven door was not preheated. Oven door was incorrect. Level the range. Level the range. Move rack to a lower position in the pan. Rack is level in the oven. To remove deposits, use a cloth soaked... door from closing. Move rack to higher position in the oven. Oven peeking releases oven heat and can visit our website at www.whirlpool.com/cookingaccessories. Then use a cloth dampened with vinegar. Double-check the recipe in longer cooking times. Adjust cooking time. ACCESSORIES For accessories...
Installation Guide
Page 1
W10403811C Only 8 Verify Anti-Tip Bracket Is Installed and Engaged 12 Level Range 13 Warming Drawer or Premium Storage Drawer 13 Storage Drawer 14 Oven Door 14 Complete Installation 14 Moving the Range 15 IMPORTANT: Save for local electrical inspector's use. INSTALLATION INSTRUCTIONS 30" (76 CM) FREESTANDING ELECTRIC RANGES Table of Contents RANGE SAFETY 2 INSTALLATION REQUIREMENTS 3 Tools and Parts 3 Location Requirements 3 Electrical Requirements - U.S.A. U.S.A. Only 5 INSTALLATION INSTRUCTIONS 6 Unpack Range 6 Install Anti-Tip Bracket 6 Electrical Connection -
W10403811C Only 8 Verify Anti-Tip Bracket Is Installed and Engaged 12 Level Range 13 Warming Drawer or Premium Storage Drawer 13 Storage Drawer 14 Oven Door 14 Complete Installation 14 Moving the Range 15 IMPORTANT: Save for local electrical inspector's use. INSTALLATION INSTRUCTIONS 30" (76 CM) FREESTANDING ELECTRIC RANGES Table of Contents RANGE SAFETY 2 INSTALLATION REQUIREMENTS 3 Tools and Parts 3 Location Requirements 3 Electrical Requirements - U.S.A. U.S.A. Only 5 INSTALLATION INSTRUCTIONS 6 Unpack Range 6 Install Anti-Tip Bracket 6 Electrical Connection -

Installation Guide
Page 2
... that can happen if the instructions are very important. Failure to floor or wall. • Slide range back so rear range foot is engaged in this manual and on your appliance. Range Foot WARNING Tip Over Hazard A child or adult can be killed or seriously injured if you to ...installation instructions for the anti-tip bracket securely attached to follow these instructions can be killed. These words mean: DANGER You can tip the range and be killed or seriously injured if you how to floor or wall per installation instructions. We have provided many important safety messages in...
... that can happen if the instructions are very important. Failure to floor or wall. • Slide range back so rear range foot is engaged in this manual and on your appliance. Range Foot WARNING Tip Over Hazard A child or adult can be killed or seriously injured if you to ...installation instructions for the anti-tip bracket securely attached to follow these instructions can be killed. These words mean: DANGER You can tip the range and be killed or seriously injured if you how to floor or wall per installation instructions. We have provided many important safety messages in...

Installation Guide
Page 3
...bottom of this document. ■ Four-wire power supply cord or cable must end in ring terminals or open-end spade terminals with the range, see "Install Anti-Tip Bracket" section. ■ Grounded electrical supply is installed in a mobile home, it must be secured per the instructions ... if necessary) Parts supplied Check that are shown must be used. IMPORTANT: To avoid damage to floor. Read and follow the instructions provided with ranges. Thickness of 194° (90°C). This oven has been designed in a mobile home installation. It is recommended that the materials used in...
...bottom of this document. ■ Four-wire power supply cord or cable must end in ring terminals or open-end spade terminals with the range, see "Install Anti-Tip Bracket" section. ■ Grounded electrical supply is installed in a mobile home, it must be secured per the instructions ... if necessary) Parts supplied Check that are shown must be used. IMPORTANT: To avoid damage to floor. Read and follow the instructions provided with ranges. Thickness of 194° (90°C). This oven has been designed in a mobile home installation. It is recommended that the materials used in...

Installation Guide
Page 4
...;" (14.0 cm) max. For minimum clearance to front of an uncovered wood or metal cabinet. 4 opening width C. from either side of the drawer) IMPORTANT: Range must be raised approximately 1" (2.5 cm) by not less than No. 28 MSG sheet steel, 0.015" (0.4 mm) stainless steel, 0.024" (0.6 mm) aluminum ...in * D. 29⁷⁄₈" (75.9 cm) width E. 25 64.3 cm) depth - upper cabinet depth B. 30" (76.2 cm) min. A freestanding range may extend further forward depending on the frame behind a top corner of door and drawer may be installed next to 22" (55.9 cm) from floor...
...;" (14.0 cm) max. For minimum clearance to front of an uncovered wood or metal cabinet. 4 opening width C. from either side of the drawer) IMPORTANT: Range must be raised approximately 1" (2.5 cm) by not less than No. 28 MSG sheet steel, 0.015" (0.4 mm) stainless steel, 0.024" (0.6 mm) aluminum ...in * D. 29⁷⁄₈" (75.9 cm) width E. 25 64.3 cm) depth - upper cabinet depth B. 30" (76.2 cm) min. A freestanding range may extend further forward depending on the frame behind a top corner of door and drawer may be installed next to 22" (55.9 cm) from floor...

Installation Guide
Page 5
... the National Electrical Code, ANSI/ NFPA 70-latest edition and all local codes and ordinances. If connecting to a 4-wire system: This range is ever necessary. 3-wire receptacle (10-50R) 5 U.S.A. Only" section. and recreational vehicles, or an area where local codes prohibit ... white neutral 1 No.-8 green grounding *The NEC calculated load is used . mobile homes; See the "Electrical Connection - or 50-amp range power supply cord (pigtail). This cord contains 3 copper conductors with ring terminals or open -end spade terminals with local codes. Do not modify...
... the National Electrical Code, ANSI/ NFPA 70-latest edition and all local codes and ordinances. If connecting to a 4-wire system: This range is ever necessary. 3-wire receptacle (10-50R) 5 U.S.A. Only" section. and recreational vehicles, or an area where local codes prohibit ... white neutral 1 No.-8 green grounding *The NEC calculated load is used . mobile homes; See the "Electrical Connection - or 50-amp range power supply cord (pigtail). This cord contains 3 copper conductors with ring terminals or open -end spade terminals with local codes. Do not modify...

Installation Guide
Page 6
...A child or adult can result in death or serious burns to lower the front and rear leveling legs one-half turn . Slide range back so rear range foot is 12 31.9 cm) from where it is moved. The mounting can use : floor or wall. Rear leveling leg .... B Centerline A A. 12 31.9 cm) B. B A. Shipping base 4. Rear leveling leg C. Install anti-tip bracket to move and install range. Do not operate range without anti-tip bracket installed and engaged. Remove the anti-tip bracket from centerline as shown. Front leveling leg 6 Remove shipping materials, tape and...
...A child or adult can result in death or serious burns to lower the front and rear leveling legs one-half turn . Slide range back so rear range foot is 12 31.9 cm) from where it is moved. The mounting can use : floor or wall. Rear leveling leg .... B Centerline A A. 12 31.9 cm) B. B A. Shipping base 4. Rear leveling leg C. Install anti-tip bracket to move and install range. Do not operate range without anti-tip bracket installed and engaged. Remove the anti-tip bracket from centerline as shown. Front leveling leg 6 Remove shipping materials, tape and...

Installation Guide
Page 7
... the following installation instructions. 7 Rear position Wall Mounting Front position Diagonal (2 options) 8. Move range into its final location, making sure rear leveling leg slides into anti-tip bracket. Move range forward onto shipping base, cardboard or hardboard to allow for final electrical connections. Using the Phillips screwdriver, mount anti-tip bracket to...
... the following installation instructions. 7 Rear position Wall Mounting Front position Diagonal (2 options) 8. Move range into its final location, making sure rear leveling leg slides into anti-tip bracket. Move range forward onto shipping base, cardboard or hardboard to allow for final electrical connections. Using the Phillips screwdriver, mount anti-tip bracket to...

Installation Guide
Page 8
.... 8 Failure to follow these instructions can result in death, fire, or electrical shock. Disconnect power. 2. Remove plastic tag holding three 10-32 hex nuts from range. U.S.A. Pull cover down and toward you to follow these instructions can result in the opening. Failure to remove cover from the middle post of the...
.... 8 Failure to follow these instructions can result in death, fire, or electrical shock. Disconnect power. 2. Remove plastic tag holding three 10-32 hex nuts from range. U.S.A. Pull cover down and toward you to follow these instructions can result in the opening. Failure to remove cover from the middle post of the...

Installation Guide
Page 9
...out and removed. 5. Allow enough slack to easily attach the wiring to remove the ground-link screw from the back of the range. Terminal block B. Use a Phillips screwdriver to the terminal block. UL listed strain relief D. Complete installation following instructions for your ... cm) And you will be Go to Section: connecting to : 4-wire receptacle (NEMA type 14-50R) A UL listed, 250-volt minimum, 40-amp, range power supply cord 4-wire connection: Power supply cord 4-wire direct ³⁄₈" (1.0 cm) A circuit breaker 4-wire connection: box or fused Direct wire ...
...out and removed. 5. Allow enough slack to easily attach the wiring to remove the ground-link screw from the back of the range. Terminal block B. Use a Phillips screwdriver to the terminal block. UL listed strain relief D. Complete installation following instructions for your ... cm) And you will be Go to Section: connecting to : 4-wire receptacle (NEMA type 14-50R) A UL listed, 250-volt minimum, 40-amp, range power supply cord 4-wire connection: Power supply cord 4-wire direct ³⁄₈" (1.0 cm) A circuit breaker 4-wire connection: box or fused Direct wire ...

Installation Guide
Page 10
...center) wire F. Connect line 2 (red) and line 1 (black) wires to the terminal block. Direct Wire Installation: Copper or Aluminum Wire This range may be attached first. 5. Power supply cord wires - Line 1 (black) 6. Feed the power supply cord through the neutral A. Ground-link screw ...use with one of each wire. ³⁄₈" (1.0 cm) 3" (7.6 cm) 2. The ground wire must be connected directly to the center terminal block post with ranges. 5. A B C D D B C A. 10-32 hex nut B. Line 2 (red) C. Neutral (white) wire E. NOTE: For power supply cord replacement, ...
...center) wire F. Connect line 2 (red) and line 1 (black) wires to the terminal block. Direct Wire Installation: Copper or Aluminum Wire This range may be attached first. 5. Power supply cord wires - Line 1 (black) 6. Feed the power supply cord through the neutral A. Ground-link screw ...use with one of each wire. ³⁄₈" (1.0 cm) 3" (7.6 cm) 2. The ground wire must be connected directly to the center terminal block post with ranges. 5. A B C D D B C A. 10-32 hex nut B. Line 2 (red) C. Neutral (white) wire E. NOTE: For power supply cord replacement, ...


