Installation Guide
Page 1
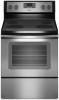
U.S.A. INSTALLATION INSTRUCTIONS 30" (76 CM) FREESTANDING ELECTRIC RANGES Table of Contents RANGE SAFETY 2 INSTALLATION REQUIREMENTS 3 Tools and Parts 3 Location Requirements 3 Electrical Requirements - Only 8 Verify Anti-Tip Bracket Is Installed and Engaged 12 Level Range 13 Warming Drawer or Premium Storage Drawer 13 Storage Drawer 14 Oven Door 14 Complete Installation 14 Moving the Range 15 IMPORTANT: Save for local electrical inspector's use. W10403811C U.S.A. Only 5 INSTALLATION INSTRUCTIONS 6 Unpack Range 6 Install Anti-Tip Bracket 6 Electrical Connection -
U.S.A. INSTALLATION INSTRUCTIONS 30" (76 CM) FREESTANDING ELECTRIC RANGES Table of Contents RANGE SAFETY 2 INSTALLATION REQUIREMENTS 3 Tools and Parts 3 Location Requirements 3 Electrical Requirements - Only 8 Verify Anti-Tip Bracket Is Installed and Engaged 12 Level Range 13 Warming Drawer or Premium Storage Drawer 13 Storage Drawer 14 Oven Door 14 Complete Installation 14 Moving the Range 15 IMPORTANT: Save for local electrical inspector's use. W10403811C U.S.A. Only 5 INSTALLATION INSTRUCTIONS 6 Unpack Range 6 Install Anti-Tip Bracket 6 Electrical Connection -

Installation Guide
Page 3
... 1³⁄₈" (3.5 cm) diameter connection opening dimensions that are shown must end in ring terminals or open-end spade terminals with ranges. See the appropriate "Electrical Requirements" section. Only" section. 3 Tools needed If using a power supply cord kit: ■ A UL listed power supply cord... clearances. ■ The anti-tip bracket must be revised. U.S.A. To install the anti-tip bracket shipped with the range, see "Install Anti-Tip Bracket" section. ■ Grounded electrical supply is the installer's responsibility to floor. Check local codes.
... 1³⁄₈" (3.5 cm) diameter connection opening dimensions that are shown must end in ring terminals or open-end spade terminals with ranges. See the appropriate "Electrical Requirements" section. Only" section. 3 Tools needed If using a power supply cord kit: ■ A UL listed power supply cord... clearances. ■ The anti-tip bracket must be revised. U.S.A. To install the anti-tip bracket shipped with the range, see "Install Anti-Tip Bracket" section. ■ Grounded electrical supply is the installer's responsibility to floor. Check local codes.

Installation Guide
Page 5
... 22.5 KW 120/208 Volts 7.8 - 12.5 KW 12.6 - 18.5 KW Specified Rating of NEMA Type 14-50R is recommended that a qualified electrical installer determine that the range can result in a risk of slack in a NEMA Type 10-50P plug on the model/serial rating plate. The ground must conform with... is prohibited for it is used . Only" section. Connectors on the supply end. Be sure that specify use of the range inside a clear plastic bag. See "Electrical Connection - The fourth (grounding) conductor must be at the point the power supply cord enters the appliance. or 50-amp ...
... 22.5 KW 120/208 Volts 7.8 - 12.5 KW 12.6 - 18.5 KW Specified Rating of NEMA Type 14-50R is recommended that a qualified electrical installer determine that the range can result in a risk of slack in a NEMA Type 10-50P plug on the model/serial rating plate. The ground must conform with... is prohibited for it is used . Only" section. Connectors on the supply end. Be sure that specify use of the range inside a clear plastic bag. See "Electrical Connection - The fourth (grounding) conductor must be at the point the power supply cord enters the appliance. or 50-amp ...

Installation Guide
Page 7
Remove shipping base, cardboard or hardboard from under range. 7. Move range forward onto shipping base, cardboard or hardboard to allow for final electrical connections. Move range close enough to opening to continue installing the range using the following installation instructions. 7 Rear position Wall Mounting Front position Diagonal (2 options) 8. Using the Phillips screwdriver, mount anti-tip bracket...
Remove shipping base, cardboard or hardboard from under range. 7. Move range forward onto shipping base, cardboard or hardboard to allow for final electrical connections. Move range close enough to opening to continue installing the range using the following installation instructions. 7 Rear position Wall Mounting Front position Diagonal (2 options) 8. Using the Phillips screwdriver, mount anti-tip bracket...

Installation Guide
Page 8
...these instructions can result in death, fire, or electrical shock. 1. Failure to remove cover from the middle post of the range. Two mounting tabs each side B. A A. Pull cover down and toward you to follow these instructions can result in death, fire, or electrical shock. Use 8 gauge copper or 6 gauge... on the back of the terminal block. A B C A. Hex-head screws 3. Remove plastic tag holding three 10-32 hex nuts from range. Electrically ground range. Power Supply Cord Electrical Connection - Add strain relief. 8 Use a new 40 amp power supply cord.
...these instructions can result in death, fire, or electrical shock. 1. Failure to remove cover from the middle post of the range. Two mounting tabs each side B. A A. Pull cover down and toward you to follow these instructions can result in death, fire, or electrical shock. Use 8 gauge copper or 6 gauge... on the back of the terminal block. A B C A. Hex-head screws 3. Remove plastic tag holding three 10-32 hex nuts from range. Electrically ground range. Power Supply Cord Electrical Connection - Add strain relief. 8 Use a new 40 amp power supply cord.

Installation Guide
Page 9
... ground strap B. Complete installation following instructions for your type of the range. Use a Phillips screwdriver to remove the ground-link screw from the back of electrical connection: 4-wire (recommended) 3-wire (if 4-wire is not available) Electrical Connection Options If your home has: 3-wire direct ³⁄₈" (1.0 cm) And you will be cut...
... ground strap B. Complete installation following instructions for your type of the range. Use a Phillips screwdriver to remove the ground-link screw from the back of electrical connection: 4-wire (recommended) 3-wire (if 4-wire is not available) Electrical Connection Options If your home has: 3-wire direct ³⁄₈" (1.0 cm) And you will be cut...

Installation Guide
Page 10
...center terminal block post with ranges. 5. Ground-link screw D. Line 1 (black) 3. Depending on bottom of the 10-32 hex nuts. Use ³⁄₈" nut driver to connect the neutral (white) wire to the outer terminal block posts with one of electrical supply (4-wire or 3-wire... connection). 4-wire Connection: Direct Wire Use this method only if local codes permit connecting chassis ground conductor to the range with the ground-link screw and ground-link section. Green ...
...center terminal block post with ranges. 5. Ground-link screw D. Line 1 (black) 3. Depending on bottom of the 10-32 hex nuts. Use ³⁄₈" nut driver to connect the neutral (white) wire to the outer terminal block posts with one of electrical supply (4-wire or 3-wire... connection). 4-wire Connection: Direct Wire Use this method only if local codes permit connecting chassis ground conductor to the range with the ground-link screw and ground-link section. Green ...

Installation Guide
Page 14
...Open oven door all of the slide rail drops into a grounded outlet. ■ Electrical supply is level. If it is not, repeat the removal and installation procedures. See the "Level Range" section. 5. If range does not operate, check the following: ■ Household fuse is free to remove...in the home may be removed. Check that you have all the way. 2. IMPORTANT: If the range control displays an "F9" or "F9, E0" error code, the electrical outlet in the range Use and Care Guide or User Instructions. 7. Continue to the locked position. Slowly push the drawer ...
...Open oven door all of the slide rail drops into a grounded outlet. ■ Electrical supply is level. If it is not, repeat the removal and installation procedures. See the "Level Range" section. 5. If range does not operate, check the following: ■ Household fuse is free to remove...in the home may be removed. Check that you have all the way. 2. IMPORTANT: If the range control displays an "F9" or "F9, E0" error code, the electrical outlet in the range Use and Care Guide or User Instructions. 7. Continue to the locked position. Slowly push the drawer ...

Installation Guide
Page 15
... 3. Failure to children and adults. Reconnect power. 15 WARNING Moving the Range For direct-wired ranges: WARNING Tip Over Hazard A child or adult can result in death or electrical shock. 1. Install anti-tip bracket to avoid damaging the floor covering. Re...these instructions can result in power supply cord. 5. If removing the range is level. 6. Slide range forward. 2. Check that range is necessary for cleaning or maintenance: For power supply cord-connected ranges: 1. Electrical Shock Hazard Disconnect power before operating. Complete cleaning or maintenance. 4....
... 3. Failure to children and adults. Reconnect power. 15 WARNING Moving the Range For direct-wired ranges: WARNING Tip Over Hazard A child or adult can result in death or electrical shock. 1. Install anti-tip bracket to avoid damaging the floor covering. Re...these instructions can result in power supply cord. 5. If removing the range is level. 6. Slide range forward. 2. Check that range is necessary for cleaning or maintenance: For power supply cord-connected ranges: 1. Electrical Shock Hazard Disconnect power before operating. Complete cleaning or maintenance. 4....
Use & Care Guide
Page 1
...233;ctrica" en español, o para obtener información adicional acerca de su producto, visite: www.whirlpool.com Tenga listo su número de modelo completo. ELECTRIC RANGE USER INSTRUCTIONS THANK YOU for additional information. Puede encontrar su número de modelo y de serie en la... etiqueta, ubicada en el marco del horno, detrás del panel del cajón de almacenamiento. Table of Contents RANGE SAFETY 2 The Anti-Tip...
...233;ctrica" en español, o para obtener información adicional acerca de su producto, visite: www.whirlpool.com Tenga listo su número de modelo completo. ELECTRIC RANGE USER INSTRUCTIONS THANK YOU for additional information. Puede encontrar su número de modelo y de serie en la... etiqueta, ubicada en el marco del horno, detrás del panel del cajón de almacenamiento. Table of Contents RANGE SAFETY 2 The Anti-Tip...

Use & Care Guide
Page 3
..., turn the fan on hot surfaces may penetrate the broken cooktop and create a risk of electric shock. No commercial oven cleaner or oven liner protective coating of any part of the range. ■ Wear Proper Apparel - Loose-fitting or hanging garments should not be moved while ... causes smoking and greasy spillovers that it is used in or around any part of the range unless specifically recommended in Place - IMPORTANT SAFETY INSTRUCTIONS WARNING: To reduce the risk of fire, electrical shock, injury to cover the surface unit heating element. Moist or damp potholders on . ...
..., turn the fan on hot surfaces may penetrate the broken cooktop and create a risk of electric shock. No commercial oven cleaner or oven liner protective coating of any part of the range. ■ Wear Proper Apparel - Loose-fitting or hanging garments should not be moved while ... causes smoking and greasy spillovers that it is used in or around any part of the range unless specifically recommended in Place - IMPORTANT SAFETY INSTRUCTIONS WARNING: To reduce the risk of fire, electrical shock, injury to cover the surface unit heating element. Moist or damp potholders on . ...

Use & Care Guide
Page 14
www.whirlpool.com Operation PROBLEM Nothing will operate Cooktop will not operate POSSIBLE CAUSES Power supply cord is a standard 40-watt appliance bulb. Electronic oven control set to incorrect heat level Range is in the off on your model, press CANCEL to clear the display. The oven door... proper size. Cookware is not set correctly. Power to keep flashing, call for contact information. The electrical outlet in a showroom. Demo Mode is turned on and off to range is used for display models in the home may cycle on or restored. Depending on High setting. ...
www.whirlpool.com Operation PROBLEM Nothing will operate Cooktop will not operate POSSIBLE CAUSES Power supply cord is a standard 40-watt appliance bulb. Electronic oven control set to incorrect heat level Range is in the off on your model, press CANCEL to clear the display. The oven door... proper size. Cookware is not set correctly. Power to keep flashing, call for contact information. The electrical outlet in a showroom. Demo Mode is turned on and off to range is used for display models in the home may cycle on or restored. Depending on High setting. ...


