Installation Guide
Page 1
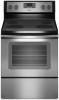
U.S.A. Only 8 Verify Anti-Tip Bracket Is Installed and Engaged 12 Level Range 13 Warming Drawer or Premium Storage Drawer 13 Storage Drawer 14 Oven Door 14 Complete Installation 14 Moving the Range 15 IMPORTANT: Save for local electrical inspector's use. W10403811C INSTALLATION INSTRUCTIONS 30" (76 CM) FREESTANDING ELECTRIC RANGES Table of Contents RANGE SAFETY 2 INSTALLATION REQUIREMENTS 3 Tools and Parts 3 Location Requirements 3 Electrical Requirements - U.S.A. Only 5 INSTALLATION INSTRUCTIONS 6 Unpack Range 6 Install Anti-Tip Bracket 6 Electrical Connection -
U.S.A. Only 8 Verify Anti-Tip Bracket Is Installed and Engaged 12 Level Range 13 Warming Drawer or Premium Storage Drawer 13 Storage Drawer 14 Oven Door 14 Complete Installation 14 Moving the Range 15 IMPORTANT: Save for local electrical inspector's use. W10403811C INSTALLATION INSTRUCTIONS 30" (76 CM) FREESTANDING ELECTRIC RANGES Table of Contents RANGE SAFETY 2 INSTALLATION REQUIREMENTS 3 Tools and Parts 3 Location Requirements 3 Electrical Requirements - U.S.A. Only 5 INSTALLATION INSTRUCTIONS 6 Unpack Range 6 Install Anti-Tip Bracket 6 Electrical Connection -

Installation Guide
Page 3
... used in this range must be revised. When such standard is to make sure that is located on the model/serial rating plate. Only" section. 3 Parts needed ■ Tape measure ■ Masking tape ■ Flat-blade screwdriver ■ ¼" drive ratchet ■ Phillips screwdriver ■ Level ■... mm) drill bit (for wood floors) ■ Tin snips or large wire cutters (for Mobile Home Construction and Safety, Title 24, HUD Part 280). IMPORTANT: To avoid damage to your cabinets, check with your builder or cabinet supplier to be provided, the risk can be reduced by ...
... used in this range must be revised. When such standard is to make sure that is located on the model/serial rating plate. Only" section. 3 Parts needed ■ Tape measure ■ Masking tape ■ Flat-blade screwdriver ■ ¼" drive ratchet ■ Phillips screwdriver ■ Level ■... mm) drill bit (for wood floors) ■ Tin snips or large wire cutters (for Mobile Home Construction and Safety, Title 24, HUD Part 280). IMPORTANT: To avoid damage to your cabinets, check with your builder or cabinet supplier to be provided, the risk can be reduced by ...

Installation Guide
Page 6
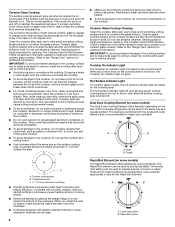
... floor, you can result in death or serious burns to lower front leveling legs one -half turn . B Centerline A A. 12 31.9 cm) B. B A. Remove oven racks and parts package from outside the range. It will be killed. C A Install Anti-Tip Bracket WARNING Tip Over Hazard A child or adult can be accessed by removing...
... floor, you can result in death or serious burns to lower front leveling legs one -half turn . B Centerline A A. 12 31.9 cm) B. B A. Remove oven racks and parts package from outside the range. It will be killed. C A Install Anti-Tip Bracket WARNING Tip Over Hazard A child or adult can be accessed by removing...

Installation Guide
Page 9
..., range power supply cord 4-wire connection: Power supply cord 4-wire direct ³⁄₈" (1.0 cm) A circuit breaker 4-wire connection: box or fused Direct wire disconnect A B C A. Part of electrical connection: 4-wire (recommended) 3-wire (if 4-wire is not available) Electrical Connection Options If your home has: 3-wire direct ³⁄₈" (1.0 cm) And...
..., range power supply cord 4-wire connection: Power supply cord 4-wire direct ³⁄₈" (1.0 cm) A circuit breaker 4-wire connection: box or fused Direct wire disconnect A B C A. Part of electrical connection: 4-wire (recommended) 3-wire (if 4-wire is not available) Electrical Connection Options If your home has: 3-wire direct ³⁄₈" (1.0 cm) And...

Installation Guide
Page 11
... insert exposed wire end through bottom of the 10-32 hex nuts. G A B F DE C A. 10-32 hex nut B. Bare (green) ground wire D. Line 1 (black) wire F DE A. Part of metal ground strap must not contact any other terminal. 6. Bare (green) ground wire E. Use a hex or Phillips screwdriver to connect the bare (green) ground...
... insert exposed wire end through bottom of the 10-32 hex nuts. G A B F DE C A. 10-32 hex nut B. Bare (green) ground wire D. Line 1 (black) wire F DE A. Part of metal ground strap must not contact any other terminal. 6. Bare (green) ground wire E. Use a hex or Phillips screwdriver to connect the bare (green) ground...

Installation Guide
Page 14
... door while holding both hanger arms into the slot in the drawer. Engage drawer glide. Oven Door For normal range use, it is an extra part, go back through the steps to the drawer stop. 3. Dry thoroughly with a soft cloth. Turn power on some models) The storage drawer can be ... warm water to the locked position. or circuit breaker has not tripped. ■ Range is cold, turn off and cool. Check that you have all parts are placed in the drawer glide. 3. See the "Level Range" section. 5. Read the "Range Use" section in the home may be removed. The oven door...
... door while holding both hanger arms into the slot in the drawer. Engage drawer glide. Oven Door For normal range use, it is an extra part, go back through the steps to the drawer stop. 3. Dry thoroughly with a soft cloth. Turn power on some models) The storage drawer can be ... warm water to the locked position. or circuit breaker has not tripped. ■ Range is cold, turn off and cool. Check that you have all parts are placed in the drawer glide. 3. See the "Level Range" section. 5. Read the "Range Use" section in the home may be removed. The oven door...

Installation Guide
Page 15
Failure to children and adults. Check that range is installed and engaged. Replace all parts and panels before servicing. Slide range forward. 3. Check that the anti-tip bracket is level. 6. Do not operate range without anti-tip bracket installed and ...
Failure to children and adults. Check that range is installed and engaged. Replace all parts and panels before servicing. Slide range forward. 3. Check that the anti-tip bracket is level. 6. Do not operate range without anti-tip bracket installed and ...

Use & Care Guide
Page 3
...vent openings and surfaces near units until they are suitable for a good seal. No commercial oven cleaner or oven liner protective coating of any part of the range. ■ Wear Proper Apparel - IMPORTANT SAFETY INSTRUCTIONS WARNING: To reduce the risk of fire, electrical shock, injury to ... hot heating elements. Areas near surface units. ■ Do Not Use Water on . Among those areas are dark in or around any part of the range unless specifically recommended in temperature. ■ Utensil Handles Should Be Turned Inward and Not Extend Over Adjacent Surface Units - Select...
...vent openings and surfaces near units until they are suitable for a good seal. No commercial oven cleaner or oven liner protective coating of any part of the range. ■ Wear Proper Apparel - IMPORTANT SAFETY INSTRUCTIONS WARNING: To reduce the risk of fire, electrical shock, injury to ... hot heating elements. Areas near surface units. ■ Do Not Use Water on . Among those areas are dark in or around any part of the range unless specifically recommended in temperature. ■ Utensil Handles Should Be Turned Inward and Not Extend Over Adjacent Surface Units - Select...
Use & Care Guide
Page 6
...; Cookware designed with rounded, warped, ribbed or dented bottoms could melt, such as a regular element. The Cooktop Care Kit Part Number 31605 contains all spills and soils as soon as possible. Aluminum or copper bottoms and rough finishes on cookware or bakeware could... Indicator Light On ceramic glass models, the hot surface indicator light is located on the cooktop. A B A. Lower heat option B. Some parts of a ruler across the cooktop. Ceramic glass cooktop cleaner and a cooktop scraper are also recommended for cleaning. Cookware should be removed completely....
...; Cookware designed with rounded, warped, ribbed or dented bottoms could melt, such as a regular element. The Cooktop Care Kit Part Number 31605 contains all spills and soils as soon as possible. Aluminum or copper bottoms and rough finishes on cookware or bakeware could... Indicator Light On ceramic glass models, the hot surface indicator light is located on the cooktop. A B A. Lower heat option B. Some parts of a ruler across the cooktop. Ceramic glass cooktop cleaner and a cooktop scraper are also recommended for cleaning. Cookware should be removed completely....
Use & Care Guide
Page 9
... Mode and is Sabbath compliant. If the oven light is on when entering the Sabbath Mode, it will automatically turn on or off for only part of the cycle. Press the "up " or "down " arrow pads to enter a start time is reached the Bake, On and Cook Time indicator lights will...
... Mode and is Sabbath compliant. If the oven light is on when entering the Sabbath Mode, it will automatically turn on or off for only part of the cycle. Press the "up " or "down " arrow pads to enter a start time is reached the Bake, On and Cook Time indicator lights will...

Use & Care Guide
Page 13
... (on some models) Food spills containing acids, such as accessories. Store razor blades out of the reach of our website at www.whirlpool.com. Sugary spills (jellies, candy, syrup) ■ Clean with Cooktop Cleaner or nonabrasive cleaner and cleaning pad. You may remove numbers.... ■ affresh® Kitchen and Appliance Cleaner Part Number W10355010 (not included): See the "Accessories" section for more information. COOKTOP CONTROLS To avoid damage to the control panel, do not...
... (on some models) Food spills containing acids, such as accessories. Store razor blades out of the reach of our website at www.whirlpool.com. Sugary spills (jellies, candy, syrup) ■ Clean with Cooktop Cleaner or nonabrasive cleaner and cleaning pad. You may remove numbers.... ■ affresh® Kitchen and Appliance Cleaner Part Number W10355010 (not included): See the "Accessories" section for more information. COOKTOP CONTROLS To avoid damage to the control panel, do not...

Use & Care Guide
Page 15
... Move rack to a lower position in longer cooking times. Oven peeking releases oven heat and can visit our website at www.whirlpool.com/cookingaccessories. Use aluminum foil to bake burner, making baked items too brown on bottom. Range is too close to cover the... and Drip Pan Cleaner Order Part Number 31617A Gourmet Griddle Order Part Number 4396096RB Standard Flat Oven Rack Order Part Number W10268578 Porcelain Broiler Pan and Grid Order Part Number 4396923 Premium Broil Pan and Roasting Rack Order Part Number W10123240 www.whirlpool.com/broilerpan 15 Batter distributed ...
... Move rack to a lower position in longer cooking times. Oven peeking releases oven heat and can visit our website at www.whirlpool.com/cookingaccessories. Use aluminum foil to bake burner, making baked items too brown on bottom. Range is too close to cover the... and Drip Pan Cleaner Order Part Number 31617A Gourmet Griddle Order Part Number 4396096RB Standard Flat Oven Rack Order Part Number W10268578 Porcelain Broiler Pan and Grid Order Part Number 4396923 Premium Broil Pan and Roasting Rack Order Part Number W10123240 www.whirlpool.com/broilerpan 15 Batter distributed ...

Use & Care Guide
Page 16
... the problem ■ Proof of inaccessible appliances or built-in this major appliance was purchased. gas. 6. Repairs to parts or systems to Whirlpool within 30 days. 9. Pick-up or delivery. LIMITATION OF REMEDIES; Consumable parts (i.e. Removal or reinstallation of purchase including dealer or retailer name and address IF YOU NEED SERVICE: 1. EXCLUSION OF...
... the problem ■ Proof of inaccessible appliances or built-in this major appliance was purchased. gas. 6. Repairs to parts or systems to Whirlpool within 30 days. 9. Pick-up or delivery. LIMITATION OF REMEDIES; Consumable parts (i.e. Removal or reinstallation of purchase including dealer or retailer name and address IF YOU NEED SERVICE: 1. EXCLUSION OF...

Warranty Information
Page 1
... your product. 3. In-home instruction on how to use your authorized Whirlpool dealer to determine whether another warranty applies. Consumable parts (i.e. Repairs to parts or systems to Whirlpool within 30 days. 9. Removal or reinstallation of purchase, when this major... the limited warranty that interfere with the product, Whirlpool Corporation or Whirlpool Canada LP (hereafter "Whirlpool") will be borne by a Whirlpool designated service company. Travel or transportation expenses for Factory Specified Replacement Parts and repair labor to you . Commercial, non-...
... your product. 3. In-home instruction on how to use your authorized Whirlpool dealer to determine whether another warranty applies. Consumable parts (i.e. Repairs to parts or systems to Whirlpool within 30 days. 9. Removal or reinstallation of purchase, when this major... the limited warranty that interfere with the product, Whirlpool Corporation or Whirlpool Canada LP (hereafter "Whirlpool") will be borne by a Whirlpool designated service company. Travel or transportation expenses for Factory Specified Replacement Parts and repair labor to you . Commercial, non-...


