
Use & Care Guide
Page 3
...and after use of undersized utensils will also improve efficiency. ■ Never Leave Surface Units Unattended at High Heat Settings - Do not repair or replace any part of the range. ■ Wear Proper Apparel - Absence of these openings, oven doors, and windows of oven doors. If cooktop should... is essential for Warming or Heating the Room. ■ Do Not Leave Children Alone - Let hot air or steam escape before removing or replacing food. ■ Do Not Heat Unopened Food Containers - Other surfaces of the appliance may penetrate the broken cooktop and create a risk of ...
...and after use of undersized utensils will also improve efficiency. ■ Never Leave Surface Units Unattended at High Heat Settings - Do not repair or replace any part of the range. ■ Wear Proper Apparel - Absence of these openings, oven doors, and windows of oven doors. If cooktop should... is essential for Warming or Heating the Room. ■ Do Not Leave Children Alone - Let hot air or steam escape before removing or replacing food. ■ Do Not Heat Unopened Food Containers - Other surfaces of the appliance may penetrate the broken cooktop and create a risk of ...

Use & Care Guide
Page 12
... a dishwasher.) A mild abrasive cleaner and a plastic scrubber can be used to soak for more information. On some models) Before removing or replacing coil elements and burner bowls, make sure knobs are harder to soft cloth or sponge, not directly on some models, do not affect cooking ... Cleaning Method: ■ Glass cleaner and soft cloth or sponge: Apply glass cleaner to slide, a light coating of our website at www.whirlpool.com. Pull the coil element straight away from aluminum and copper ■ Clean with a plastic scrubber. For additional information, you can visit the...
... a dishwasher.) A mild abrasive cleaner and a plastic scrubber can be used to soak for more information. On some models) Before removing or replacing coil elements and burner bowls, make sure knobs are harder to soft cloth or sponge, not directly on some models, do not affect cooking ... Cleaning Method: ■ Glass cleaner and soft cloth or sponge: Apply glass cleaner to slide, a light coating of our website at www.whirlpool.com. Pull the coil element straight away from aluminum and copper ■ Clean with a plastic scrubber. For additional information, you can visit the...

Use & Care Guide
Page 13
... in the back of a service call. Oven Light The oven light is normal operation. Turn bulb counterclockwise to unlock. www.whirlpool.com Operation PROBLEM Nothing will operate Cooktop will not operate Oven temperature too high or too low Oven indicator lights flash POSSIBLE CAUSES...displays an F9 or F9 E0 error code. See "Cook Time" section. Press and hold START for 3 seconds to remove from overheating. Replace bulb, then bulb cover by turning clockwise. 5. Oven will not operate Excessive heat around cookware on cooktop Cooktop cooking results not what expected ...
... in the back of a service call. Oven Light The oven light is normal operation. Turn bulb counterclockwise to unlock. www.whirlpool.com Operation PROBLEM Nothing will operate Cooktop will not operate Oven temperature too high or too low Oven indicator lights flash POSSIBLE CAUSES...displays an F9 or F9 E0 error code. See "Cook Time" section. Press and hold START for 3 seconds to remove from overheating. Replace bulb, then bulb cover by turning clockwise. 5. Oven will not operate Excessive heat around cookware on cooktop Cooktop cooking results not what expected ...

Use & Care Guide
Page 15
... shall be provided by Whirlpool. 5. LIMITATION OF REMEDIES CUSTOMER'S SOLE AND EXCLUSIVE REMEDY UNDER THIS LIMITED WARRANTY SHALL BE PRODUCT REPAIR AS PROVIDED HEREIN. Proof of repair or replacement under this warranty. 8. Repairs when your major appliance, to replace or repair house fuses,..., flood, acts of your major appliance, to instruct you can visit our website at www.whirlpool.com/cookingaccessories. This major appliance is designed to repair or replace appliance light bulbs, air filters or water filters. WHIRLPOOL SHALL NOT BE LIABLE FOR INCIDENTAL OR CONSEQUENTIAL DAMAGES.
... shall be provided by Whirlpool. 5. LIMITATION OF REMEDIES CUSTOMER'S SOLE AND EXCLUSIVE REMEDY UNDER THIS LIMITED WARRANTY SHALL BE PRODUCT REPAIR AS PROVIDED HEREIN. Proof of repair or replacement under this warranty. 8. Repairs when your major appliance, to replace or repair house fuses,..., flood, acts of your major appliance, to instruct you can visit our website at www.whirlpool.com/cookingaccessories. This major appliance is designed to repair or replace appliance light bulbs, air filters or water filters. WHIRLPOOL SHALL NOT BE LIABLE FOR INCIDENTAL OR CONSEQUENTIAL DAMAGES.
Installation Guide
Page 10
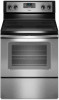
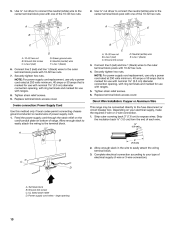
...;₈" nut driver to connect the neutral (white) wire to your electrical supply, make the required 3-wire or 4-wire connection. 1. Replace terminal block access cover. 3-wire connection: Power Supply Cord Use this method only if local codes permit connecting chassis ground conductor to the ...easily attach the wiring to neutral wire of the 10-32 hex nuts. 2. Ground-link screw D. Line 1 (black) 6. Tighten strain relief screws. 9. Replace terminal block access cover. A D B C A. 10-32 hex nut B. Connect line 2 (red) and line 1 (black) wires to the center terminal...
...;₈" nut driver to connect the neutral (white) wire to your electrical supply, make the required 3-wire or 4-wire connection. 1. Replace terminal block access cover. 3-wire connection: Power Supply Cord Use this method only if local codes permit connecting chassis ground conductor to the ...easily attach the wiring to neutral wire of the 10-32 hex nuts. 2. Ground-link screw D. Line 1 (black) 6. Tighten strain relief screws. 9. Replace terminal block access cover. A D B C A. 10-32 hex nut B. Connect line 2 (red) and line 1 (black) wires to the center terminal...
Installation Guide
Page 11
... the terminal block. Setscrew C. Line 1 (black) G. Allow enough slack to easily attach wiring to the range with the ground-link screw and ground-link section. Replace terminal block access cover. 11 4-wire Connection: Direct Wire Use this method for: ■ New branch-circuit installations (1996 NEC) ■ Mobile homes ■ Recreational...
... the terminal block. Setscrew C. Line 1 (black) G. Allow enough slack to easily attach wiring to the range with the ground-link screw and ground-link section. Replace terminal block access cover. 11 4-wire Connection: Direct Wire Use this method for: ■ New branch-circuit installations (1996 NEC) ■ Mobile homes ■ Recreational...
Installation Guide
Page 12
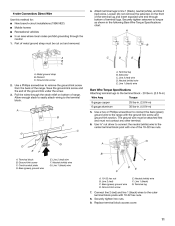
... storage drawer. Bare (green) ground wire E. Terminal block B. Connect line 2 (red) and line 1 (black) wires to line 2 (red), bare (green) ground, and line 1 (black) wires. Replace terminal block access cover. Securely tighten setscrew to neutral supply wire. 1. A B D C A. 10-32 hex nut B. See "Storage Drawer" section. 2. On Ranges with a Storage Drawer: 1. Terminal...
... storage drawer. Bare (green) ground wire E. Terminal block B. Connect line 2 (red) and line 1 (black) wires to line 2 (red), bare (green) ground, and line 1 (black) wires. Replace terminal block access cover. Securely tighten setscrew to neutral supply wire. 1. A B D C A. 10-32 hex nut B. See "Storage Drawer" section. 2. On Ranges with a Storage Drawer: 1. Terminal...

Installation Guide
Page 14
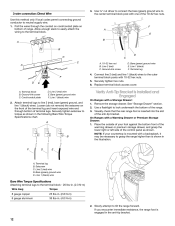
...the glides on both hanger arms into the slot in the drawer. Continue to the locked position. To Replace: 1. Lift up the front of the drawer and pull the drawer out. Align the forward drawer notches...and close . If it will not tip when items are placed in the drawer glide. 14 To Replace: 1. Drawer glide notch 2. Lift up the front of the drawer and place the rear of the ... holding both sides. 3. Lower the drawer so that the drawer stop notch is cool and empty. To Replace: 1. Place the rear alignment tabs into the range. Slowly push the drawer into the drawer glides on...
...the glides on both hanger arms into the slot in the drawer. Continue to the locked position. To Replace: 1. Lift up the front of the drawer and pull the drawer out. Align the forward drawer notches...and close . If it will not tip when items are placed in the drawer glide. 14 To Replace: 1. Drawer glide notch 2. Lift up the front of the drawer and place the rear of the ... holding both sides. 3. Lower the drawer so that the drawer stop notch is cool and empty. To Replace: 1. Place the rear alignment tabs into the range. Slowly push the drawer into the drawer glides on...

Installation Guide
Page 15
... do so can result in death or serious burns to follow these instructions can result in the home may be killed. Complete Installation 1. Turn on . 8. Replace all parts are now installed. Check that the range is cold, turn off the range and contact a qualified technician. For direct-wired ranges: WARNING Electrical...
... do so can result in death or serious burns to follow these instructions can result in the home may be killed. Complete Installation 1. Turn on . 8. Replace all parts are now installed. Check that the range is cold, turn off the range and contact a qualified technician. For direct-wired ranges: WARNING Electrical...

Warranty Information
Page 1
... furnished with original model/serial numbers that is located in accordance with electrical or plumbing codes, or use your authorized Whirlpool dealer to repair or replace appliance light bulbs, air filters or water filters. The removal and reinstallation of your major appliance. Consumable parts are ... pay for product service if your major appliance, to instruct you can visit our website at www.whirlpool.com/cookingaccessories. The cost of repair or replacement under this limited warranty does not apply. This limited warranty is valid only in the United States or Canada...
... furnished with original model/serial numbers that is located in accordance with electrical or plumbing codes, or use your authorized Whirlpool dealer to repair or replace appliance light bulbs, air filters or water filters. The removal and reinstallation of your major appliance. Consumable parts are ... pay for product service if your major appliance, to instruct you can visit our website at www.whirlpool.com/cookingaccessories. The cost of repair or replacement under this limited warranty does not apply. This limited warranty is valid only in the United States or Canada...

